- How to change Tkinter Button font style?
- Pseudo Code – Change Button Font
- Examples
- 1. Change font family of Button to Helvetica
- 2. Change font size of tkinter Button to 30
- 3. Change font weight of tkinter Button to bold
- 4. Change font family, size, and style of Button in a single statement.
- Summary
- Работа с цветами и шрифтами / tkinter 7
- Как работает настройка цвета
- Задание шрифтов виджета
- Как работает настройка шрифтов?
- Tkinter Label – Bold Text
- Steps to set bold text for Label in Tkinter
- Step 1
- Step 2
- Examples
- 1. Label with bold text
- Summary
- tkinter.font — Tkinter font wrapper
How to change Tkinter Button font style?
You can change the font properties like font-family, font size, font weight, etc., of Tkinter Button, by using tkinter.font package. In your Python program, import tkinter.font as font, create font.Font() object with required options and assign the Font object to font option of Button.
In this tutorial, we shall learn how to change the font-family, font size and font weight, with the help of well detailed example Python programs.
Pseudo Code – Change Button Font
Following is the pseudo code to change font style of Tkinter Button.
import tkinter.font as font #create Font object myFont = font.Font(family='Helvetica') button = Button(parent, font=myFont) #or button = Button(parent) button['font'] = myFontExamples
1. Change font family of Button to Helvetica
In this example, we will change the font family of tkinter button using family named argument provided to font.Font().
Python Program
from tkinter import * import tkinter.font as font gui = Tk(className='Python Examples - Button') gui.geometry("500x200") # define font myFont = font.Font(family='Helvetica') # create button button = Button(gui, text='My Button', bg='#0052cc', fg='#ffffff') # apply font to the button label button['font'] = myFont # add button to gui window button.pack() gui.mainloop() 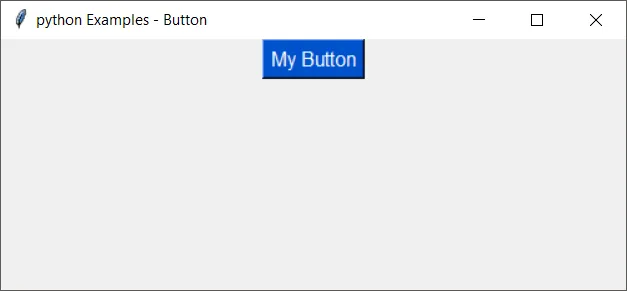
Without font, the button would look like in the following GUI window.
You can compare the output of our next examples with this button and find how a font property has affected the button.
2. Change font size of tkinter Button to 30
You can also change font size of the text in tkinter Button, by passing named argument size to font.Font().
In this example, we will change the font size of tkinter button.
Python Program
from tkinter import * import tkinter.font as font gui = Tk(className='Python Examples - Button') gui.geometry("500x200") # define font myFont = font.Font(size=30) # create button button = Button(gui, text='My Button', bg='#0052cc', fg='#ffffff') # apply font to the button label button['font'] = myFont # add button to gui window button.pack() gui.mainloop() 
Font size of the button is 30.
3. Change font weight of tkinter Button to bold
You can change font weight of the text in tkinter Button, by passing named argument weight to font.Font().
In this example, we will change the font weight of tkinter button.
Python Program
from tkinter import * import tkinter.font as font gui = Tk(className='Python Examples - Button') gui.geometry("500x200") # define font myFont = font.Font(weight="bold") # create button button = Button(gui, text='My Button', bg='#0052cc', fg='#ffffff') # apply font to the button label button['font'] = myFont # add button to gui window button.pack() gui.mainloop() 
4. Change font family, size, and style of Button in a single statement.
We can apply all the font styling together with font.Font().
In this example, we will change font family, font size and font weight.
Python Program
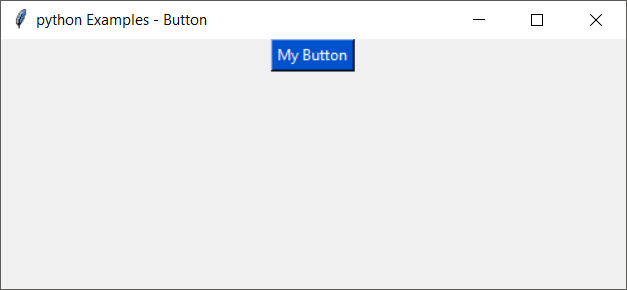
from tkinter import * import tkinter.font as font gui = Tk(className='Python Examples - Button') gui.geometry("500x200") # define font myFont = font.Font(family='Helvetica', size=20, weight='bold') # create button button = Button(gui, text='My Button', bg='#0052cc', fg='#ffffff') # apply font to the button label button['font'] = myFont # add button to gui window button.pack() gui.mainloop() When you run this application, you will get the window

Let us change the font family to Courier and run the application.
myFont = font.Font(family='Courier', size=20, weight='bold')
Summary
In this tutorial of Python Examples, we changed the font family, font size and font weight of tkinter Button, with the help of well detailed examples.
Работа с цветами и шрифтами / tkinter 7
В примерах из прошлых материалов цвета задавались с помощью их названий: например, white, blue или yellow. Эти значения передаются в виде строк параметрам foreground и background , которые изменяют цвет текста и фона виджета соответственно.
Названия цветов дальше уже привязываются к RGB-значениям (аддитивной модели, которая представляет цвета за счет комбинации интенсивности красного, зеленого и синего цветов). Этот перевод делается на основе таблицы, которая отличается от платформы к платформе. Если же нужно отображать один и тот же цвет на разных платформах, то можно передавать RGB-значение в параметры виджета.
Следующее приложение показывает, как можно динамически менять параметры foreground и background у метки, которая демонстрирует зафиксированный текст:
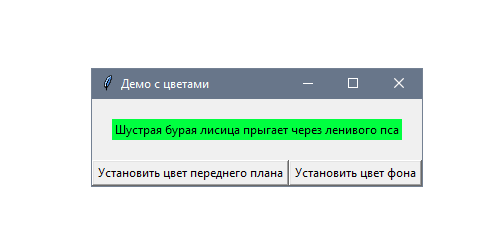
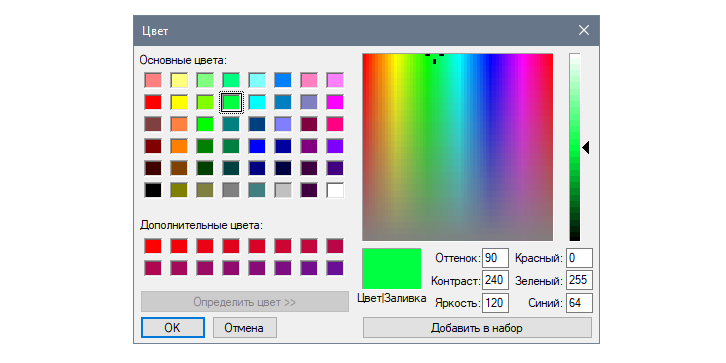
Цвета определены в формате RGB и выбираются с помощью нативного модального окна. На следующем скриншоте представлено диалоговое окно из Windows 10:
Традиционно будем работать с настройками виджета с помощью кнопок — по одной для каждого параметра. Основное отличие по сравнению с предыдущими примерами в том, что значения могут быть прямо выбраны с помощью диалогового окна askcolor из модуля tkinter.colorchooser :
from functools import partial import tkinter as tk
from tkinter.colorchooser import askcolor class App(tk.Tk):
def __init__(self):
super().__init__()
self.title("Демо с цветами")
text = "Шустрая бурая лисица прыгает через ленивого пса"
self.label = tk.Label(self, text=text)
self.fg_btn = tk.Button(self, text="Установить цвет текста",
command=partial(self.set_color, "fg"))
self.bg_btn = tk.Button(self, text="Установить цвет фона",
command=partial(self.set_color, "bg"))
self.label.pack(padx=20, pady=20)
self.fg_btn.pack(side=tk.LEFT, fill=tk.BOTH, expand=True)
self.bg_btn.pack(side=tk.LEFT, fill=tk.BOTH, expand=True)
def set_color(self, option):
color = askcolor()[1]
print("Выбрать цвет:", color)
self.label.config(**)
if __name__ == "__main__":
app = App()
app.mainloop()Если нужно проверить RGB-значение выбранного цвета, то его можно вывести в консоль при подтверждении выбора. Если же ничего не было выбрано, то и консоль останется пустой.
Как работает настройка цвета
Обе кнопки используют функцию partial в качестве обратного вызова. Это инструмент из модуля functools , который создает новый вызываемый объект. Он ведет себя как оригинальная функция, но с некоторыми зафиксированными аргументами. Возьмем в качестве примера такую инструкцию:
tk.Button(self, command=partial(self.set_color, "fg"), . )Предыдущая инструкция выполняет то же действие, что и следующая:
tk.Button(self, command=lambda: self.set_color("fg"), . )Так делается для того, чтобы переиспользовать метод set_color() из модуля functools . Это особенно полезно в более сложных сценариях, например, когда нужно создать несколько функций, и очевидно, что некоторые аргументы заданы заранее.
Нужно лишь помнить тот нюанс, что foreground и background кратко записаны как fg и bg . Эти строки распаковываются с помощью ** при настройке виджета в инструкции:
def set_color(self, option):
color = askcolor()[1]
print("Выбрать цвет:", color)
self.label.config(**) # same as (fg=color)
or (bg=color)askcolor возвращает кортеж с двумя элементами, которые представляют собой выбранный цвет. Первый — кортеж цветов из RGB-значений, а второй — шестнадцатеричное представление в виде строки. Поскольку первый вариант не может быть прямо передан в параметры виджета, используется второй.
Если нужно преобразовать название цвета в RGB-формат, можно использовать метод winfo_rgb() из предыдущего виджета. Поскольку он возвращает кортеж целых чисел от 0 до 65535, которые представляют 16-битные RGB-значения, их можно конвертировать в более привычное представление #RRGGBB , сдвинув вправо 8 битов:
rgb = widget.winfo_rgb("lightblue")
red, green, blue = [x>>8 for x in rgb]
print("#".format(red, green, blue))В предыдущем коде использовался для форматирования каждого целого числа в два шестнадцатеричных.
Задание шрифтов виджета
В Tkinter можно менять шрифт виджета на кнопках, метках и записях. По умолчанию он соответствует системному, но его можно поменять с помощью параметра font .
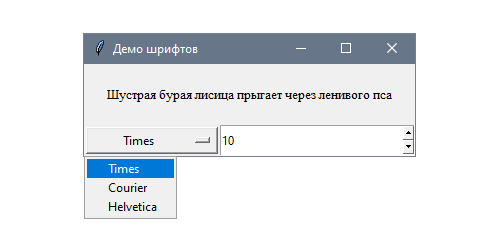
Следующее приложение позволяет пользователю динамически менять тип шрифта и его размер для статического текста. Попробуйте разные значения, чтобы увидеть результаты настройки:
В данном случае для настройки используются два вида виджетов: выпадающее меню со списком шрифтов и поле ввода с предустановленными вариантами Spinbox для выбора размера:
import tkinter as tk class App(tk.Tk):
def __init__(self):
super().__init__()
self.title("Демо шрифтов")
text = "Шустрая бурая лисица прыгает через ленивого пса"
self.label = tk.Label(self, text=text)
self.family = tk.StringVar()
self.family.trace("w", self.set_font)
families = ("Times", "Courier", "Helvetica")
self.option = tk.OptionMenu(self, self.family, *families)
self.size = tk.StringVar()
self.size.trace("w", self.set_font)
self.spinbox = tk.Spinbox(self, from_=8, to=18,
textvariable=self.size)
self.family.set(families[0])
self.size.set("10")
self.label.pack(padx=20, pady=20)
self.option.pack(side=tk.LEFT, fill=tk.BOTH, expand=True)
self.spinbox.pack(side=tk.LEFT, fill=tk.BOTH, expand=True)
def set_font(self, *args):
family = self.family.get()
size = self.size.get()
self.label.config(font=(family, size)) if __name__ == "__main__":
app = App()
app.mainloop()Стоит обратить внимание, что у переменных Tkinter есть некоторые значения по умолчанию, которые привязаны к каждому полю.
Как работает настройка шрифтов?
Кортеж FAMILIES включает три типа шрифтов, которые Tk гарантированно поддерживает на всех платформах: Times (Times New Roman), Courier и Helvetica. Между ними можно переключаться с помощью виджета OptionMenu , который привязан к переменной self.family .
Подобный подход используется также для того, чтобы задать размер шрифта в Spinbox . Обе переменных вызывают метод, который меняет шрифт метки:
Tkinter Label – Bold Text
To set bold weighted font style for a Label widget in Tkinter, create a Font object with the weight parameter of Font() constructor set to “bold”, and pass this font object as argument to the font parameter of Label() constructor.
In this tutorial, you will learn how to set the bold font style for a Label widget, with examples.
Steps to set bold text for Label in Tkinter
Step 1
Import font from tkinter library, and create a Font class object with weight parameter set to bold.
from tkinter import font label_font = font.Font(weight="bold")Step 2
Create a label widget using tkinter.Label class constructor and pass the label_font (created in the above step) as argument to the font parameter.
tk.Label(window, text="Hello World!", font=label_font)Examples
1. Label with bold text
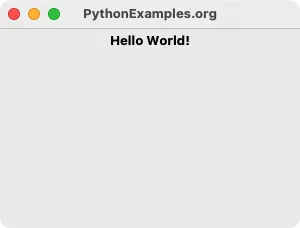
In this example, we shall create a Label with text Hello World! and font weight to bold, and display it in the main window.
import tkinter as tk from tkinter import font # Create the main window window = tk.Tk() window.title("PythonExamples.org") window.geometry("300x200") # Create font object label_font = font.Font(weight="bold") # Create a label widget with specific font label = tk.Label(window, text="Hello World!", font=label_font) # Pack the label widget to display it label.pack() # Run the application window.mainloop()
Summary
In this Python Tkinter tutorial, we learned how to create a Label widget with italic text, with examples.
tkinter.font — Tkinter font wrapper
The tkinter.font module provides the Font class for creating and using named fonts.
The different font weights and slants are:
tkinter.font. NORMAL ¶ tkinter.font. BOLD ¶ tkinter.font. ITALIC ¶ tkinter.font. ROMAN ¶ class tkinter.font. Font ( root=None, font=None, name=None, exists=False, **options ) 
The Font class represents a named font. Font instances are given unique names and can be specified by their family, size, and style configuration. Named fonts are Tk’s method of creating and identifying fonts as a single object, rather than specifying a font by its attributes with each occurrence.
additional keyword options (ignored if font is specified):
Return the attributes of the font.
Retrieve an attribute of the font.
Modify attributes of the font.
Return new instance of the current font.
measure ( text, displayof=None ) 
Return amount of space the text would occupy on the specified display when formatted in the current font. If no display is specified then the main application window is assumed.
Return font-specific data. Options include:
ascent - distance between baseline and highest point that a
character of the font can occupy
descent - distance between baseline and lowest point that a
character of the font can occupy
linespace - minimum vertical separation necessary between any two
characters of the font that ensures no vertical overlap between lines.
fixed - 1 if font is fixed-width else 0
tkinter.font. families ( root=None, displayof=None ) 
Return the different font families.
tkinter.font. names ( root=None ) 
Return the names of defined fonts.
tkinter.font. nametofont ( name ) 
Return a Font representation of a tk named font.