- You will need to enable javascript
- # Table of Contents
- # You need to enable JavaScript to run this app error [Fixed]
- # Configuring your React.js proxy correctly
- # Configuring your Express server correctly
- # Using a Static Server instead
- # Make sure JavaScript is enabled in your browser
- # Enabling JavaScript in Chrome
- # Enabling JavaScript in Firefox
- # Enabling JavaScript in Safari
- # Clear your local storage, session storage and cookies
- # Conclusion
- How to enable JavaScript in Windows
- More Information
- Internet Explorer
- Google Chrome
- Mozilla Corporation’s Firefox
- Как включить JavaScript в Windows
- Дополнительная информация
- Исследователь Интернета
- Google Chrome
- Firefox корпорации Mozilla
You will need to enable javascript
Last updated: Mar 17, 2023
Reading time · 5 min

# Table of Contents
# You need to enable JavaScript to run this app error [Fixed]
The React.js error «You need to enable JavaScript to run this app.» occurs for multiple reasons:
- Forgetting to configure your proxy on the client side.
- Having JavaScript disabled in your browser.
- Having stale cookies, local or session storage.
# Configuring your React.js proxy correctly
If you proxy your requests, the first thing you should try is to set the proxy property in your package.json file.
The property should point to the server that proxies your requests.
Copied!"proxy": "http://localhost:5000",
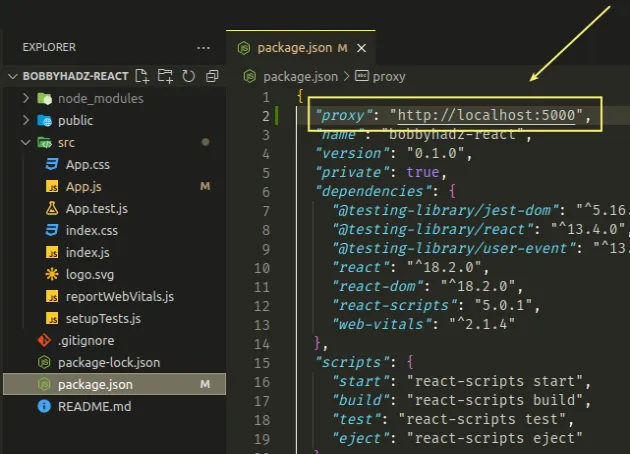
Make sure to replace http://localhost:5000 with the fully-qualified URL to your proxy server.
Restart your development server after adding or updating the proxy property in your package.json file.
The example above assumes that there is a proxy server running on localhost port 5000 .
Here is the basic Express.js proxy server that demonstrates how this works.
Copied!const express = require('express'); const app = express(); const port = 5000; app.get('/', (req, res) => res.json(site: 'bobbyhadz.com'>); >); app.get('/books', (req, res) => res.json(['book 1', 'book 2', 'book 3']); >); app.listen(port, () => console.log(`Example app listening on port $port>`); >);
Notice that the server is configured to run on port 5000 .
I’ve installed Express and started my proxy server by running the following commands.
Copied!# 1) install express npm install express # 2) start express proxy server node index.js

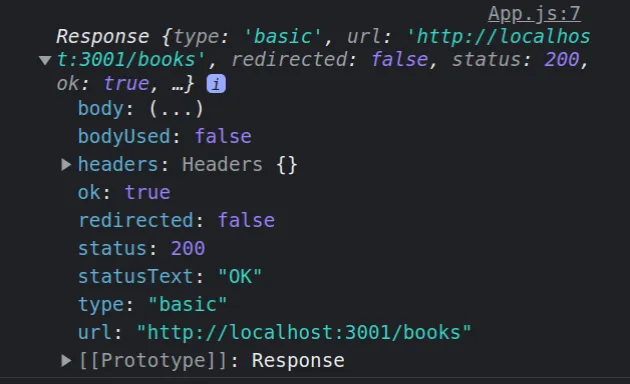
Here is the App.js file from my React.js application that makes an HTTP request through the proxy server.
Copied!import useEffect> from 'react'; function App() useEffect(() => fetch('/books') .then(response => console.log(response); >) .catch(error => console.log(error); >); >, []); return ( div> h2>bobbyhadz.comh2> div> ); > export default App;
Notice that instead of passing a complete URL to the fetch() function, I passed it a relative URL of /books .
We set the proxy property in our package.json file, so the React application knows that it has to make the HTTP request to http://localhost:5000/books .
Copied!"proxy": "http://localhost:5000",
Restart your development server after adding or updating the proxy property in your package.json file.
If I open my browser console, I can see that the request is successful.
# Configuring your Express server correctly
If the error persists, your Express server might be misconfigured.
If you use React Router, you might encounter some issues.
For example, if you use React Router with a route for /books/5 , the development server will respond to localhost:3000/books/5 correctly, however, an Express server will not.
When there is a fresh page load for /books/5 , the server looks for the file build/books/5 which is not what you want.
Instead, the server needs to be configured to respond to a request to /books/5 with the index.html file.
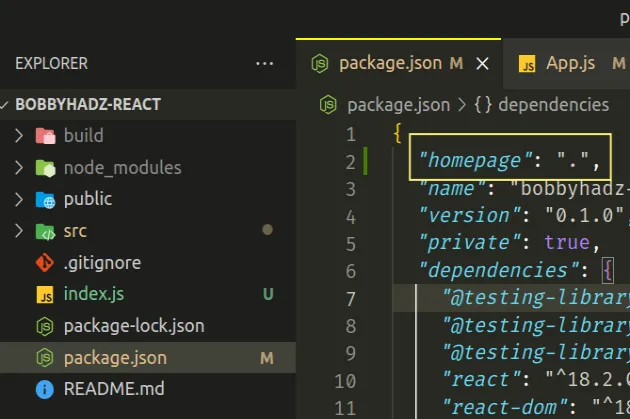
Set the homepage property to a period . in your React.js package.json file.
In your Express.js index.js file, make the following changes.
Copied!const express = require('express'); const app = express(); const path = require('path'); // 👇️ serving static files from build directory app.use(express.static(path.join(__dirname, 'build'))); // 👇️ catch-all route app.get('/*', function (req, res) res.sendFile(path.join(__dirname, 'build', 'index.html')); >);
Make sure the catch-all /* route is placed after all your other routes (if any have any).
Now requests to /books/5 will get handled correctly both in development and production.
The Express.js server will simply serve the index.html file from your build directory.
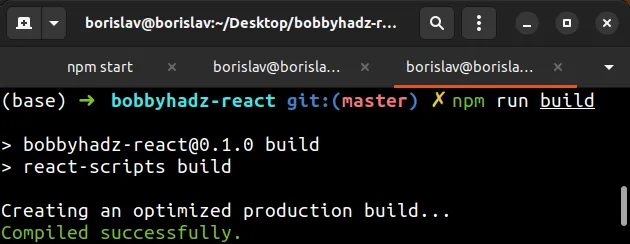
The npm run build command creates your build directory that contains the index.html file.
# Using a Static Server instead
As previously noted, the npm run build command creates your build directory.
The directory contains your index.html file that should be served to the user and your static assets (JavaScript files, CSS, images, etc).
When someone visits your site, your server should respond with the index.html file and serve static files when requested.
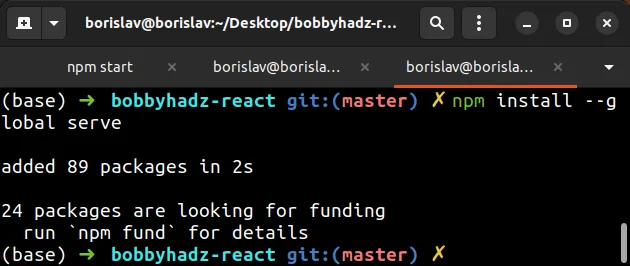
The easiest way to handle this is to use the serve npm package.
You can install the package globally by running the following command.
Copied!npm install --global serve
Once you install the package, run the npm run build command to generate your build folder.
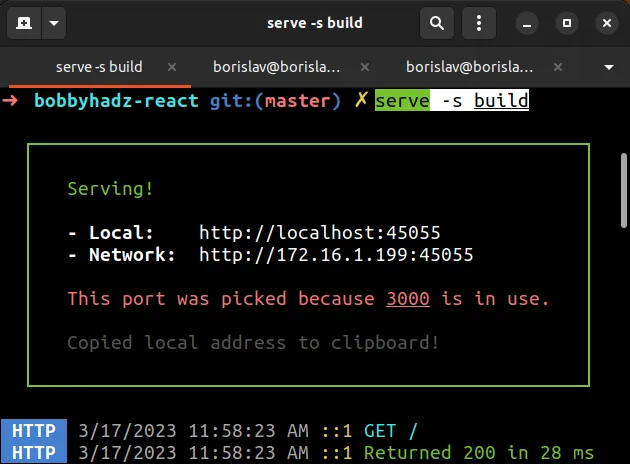
Now issue the serve command to start your static server.
If you don’t want to install serve globally, use the npx prefix instead.
We pointed the command to the build directory where it automatically looks for an index.html file.
If your index.html file is located in the current (same) directory you would use the following command instead.
The -s (—single) option rewrites all not-found requests to index.html .
The command will serve your static site on port 3000 (unless the port is already taken).
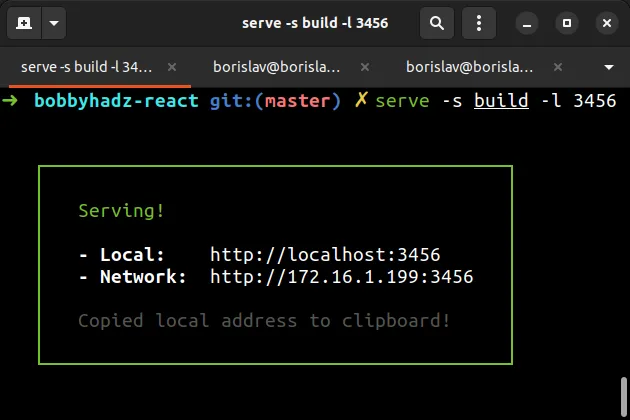
You can explicitly specify the port by using the -l or —listen option.
Copied!serve -s build -l 3456
And here is the equivalent command if you prefer to use npx .
Copied!npx serve -s build -l 3456
You can use the npx serve —help command to view all available options with a short description.
# Make sure JavaScript is enabled in your browser
If the «You need to enable JavaScript to run this app.» error persists, make sure JavaScript is enabled in your browser.
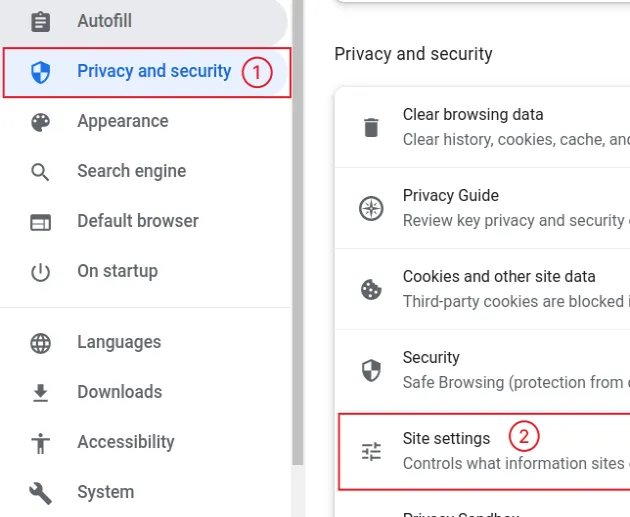
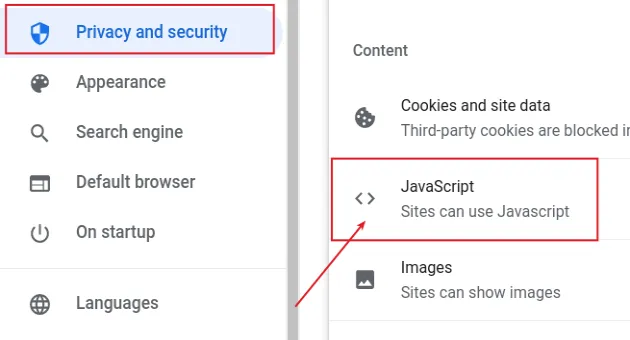
# Enabling JavaScript in Chrome
For example, in Google Chrome, you can:
![]()

# Enabling JavaScript in Firefox
To enable JavaScript in Firefox:
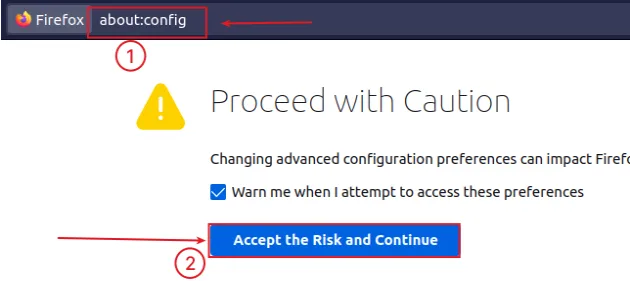
- Click on the Accept the Risk and Continue button.
- In the search field, search for javascript.enabled .

You can double-click on the setting to toggle it.
# Enabling JavaScript in Safari
If you use Safari, make sure your JavaScript is enabled by following the instructions in this article.
You can click on the Safari radio button to show the instructions.
# Clear your local storage, session storage and cookies
If the error persists, clear your:
For example, in Chrome you can:
- Open your React.js webpage.
- Right-click on the page and select inspect or press F12 to open your developer tools.
- Click on the Application tab.
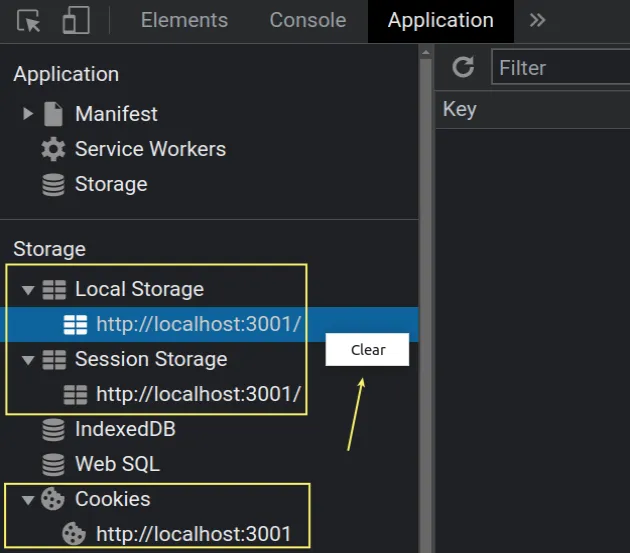
Expand each submenu, right-click and select clear.
Try to restart your development server after clearing your local storage, session storage and cookies.
# Conclusion
To solve the React.js error «You need to enable JavaScript to run this app.», make sure to:
- Configure your proxy on the client side correctly.
- You haven’t disabled JavaScript in your browser.
- You don’t have stale cookies, local or session storage.
I wrote a book in which I share everything I know about how to become a better, more efficient programmer.
How to enable JavaScript in Windows
Many Internet Web sites contain JavaScript, a scripting programming language that runs on the web browser to make specific features on the web page functional. If JavaScript has been disabled within your browser, the content or the functionality of the web page can be limited or unavailable. This article describes the steps for enabling JavaScript in web browsers.
More Information
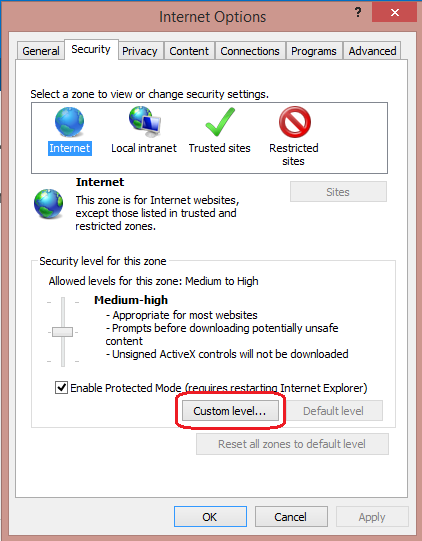
Internet Explorer
To allow all websites within the Internet zone to run scripts within Internet Explorer:
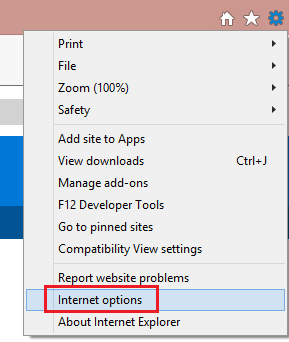
- On the web browser menu, click Tools or the «Tools» icon (which looks like a gear), and select Internet Options.

- When the «Internet Options» window opens, select the Security tab.
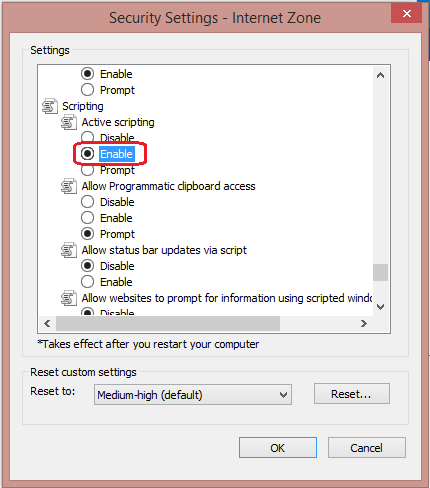
- On the «Security» tab, make sure the Internet zone is selected, and then click on the «Custom level. » button.
- In the Security Settings – Internet Zone dialog box, click Enable for Active Scripting in the Scripting section.
- When the «Warning!» window opens and asks, «Are you sure you want to change the settings for this zone?» select Yes.
- Click OK at the bottom of the Internet Options window to close the dialog.
- Click the Refresh button to refresh the page and run scripts.


To allow scripting on a specific website, while leaving scripting disabled in the Internet zone, add the specific Web site to the Trusted sites zone:
- On the web browser menu, click Tools, or the «Tools» icon (which looks like a gear) and select Internet Options.
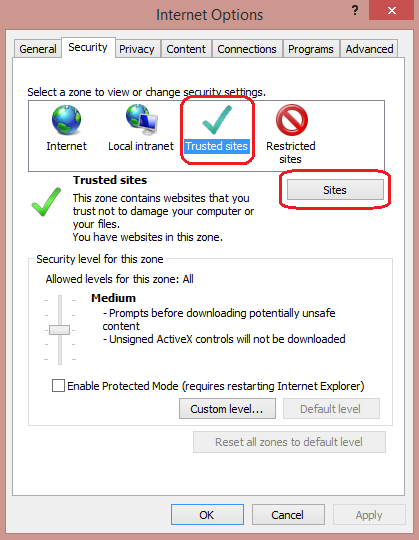
- When the «Internet Options» window opens, select the Security tab.
- On the «Security» tab, select the Trusted sites zone and then click the Sites button.
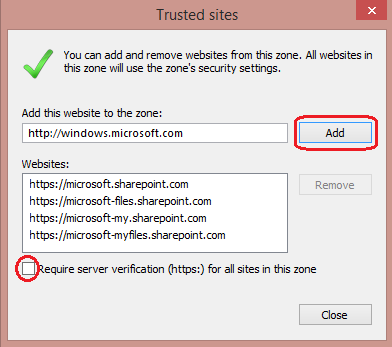
- For the website(s) you would like to allow scripting, enter the address within the Add this website to the zone text box and click Add. Note: If the address does not begin with «https:», you many need to uncheck «Require server verification (https:) for all sites in this zone».
- Click Close and then click OK at the bottom of the Internet Options window to close the dialog.
- Click the Refresh button to refresh the page and run scripts.

Google Chrome
To enable JavaScript in Google Chrome, please review and follow the instructions provided at Enable JavaScript in your browser to see ads on your site.
Mozilla Corporation’s Firefox
To enable JavaScript in Firefox, please review and follow the instructions provided at JavaScript settings for interactive web pages.
Как включить JavaScript в Windows
Многие веб-сайты в Интернете содержат JavaScript, язык программирования сценариев, который работает в веб-браузере, чтобы сделать конкретные функции на веб-странице функциональными. Если JavaScript был отключен в вашем браузере, содержание или функциональность веб-страницы могут быть ограничены или недоступны. В этой статье описаны шаги для включения JavaScript в веб-браузерах.
Дополнительная информация
Исследователь Интернета
Чтобы все веб-сайты в зоне Интернета запускали скрипты в Internet Explorer:
- В меню веб-браузера нажмите «Инструменты» или значок «Инструменты» (который выглядит как шестерня) и выберите параметры Интернета.
- При открытии окна «Интернет-опционы» выберите вкладку Безопасности.
- На вкладке «Безопасность» убедитесь, что интернет-зона выбрана, а затем нажмите на «Таможенный уровень. » Кнопку.
- В настройках безопасности — диалоговом поле «Интернет-зона» нажмите «Включить» для активного сценария в разделе Сценарий.
- Когда открывается окно «Предупреждение!» и спрашивает: «Вы уверены, что хотите изменить настройки для этого zone?» выберите «Да»
- Нажмите OK в нижней части окна Опционов Интернета, чтобы закрыть диалог.
- Нажмите кнопку Обновления, чтобы обновить страницу и запустить скрипты.


Чтобы разрешить написание сценариев на определенном веб-сайте, оставляя сценарий отключенным в зоне Интернета, добавьте определенный веб-узел в зону «Доверенные сайты»:
- В меню веб-браузера нажмите «Инструменты»или значок «Инструменты» (который выглядит как шестерня) и выберите параметры Интернета.
- При открытии окна «Интернет-опционы» выберите вкладку Безопасности.
- На вкладке «Безопасность» выберите зону «Доверенные сайты», а затем нажмите кнопку «Сайты».
- Для веб-сайта (ы) вы хотели бы разрешить сценарий, введите адрес в Добавить этот веб-сайт в зону текстового окна и нажмите Добавить. Примечание: Если адрес не начинается с «https:», вам многие должны отменить проверку «Требуемая проверка сервера (https:) для всех участков в этой зоне».
- Нажмите Закрыть, а затем нажмите OK в нижней части окна Интернет опционов, чтобы закрыть диалог.
- Нажмите кнопку Обновления, чтобы обновить страницу и запустить скрипты.


Google Chrome
Чтобы включить JavaScript в Google Chrome, пожалуйста, просмотрите и следуйте инструкциям, предоставленным на Enable JavaScript в вашем браузере, чтобы увидеть объявления на вашемсайте.
Firefox корпорации Mozilla
Для включения JavaScript в Firefox, пожалуйста, просмотрите и следуйте инструкциям, предоставленным в настройках JavaScript для интерактивных веб-страниц.