- Update PHP Version to PHP 8 In XAMPP On Windows
- Step 1 — Open XAMPP Control Panel
- Step 2 — Open Apache Config Panel
- Step 3 — Open Config File
- Step 4 — Update PHP Installation Path
- Step 5 — Save Configuration and Start Apache
- Step 6 — Verify PHP
- Summary
- Установка новой (дополнительной) версии PHP на XAMPP
- Шаг 1.
- Шаг 2.
- Шаг 3.
- Шаг 4.
- Update PHP in XAMPP and Composer in 1 minute (2023)
- 3 simple steps to update PHP 7 to PHP 8 in XAMPP:
- Download PHP from the latest Xampp:
- Configure httpd-xampp.conf
- Fix Composer after XAMPP PHP update
- Fix PhpMyAdmin Error
- How to change PHP version in XAMPP for Windows
- STEP 1
- STEP 2
- STEP 3
- STEP 4
- STEP 5
Update PHP Version to PHP 8 In XAMPP On Windows
It provides all the steps required to update and upgrade the PHP version to PHP 8 in XAMPP on Windows 10.
XAMPP is a complete package to install the Apache Web Server, MySQL, PHP, Perl, FTP Server, and phpMyAdmin for Linux, Solaris, Windows, and Mac OS X. It also provides an interface to admin Apache Web Server, MySQL, and PHP. Though XAMPP is being released frequently, it might be required to use the most recent version of PHP till XAMPP include it in its distribution. This tutorial provides all the steps required to update or upgrade the PHP version to PHP 8 in XAMPP.
You can also follow the tutorials How To Install XAMPP On Windows and How To Install PHP 8 On Windows to install the most recent version of XAMPP and PHP on Windows.
Step 1 — Open XAMPP Control Panel
Open the XAMPP Control Panel as shown in Fig 1.
Step 2 — Open Apache Config Panel
Click the Config Button next to apache. It will show the configuration options as shown in Fig 2.
Step 3 — Open Config File
Choose the option Apache(httpd-xampp.conf) as highlighted in Fig 2. It will open the configuration file httpd-xampp.conf as shown in Fig 3.
Step 4 — Update PHP Installation Path
I have highlighted some of the PHP configurations in Fig 3. I have installed the most recent version of PHP i.e. PHP 7.4.0 while writing this tutorial by following How To Install PHP 7 On Windows. Also, I have updated the PHP installation path as highlighted in Fig 4.
Step 5 — Save Configuration and Start Apache
Now save the changes and start the Apache Web Server. It will show the Apache status as shown in Fig 5.
Step 6 — Verify PHP
In this step, we will verify the PHP version used by XAMPP. Open the Browser and type the URL http://localhost. It will show the XAMPP Dashboard. Now click the PHPInfo Link to open the PHP info page as shown in Fig 6.
It reflects the most recent version of PHP i.e. PHP 8.0.3.
Summary
In this tutorial, we have discussed using the multiple versions of PHP using XAMPP by configuring the apache configuration file. I have provided all the steps required to upgrade the PHP distributed by XAMPP to the most recent version of PHP i.e. PHP 8.0.3.
Установка новой (дополнительной) версии PHP на XAMPP
Сборка XAMPP поставляется с одной версией PHP. Иногда требуется обновить версию PHP или добавить вторую, при этом не обновляя и не переустанавливая весь XAMPP.
ОС Windows. Установленный у меня XAMPP имеет версию PHP 7.1, я хочу добавить версию PHP 7.3.
Шаг 1.
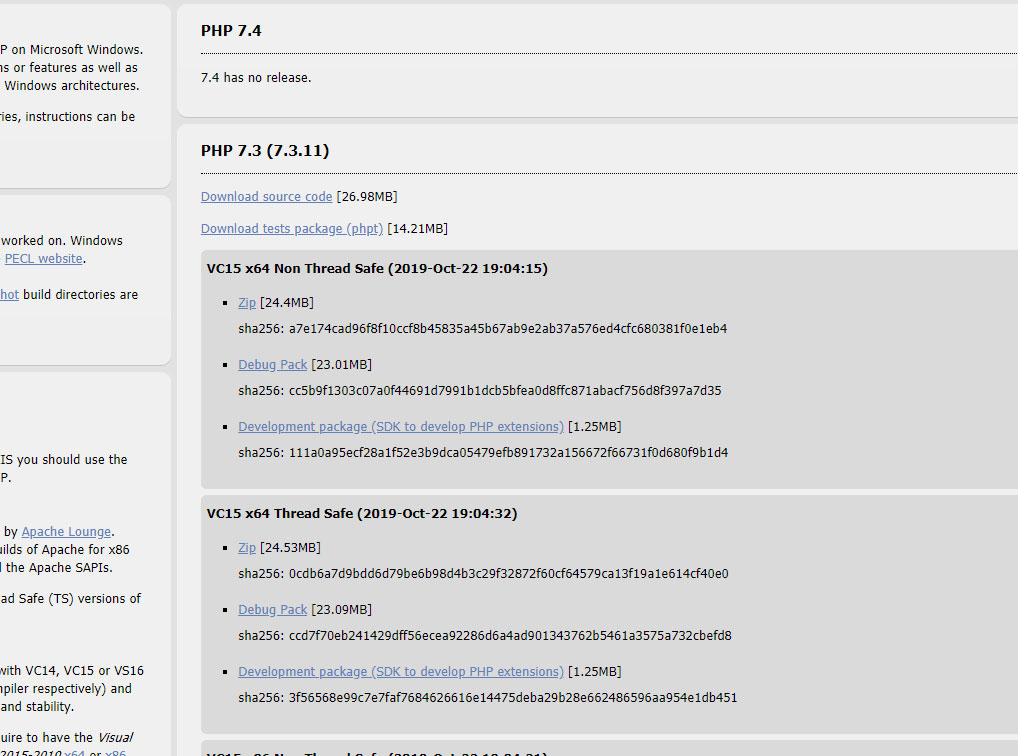
Идем на сайт https://windows.php.net/download и скачиваем PHP 7.3 VC15 x64 Thread Safe.
Шаг 2.
В папке XAMPP создаем подпапку, например, php73 и распаковываем туда скаченный архив.

Шаг 3.
Заходим в папку php73 и переименовываем файл php.ini-development в php.ini , далее в этом файле необходимо указать необходимые вам настройки для php. Можно просто скопировать все настройки из php.ini, который поставлялся вместе с XAMPP (он находится в папке php).
Главное за забудьте раскомметрировать строку extension_dir = «ext» и указать правильный путь, в моем случае это extension_dir=»E:\xampp\php73\ext»
Не забудьте в секции Dynamic Extensions раскомментировать строки для подключения нужных вам модулей PHP.
Шаг 4.
Далее идем в папку apache\conf\extra . Здесь делаем копию файла httpd-xampp.conf и сохраняем его например под именем httpd-xampp71.conf (для удобства, поскольку изначальная версия PHP была 7.1). Теперь, если нам понадобится вернуться на старую версию PHP мы сможем воспользоваться этим файлом.
Теперь открываем оригинальный файл httpd-xampp.conf и везде в путях меняем директорию php на php73.
# # PHP-Module setup # LoadFile "E:/xampp/php73/php7ts.dll" LoadFile "E:/xampp/php73/libpq.dll" LoadModule php7_module "E:/xampp/php73/php7apache2_4.dll" . И так далее во всем файле.
Далее сохраняем файл и перезагружаем Apache, все должно работать.
Update PHP in XAMPP and Composer in 1 minute (2023)


Do you know that you can update PHP in the XAMPP server within a few minutes? This article tells you how to update PHP for Xampp and composer.
I was trying to make a new build of Laravel with laravel new project-name but the composer was making it with the old version 8.
As Laravel 9 requires PHP 8, my composer was linked to PHP 7.
So, even after running the composer global update didn’t update the overall packages.
Then, I figured out that it could be the issue of PHP of my xampp with the composer.
3 simple steps to update PHP 7 to PHP 8 in XAMPP:
Before moving forward make sure to take backup (Optional but just in case if something went wrong).
Download PHP from the latest Xampp:
You can download source code of xampp windows from source forge.

Extract the folder and copy php folder from the latest xampp.
Now, go to your existing xampp folder and rename the current PHP folder to php7 or whatever you want.
Then paste the new php folder in the existing xampp.
That’s it! You have finally put the latest php inside Xampp.
But, the process does not end here.
Let’s move to the next step.
Configure httpd-xampp.conf
Open xampp control panel. Go to the apache config and select httpd-xampp.conf.

Here you need to update the following:
Turn php7 to php 8

Turn php7_module to php_module


Save it! Now, if you will try to run apache. It will work fine.
If you go to localhost/dashboard/phpinfo.php, you will see the latest php version.
But, when you try to run composer. It will fail and will give tons of errors.
Let’s move to the final step.
Fix Composer after XAMPP PHP update
Go to xampp control panel, click on apache config and go to php.ini.

Inside php.ini, set the absolute paths like \xampp\php to F:\xampp\php
F: (Where you have installed directory of xampp, in my case it’s F)
Find \xampp\php inside php.ini and change all paths from relative to absolute.
Click save and then go to the command line.
Type composer you will see the output of Composer instead of errors.
Fix PhpMyAdmin Error
After the above process, if your phpmyadmin is broken then follow the steps mentioned below.
You copied the PHP folder and placed it inside your existing xampp. Just like that, you will need to copy the PhpMyAdmin from the new xampp to your existing one.
But, before that make sure to get the backup of the existing config.inc.php file which is inside PhpMyAdmin in xampp, and then replace the complete folder with the new one.
Now, replace the config.inc.php file with the old one.

Re-run your xampp’s Apache and MySQL. After that visit the phpmyadmin dashboard.
The Errors should be gone.
That’s it! In a nutshell, you learned:
- How to download the source code of xampp
- How to change php version in xampp
- How to update PHP7 to PHP8
- How to fix the composer issue after the update to PHP8.
- How to fix PhpMyAdmin Error
If you want to become smart in web development make sure to subscribe to our newsletter and don’t forget to share with others.
How to change PHP version in XAMPP for Windows

Have you ever wondered how to upgrade or downgrade your PHP version in XAMPP without having to install another XAMPP software?, Well i have and from most answers i saw online, the best option was to download an updated version of XAMPP, but looking at it, i knew there had to be a better way so i made some research and was able to figure it out. In this article, i would show you how i changed my PHP version from 7.4.15 to 8.0.19. This is a screenshot of my current PHP version If you don’t know your current PHP version, you can use this link to check it.
STEP 1

Download the PHP version you want to use, you can find the PHP version you want to download from PHP’s download website for windows, but there is something you need to know before downloading any package, the download for a PHP version exists in 2 types — thread safe and non thread safe. Since you are using PHP with XAMPP, you are going to download the non-thread safe version because there is an apache file it has that would be used to configure XAMPP with PHP. After locating it, download the zip file. If you are running on a 32-bit system, download the non-thread safe version labelled with x86.
STEP 2

After you have downloaded it, extract the zip file and rename the extracted folder to «php», open the folder to find the apache file i mentioned in step 1 as shown in the image below. Once you have seen it, move the php folder to your xampp folder. Remember to make sure the current php folder in the XAMPP folder is either removed or renamed to something else so that the name won’t conflict with the one you are moving.
STEP 3
After moving the php folder into the XAMPP folder, open the folder and look for the php.ini config file. Whenever you download a PHP package, the php.ini file comes in two parts, php.ini-development and php.ini-production. These two config files represent the settings running on your development and production environments. Since you are using XAMPP, you would be using the development config file, so rename that config file to php.ini.
STEP 4
Open your XAMPP control panel. Under the actions option for Apache, look for the config button, click on it and select the Apache (httpd-xampp.conf) config file to open it. This is the file that XAMPP uses to configure PHP properly, look for the following:
LoadFile "C:/xampp/php/php7ts.dll" LoadModule php7_module "C:/xampp/php/php7apache2_4.dll" NOTE — Search everywhere in the file for «php7_module» and change it to «php_module» as you might need to change it in some places.
STEP 5
After you have done all this, save the changes and restart your server, go back to this url and confirm that your PHP version has changed. if everything was done correctly, you should see that you have successfully changed your PHP version!

Very easy and convenient. You can agree it is really not difficult to change your PHP version in XAMPP as it is quite simple to do. Connect with me on twitter and linkedin to find out more about me and my work.