- LearnAn Introduction to Source Maps
- How Source Maps Work
- Are you ready to start learning?
- Generating Source Maps with UglifyJS
- Source Maps in Chrome Dev Tools
- Source Maps in the Firefox Developer Tools
- Final Thoughts
- Useful Links
- What are source maps?
- The need for source maps #
- Generating source maps #
- Understanding the source map #
- Source map extensions #
- It’s not perfect #
LearnAn Introduction to Source Maps
One of the easiest performance wins you can gain for your website is to combine and compress your JavaScript and CSS files. But what happens when you need to debug the code within those compressed files? It can be a nightmare. Fear not however, there is a solution on the horizon and it goes by the name of source maps.
A source map provides a way of mapping code within a compressed file back to it’s original position in a source file. This means that – with the help of a bit of software – you can easily debug your applications even after your assets have been optimized. The Chrome and Firefox developer tools both ship with built-in support for source maps.
In this blog post you’re going to learn how source maps work and take a look at how to generate them. We’re going to be focussing primarily on source maps for JavaScript code but the principles apply to CSS source maps too.
Note: Support for source maps is enabled by default in Firefox’s developer tools. You may need to enable support manually in Chrome. To do this, launch the Chrome dev tools and open the Settings pane (cog in the bottom right corner). In the General tab make sure that Enable JS source maps and Enable CSS source maps are both ticked.
How Source Maps Work
As the name suggests, a source map consists of a whole bunch of information that can be used to map the code within a compressed file back to it’s original source. You can specify a different source map for each of your compressed files.
You indicate to the browser that a source map is available by adding a special comment to the bottom of your optimised file.
//# sourceMappingURL=/path/to/script.js.mapThis comment will usually be added by the program that was used to generate the source map. The developer tools will only load this file if support for source maps is enabled and the developer tools are open.
You can also specify a source map is available by sending the X-SourceMap HTTP header in the response for the compressed JavaScript file.
X-SourceMap: /path/to/script.js.mapThe source map file contains a JSON object with information about the map itself and the original JavaScript files. Here is a simple example:
Lets take a closer look at each of these properties.
- version – This property indicates which version of the source map spec the file adheres to.
- file – The name of the source map file.
- sources – An array of URLs for the original source files.
- sourceRoot – (optional) The URL which all of the files in the sources array will be resolved from.
- names – An array containing all of the variable and function names from your source files.
- mappings – A string of Base64 VLQs containing the actual code mappings. (This is where the magic happens.)
Are you ready to start learning?
Learning with Treehouse for only 30 minutes a day can teach you the skills needed to land the job that you’ve been dreaming about.
Generating Source Maps with UglifyJS
UglifyJS is a popular command line utility that allows you to combine and compress JavaScript files. Version 2 supports a number of command line flags that help with generating source maps.
- —source-map – The output file for the source map.
- —source-map-root – (optional) This populates the sourceRoot property in the map file.
- —source-map-url – (optional) The path to the source map on your server. This will be used in the comment that is placed in the optimized file. //# sourceMappingURL=/path/to/script.js.map
- —in-source-map – (optional) An input source map. This can be useful if you are compressing JavaScript files that have already been generated from source files elsewhere. Think JavaScript libraries.
- —prefix or -p – (optional) Removes n number of directories from the file paths that appear in the sources property. For example, -p 3 would drop the first three directories from the file path, so one/two/three/file.js would become file.js . Using -p relative will make UglifyJS figure out the relative paths between the source map and the original files for you.
Here’s an example command that uses some of these command line flags.
uglifyjs [input files] -o script.min.js --source-map script.js.map --source-map-root http://example.com/js -c -mNote: If you use the grunt-contrib-uglify plugin for Grunt, refer to the documentation for information on how to specify these options in your Gruntfile.
There are also a number of other utilities available that have support for generating source maps. A selection of these are listed below.
Source Maps in Chrome Dev Tools
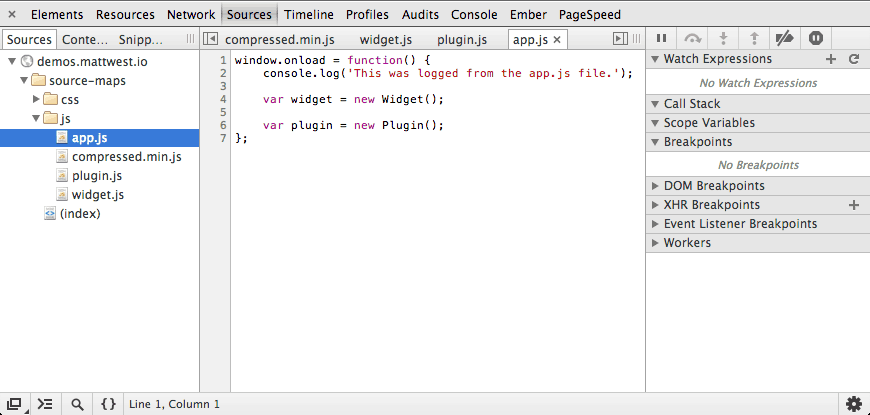
The Sources Tab in Chrome Dev Tools
If you have your source maps set up correctly, you should see each of the original JavaScript files listed in the file pane of the Sources tab.
Examining the HTML for your page will confirm that only the compressed JavaScript file is being referenced. The dev tools is loading the source map file for you and then fetching each of the original source files.
Source Maps in the Firefox Developer Tools
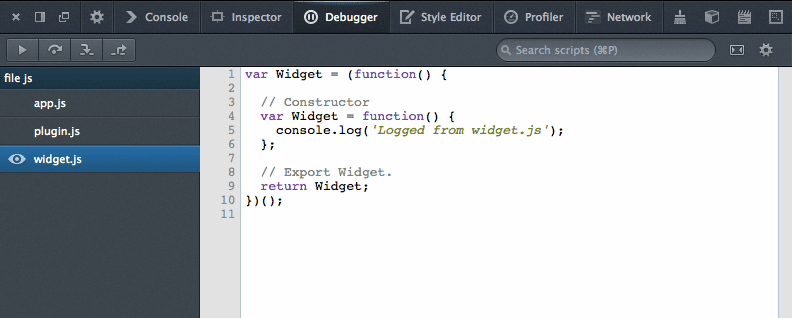
The Debugger Tab in the Firefox Developer Tools
Firefox users can see the individual source files in the Debugger tab of the developer tools. Again the dev tools has identified that a source map is available and has then fetched each of the referenced source files.
Should you wish to view the compressed versions instead, click the cog icon in the top right corner of the tab and deselect Show original sources.
Final Thoughts
Using source maps allows developers to maintain a straight-forward debugging environment while at the same time optimizing their sites for performance.
In this post you have learned how source maps work and seen how you can generate them using UglifyJS. If you ever ship websites with compressed assets (which you should), it’s really worth taking the time to integrate source map creation into your workflow.
Useful Links
Learning with Treehouse for only 30 minutes a day can teach you the skills needed to land the job that you’ve been dreaming about.
What are source maps?

Today, we are talking about source maps, a crucial tool in modern web development that makes debugging significantly easier. In this article, we will explore the basics of source maps, how they are generated, and how they improve the debugging experience.
The need for source maps #

Back in the good old days, we built web applications with pure HTML, CSS, and JavaScript and deployed the same files to the web. However, as we are building more complex web applications nowadays, your development workflow may involve using various tools. For example:
- Templating languages and HTML preprocessors: Pug, Nunjucks, Markdown.
- CSS preprocessors: SCSS, LESS, PostCSS.
- JavaScript frameworks: Angular, React, Vue, Svelte.
- JavaScript meta frameworks: Next.js, Nuxt, Astro.
- High-level programming languages: TypeScript, Dart, CoffeeScript.
- And more. The list can go on and on!
These tools require a build process to transpile your code into standard HTML, JavaScript, and CSS that browsers can understand. Additionally, to optimize performance, it’s common practice to compress (for example, using Terser to minify and mangle JavaScript) and combine these files, reducing their size and making them more efficient for the web.
For example, using build tools, we can transpile and compress the following TypeScript file into a single line of JavaScript. You can play with the demo in my GitHub repository.
/* A TypeScript demo: example.ts */

document.querySelector('button')?.addEventListener('click', () =>
const num: number = Math.floor(Math.random() * 101);
const greet: string = 'Hello';
(document.querySelector('p') as HTMLParagraphElement).innerText = `$greet>, you are no. $num>!`;
console.log(num);
>);
A compressed version would be:
/* A compressed JavaScript version of the TypeScript demo: example.min.js */

document.querySelector("button")?.addEventListener("click",(()=>const e=Math.floor(101*Math.random());document.querySelector("p").innerText=`Hello, you are no. $e>!`,console.log(e)>));
However, this optimization can make debugging more challenging. Compressed code with everything in a single line and shorter variable names can make it difficult to pinpoint the source of an issue. That’s where source maps come in—they map your compiled code back to the original code.
Generating source maps #
Source maps are files with names ending with .map (for example, example.min.js.map and styles.css.map ). They can be generated by most build tools, for example, Vite, webpack, Rollup, Parcel, esbuild, and more.
Some tools include source maps by default, while others may need additional configuration to produce them.
/* Example configuration: vite.config.js */
/* https://vitejs.dev/config/ */

export default defineConfig(
build:
sourcemap: true, // enable production source maps
>,
css:
devSourcemap: true // enable CSS source maps during development
>
>)
Understanding the source map #
These source map files contain essential information about how the compiled code maps to the original code, enabling developers to debug with ease. Here is an example of a source map.
"mappings": "AAAAA,SAASC,cAAc,WAAWC, . ",
"sources": ["src/script.ts"],
"sourcesContent": ["document.querySelector('button'). "],
"names": ["document","querySelector", . ],
"version": 3,
"file": "example.min.js.map"
>
To understand each of these fields, you can read the source map specification or this classic article on the anatomy of a source map.
The most critical aspect of a source map is the mappings field. It uses a VLQ base 64 encoded string to map lines and locations in the compiled file to the corresponding original file. This mapping can be visualized using a source map visualizer like source-map-visualization and Source Map Visualization.

The generated column on the left shows the compressed content and the original column shows the original source.
The visualizer color codes each line in the original column and its corresponding code in the generated column.
The mappings section shows the decoded mappings of the code. For example, the entry 65-> 2:2 means:

- Generated code: The word const starts at position 65 in the compressed content.
- Original code: The word const starts at line 2 and column 2 in the original content.
This way, developers can quickly identify the relationship between the minified code and the original code, making debugging a smoother process.
Browser Developer Tools apply these source maps to help you pinpoint your debugging issues quicker, right in the browsers.

The image shows how browser Developer Tools applies source maps and shows the mappings between files.
Source map extensions #
Source maps support extensions. Extensions are custom fields that start with the x_ naming convention. One example is the x_google_ignoreList extension field proposed by Chrome DevTools. See x_google_ignoreList to learn more on how these extensions help you focus on your code.
It’s not perfect #
In our example, the variable greet was optimized away during the build process. The value was directly embedded into the final string output.

In this case, when you debug the code, developer tools might not be able to infer and display the actual value. This isn’t just the challenges for browser’s developer tools. It also makes code monitoring and analysis harder.

This of course is a solvable problem. One of the ways is to include the scope information in the source maps like other programming languages do with their debug information.
However, this requires the whole ecosystem to work together to improve the source maps specification and implementation. There is an active discussion on improving the debuggability with source maps.
We look forward to improving source maps and making debugging even less overwhelming!