- HTML Code For Registration Form with Validation
- HTML Registration Form
- HTML Code For Registration Form
- Registration form HTML codes
- CSS Code For Registration Form
- Validation In Javascript For Registration Form
- Conclusion
- Login and Registration Form Using HTML, CSS and JavaScript
- Login and Registration Form [Live Demo]
- Login and Registration Form in HTML CSS
- Step 1: Create the structure of the login form
- How to create registration form with JavaScript Validation in HTML?
- Step 1.
- Step 2.
- Create Your Account
- Step 3.
- Step 4.
- Example: add JavaScript tag
- Step 5. Final Step
HTML Code For Registration Form with Validation
In this article, we are going to write HTML code for registration form with validation in JavaScript. Validation in javascript for registration form is explained step by step with examples.
The registration forms help us to register user’s details on online portals like subscription, tickets booking, slot booking, sending and receiving data from the database, etc.
A registration form is an HTML form that contains input fields and submit button to submit your details.
Users can fill out the form with their details and submit it to the server. But before submitting the form, we need to check the validation of the form whether the form is filled correctly or not so that we can prevent the user from submitting the form with invalid data.

This article creates and discusses a beautiful registration form with HTML, CSS and validate it with Javascript in detail, and also provides complete code for it.
HTML Registration Form
To begin with, creating a registration form first you need to decide what kind of information you want from the users. For different uses, form sections could be different but the basic idea behind form designing is the same.
For this section we have taken the following detail into consideration ( you can add or remove parts as your choice ):
- Name
- Password
- Phone Number
- Gender
- Language
- Zip Code
- About
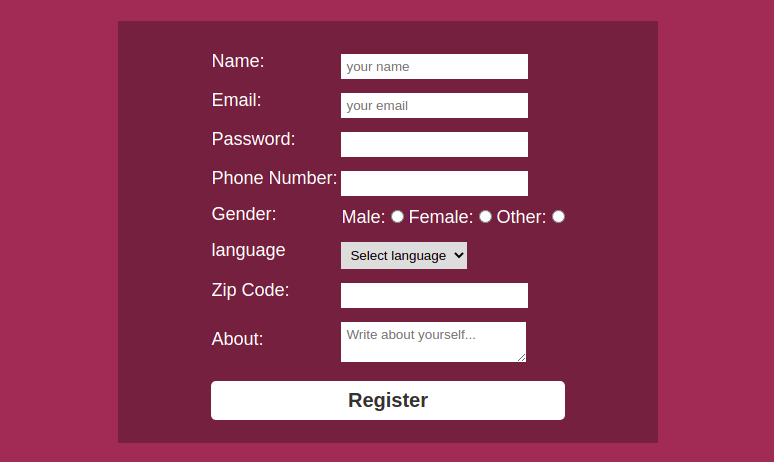
Here is what our registration form would look like:
HTML Code For Registration Form
To create form in HTML tag is used. The form consists of many different kinds of inputs, to create inputs tag is used. The has attribute type which defines what is type of input you want, it may be text, email, password, number, date, file, etc.
Each input in a form has a label that defines the purpose of the input element.
So basically a form consists of different types of input with their label and a submit button.
Let’s first look at the HTML code for the registration form and then we will explain the code
Registration form HTML codes
HTML registration form with varification You can see the HTML code for the registration form above and notice we have used inside the form which is wrapping our label and input elements in form of rows and columns.
You can directly use inputs with their labels without wrapping them in a table but those form elements will not be aligned in the same verticle line.
Let’s look at the output of the above code to understand how its elements are vertically aligned.
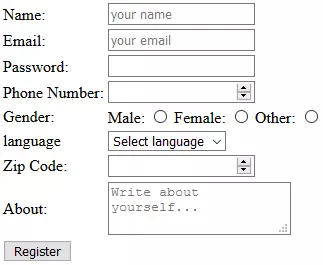
As you can see in the above image all the labels are of different sizes but their input starts with the same verticle line which improves the look of the registration form.
CSS Code For Registration Form
HTML defines the structure of form, but its CSS which makes the registration form look beautiful.
We generally work with CSS classes when talking about CSS. In the HTML code, you can see we have set the .registartion-form class to the form to style it.
Let’s see the CSS code for the form and understand how you can style it.
* < margin: 0 >.container < display: flex; justify-content: center; align-items: center; flex-direction: column; height: 100vh; background-color: #6699cc; >.container h1 < color: white; font-family: sans-serif; margin: 20px; >.registartion-form < display: flex; justify-content: center; align-items: center; width: 600px; color: rgb(255, 255, 255); font-size: 18px; font-family: sans-serif; background-color: #154a68; padding: 20px; >.registartion-form input, .registartion-form select, .registartion-form textarea < border: none; padding: 5px; margin-top: 10px; font-family: sans-serif; >.registartion-form input:focus, .registartion-form textarea:focus < box-shadow: 3px 3px 10px rgb(228, 228, 228), -3px -3px 10px rgb(224, 224, 224); >.registartion-form .submit < width: 100%; padding: 8px 0; font-size: 20px; color: rgb(44, 44, 44); background-color: #ffffff; border-radius: 5px; >.registartion-form .submit:hover
As you can see in the above code, the form elements are aligned to the center using CSS flexbox applied on class .registration-form class and other necessary styles are defined like, width, background-color, font style, color, etc.
Submit button gives colspan=»2″ so that it may cover the full width of the registration form. Submit button has class .submit which adds a few CSS styles to it like, border-radius, font-size, background-color, etc.
You can see codes for :hover and :focus these are used to change certain CSS styles of elements on different actions on the element.
Validation In Javascript For Registration Form
You can verify whether the data given by the user in the registration form is valid or not using javascript.
As soon as the register button (submit button) is clicked, all the data is submitted but validation in javascript for registration form is necessary before sending data to the server because data given by user may not be valid.
When you validate the data and find it is not valid, you can show the error message to the user.
For validation, you can use regex (regular expression) with javascript.
Note : regex is a pattern that is used to match character combinations in strings.
Let’s first look at the javascript verification code then we will look at the code in detail.
// Select all input elements for varification const name = document.getElementById("name"); const email = document.getElementById("email"); const password = document.getElementById("password"); const phoneNumber = document.getElementById("phoneNumber"); const gender = document.registration; const language = document.getElementById("language"); const zipcode = document.getElementById("zipcode"); // function for form varification function formValidation() < // checking name length if (name.value.length < 2 || name.value.length >20) < alert("Name length should be more than 2 and less than 21"); name.focus(); return false; >// checking email if (email.value.match(/^\w+([\.-]?\w+)*@\w+([\.-]?\w+)*(\.\w)+$/)) < alert("Please enter a valid email!"); email.focus(); return false; >// checking password if (!password.value.match(/^.$/)) < alert("Password length must be between 5-15 characters!"); password.focus(); return false; >// checking phone number if (!phoneNumber.value.match(/^21$/)) < alert("Phone number must be 10 characters long number and first digit can't be 0!"); phoneNumber.focus(); return false; >// checking gender if (gender.gender.value === "") < alert("Please select your gender!"); return false; >// checking language if (language.value === "") < alert("Please select your language!") return false; >// checking zip code if (!zipcode.value.match(/^4$/)) < alert("Zip code must be 6 characters long number!"); zipcode.focus(); return false; >return true; >From the above example, you can see there is a javascript function formValidation which validates our form.
This function runs whenever a user submits the form if there is any input value that doesn’t satisfy some constrain it alerts a message and stops the submission of the form by returning false.
For name it checks whether the length of the name given by the user is between 3 and 21 or not. If not then it alerts a message, focus on name input, and returns a false which stops form submission.
When checking email it matches user input by regex string /^w+([.-]?w+)*@w+([.-]?w+)*(.w)+$/ . By using javascript match() function we can check a string’s validation by passing regex as an argument. If string does not satisfy regex then it return false and stop form submittion.
All rest verification is done in a similar manner.
Conclusion
In this tutorial, we have seen HTML code for registration form with validation using javascript .
We have also learned how to create a registration form with validation using HTML and CSS.
Login and Registration Form Using HTML, CSS and JavaScript

![]()
In this article, you will learn how to create a login and registration forms using HTML, CSS, and JavaScript programming code. We all know that a login form is a design that is used in every website. The user can access his account using the login form.
Different types of login forms are used on different websites. I have already shown you many types of designs. In this design, we can do both login and registration in one form. Basically, we create separate forms for login and registration.
But in this case, you can do two types of work in one form. First of all, when you open this login form, there will be a complete interface for login.
Login and Registration Form [Live Demo]
When you want to register, clicking on the registration button at the top will open the registration page . You can register here with your username, e-mail id, password. This is a simple and beautiful design.
In this case, I have used Jquery programming code. To activate the menu bar in this login form. If you want to know how this design works then you must check out the demo below.
As you can see above, first of all, I used the background blue of the home page and created a nice login form on it. First of all, I created two buttons in the login form. Clicking on which will open the login and registration form. In general, the login form can be seen by clicking on it.
Login and Registration Form in HTML CSS
In the first login form, I have made two buttons of Facebook and Google so that you can also log in with the help of social media. Below is the space to input the email ID and password.
Below I have created a login button. To register, click on the registration button on the top. If you click on that button, you will see the registration form. First of all in this form I have made a place to input username e-mail, ID, and password. Then I added a nice button in the same way. I used the Jquery programming code to execute the menu bar.
If you want the source code to create it, use the download button below . If you want to know how I made it then you must follow the tutorial below step by step. In the following tutorial, I have shown step by step how this login form has been created based on any programming code.
Step 1: Create the structure of the login form
First of all, copy the HTML structure below and add it to your Html file. In this case, you will see that I have added the query and font awesome CDN link in the head section of the HTML structure.
Of course, you have to put the link between these two in the HTML file. The font awesome link will help to highlight the icons and the jQuery link will help to execute the jQuery script.
How to create registration form with JavaScript Validation in HTML?
Create registration form with step by step learning method that helps to you learn HTML and CSS language together. How registration form or page created? in HTML just follow the below steps.
If you found any difficulty in this tutorial, then ask question by posting comment in comment box.

Step 1.
Open Notepad or Adobe Dreamweaver or any other Html editor. I am using Dreamweaver. I am suggest to you, use Notepad for better practise.
Step 2.
Copy the below complete HTML code and paste it in your editor.
Create Your Account
Enter Name : Enter Email ID : Enter Username : Enter Password : Enter Confirm Password : Step 3.
Now apply the CSS to all Elements for better presentation. First create CSS
tag in between .. tag like below.
Now copy the below CSS code and paste it in between
tag.
/* body css for whole page */ body < margin:0px; background-color:#f26724; background-image:url(image/background.jpg); color:#f9fcf5; font-family:Arial, Helvetica, sans-serif; >#main #main table /* css code for textbox */ #main .tb #main .tb:focus /* css code for button*/ #main .btn #main .btn:hover
Step 4.
Here we will add JavaScript code for validation check. If textbox will blank, password not match, password not in valid form and email id not valid then it will give error message.
Now create JavaScript tag in between .. tag like below example.
Example: add JavaScript tag
After that copy the below JavaScript code and paste it in between tag.
function registration() < var name= document.getElementById("t1").value; var email= document.getElementById("t2").value; var uname= document.getElementById("t3").value; var pwd= document.getElementById("t4").value; var cpwd= document.getElementById("t5").value; //email id expression code var pwd_expression = /^(?=.*?[A-Z])(?=.*?[a-z])(?=.*?1)(?=.*?[#?!@$%^&*-])/; var letters = /^[A-Za-z]+$/; var filter = /^([a-zA-Z0-9_\.\-])+\@(([a-zA-Z0-9\-])+\.)+([a-zA-Z0-9])+$/; if(name=='') < alert('Please enter your name'); >else if(!letters.test(name)) < alert('Name field required only alphabet characters'); >else if(email==») < alert('Please enter your user email id'); >else if (!filter.test(email)) < alert('Invalid email'); >else if(uname==») < alert('Please enter the user name.'); >else if(!letters.test(uname)) < alert('User name field required only alphabet characters'); >else if(pwd==») < alert('Please enter Password'); >else if(cpwd==») < alert('Enter Confirm Password'); >else if(!pwd_expression.test(pwd)) < alert ('Upper case, Lower case, Special character and Numeric letter are required in Password filed'); >else if(pwd != cpwd) < alert ('Password not Matched'); >else if(document.getElementById(«t5»).value.length < 6) < alert ('Password minimum length is 6'); >else if(document.getElementById(«t5»).value.length > 12) < alert ('Password max length is 12'); >else < alert('Thank You for Login & You are Redirecting to Campuslife Website'); // Redirecting to other page or webste code. window.location = "http://www.campuslife.co.in"; >> function clearFunc()
Step 5. Final Step
Now save your page with any name with .html extension. Like registration.html. After saving the file, open the file by double clicking on it and see your final output.