- Get Started Developing TypeScript Apps With WebStorm
- Install and Configure TypeScript
- Write TypeScript Code
- Test the TypeScript App
- Summary
- How To Run TypeScript In WebStorm
- Installing and configuring TypeScript
- Compiling TypeScript in WebStorm
- Running Your TypeScript Project On WebStorm
- Debugging TypeScript in WebStorm
- Wrap Up
Get Started Developing TypeScript Apps With WebStorm
TypeScript is a superset of JavaScript that contains features that make it easier to write and maintain than standard JavaScript. Types are at the heart of TypeScript, and it performs type checking when compiling to JavaScript.
While JavaScript does contain a few primitive types, its type system is loosely typed, and types are inferred by their usage. Developers are free to change the data type of variables during a program’s execution. This might sound easy, and it is – an easy way to get into trouble! This is especially true if some data is accepted from an input source that doesn’t match the expected type. TypeScript offers a full type system, since types are important to create correct code.
In addition to data types, TypeScript, like JavaScript, is object-oriented, so you can create models that mirror data stores or objects in the real world. It also performs module resolution and has the notion of namespaces, so you can more easily organize code. Finally, TypeScript has many syntactical enhancements and features from ECMAScript even before they’re standardized. TypeScript makes writing JavaScript apps quite easy because of these new programming features!
Install and Configure TypeScript
You don’t need to do anything to use TypeScript with WebStorm. You can use it in any WebStorm project, including built-in project templates using JavaScript frameworks or existing projects.
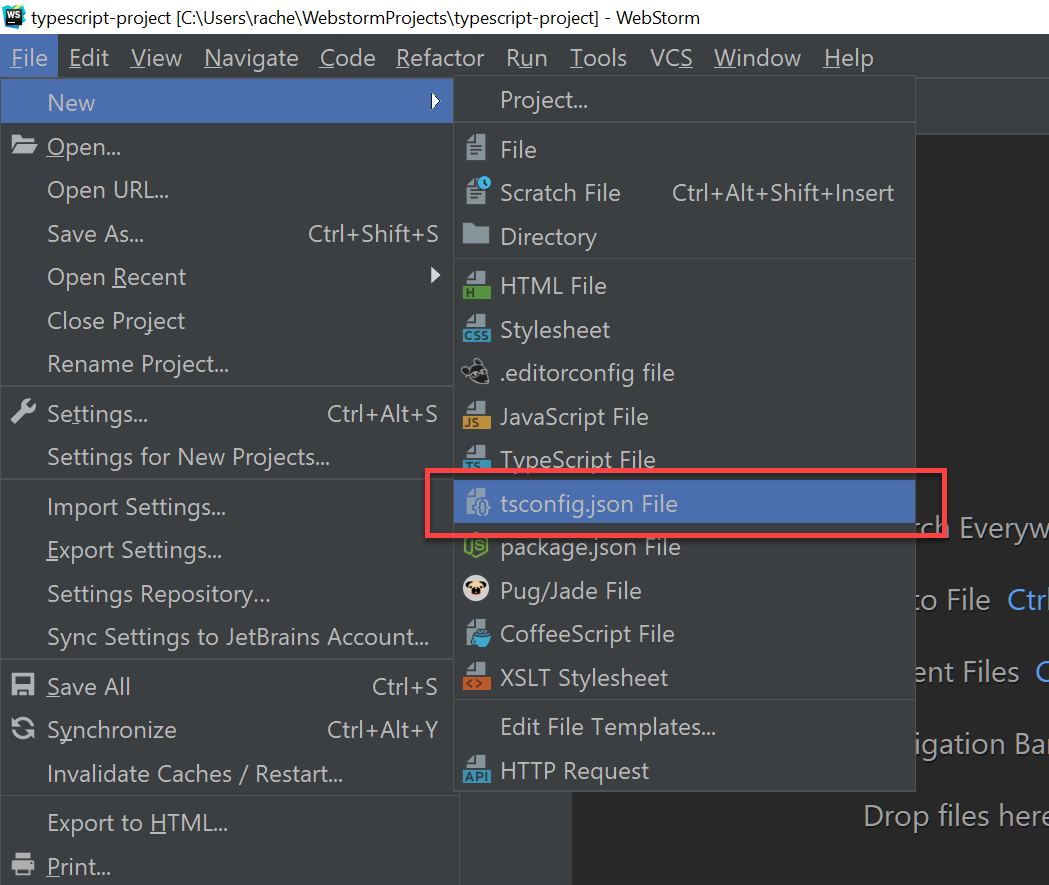
When you’re ready to start writing TypeScript code, add a tsconfig.json file (TypeScript configuration file) to the project. The tsconfig.json file is a JSON file that tells the TypeScript compiler how to compile TypeScript to JavaScript. In WebStorm, add a tsconfig.json file by choosing File – New tsconfig.json File from the menu. Most developers add this file to their root directory.
The default tsconfig.json file looks like the following:
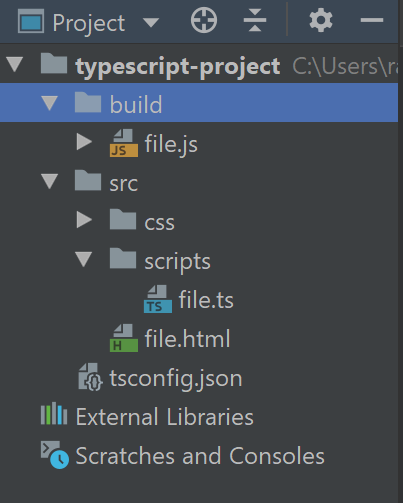
Project directories and assets can be organized into any structure, however, a popular convention is to create a structure where TypeScript files are in a src directory and the compiled output from them in another, such as a build folder, similar to the following:
To configure this folder structure, you must first add «outDir»: «build» under «compilerOptions» in the tsconfig.json file. You can alert TypeScript to build particular folders in the build by adding the «include» directive as a top-level entry. This is the resulting tsconfig.json file:
< "compilerOptions": < "module": "commonjs", "target": "es5", "sourceMap": true, "outDir": "build" >, "exclude": [ "node_modules" ], "include": [ "src/scripts/**/*" ] >
If you prefer, you can use a JavaScript bundler, e.g. webpack, to combine the output into a single JavaScript file.
Write TypeScript Code
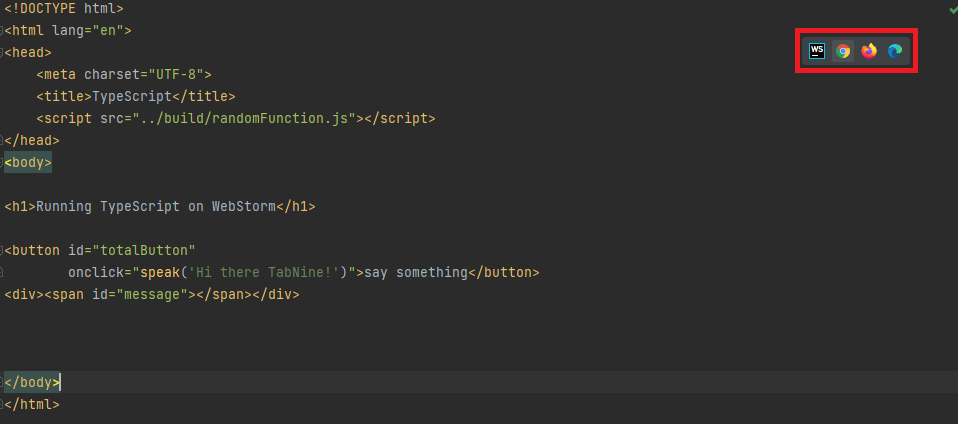
Since many TypeScript apps are part of client-side apps, we’ll add in some simple HTML to the body of an HTML file that defines a button and an element to display the output.
The click on the button will be handled by the displayTotalPerPerson function that we’ll write in a moment. The code will be written in a TypeScript file and the compiler to JavaScript. This compiled JavaScript file is included using the script tag in our HTML file.
In order to output the message, you must add some code to a .ts file. The following code shows how we display a message using TypeScript:
function displayTotalPerPerson(person: string, total: number)
There are only tiny differences between the above TypeScript code and JavaScript, though in a sizable app you’ll see many more. Notice the type annotations on the person and total function arguments, as well as the message variable. TypeScript provides a full type system so you can write code that’s easy to read and maintain. You can write both in TypeScript and JavaScript in .ts files.
When ready, compile to JavaScript using the Compile button on the top left corner of the TypeScript tool window in the IDE. Notice that WebStorm builds both a JavaScript file and a .map file. Mapping files map the TypeScript code to its JavaScript output, and exist so that tools can allow developers to debug TypeScript code. When compiling for production use, mappings are usually not built, unless they are needed for production debugging. To turn off mapping, change the «sourceMap» setting under «compilerOptions» to false in the tsconfig file.
Test the TypeScript App
Once your code is compiled, run the app in the browser to test it. In WebStorm, navigate to the page that you want to launch, and click on the browser icon of your choice in the top-right of the editor. You can also debug TypeScript apps using WebStorm’s excellent debugging tools.
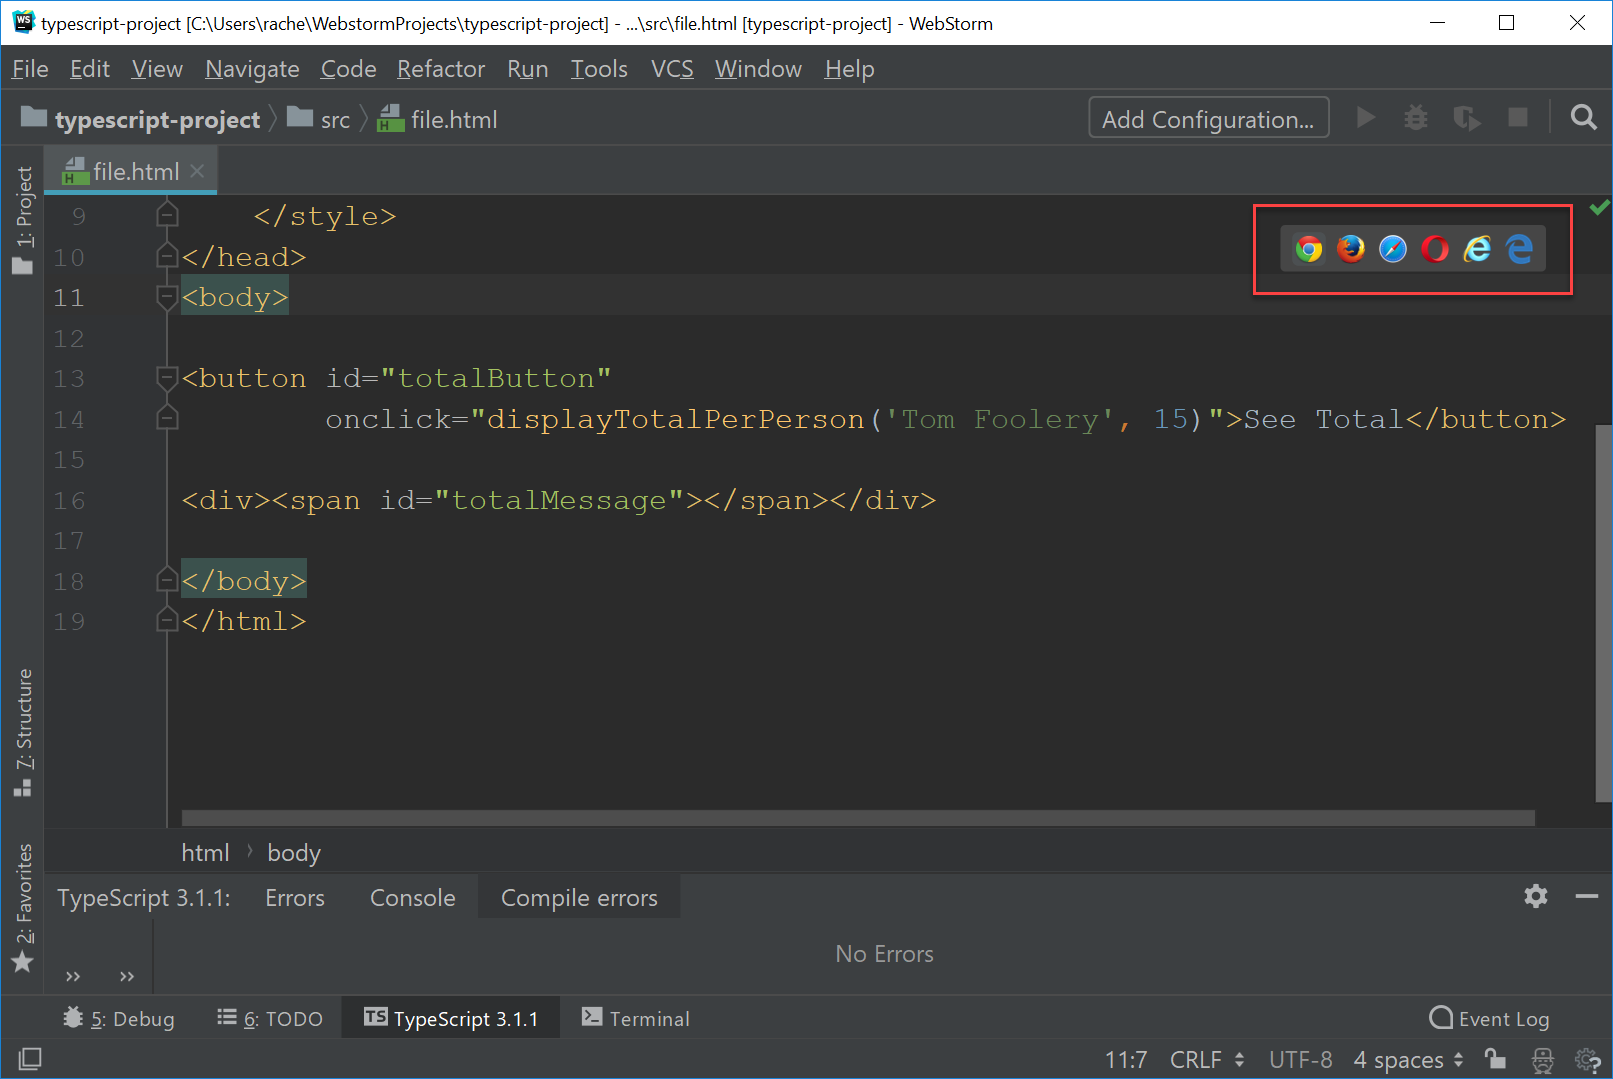
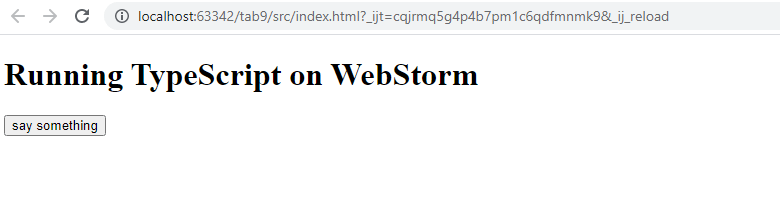
Notice the localhost:port address in the browser that specifies that this is WebStorm’s web server for testing.

Summary
WebStorm has many features for developing apps in TypeScript out of the box. It makes getting started easy, without needing to add any plug-ins or extensions.
Keep an eye out for more posts showing how to develop applications using TypeScript with WebStorm. Or visit WebStorm docs to find out more about the TypeScript support.
How To Run TypeScript In WebStorm

WebStorm is a JetBrains IDE that prides itself on being the “smartest JavaScript IDE” on the market. But is it? And what exactly can WebStorm do for you?
WebStorm is part of JetBrains’ suite of language-specific IDEs. This specialized tool focuses on JavaScript development and features an extensive suite of built-in developer tools, fast navigation, search, customizable environments, and real-time teamwork integrations.
One of the main features of WebStorm is its support for TypeScript source code. WebStorm recognizes both .ts and .tsx files with code support systems to make your workflow as seamless as possible.
For JavaScript developers, especially those working with Angular, TypeScript support in an IDE can make or break the productivity glass ceiling.
Here is a quick guide on how to run TypeScript in WebStorm and develop your first app to get you started.
Installing and configuring TypeScript
When it comes to TypeScript with WebStorm, you don’t have to do much. This is because WebStorm comes with built-in project templates that you can use as you start.
When you start WebStorm, you will have the option of choosing an empty project or a boilerplate setup for the most popular JavaScript libraries and frameworks such as Angular, Cordova, Express, Meteor, Node.js, React, React Native, and Vue.js.
If you are creating a new project from scratch and require a tsconfig.json file, the boilerplate can easily be booted up by going to File > New > tsconfig.json File.

You will get a default tsconfig.json file that looks something like this:
| “compilerOptions”: “module”: “commonjs”, “target”: “es5”, “sourceMap”: true >, “exclude”: [ “node_modules” ]> |
To set up your TypeScript project, the convention is to have a src folder and a build folder. The src folder is where all your code will go, while the build folder is where your JavaScript build outputs will compile to.
Once this is completed, you need to add “outDir” : “build” to your compilerOptions. The build at outDir corresponds with the build folder you’ve created. In theory, this can be anything you want, as long the name corresponds to one another.
To tell TypeScript which folder you want to build, add the folder path to include.
Here is an example of the final TypeScript tsconfig.json file setup with build and src directories:
| “compilerOptions”: “module”: “commonjs”, “target”: “es5”, “sourceMap”: true, “outDir”: “build” >, “exclude”: [ “node_modules” ], “include”: [ “src/scripts/**/*” ]> |
Compiling TypeScript in WebStorm
Now that we’ve got the basics all done, you can start creating your TypeScript project inside WebStorm. The next step will be to compile TypeScript in WebStorm.
The easiest way is to right-click anywhere on your TypeScript workspace, and right at the bottom of the list that shows is a Compile TypeScript option. Once you’ve clicked on that, your TypeScript code will compile in WebStorm for you automatically.
It is good to note that for TypeScript to compile correctly, the include inside your tsconfig.json must correspond with the file path. In the screenshot above, the file path for the file sits inside src/scripts. Our include portion corresponds with this:
Running Your TypeScript Project On WebStorm
There are multiple ways to run your TypeScript. One way is to and select Run.

Alternatively, you can use the keyboard command combination Ctrl + Shift + F10. These two options will bring up a localhost page on your default browser.
However, if you want to test on a different browser, you can select from one of the browser icons located on the top right of your screen – as highlighted in red below.
Here is a screenshot of the localhost generated based on the code above.
Once you have your localhost up, WebStorm sets you up with hot reloading automatically. This means that you don’t have to intervene with a page refresh every time you alter your code.
Debugging TypeScript in WebStorm
At some point, you’re going to want to debug your code. While console.log() may help you track things down, WebStorm’s debugging tools can speed up the process without littering your code. Not only that, using console.log() to debug is not the best practice.
While console.log can help with particular instances, most of the time, what you need is for your code to slow down. This is so you can mentally digest what is going on and pinpoint precisely what is happening, why things are happening, and if it contributes to the bug you are trying to fix.
When it comes to TypeScript, you are most likely working on a single page application (SPA) or node.js based server-side application. This means you are also dealing with things like lifecycles. Using breakpoints lets you pause your code so you can have a chance to see the line-by-line impact for each region of code.
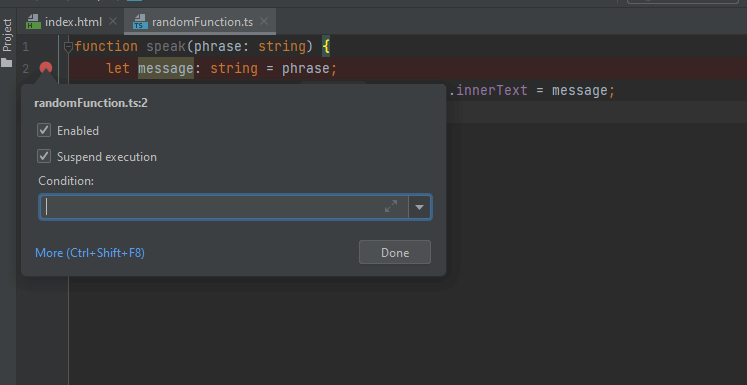
To debug TypeScript in WebStorm, you can create breakpoints in your code by click on the line number. This will produce a red dot, where the code will be paused once it hits the breakpoint.

If you right-click on your breakpoint’s red dot, you can also configure it with conditionals, logging, stack tracing and disable it based on exceptions. These features can come in handy when you want to finetune your debugging process in WebStorm for TypeScript.
Here is a screenshot of what it looks like:
To bring up more options, click on More or Ctrl + Shift + F8. Here is the rest of what WebStorm offers for TypeScript debugging.
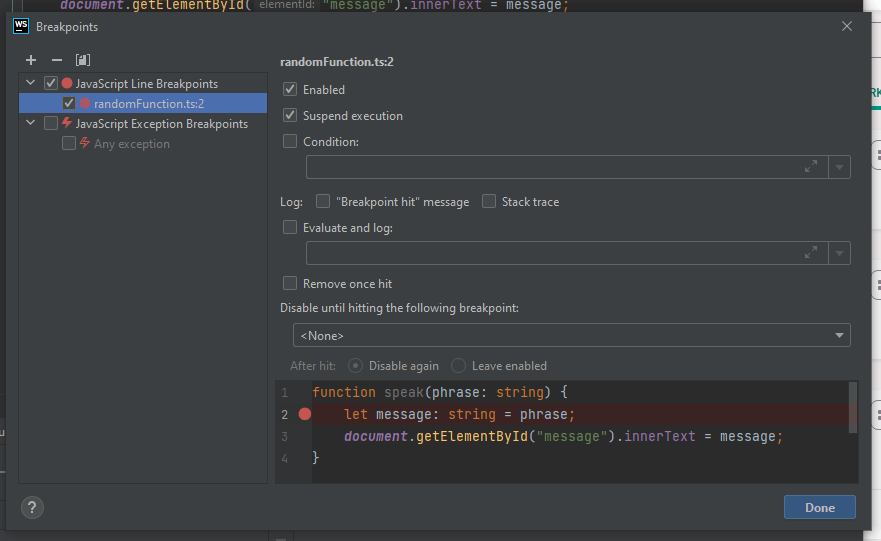
To run the debugger, click on the little green bug icon. This will bring up a new localhost window, where you can test out your code process flow.

Here is an example of what WebStorm’s TypeScript debugger looks like in action with breakpoints:
Wrap Up
When it comes to TypeScript, WebStorm does most of the heavy lifting for you. There is minimal setup – other than setting up your project. Running TypeScript in WebStorm is a breeze, with no need to deal with command lines, configuring localhosts, or too many steps for compiling TypeScript into JavaScript code. Everything comes out of the box, ready to go, and fully optimized for TypeScript projects.
Debugging is integrated by default, so you don’t need to set it up or download additional plugins to get started. For TypeScript in WebStorm, things work.
Overall, if you want a seamless experience, give WebStorm a try for your next TypeScript project and experience the difference in your coding workflow. While this isn’t a free IDE, the subscription cost is worth the benefits that it brings to your ability to produce code quickly.
The following article is brought to you by Tabnine — an AI-powered tool that uses generative models to improve software development

The 6 best CodeWhisperer alternatives to know in 2022 (free and paid).

When to use and when not to use Confluence.

7 best code review tools for enterprise businesses.
From CI to AI: The AI layer in your organization.

How to get better code predictions from AI.
More from Programming Productivity
How to Select Vim Code Completion for Any Language
Top 9 Flutter Apps: The Most Popular Apps Built in Flutter
Top 11 GoLand IDE Plugins for 2022
Top 6 Most Used Redis Libraries [by Tabnine Users]

When a layperson imagines quality control, they usually imagine end-to-end testing. Approach the software as…

Software engineering is difficult. Contrary to what you might think, the challenges often arise not…

As artificial intelligence moves in to transform industries as diverse as banking and art, leaders…