- Как сделать чат на PHP
- Back-end:
- Chat Web Application using PHP with MySQL & JavaScript
- Video Tutorial of Chat Application in PHP and MySQL
- You might like this:
- Chat Web Application using PHP [Source Codes]
- How to download source code files and what to do after downloading them?
- Simple Live Chat With PHP Websockets (Free Download)
- TABLE OF CONTENTS
- PHP LIVE CHAT
- DOWNLOAD RATCHET WEBSOCKET LIBRARY
- PART 1) PHP WEBSOCKET LIVE CHAT
Как сделать чат на PHP

В этой статье мы разберём как сделать простой чат на языке программирования PHP для вашего сайта.
Ещё стоит сказать, что наш чет использует WebSocket на PHP, для этого мы будем использовать библиотеку Ratchet, но мы не будем подробно про неё рассказывать, для этого посмотрите статью: «Основы PHP библиотеки Ratchet», в ней вы узнает всё самое важное, что стоит знать.
Back-end:
Так как мы делаем чат на языке PHP, начнём со серверной части, сперва нужно установить библиотеку Ratchet, для этого используйте эту команду:
После того как всё установили, создадим файл «chat.php», где создадим класс для работы с нашем чатом, вот что в нём будет.
В начале мы создаём пространство имён для этого скрипта, потом подключаем все нужные зависимости.
Потом создаём класс Chat и наследуем его от класса MessageComponentInterface , создаём защищенное свойство для хранения всех подключённых клиентов, и в конструкторе ему даём значение объекта класса SplObjectStorage .
Потом создаём несколько методов, первый onOpen() , следит за подключением новых пользователей и добавляем их в clients .
Второй метод onMessage() нужен для обработки полученных сообщений и отправки их остальным клиентам, в нём для отправки проходимся по всем пользователям и отправляем каждому.
Следующий метод проверяем отключение клиента от сервера и убирает его, последний нужен для вывода ошибок, если есть, то закрывает сервер.
Теперь создадим файл «index.php», в котором запустим WS сервер.
Chat Web Application using PHP with MySQL & JavaScript
Hey friends, today in this blog you’ll learn how to create a Chat Web Application using PHP with MySQL & JavaScript. Earlier I have shared a blog on how to create a Simple Chatbot using PHP with MySQL & jQuery Ajax. Our maximum viewers have requested me to create a Chat App so I decided to create one.
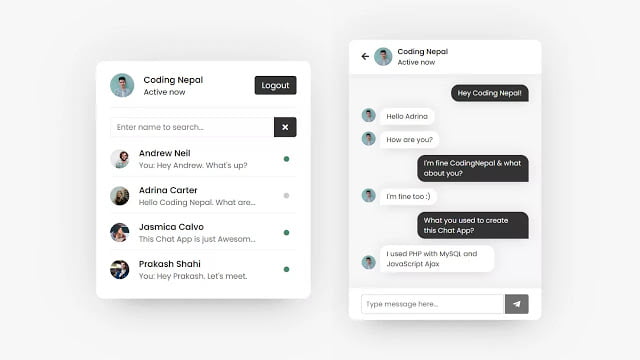
In this chat application, when you open it first on your browser, there is shown a signup form where you have to signup with your details like name, email, password, and image. Email and image field is fully validated which means you’ve to enter a valid email and an image file only. Once you signed up successfully, you’ll be redirected to the user’s page where you can see your full name, image, status, and logout button to the top, and users, like you, appear on the bottom if someone has signed up.
On this page, you can see their image, name, status, and the last message if they sent to you. You have to click on the particular user or you can also search any existing user with their name then you’ll be redirected to the chat page and there you can see the image, name, status of that user who is going to chat.
Once you send a message to another user then immediately that message appears in your chat box and another user chatbox too which you’ve sent the message. On the message receiver chatbox, this user received the message with the sender image. Remember chatbox will be automatically scrolled to the bottom once the chatbox starts scrolling. You can log out from the chat application at any time and once you log out, immediately all other users will know that you’ve been log out or offline.
Once you log out, you can again login and with your email and password that you used when signing up for the form. If you entered the correct credentials then you’ll be redirected to the user’s page and all other users will immediately know that you’ve logged on and now active.
Video Tutorial of Chat Application in PHP and MySQL
In the video, you’ve seen the demo of the chat application in PHP and MySQL and the codes or concepts behind creating a chat app. As I already told you I used PHP with MySQL and pure JavaScript Ajax to create this chat app so you don’t need to reload the page to see changes in the chat app. I know if you’re a beginner and you don’t have enough knowledge about PHP then definitely you’ve to difficult to understand the codes.
But I tried to explain each JavaScript and PHP line with comments, subtitles, etc. But don’t worry I have provided the source code files of this chat app so you can easily download from the given download button and try analyzing, practicing the codes to understand better. And I know, there are many other features that are missed on this chat app but for now, I think it is more than enough for practice.
You might like this:
Chat Web Application using PHP [Source Codes]
How to download source code files and what to do after downloading them?
Steps: – To download files, just click on the given download button then a 60 seconds timer will start, just wait for the timer. Once the timer completed then a zip file will be downloaded automatically. Once it downloaded, just extract the zip file then you’ll see the folder name with ChatApp. Copy this folder and paste it inside htdocs folder of your XAMPP then start your apache and MySQL from the XAMMP control panel.
After completing these steps, go to your browser and open this URL localhost/phpmyadmin then create a new database name with a chatapp. After creating the database, there you can see an import option, just click on that and import the SQL file which is in the ChatApp folder. Everything is done now, just open this URL localhost/chatapp that’s it. Your chat application is ready to chat.
If you want to upload this chat application to an online server for free and don’t know how? Then please watch this video How to upload Chat Application to an Online Server for Free?
Simple Live Chat With PHP Websockets (Free Download)
Welcome to a tutorial on how to create a simple live chat application with PHP and WebSockets. Looking to add live chat features to your website or portal? Let us walk through an example in this guide – Read on!
TABLE OF CONTENTS
PHP LIVE CHAT
All right, let us now get into more details on the PHP live chat.
DOWNLOAD RATCHET WEBSOCKET LIBRARY
- As above, a copy of Ratchet is required.
- An easy way is to use Composer to fetch the latest version.
- Open the command line, navigate to your HTTP folder – cd YOUR-HTTP-FOLDER .
- Run composer require cboden/ratchet . This will automatically download the latest version into the vendor/ folder.
PART 1) PHP WEBSOCKET LIVE CHAT
if (defined("STDIN")) < return true; >if (array_key_exists("SHELL", $_ENV)) < return true; >if (!array_key_exists("REQUEST_METHOD", $_SERVER)) < return true; >if (empty($_SERVER["REMOTE_ADDR"]) && !isset($_SERVER["HTTP_USER_AGENT"]) && count($_SERVER["argv"])>0) < return true; >return false; > if (!is_cli()) < exit("Please run this in the command line."); >// (B) LOAD RATCHET // https://github.com/ratchetphp/Ratchet // composer require cboden/ratchet require "vendor/autoload.php"; use Ratchet\MessageComponentInterface; use Ratchet\ConnectionInterface; use Ratchet\Server\IoServer; use Ratchet\Http\HttpServer; use Ratchet\WebSocket\WsServer; // (C) CHAT CLASS class Chat implements MessageComponentInterface < // (C1) PROPERTIES private $debug = true; // debug mode protected $clients; // connected clients // (C2) CONSTRUCTOR - INIT CLIENTS LIST public function __construct () < $this->clients = new \SplObjectStorage; if ($this->debug) < echo "Chat server started.\r\n"; >> // (C3) ON CLIENT CONNECT - STORE INTO $THIS->CLIENTS public function onOpen (ConnectionInterface $conn) < $this->clients->attach($conn); if ($this->debug) < echo "Client connected: resourceId>\r\n"; > > // (C4) ON CLIENT DISCONNECT - REMOVE FROM $THIS->CLIENTS public function onClose (ConnectionInterface $conn) < $this->clients->detach($conn); if ($this->debug) < echo "Client disconnected: resourceId>\r\n"; > > // (C5) ON ERROR public function onError (ConnectionInterface $conn, \Exception $e) < $conn->close(); if ($this->debug) < echo "Client error: resourceId> | getMessage()>\r\n"; > > // (C6) ON RECEIVING MESSAGE - SEND TO EVERYONE public function onMessage (ConnectionInterface $from, $msg) < $msg = strip_tags($msg); if ($this->debug) < echo "Received message from resourceId>: \r\n"; > foreach ($this->clients as $client) < $client->send($msg); > > > // (D) START! $server = IoServer::factory(new HttpServer(new WsServer(new Chat())), 8080); // @CHANGE if not port 8080 $server->run();Not going to explain this line-by-line, but in summary:
- A “safety check” to make sure the script is run from the command line.
- Load and use the Ratchet library.
- The mechanics of the chat application:
- (C3) We store all clients into $this->clients when they connect to the WebSocket server.
- (C4) Remove the clients from $this->clients when they disconnect.
- (C6) On receiving a message from any client, we loop through $this->clients and forward the message to everyone.
- Start the live chat server.
Yep. That’s all for the “complicated chat server”.