- View binding Part of Android Jetpack.
- Setup
- Groovy
- Kotlin
- Usage
- Use view binding in activities
- Kotlin
- Java
- Kotlin
- Java
- Use view binding in fragments
- Kotlin
- Java
- Kotlin
- Java
- Provide hints for different configurations
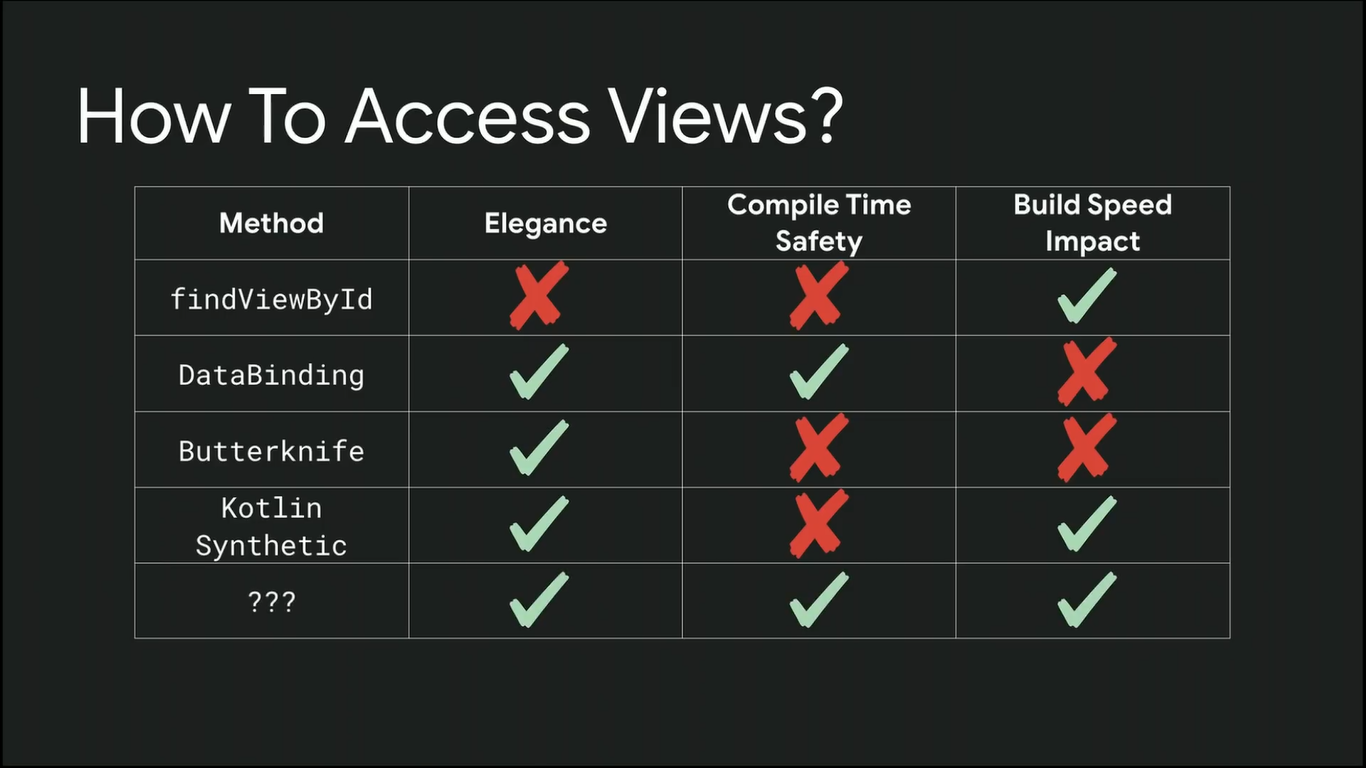
- Differences from findViewById
- Comparison with data binding
- Additional resources
- Samples
- Blogs
- Videos
- Recommended for you
- Долгожданный View Binding в Android
- Как включить
- Как использовать
- Отличия от других подходов
- Использование в RecyclerView.ViewHolder
View binding Part of Android Jetpack.
View binding is a feature that makes it easier to write code that interacts with views. Once view binding is enabled in a module, it generates a binding class for each XML layout file present in that module. An instance of a binding class contains direct references to all views that have an ID in the corresponding layout.
In most cases, view binding replaces findViewById .
Setup
View binding is enabled on a module-by-module basis. To enable view binding in a module, set the viewBinding build option to true in the module-level build.gradle file, as shown in the following example:
Groovy
Kotlin
If you want a layout file to be ignored while generating binding classes, add the tools:viewBindingIgnore=»true» attribute to the root view of that layout file:
Usage
If view binding is enabled for a module, a binding class is generated for each XML layout file that the module contains. Each binding class contains references to the root view and all views that have an ID. The name of the binding class is generated by converting the name of the XML file to Pascal case and adding the word «Binding» to the end.
For example, consider a layout file called result_profile.xml that contains the following:
The generated binding class is called ResultProfileBinding . This class has two fields: a TextView called name and a Button called button . The ImageView in the layout has no ID, so there is no reference to it in the binding class.
Every binding class also includes a getRoot() method, providing a direct reference for the root view of the corresponding layout file. In this example, the getRoot() method in the ResultProfileBinding class returns the LinearLayout root view.
The following sections demonstrate the use of generated binding classes in activities and fragments.
Use view binding in activities
To set up an instance of the binding class for use with an activity, perform the following steps in the activity’s onCreate() method:
- Call the static inflate() method included in the generated binding class. This creates an instance of the binding class for the activity to use.
- Get a reference to the root view by either calling the getRoot() method or using Kotlin property syntax.
- Pass the root view to setContentView() to make it the active view on the screen.
These steps are shown in the following example:
Kotlin
private lateinit var binding: ResultProfileBinding override fun onCreate(savedInstanceState: Bundle?)
Java
private ResultProfileBinding binding; @Override protected void onCreate(Bundle savedInstanceState)
You can now use the instance of the binding class to reference any of the views:
Kotlin
binding.name.text = viewModel.name binding.button.setOnClickListener
Java
binding.getName().setText(viewModel.getName()); binding.getButton().setOnClickListener(new View.OnClickListener() < viewModel.userClicked() >);
Use view binding in fragments
To set up an instance of the binding class for use with a fragment, perform the following steps in the fragment’s onCreateView() method:
- Call the static inflate() method included in the generated binding class. This creates an instance of the binding class for the fragment to use.
- Get a reference to the root view by either calling the getRoot() method or using Kotlin property syntax.
- Return the root view from the onCreateView() method to make it the active view on the screen.
Kotlin
private var _binding: ResultProfileBinding? = null // This property is only valid between onCreateView and // onDestroyView. private val binding get() = _binding!! override fun onCreateView( inflater: LayoutInflater, container: ViewGroup?, savedInstanceState: Bundle? ): View? < _binding = ResultProfileBinding.inflate(inflater, container, false) val view = binding.root return view >override fun onDestroyView()
Java
private ResultProfileBinding binding; @Override public View onCreateView (LayoutInflater inflater, ViewGroup container, Bundle savedInstanceState) < binding = ResultProfileBinding.inflate(inflater, container, false); View view = binding.getRoot(); return view; >@Override public void onDestroyView()
You can now use the instance of the binding class to reference any of the views:
Kotlin
binding.name.text = viewModel.name binding.button.setOnClickListener
Java
binding.getName().setText(viewModel.getName()); binding.button.setOnClickListener(new View.OnClickListener() < viewModel.userClicked() >);
Note: Fragments outlive their views. Make sure you clean up any references to the binding class instance in the fragment’s onDestroyView() method.
Provide hints for different configurations
When you declare views across multiple configurations, it occasionally makes sense to use a different view type depending on the particular layout. The following code snippet shows an example of this:
# in res/layout/example.xml # in res/layout-land/example.xml In this case, you might expect the generated class to expose a field userBio of type TextView , because TextView is the common base class. Due to technical limitations, the view binding code generator can’t determine this and generates a View field instead. This requires casting the field later with binding.userBio as TextView .
To work around this limitation, view binding supports a tools:viewBindingType attribute, letting you tell the compiler what type to use in the generated code. In the previous example, you can use this attribute to make the compiler generate the field as a TextView :
# in res/layout/example.xml (unchanged) # in res/layout-land/example.xml In another example, suppose you have two layouts, one that contains a BottomNavigationView and another that contains a NavigationRailView . Both classes extend NavigationBarView , which contains most of the implementation details. If your code doesn’t need to know exactly which subclass is present in the current layout, you can use tools:viewBindingType to set the generated type to NavigationBarView in both layouts:
# in res/layout/navigation_example.xml # in res/layout-w720/navigation_example.xml View binding can’t validate the value of this attribute when generating code. To avoid compile-time and runtime errors, the value must meet the following conditions:
- The value must be a class that inherits from android.view.View .
- The value must be a superclass of the tag it is placed on. For example, the following values don’t work:
Differences from findViewById
View binding has important advantages over using findViewById :
- Null safety: since view binding creates direct references to views, there’s no risk of a null pointer exception due to an invalid view ID. Additionally, when a view is only present in some configurations of a layout, the field containing its reference in the binding class is marked with @Nullable .
- Type safety: the fields in each binding class have types matching the views they reference in the XML file. This means there’s no risk of a class cast exception.
These differences mean incompatibilities between your layout and your code result in your build failing at compile time rather than at runtime.
Comparison with data binding
View binding and data binding both generate binding classes that you can use to reference views directly. However, view binding is intended to handle simpler use cases and provides the following benefits over data binding:
- Faster compilation: view binding requires no annotation processing, so compile times are faster.
- Ease of use: view binding doesn’t require specially tagged XML layout files, so it’s faster to adopt in your apps. Once you enable view binding in a module, it applies to all of that module’s layouts automatically.
On the other hand, view binding has the following limitations compared to data binding:
- View binding doesn’t support layout variables or layout expressions, so it can’t be used to declare dynamic UI content straight from XML layout files.
- View binding doesn’t support two-way data binding.
Because of these considerations, in some cases it’s best to use both view binding and data binding in a project. You can use data binding in layouts that require advanced features and use view binding in layouts that don’t.
Additional resources
To learn more about view binding, see the following additional resources:
Samples
Blogs
Videos
Recommended for you
Content and code samples on this page are subject to the licenses described in the Content License. Java and OpenJDK are trademarks or registered trademarks of Oracle and/or its affiliates.
Last updated 2023-07-12 UTC.
Долгожданный View Binding в Android
Пару дней назад Google выпустил Android Studio 3.6 Canary 11, главным нововведением в которой стал View Binding, о котором было рассказано еще в мае на Google I/O 2019.
View Binding — это инструмент, который позволяет проще писать код для взаимодейтсвия с view. При включении View Binding в определенном модуле он генерирует binding классы для каждого файла разметки (layout) в модуле. Объект сгенерированного binding класса содержит ссылки на все view из файла разметки, для которых указан android:id .
Как включить
Чтобы включить View Binding в модуле надо добавить элемент в файл build.gradle :
Также можно указать, что для определенного файла разметки генерировать binding класс не надо. Для этого надо указать аттрибут tools:viewBindingIgnore=»true» в корневой view в нужном файле разметки.
Как использовать
Каждый сгенерированный binding класс содержит ссылку на корневой view разметки ( root ) и ссылки на все view, которые имеют id. Имя генерируемого класса формируется как «название файла разметки», переведенное в camel case + «Binding».
Например, для файла разметки result_profile.xml :
Будет сгенерирован класс ResultProfileBinding , содержащий 2 поля: TextView name и Button button . Для ImageView ничего сгенерировано не будет, как как оно не имеет id . Также в классе ResultProfileBinding будет метод getRoot() , возвращающий корневой LinearLayout .
Чтобы создать объект класса ResultProfileBinding , надо вызвать статический метод inflate() . После этого можно использовать корневой view как content view в Activity :
private lateinit var binding: ResultProfileBinding @Override fun onCreate(savedInstanceState: Bundle)
Позже binding можно использовать для получения view:
binding.name.text = viewModel.name binding.button.setOnClickListener
Отличия от других подходов
Главные преимущества View Binding — это Null safety и Type safety.
При этом, если какая-то view имеется в одной конфигурации разметки, но отсутствует в другой ( layout-land , например), то для нее в binding классе будет сгенерировано @Nullable поле.
Также, если в разных конфигурациях разметки имеются view с одинаковыми id, но разными типами, то для них будет сгенерировано поле с типом android.view.View .
(По крайней мере, в версии 3.6 Canary 11)
А вообще, было бы удобно, если бы сгенерированное поле имело наиболее возможный специфичный тип. Например, чтобы для Button в одной конфигурации и TextView в другой генерировалось поле с типом TextView ( public class Button extends TextView ).
При использовании View Binding все несоответствия между разметкой и кодом будут выявляться на этапе компиляции, что позволит избежать ненужных ошибок во время работы приложения.
Использование в RecyclerView.ViewHolder
Ничего не мешает использовать View Binding при создании view для RecyclerView.ViewHolder :
class PersonViewHolder(private val itemPersonBinding: ItemPersonBinding) : RecyclerView.ViewHolder(itemPersonBinding.root) < fun bind(person: Person) < itemPersonBinding.name.text = person.name >>Однако, для создания такого ViewHolder придется написать немного бойлерплейта:
override fun onCreateViewHolder(parent: ViewGroup, viewType: Int): PersonViewHolder
Было бы удобнее, если при работе с RecyclerView.ViewHolder метод inflate(. ) не будет иметь параметр layoutInflater , а будет сам получать его из передаваемого parent .
Тут нужно ещё упомянуть, что при использовании View Binding поиск view через findViewById() производится только один раз при вызове метода inflate() . Это дает преимущество над kotlin-android-extensions , в котором кеширование view по умолчанию работало только в Activity и Fragment , а для RecyclerView.ViewHolder требовалась дополнительная настройка.
В целом, View Binding это очень удобная вещь, которую легко начать использовать в существующих проектах. Создатель Butter Knife уже рекомендует переключаться на View Binding.
Немного жаль, что такой инструмент не появился несколько лет назад.