- Установка Python в Windows 10
- Требования
- 1: Загрузка установщика Python
- 2: Запуск исполняемого файла установщика
- 3: Добавление Python в переменные среды (опционально)
- 4: Проверка установки Python
- Подводим итоги
- Precompiled Standard Library In Python And Its Uses
- What are pyc files?
- What are the advantages of .pyc files?
- Difference between .py and .pyc files
- Precompiled Standard Library
- How to generate .pyc of any other .py files?
- 1. Using py_compile method
- Code
- pyc file folder
- 2. Using compile all method
- Code
- 3. py_compileall.main()
- Code
- Generate pyc files in terminals
- Using py_compile method
- Compile_all method in a terminal
- FAQs Related to Precompile Standard Library in Python
- Conclusion
Установка Python в Windows 10
Язык программирования Python становится все более популярным среди начинающих и опытных разработчиков. Это гибкий и универсальный язык, он отлично подходит для написания скриптов, автоматизации, анализа данных, машинного обучения и бэкенд разработки.
В этом туториале мы установим Python в Windows.
Примечание: если вы хотите узнать, как работать с Windows PowerShell, пакетными менеджерами, а также установить и настроить Python в Windows с помощью интерфейса командной строки, то рекомендуем ознакомиться с этим мануалом.
Если вам нужен Python для веб-разработки, Microsoft рекомендует устанавливать его с помощью подсистемы Windows для Linux.
Требования
Для выполнения этого мануала вам понадобится компьютер с установленной Windows, права администратора и подключение к сети.
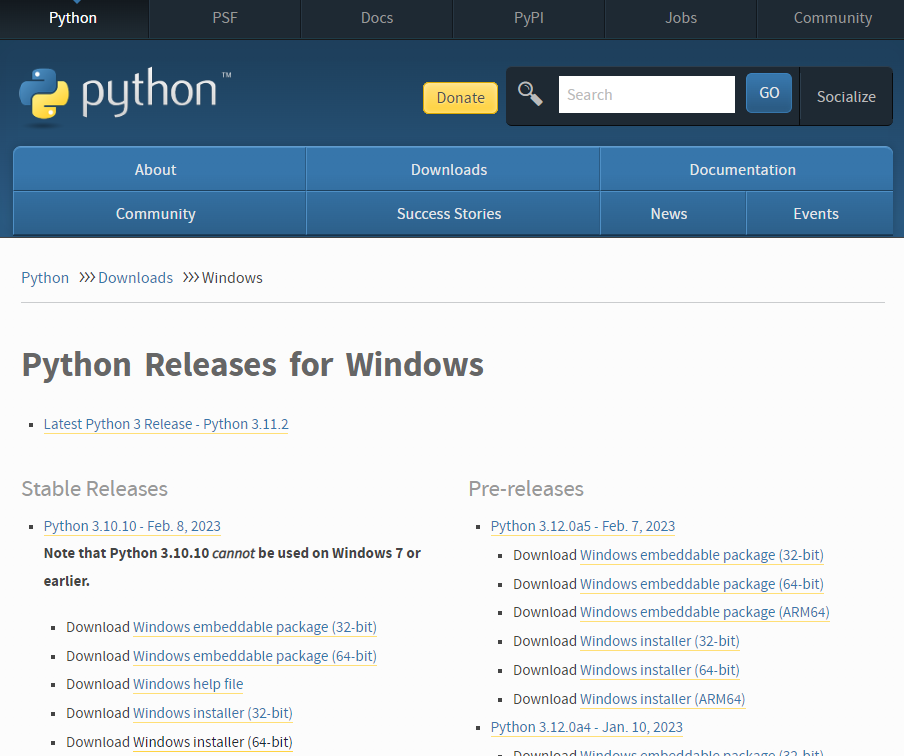
1: Загрузка установщика Python
Найдите стабильный релиз Python 3. В этом туториале мы будем работать с Python версии 3.10.10.
Затем нажмите на соответствующую ссылку для вашей системы, чтобы загрузить исполняемый файл : Windows Installer (64-bit) или Windows Installer (32-bit).
2: Запуск исполняемого файла установщика
После загрузки установщика дважды нажмите на файл .exe, например python-3.10.10-amd64.exe, чтобы запустить инсталлер Python.
Далее установите флажок на “Install launcher for all users checkbox”, чтобы все пользователи компьютера имели доступ к лаунчеру Python.
Установите флажок на “Add python.exe to PATH”, что позволит пользователям запускать его из командной строки.

Если вы только начинаете работать с Python и хотите поставить его со стандартными функциями, нажмите “Install Now” и перейдите к этапу 4 — Проверка установки Python. Чтобы установить дополнительные и расширенные функции, нажмите “Customize Installation”.
Дополнительные функции включают общие утилиты и ресурсы для Python, вы можете установить их все, даже если не планируете их использовать.
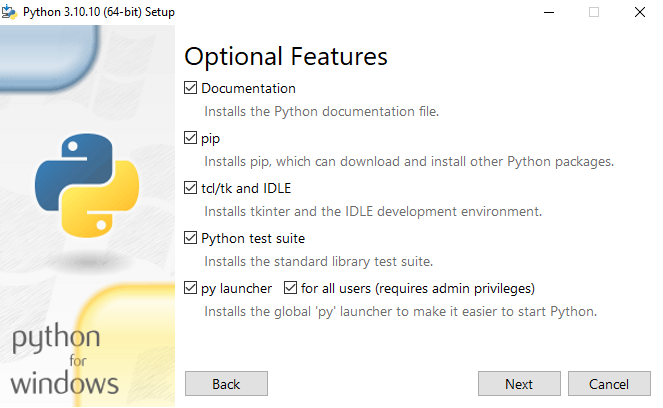
Выберите нужные вам из следующих опций:
- Documentation: рекомендуется выбрать
- pip: рекомендуется, если вы хотите устанавливать пакеты Python (например NumPy или pandas)
- tcl/tk and IDLE: если вы планируете использовать IDLE или работать с мануалами, для которых он нужен
- Python test suite: рекомендуется установить, если вы используете python для тестирования и обучения
- py launcher и for all users: позволяет запускать Python из командной строки
Откроется диалоговое окно “Advanced Options”.

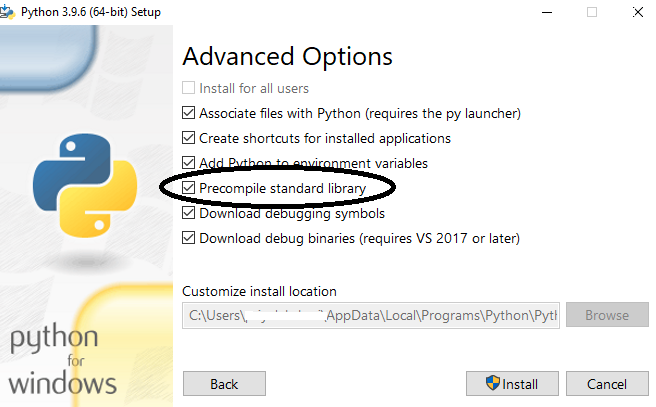
Выберите параметры, которые вам нужны:
- Install for all users: рекомендуется, если на этом компьютере несколько пользователей
- Associate files with Python: эта опция связывает все типы файлов Python с лаунчером или редактором
- Create shortcuts for installed applications: создать ярлыки для приложений Python
- Add Python to environment variables: включить запуск интерпретатора Python
- Precompile standard library: не требуется, это может замедлить установку
- Download debugging symbols и Download debug binaries: рекомендуется только в том случае, если вы планируете создавать расширения на C или C++
Запишите каталог установки Python, вам понадобится обратиться к нему позже.
Чтобы начать установку, нажмите “Install”.
После завершения инсталляции появится уведомление “Setup was successful”.

3: Добавление Python в переменные среды (опционально)
Пропустите этот этап, если во время установки вы выбрали “Add Python to environment variables”.
Если вы хотите получить доступ к Python через командную строку, но не добавили Python в переменные среды во время установки, то вы можете сделать это вручную.
Прежде чем начать, найдите каталог установки Python в вашей системе. Ниже приведены примеры путей к директории по умолчанию :
- C:\Program Files\Python310: если во время установки вы выбрали “Install for all users”, то каталог будет общесистемным.
- C:\Users\8host\AppData\Local\Programs\Python\Python310: если во время инсталляции вы не выбрали “Install for all users”, то каталог будет находиться в пути пользователя Windows.
Обратите внимание: если вы поставили другую версию, то имя папки будет отличаться, но все равно будет начинаться с Python.
Перейдите в меню “Пуск” и в строке поиска введите advanced system settings.
Нажмите “View advanced system settings”.
В диалоговом окне “System Properties” перейдите на вкладку “Advanced” и нажмите “ Environment Variables ”.
Дальнейшие действия зависят от того, как вы установили Python:
- Если во время инсталляции вы выбрали “Install for all users”, выберите “Path” в списке “System Variables” и нажмите “Edit”.
- Если во время установки вы не выбрали “Install for all users”, выберите “Path” в списке “User Variables” и нажмите “Edit”.
Нажмите “New” и введите путь к директории Python, затем нажимайте “OK”, пока все диалоговые окна не будут закрыты.
4: Проверка установки Python
Проверить, что Python успешно установлен, можно через командную строку либо через приложение Integrated Development Environment (IDLE), если вы установили его.
Перейдите в “Пуск” и введите cmd в строке поиска. Нажмите “Command Prompt”.
Введите следующую команду в командной строке:
Также вы можете проверить версию Python, для этого запустите приложение IDLE. Перейдите в меню “Пуск” и введите python в строке поиска, а затем выберите IDLE, например IDLE (Python 3.10, 64-bit).
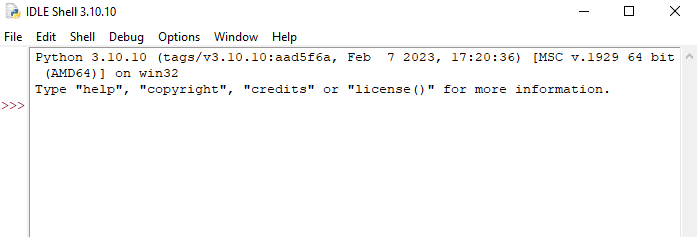
Вы можете начать кодить на Python через IDLE или выбрать другой редактор.
Подводим итоги
Мы установили Python на компьютер под Windows, теперь у вас всё готово для начала программирования и обучения на Python. Далее вы можете написать свою первую программу.
Precompiled Standard Library In Python And Its Uses

In this article, we will learn about precompiled standard library in python. Simply we are going to learn about .pyc extensions in python. At the end of the article, we will come to know about What is .pyc file? What are the advantages of .pyc files? How to generate .py to .pyc files? Many of us thought .py is an extension to save the files in python. And we don’t have any knowledge about the .pyc extension. After reading this article, we will be clear about it. Let us move to the article.
pyc stands for python compiled files. Python is a combination or package of interpreter and support libraries. Whenever we are installing python, we will get the two things. They are interpreters and support libraries. An interpreter is useful for running a python code. Support libraries contain all those definitions about all built-in functions.
What are pyc files?
pyc files are the byte code representation of the python scripts. These files are automatically generated when we create a python script. This .pyc file contains the “compiled bytecode” of the program. So It converts the source code to byte code only one time. .pyc files speed up the process. pyc files are created only for the files we import.
What are the advantages of .pyc files?
Before interpreting the python code, the scripts are converted to byte codes. Whenever .pyc files are there, they will help to speed up the execution. We don’t need to recompile. The only condition is that if there are .pyc files, there must be corresponding .py files.
Difference between .py and .pyc files
.py contains the source code of the program, and the pyc files contain the byte code of the program. After the compilation of .py files, the .pyc files are generated. The .pyc files are not created for every program that we run. It only generates for the files that we import.
Precompiled Standard Library
Precompiled Standard Library is the .pyc (byte code) files generated for each of the standard libraries in python. It just converts .py code to .pyc code. Simply, it converts source code to byte code. When we import a python library, it doesn’t have corresponding .pyc files. So it will compile “new byte code”. By doing this will speed up the execution of the code. And we don’t need to recompile the byte code.
While installing python, there is an option named precompiled standard library. It is useful to generate .pyc files for standard libraries. In the below image, I highlighted the option.
How to generate .pyc of any other .py files?
1. Using py_compile method
Let us consider we have a python file named “program.py”. Now we are going to compile this program. We have to give the file name of the python, which we have to compile. After seeing the name of the file, it converts the source code into byte code.
Code
import py_compile py_compile. compile("program.py") It doesn’t generate any output for this. This code creates a byte code for the file. If we want to see the .pyc files, then we have to follow the steps.
- First, open the IDLE python folder. Right-click on it you will find the option like open file location.
- Just open it you will find the folder named __pycache__. In that, you will find many pyc files.
- Now I wrote a source code for program.py. Let us check the corresponding compiled file.
pyc file folder
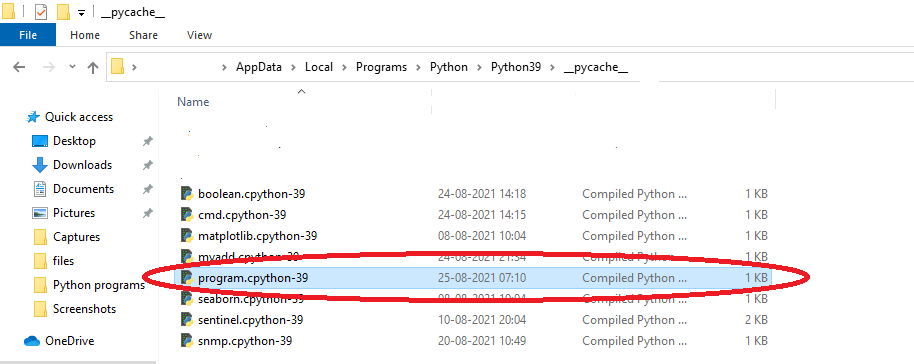
Now we can see that a pyc file is there in the corresponding location.
2. Using compile all method
Now let us see how to compile all the files present in a python directory in a single time.
Code
import compileall compileall.compile_dir("C:/Users/AppData/Local/Programs/Python/Python39") This code will compile all the python scripts in a specified directory. “C:/Users/AppData/Local/Programs/Python/Python39” replace it with your python folder path.
3. py_compileall.main()
This method is useful to compile multiple files at the same time.
Code
import py_compile py_compile.main(['program.py','program1.py','program2.py'])
It doesn’t generate any output for this. This code creates a byte code for the file. If we want to see the pyc files, just follow the same method we have done for method one.
Generate pyc files in terminals
Whatever we have done using python programs is possible in terminals also. We can generate a pyc file using terminals also.
Using py_compile method
C:\Users\Username> python -m compile program.py program1.py program2.py
Opening a terminal, you will initially get that prompt symbol. Give the command that is in bold letters. The pyc files will be generated.
Compile_all method in a terminal
C:\Users\Username> python -m compileall
This will compile all the files in a python directory.
FAQs Related to Precompile Standard Library in Python
Byte code is a machine-level code that is understandable only by computer. These byte codes are automatically generated with a .pyc extension.
pyc stands for python compiled files.
.pyc files will speed up the execution.
Conclusion
Here we have learned about precompiled standard library in python. Now we are all known about the behind-scenes of python. As a good programmer, it is necessary to know What is happening behind the programming language. So we think this article will be useful for all Python programmers.
We hope this is easy to understand. Learn with us:) In case of any queries, ask it in the comments. We will clear you as soon as possible.