- JRE Installer Options
- The Installation section has the following topics:
- Introduction
- Command Line Install
- Installation Configurations
- Example 1
- Example 2
- Creating a Log File
- Installation Example
- JRE Installation for Microsoft Windows (32-bit)
- Installation Instructions
- Особенности установки и настройки Java-машины в ОС Windows
- Настройка JRE
- Проверка результата установки
- Как и где разместить дополнительные JAR-файлы
JRE Installer Options
This section discusses options for installation of the Java Runtime Environment (JRE) on Windows 32-bit platform. It is intended for:
- System Administrators deploying the Java JRE with Java Plug-in and Web Start technologies on multiple PCs in Intranet without user interaction.
- Vendors having products requiring the JRE. The JRE can be silently installed with their product.
The Installation section has the following topics:
Introduction
Java™ SE Runtime Environment (JRE) installations are built using Microsoft Window Installer (MSI) 2.0 technology. MSI contains built-in support for silent or unattended installations. This document tells how to manually install the JRE using the .exe that launches the MSI installation. The installer options are explained.
Command Line Install
In Java SE 6 The Windows offline installation command has the same syntax as the Windows Installation. The command is as follows:
.exe [/lang=] [/s] [IEXPLORER=1] [MOZILLA=1] [INSTALLDIR=:\] [STATIC=1] - .exe is the single executable installer for the Java Runtime Environment (JRE)
- /lang= , if used, sets the localized language for the installer. For a complete list, please see Language IDs.
- /s , if used, indicates silent installation
- IEXPLORER=1 , if used, indicates that the Plug-in should be registered as the default Java VM with the Internet Explorer browser
- MOZILLA=1 indicates that the Plug-in should be registered with Mozilla 1.1 and later and Netscape browsers
- INSTALLDIR , if used, specifies the drive and path of the installation
- If INSTALLDIR is not specified, the installation will go into C:\Program Files\java\jre1.6.0 (default location).
- STATIC=1 , if used, specifies a static installation. This option is available in the 6u10 release and above. For more information on static install, please see Java Runtime Environment Configuration.
The following options have been deprecated starting in release Java SE 6 update 10:
Installation Configurations
Example 1
Suppose the JRE installer is jre-6-rc-windows-i586.exe and you want to install the following configuration:
- Perform a Windows Installation
- Install the JRE core, additional fonts, colors, and Soundbank
- Register the Plug-in with Netscape 7 and Mozilla 1.3
The command to install the above mentioned configuration is as follows:
jre-6-rc-windows-i586.exe /s MOZILLA=1
Example 2
Suppose the JRE installer is jre-6-rc-windows-i586.exe and you want to install the following configuration:
- Perform a Windows Offline Installation and install the JRE on D drive at java\jre
- Have all features of the JRE installed
- Register the Plug-in with Internet Explorer
The command to install the above mentioned configuration is as follows:
jre-6-rc-windows-i586.exe /s IEXPLORER=1 INSTALLDIR=D:\java\jre
To keep the MS-DOS window open, until the installation of JRE is complete use the start /w command as follows:
start /w jre-6-rc-windows-i586.exe /s MOZILLA=1
Creating a Log File
Log file can be used to verify if an installation succeeded. To create a log file describing the installation append /L C:\setup.log to the install command and scroll to the end of the log file to verify.
Installation Example
The following is an example for installation:
jre-6-rc-windows-i586.exe /s /L C:\setup.log
The above command causes the log to be written to the setup.log file.
JRE Installation for Microsoft Windows (32-bit)
See supported System Configurations for information about supported platforms, operating systems, desktop managers, and browsers.
Running with less memory may cause disk swapping which has a severe effect on performance. Very large programs may require more RAM for adequate performance.
- Trying to install the Java SE Runtime Environment on a non-supported version of Microsoft Windows or on a machine that doesn’t have a sufficiently up-to-date Service Pack will cause the installer to generate this warning: «We recommend that you do not install this Java platform for the following reasons: This Java platform does not support the operating system or operating-system service pack on this machine.»
- See Browsers Supported by Next-Generation Java Plugin for information about browser support in the new Java Plugin.
Installation Instructions
Java Update
Note: For any text on this page containing the following notation, you must substitute the appropriate update version number for the notation.
For example, if you are downloading the installer for update 1.6.0_01, the following file name:
1. If choosing «Windows Offline Installation», download and check the download file size
After clicking the JRE «Download» link for the «Windows Offline Installation» a dialog box pops up — choose the following option:
- Save — This saves the downloaded file without installing it. Check that you have downloaded the entire file by comparing the size of the file you downloaded with the expected size shown on the download page:
- jre-1_6_0_-windows-i586.exe
This file contains everything needed to install the Java SE Runtime Environment, including the installer and character conversion classes and support for locales other than the US English locale.
2. Run the installer
You must have administrative permissions in order to install the Java SE Runtime Environment on Microsoft Windows 2000 and XP.
The download page provides the following two choices of installation. Continue based on your choice.
- Open — This starts a small program which then prompts you for more information about what you want to install.
This option starts the installation process by downloading and executing the file jre-1_6_0_-windows-i586-iftw.exe , which prompts you through the steps to download and install only the features you request. (The letters » iftw » mean «install from the web».)
b. Windows Offline Installation — Run the file downloaded in step 1 by double-clicking on the installer’s icon. Then follow the instructions the installer provides. When done with the installation, you can delete the downloaded file to recover disk space.
With either choice, the installer may ask you to reboot your computer
- Exit the Netscape 7.x, Mozilla 1.x, or Firefox 1.x browser and all of its «objects» (Messenger, Composer . );
- If the Quick Launch feature is enabled, disable it;
- Then restart Netscape 7.x, Mozilla 1.x or Firefox 1.x.
The installation process also installs Java Web Start.
Java Web Start
- Compatibility: The release of Java Web Start that comes with this JRE can be run on JRE 1.2.2 or later. It will not work with JRE 1.1.x or earlier.
- Upgrading from Previous Versions: If you have a previous release of Java Web Start, do not uninstall it. Uninstalling it will cause the download cache to be cleared, and all previously installed Java Web Start application data will have to be downloaded again. This new release will overwrite previous installations and automatically update browsers to use this new release. The configuration files and program files folder used by Java Web Start have changed, but all your settings will remain intact after the upgrade, since Java Web Start will translate your settings to the new form.
- Uninstalling: The only way to uninstall Java Web Start is to uninstall the JDK/JRE. Uninstalling the JDK/JRE will not, however, remove the cache for previous releases of Java Web Start. Previous releases have separate uninstallers for Java Web Start.
Note: You may see a misleading message if you do the following:
- Download and cache a Java Web Start (JNLP) application with JDK/JRE 5.x
- Remove JDK/JRE 5.x using «Add or Remove Programs» from the Windows Control Panel
- Remove the Java Web Start application using «Add or Remove Programs.»
When you remove the application, you see an «Uninstaller Error» dialog saying «An error occurred while trying to remove Java-Application: App. It may have already been uninstalled. Would you like to remove Java-Application: App from the Add or Remove program list?» If you say yes to this, then you will see another «Uninstaller Error» dialog saying «You do not have sufficient access to remove Java-Application: App from the Add or Remove Program list. Please contact your system administrator.» This is the misleading message. It implies that the problem is due to privileges. It is not. The problem is that you have already removed the Java Web Start application when you removed JDK/JRE 5.x, but this is not reflected in the «Add or Remove Programs» dialog until it is refreshed by pressing F5 or it is closed and reopened.
To avoid seeing this misleading message, either press F5 or close and reopen the dialog. Any Java Web Start application that was downloaded and cached with JDK/JRE 5.x will no longer appear in the list of currently installed programs.
- Using Java Web Start with Netscape 6.x/7.x: For Netscape 6.x/7.x users, setup the Java Web Start MIME type (JNLP) in the Edit->Preferences->Navigator->Helper Applications section. The file extension is jnlp ; MIME Type is application/x-java-jnlp-file . It should be handled by the javaws executable file in your Java Web Start directory. Also note that, due to a problem with the JavaScript in Netscape 6.x/7.x, you must use the non-JavaScript version of the demos page
Silent Install — To install the Java SE Runtime Environment non-interactively, which is useful for installing on multiple machines, use Silent Installation Instructions.
JRE Deployment for System Administrators — The JRE can be distributed to intranet users by hosting the .msi file on an internal website and asking users to launch the installer through msiexec. The other option is to install the JRE through Active Directory. The instructions for these are available in the «Intranet Deployment» section of JRE Intranet Deployment.
Launch Applications Directly — If you want to use the Invocation API to launch an application directly rather than using the Java application launcher, please see Location of VM Library Files (jvm.dll).
Особенности установки и настройки Java-машины в ОС Windows
В данной статье рассматривается процесс установки JRE на компьютер под управлением операционной системы Windows.
Авторизуйтесь под учётной записью с правами администратора и запустите ранее загруженный файл jre-8u201-windows-x64.exe.
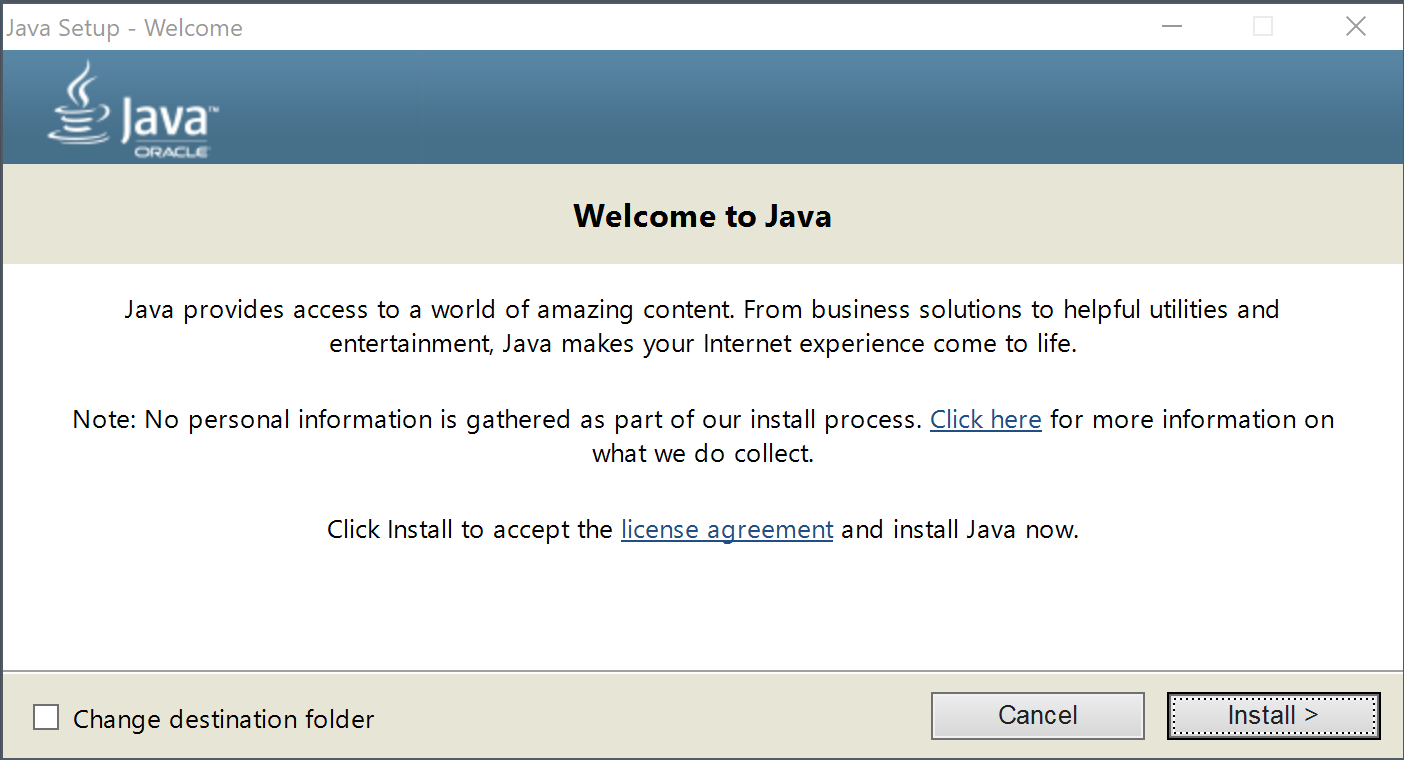
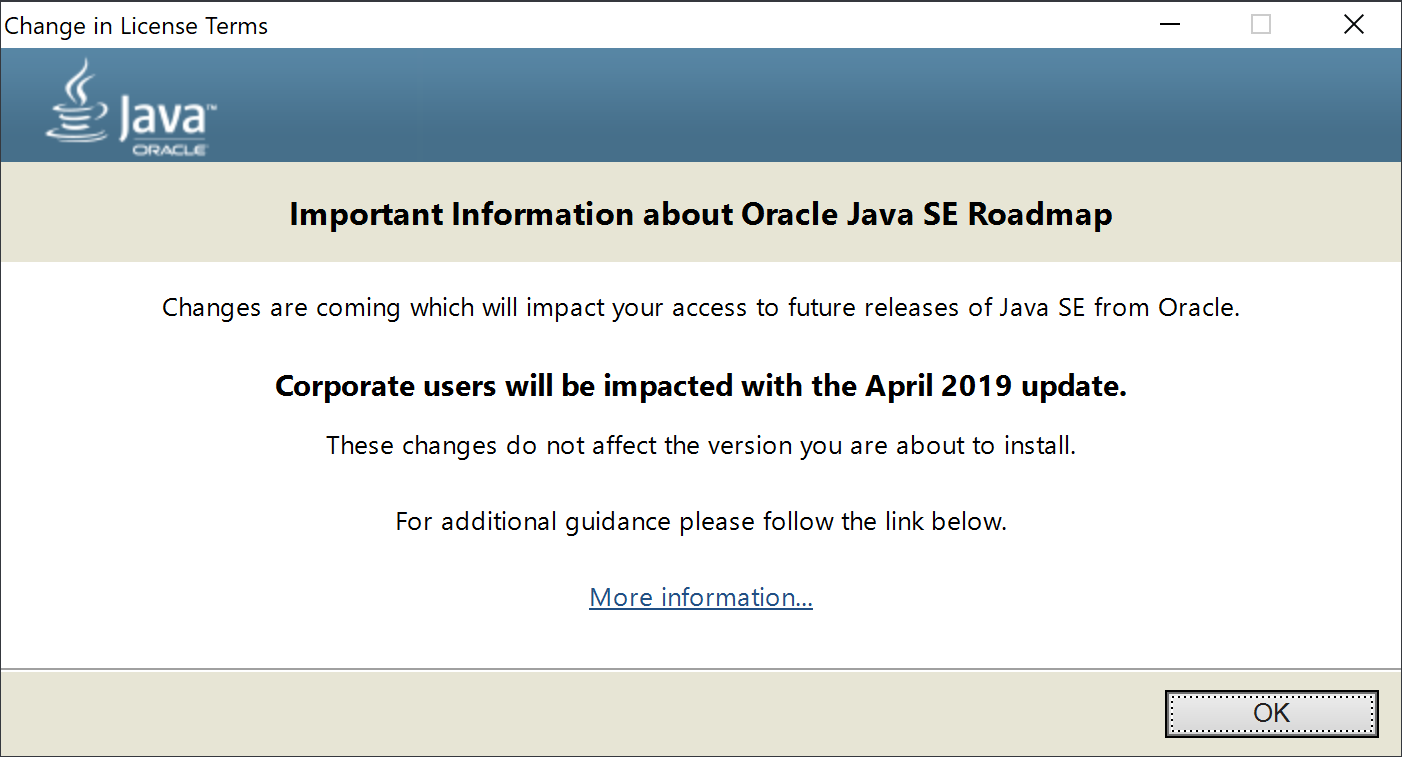
Для начала установки нажмите кнопку «Install», после чего программа покажет сообщение о влиянии изменения условий лицензирования на корпоративных пользователей:
По завершению установки вы увидите окно с сообщением об успешном выполнении операции:
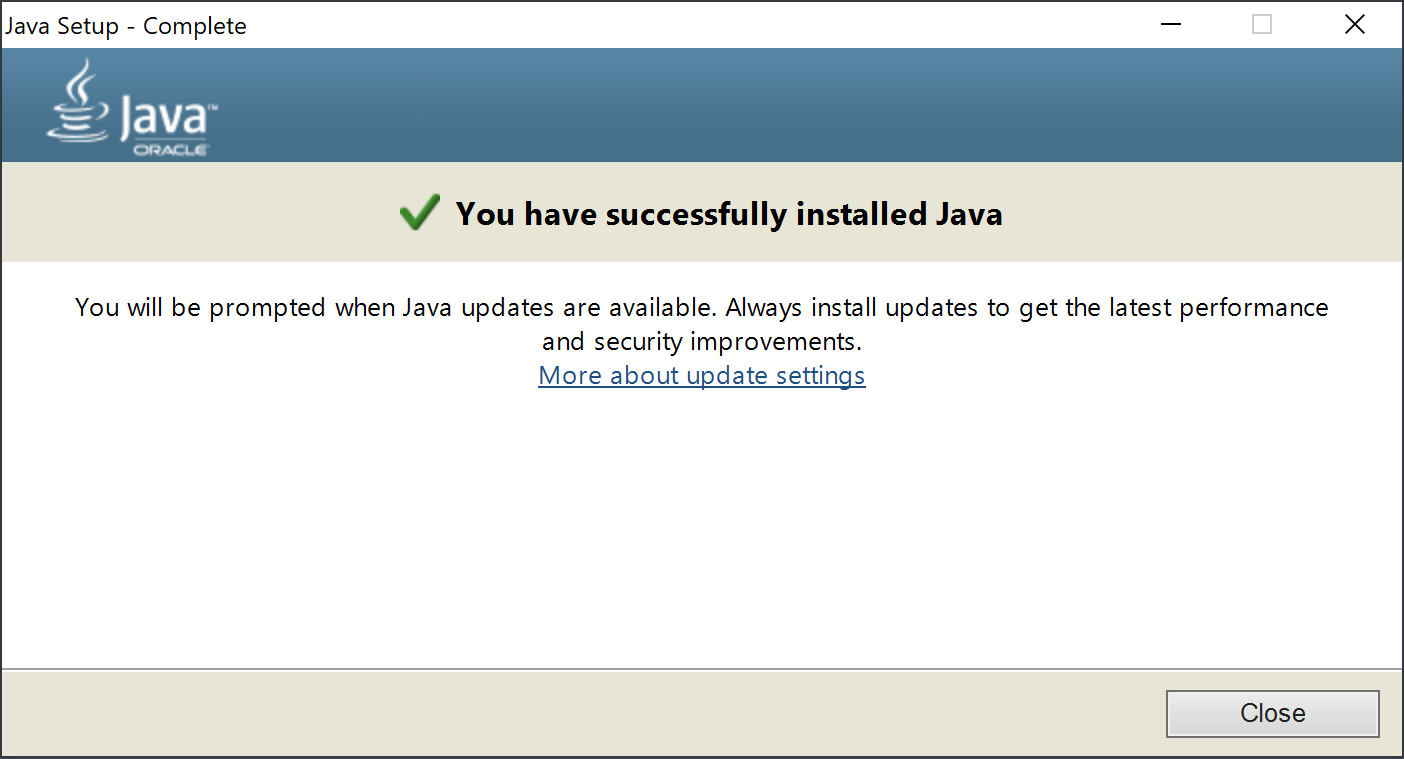
Нажмите кнопку «Close» для выходя из программы установки.
Настройка JRE
Отключите автоматическое обновление Java. Для этого откройте Панель управления Windows:
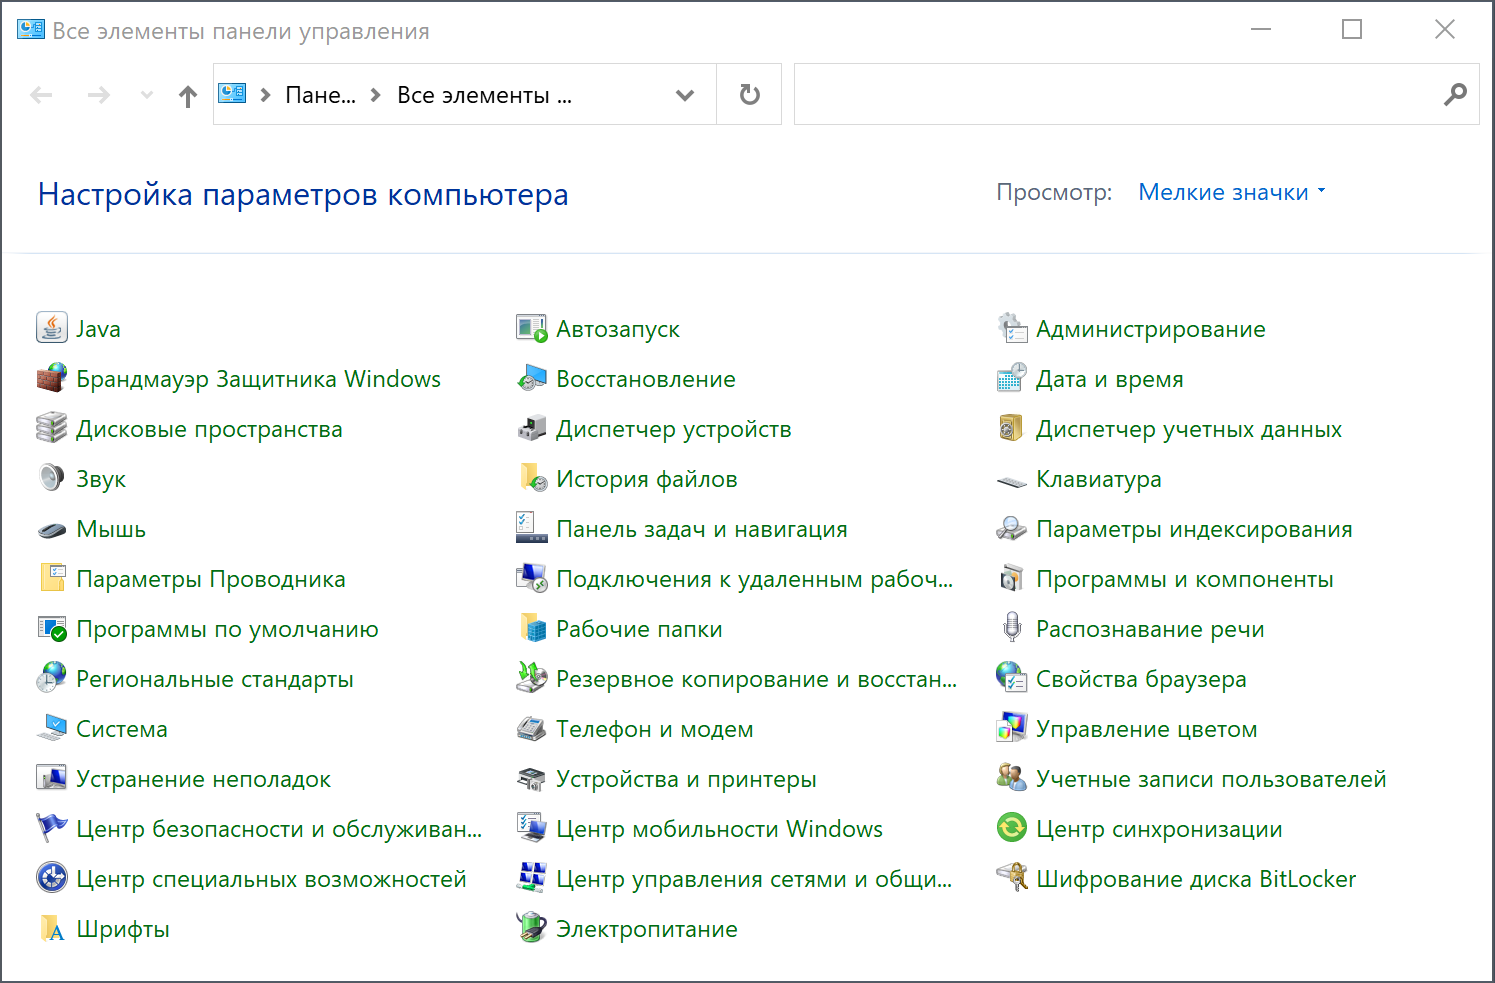
Дважды кликните по значку «Java», после чего откроется контрольная панель Java, в которой необходимо перейти на вкладку «Update»:
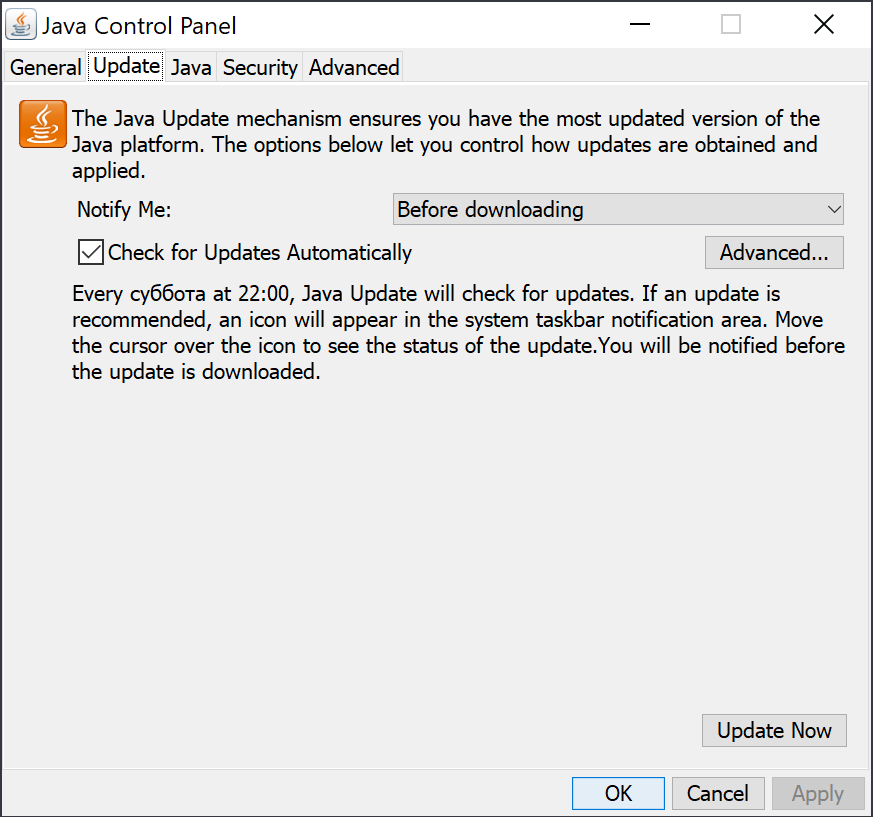
Выключите флажок «Check for Updates Automatically» для отключения автоматического обновления Java. При этом вам будет выведено окно предупреждения:
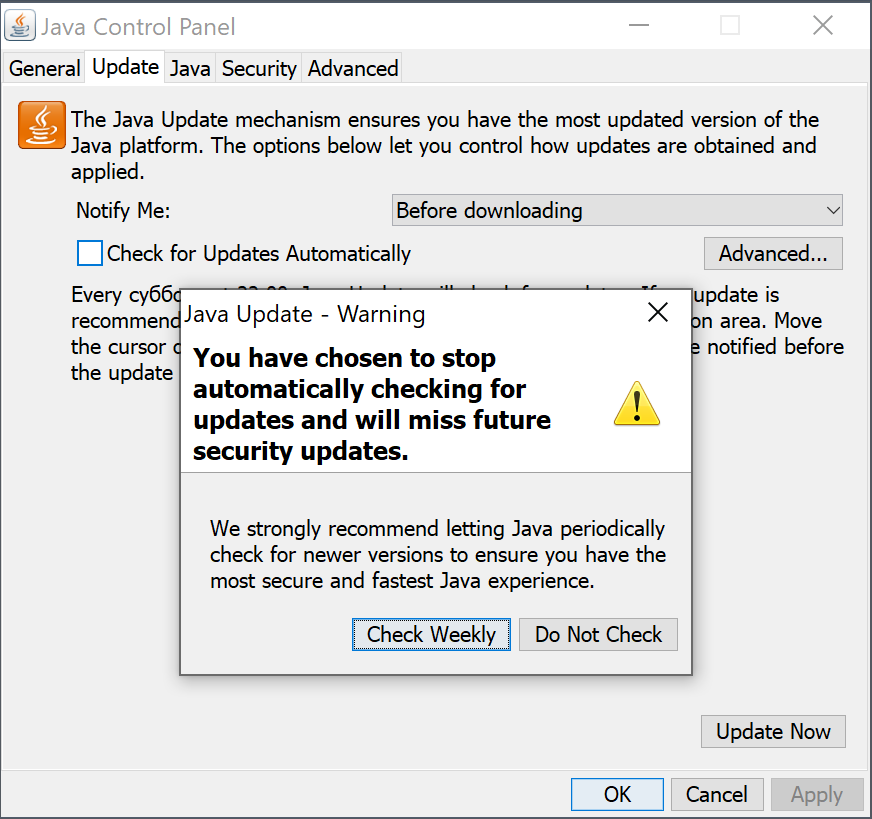
Нажмите кнопку «Do Not Check» и закройте окно кнопкой «ОК».
Проверка результата установки
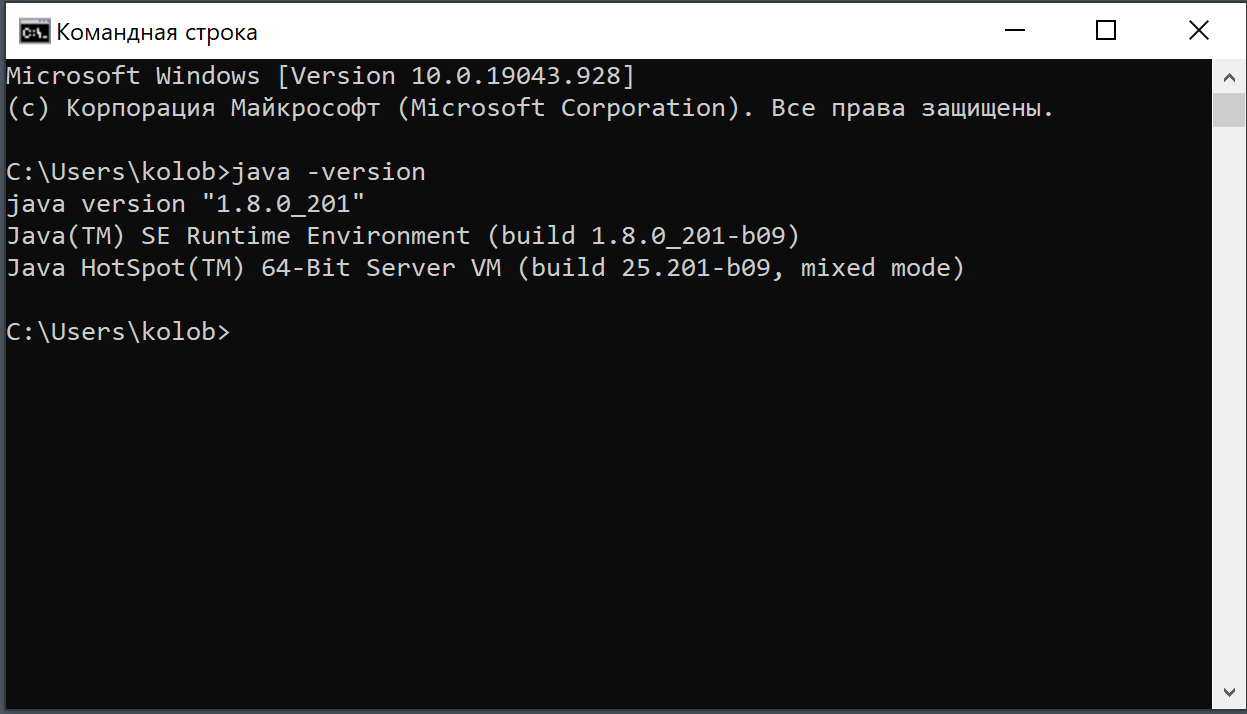
Проверка результата установки JRE производится в командной строке. Для доступа к командной строке нажмите на клавиатуре сочетание клавиш Win+R и в открывшемся окне «Выполнить» введите команду «cmd»:

После нажатия кнопки «ОК» откроется окно командной строки. Введите команду:
Если установка была произведена без ошибок, вы увидите информацию о версии установленной JRE:
Как и где разместить дополнительные JAR-файлы
После установки и проверки JRE загруженные ранее дополнительные JAR-файлы «commons-logging-1.1.jar» и «xmlsec-1.4.5.jar» следует скопировать в директорию C:\Program Files\Java\jre1.8.0_201\lib\ext .
После этого установку JRE на компьютер под управлением Windows можно считать завершённой.