Из жизни разработчика
Порой бывает очень удобно использовать внешние скрипты, такие как Lua или Python в своем проекте.
Почему это удобно? И почему это может облегчить жизнь?
Ну к примеру в проекте есть места, где логика не так очевидна на первый взгляд (к примеру какое-то локальное поведение персонажей в каких-либо ситуациях) и могла бы быть имплементирована позже (и возможно другим программистом)
Или возможно дать некоторую свободу изменять или создавать дополнения к вашему продукту для сообщества фанатов.
Или к примеру ваш геймдизайнер постоянно пытается что-то поменять в проекте, и надоедливо жужжит о том, что надо бы перекомпилировать все к буям, только потому, что он что-то там поменял в настройках.
Да, можно (и нужно!) конечно выносить настройки объектов в игре в отдельные таблицы (например в те же гуглодоки), но иногда этого недостаточно. Приходится задумываться о том, чтобы была возможность менять логику программы, не прибегая к перекомпилированию всего проекта.
Вот тут и приходит на помощь скриптовый язык.
В нашем проекте CASTROL RACE такой необходимости не было, но иногда я всё же задумывался применить тут данную технику. Ну а раз мысли такие меня начали посещать, да и появился свободный часик, я залез в интернет на поиски возможных готовых решений (честно говоря я копал в сторону Lua) и натолкнулся на бесплатный extension для Python.
Кому интересно, прошу под кат!
В Unity3d Store я наткнулся на реализацию Iron Python. Несмотря на то, что искал я Lua (с ней уже приходилось работать),
мне стало интересно и я решил попробовать. Тем более, что это абсолютно бесплатно.
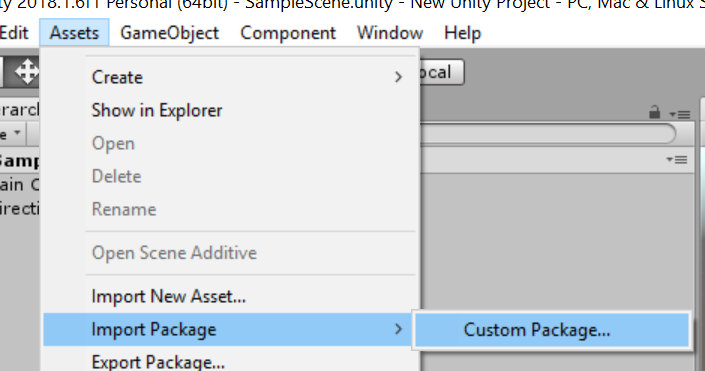
2 клика мышью и проект уже открыт:
рис. 1 Проект изначально содержит все что нужно
Всё что требуется, так это настроить проект на использование .NET 2.0 в свойствах плеера. Об этом подробно написано в небольшой документации к экстеншену, так что не буду грузить мозг. Просто заходим в свойства проекта, далее в свойства плеера, там во вкладке other выбираем .NET 2.0 и сохраняем.
Нам сразу же доступна сцена с единственным объектом, к которому прицеплен скрипт.
Этот скрипт по сути просто представляет нам возможность посмотреть, как это работает.
рис. 2 Окно в демо проекте
Если запустить проект, то нам явится 2 окна:
— Сверху окно соджержит код на питоне, который можно прям тут же изменить
— Снизу окошко в которое выводится результат выполнения этого самого скрипта
Как можно заметить, скрипт, который уже вбит в верхнее окно, делает следующее — создает 5 сфер в сцене, дает им имена согласно номеру, и выводит строку «Created 5 spheres».
Если нажать на кнопку Run, то это и произойдёт! (:
Вобщем, не долго играясь с верхним окном я полез в код.
Вот он инициализирует сам интерпретатор:
using UnityEngine; using System.Collections; /// /// A simple python behaviour that demonstrates how code can be ran in the runtime engine /// public class InGamePythonInterpreter : MonoBehaviour private string m_pyCode; private string m_pyOutput; private PythonEnvironment m_pyEnv; private const string INITIALIZATION_CODE = @" import clr clr.AddReference('UnityEngine') import UnityEngine "; // Use this for initialization void Start () m_pyEnv = new PythonEnvironment(); m_pyEnv.RunCommand(INITIALIZATION_CODE); m_pyOutput = string.Empty; >
import clr clr.AddReference('UnityEngine') import UnityEngine
осуществляют связку среды Python c классами Unity3d. По сути, далее мы можем обращаться к классам Unity3d непосредственно из скриптов. Стоит отметить 2 момента:
— С одной стороны это очень удобно, поскольку не нужно экспортировать описание каждого класса как в Lua, ведь это запарно
— С другой стороны встает вопрос безопасности Ведь можно подсунуть другой скрипт и ничто не помешает ему внедриться в логику программы. Но это вопрос не к относится к сегодняшней теме (:
Итак, по нажатию на кнопку Run в сущности выполняется всего одна команда:
PythonEnvironment.CommandResult result = m_pyEnv.RunCommand(m_pyCode);
RunCommand — гениально (: Эта команда просто выполняет текст скрипта!
Вроде бы как всё очень понятно и ясно.
Не имея четкой цели, я решил вынести скрипт в отдельный файл, далее скачать его во время работы программы и исполнить. Я добавил кнопку и следующий код:
WWW www = new WWW("http://www.yoursite.ru/_unity/script.py"); yield return www; PythonEnvironment.CommandResult result = m_pyEnv.RunCommand(www.data);
Это сработало на ура! Теперь можно было запускать почти любую логику из этого скрипта, не прибегаю к перекомпиляции проекта. Цель достигнута.
PS: Должен отметить, что тут не рассматривались вопросы безопасности данного подхода
Также данная статья ни в коем случае не претендует на полноту рассмотрения проблемы использования сторонних интерпретируемых скриптов в Unity3d.
PPS: Был сделан небольшой сравнительный анализ производительности выполнения скрипта на Python и встроенного C#, разница приблизительно в 100 раз (медленнее конечно же). Для анализа скрипт в цикле 1000 раз создавал 2 вектора, отнимал из первого второй, и высчитывал магнитуду полученного.
Posted on May. 26th, 2011 at 06:04 pm | Link | Leave a comment | Share | Flag
Use Python with Unity 3D – the definitive guide
Python is a great programming language due to a multitude of reasons such as a long list of libraries ready to solve almost any problem you might encounter. For me, however, the biggest reason to prefer coding in Python with Unity over C# is that I simply don’t have to type as much; no type declarations, semicolons or curly brackets, not to mention return types, scopes and so on… 😴
Yet, online I can only find outdated guides or worse yet «why don’t you just learn C#, it’s easy and blah blah» comments. 😫 But I like Python. 🥺Therefore, this post teaches you how to use IronPython with Unity. Just remember that IronPython only supports Python 2.
First you will have to download IronPython dll files and place them into Assets/Plugins directory. The easiest way to do this is by downloading my Unity package.
Import my Unity package to your game project
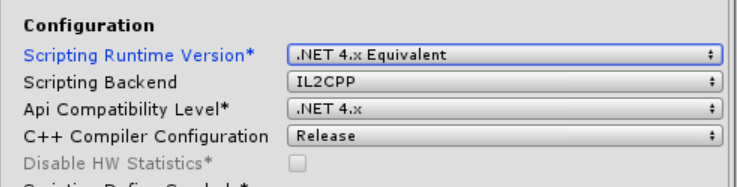
IronPython requires .NET 4.5, and Unity doesn’t like this by default. That’s why you will have to change the .NET version by going to Edit -> Project Settings -> Player. Make sure that the Scripting Runtime Version is .NET 4.x (this requires you to restart Unity) and that API Compatibility level is .NET 4.x
Assume you have a small code snippet greeter.py in Python like this:
class Greeter(): def __init__(self, name): self.name = name def greet(self): return "Hi, " + self.name
You can use it from C# like this
using System.Collections; using System.Collections.Generic; using IronPython.Hosting; using UnityEngine; public class PythonInterfacer : MonoBehaviour < void Start () < var engine = Python.CreateEngine(); ICollectionsearchPaths = engine.GetSearchPaths(); //Path to the folder of greeter.py searchPaths.Add(@"C:\Users\Mika\Documents\MyPythonScripts\"); //Path to the Python standard library searchPaths.Add(@"C:\Users\Mika\Documents\MyUnityGame\Assets\Plugins\Lib\"); engine.SetSearchPaths(searchPaths); dynamic py = engine.ExecuteFile(@"C:\Users\Mika\Documents\MyPythonScripts\greeter.py"); dynamic greeter = py.Greeter("Mika"); Debug.Log(greeter.greet()); > > For a similar example, see the PythonExample prefab in my Unity package.
As you can see, the Python class can be directly used as an object in C#, and better yet, if you provide the path to the Assets\Plugins\Lib folder included in my Unity package, you can use anything in Python standard library! In addition, if you also provide the path to your Python script, you can import anything in that path as usual.
Next steps
If you want to use any external Python libraries (the ones you install with pip), you can just download and extract them to the
Assets\Plugins\Lib folder. This will make them available for IronPython.
Note: Using absolute paths is fine when you are doing development, but if you ever decide to publish your game, you will need to resolve the paths dynamically and distribute the standard library in Assets\Plugins\Lib and your Python scripts with the game executable.
Finally you can have the best of two worlds: Unity’s dead easy world editor and Pythonic simplicity. ☺️
Using the Package with Unity Game Engine
This is a sort of experiment I did while developing this package, which I focused in making a simple working example in Unity and make it work with a build. I executed all necessary functions to check which python interpreter and where the module is being loaded. And they returned that they were loaded from the game build path, which it’s important when you ship your game so you don’t need to ask for the user to install python together with your game.
However I did not try to execute it in a machine that doesn’t have Python, so if you want to use it in production that test must be made.
So in this example we will learn how to:
- Configure a Unity project
- Use Python using Unity
- Learn how to install a package using pip and use inside Unity
- Code C# using python modules and Python.Net
You can’t use yaml if you use Unity because PyYaml raises errors, so you have to use json raws.
Setting a Unity Project
For this we are using Unity 2019.02.0f1 but it would probably work with any Unity that is able to execute .net framework 4.x.
So, create a new Unity project as normal, for learning purposes let’s name the project core_data. Then set the API compatibility to framework 4.x you can read how to in this link: https://docs.microsoft.com/en-us/visualstudio/cross-platform/unity-scripting-upgrade?view=vs-2019#enabling-the-net-4x-scripting-runtime-in-unity which will inform a couple more things about the difference between the versions.
I tested with netstandard 2.0 however it did not work because dynamic fields needs a microsoft dll which is not referenced.
Installing Python.net
The easiest way that I found how to set everything up, is first of all, install python 3.7 64 bits, or 32 depending on the final build you desire and then install virtualenv with this command:
If you fell with a parachute here. The command above installs packages from the Python Library Index (PyPI) and virtualenv let you create a python interpreter that is not linked to the one installed into the system. So, pretty much we will create a virtualenv, cd to the root of your project and run this code:
virtualenv Packages/python_net
Wait for the command to execute. Then activate the virtualenv with:
./Packages/python_net/Scripts/activate
Then simply install Python.Net with:
Lastly create a file inside core_data/Packages/python_net named package.json with this contents:
"name": "com.company.package_name", "version": "0.0.1", "displayName": "Example", "description": "Any Description" > Unity just needs those fields, the contents can be almost anything, but version and name fields needs to follow the pattern above.
Installing PandaCoreData
The Python interpreter needs to load the module, but Unity compacts everything, but it doesn’t compact anything inside the folder Assets/StreamingAssets so create that folder if it doesn’t exist, then cd to that folder. Then execute this command:
pip install --ignore-installed git+https://github.com/Cerberus1746/PandaCoreData.git --install-option="--prefix=absolute_folder"
And replace absolute_folder with the absolute folder to your streaming assets folder. Wait the command to execute and you are done.
Follow this tutorial Getting Started and create the file structure with the command in there but inside Assets/StreamingAssets folder. Probably you would need to use the quickstart command like this:
./Script/panda_core_data_commands -o . -re json
Considering that you are executing that command inside the streaming folder, it will create a mods folder using json raws. Again, yaml won’t work. Then follow Getting Started as normal, of course, you won’t need to install again the package. But delete the main.py file, you won’t be needing it because we use a:
C# Main File
And here’s the final working example, the results will be the same as the Getting Started but this file will need to be inside the Assets folder, outside StreamingAssets folder. For convenience sake, let’s call it main.cs
using UnityEngine; using Python.Runtime; using System.IO; using System.Collections.Generic; namespace PythonTest < public class PythonTest : MonoBehaviour < void Start() < using(Py.GIL()) < // Let's import sys dynamic py_sys = Py.Import("sys"); // We need this so we add the python modules from the // streaming assets. Otherwise the module won't load. string site_pkg = "Lib\\site-packages"; py_sys.path.insert(0, Path.Combine(Application.streamingAssetsPath, site_pkg)); // Now we can import all necesary modules for the example. dynamic py_panda_core_data = Py.Import("panda_core_data"); dynamic py_dataclasses = Py.Import("dataclasses"); dynamic py_builtin = Py.Import("builtins"); // Now we get the mods folder from streaming assets string mods_folder = Path.Combine(Application.streamingAssetsPath, "mods"); // And now we can use the data_core just like we do in python. // List type is automatically converted to python equivalent with Pyton.Net py_panda_core_data.data_core(mods_folder, templates_folder: false, excluded_extensions: new List()); // Now we iterate along all model instances dynamic item_model = py_panda_core_data.data_core.get_model_type("items"); foreach(dynamic instance in item_model) < // And we can iterate along all fields foreach(dynamic field in py_dataclasses.fields(instance)) < // And show the field name and field value Debug.Log($": "); > > > > > > Then attatch this script to the camera or any object that you prefer. Then all you need to do is hit play or build the project if you want.
© Copyright 2019, Leandro (Cerberus1746) Benedet Garcia Revision 52d466af .
Versions latest stable development 0.0.5 0.0.4 0.0.3 Downloads pdf html epub On Read the Docs Project Home Builds Free document hosting provided by Read the Docs.