- How to Easily Add JavaScript in WordPress Pages or Posts (3 Methods)
- What is JavaScript?
- Method 1. Add JavaScript Anywhere on Your WordPress Site Using WPCode (Recommended)
- Method 2. Adding JavaScript Code to WordPress Manually Using Code (Advanced)
- Как добавить JavaScript на WordPress
- Что такое JavaScript
- Как добавить JavaScript на WordPress
- С помощью плагина Shortcoder
- С помощью плагина Insert Headers and Footers
- С помощью изменения файла functions.php
How to Easily Add JavaScript in WordPress Pages or Posts (3 Methods)
Last updated on February 13th, 2023 by Editorial Staff | Reader Disclosure Disclosure: Our content is reader-supported. This means if you click on some of our links, then we may earn a commission. See how WPBeginner is funded, why it matters, and how you can support us.
Do you want to add JavaScript in your WordPress pages or posts?
Sometimes you may need to add JavaScript code to your entire website or into specific pages and posts. By default, WordPress does not let you add code directly in your posts.
In this article, we’ll show you how to add JavaScript in WordPress pages or posts easily.

What is JavaScript?
JavaScript is a programming language that runs on the user’s browser, not on your server. This client-side programming allows developers to do a lot of cool things without slowing down your website.
If you want to embed a video player, add calculators, or some other third-party service, then you will be often asked to copy and paste a JavaScript code snippet into your WordPress website.
A typical JavaScript code snippet may look like this:
But, if you add a javascript code snippet to a WordPress post or page, then it will be deleted by WordPress when you try to save it.
That being said, let’s see how you can easily add JavaScript to WordPress pages or posts without breaking your website. You can use the quick links below to jump straight to the method you want to use.
Method 1. Add JavaScript Anywhere on Your WordPress Site Using WPCode (Recommended)
Sometimes a plugin or tool will need you to copy and paste a JavaScript code snippet into your website to work correctly.
Usually, these scripts will go in the header or footer section of your WordPress blog, so the code is loaded on every page view.
For example, when you install Google Analytics, the code needs to run on every page of your website, so it can track your website visitors.
You can manually add the code to your header.php or footer.php files, but these changes will be overwritten when you update or change your theme.
That’s why we recommend using WPCode to add JavaScript anywhere on your entire WordPress site.
WPCode is the most powerful code snippet plugin available for WordPress. It lets you easily add custom code to any area of your site, and best of all, it’s free.
First, you need to install and activate the free WPCode plugin. For more details, see our step-by-step guide on how to install a WordPress plugin.
Once activated, you need to go to Code Snippets » Headers & Footer.
Here you will see three separate fields labeled ‘Header,’ ‘Body,’ and ‘Footer.’
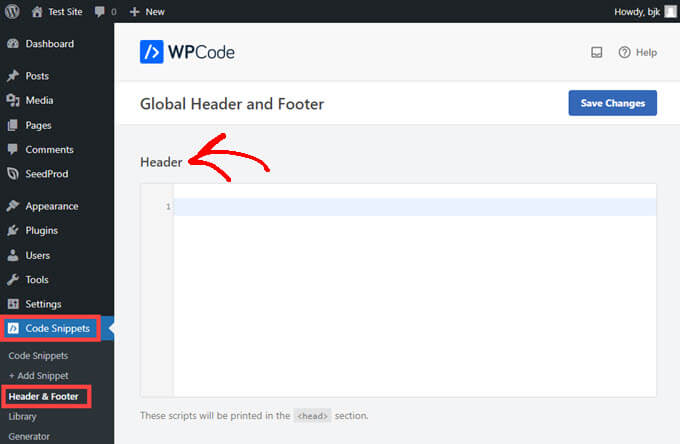
You can now add your JavaScript code to one of these boxes, and then simply click on the ‘Save’ button. WPCode will now automatically load the code you added to the every page of your website.
You can also add code snippets to any other place on your site, such as inside posts or pages.
To do this, simply go to Code Snippets » + Add Snippet and then click on ‘Create Your Own.’
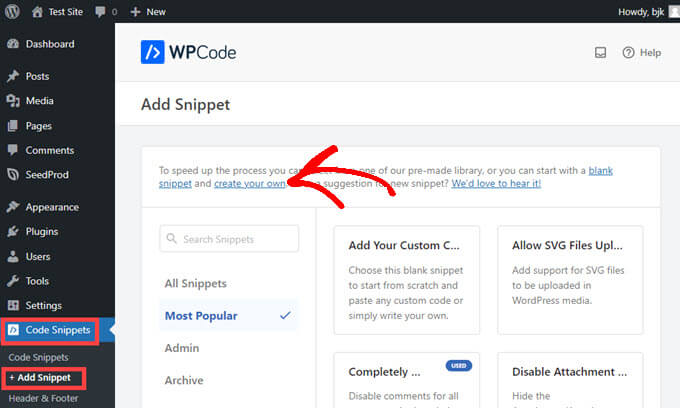
You will now see a ‘Create Custom Snippet’ page where you can add a title for your code and paste it into the ‘Code Preview’ box.
After that, select ‘JavaScript Snippet’ from the ‘Code Type’ dropdown menu.

Then, just scroll until you find the ‘Insertion’ section.
All you have to do now is select a ‘Location’ for the code from the dropdown menu. Find ‘Page, Post, Custom Post Type’ and choose where in the page or post you want the code to appear.
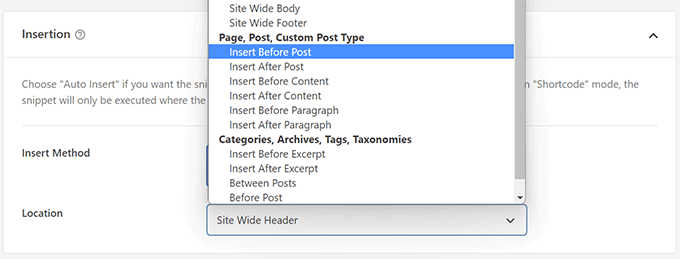
If you choose to have WPCode insert the snippet before or after a paragraph, you will be able to choose which specific paragraph in the post it will appear before or after.
For example, if you put 1 in the ‘Insert Number’ field, the code snippet will appear before or after the first paragraph. Use 2 for the second paragraph, and so on.
After that, you just have to click the toggle near the top of the screen to switch to ‘Active,’ and then click ‘Save Snippet’ button beside it.

That’s all it takes to make your code snippet live on site!
Method 2. Adding JavaScript Code to WordPress Manually Using Code (Advanced)
With this method, you need to add code to your WordPress files. If you haven’t done this before, then check out our guide on how to copy and paste code in WordPress.
First, we’ll show you how to add code to your WordPress site’s header. You need to copy the following code and add it to your functions.php, in a site-specific plugin, or by using a code snippets plugin.
function wpb_hook_javascript() < ?> add_action('wp_head', 'wpb_hook_javascript'); Adding JavaScript to a Specific WordPress Post Using Code
If you only want to add JavaScript to a single WordPress post, then you will need to add conditional logic to the code.
Take a look at the following code snippet:
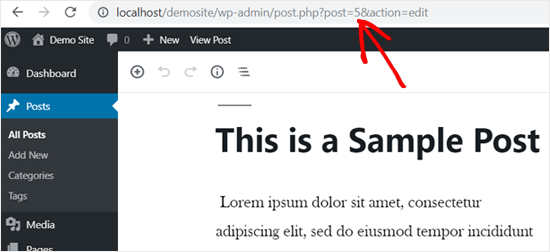
function wpb_hook_javascript() < if (is_single ('5')) < ?> > add_action('wp_head', 'wpb_hook_javascript'); The code above will only run the JavaScript if the post ID matches ’5’. Make sure you replace the ’5’ with your own post ID.
To find the post ID open up the post where you want the JavaScript to run. Then, in the URL of the page, you’ll find the post ID.
Adding JavaScript to a Specific WordPress Page Using Code
If you only want to add JavaScript to a single WordPress page, then you will need to add conditional logic to the code, just like above.
Take a look at the following example:
function wpb_hook_javascript() < if (is_page ('10')) < ?> > add_action('wp_head', 'wpb_hook_javascript'); The code above will only run the JavaScript if the page ID is ’10’. Make sure you replace the ’10’ with your own page ID.
You can find the page ID using the same method as above. Simply open the page you want the JavaScript to run and note the page ID in the URL.
Adding JavaScript to a Specific WordPress Post or Page Using Code in the Footer
If you want the JavaScript to run in your site footer instead of the header, then you can add the following code snippet to your website.
function wpb_hook_javascript_footer() < ?> add_action('wp_footer', 'wpb_hook_javascript_footer'); This code snippet hooks into wp_footer instead of wp_head . You can also add conditional tags to add javaScript to specific posts and pages like the examples above.
Note: These methods are for beginners and website owners. If you are learning WordPress theme or plugin development, then you need to properly enqueue JavaScript and stylesheets to your projects.
We hope this article helped you learn how to easily add JavaScript to WordPress pages or posts. You may also want to see our guide on how to choose the best blogging platform and our expert picks of the best AI chatbot software for your website.
If you liked this article, then please subscribe to our YouTube Channel for WordPress video tutorials. You can also find us on Twitter and Facebook.
Как добавить JavaScript на WordPress
В статье мы расскажем, как подключить скрипт JS в тему WordPress.
Что такое JavaScript
JavaScript — это скриптовый язык программирования. Его скрипты обрабатываются не на сервере, а прямо в браузере. Это позволяет добавлять новые функции без потери скорости сайта.
Скрипт JS встроен внутрь тега — он позволяет отделить написанный код JavaScript от PHP:
Если вы хотите добавить скрипт JS, просто разместите его на нужной странице в коде сайта. Однако если вы работаете с WordPress, разместить JavaScript на странице таким способом не получится — он удалится при сохранении пользовательского файла. О том, как обойти это ограничение, расскажем ниже.
Как добавить JavaScript на WordPress
Если вы хотите добавить JS в WordPress, выберите один из трех способов:
- с помощью плагина Shortcoder,
- с помощью плагина Insert Headers and Footers,
- с помощью изменения файла functions.php.
Выберите инструкцию, чтобы разрешить подключение скрипта WordPress.
С помощью плагина Shortcoder
Shortcoder — это плагин, с помощью которого можно создать блок кода элемента. После публикации создается специальный шаблон, который можно добавить на нужную вам страницу.
Чтобы установить Shortcoder:

Откройте раздел Плагины — Добавить новый:
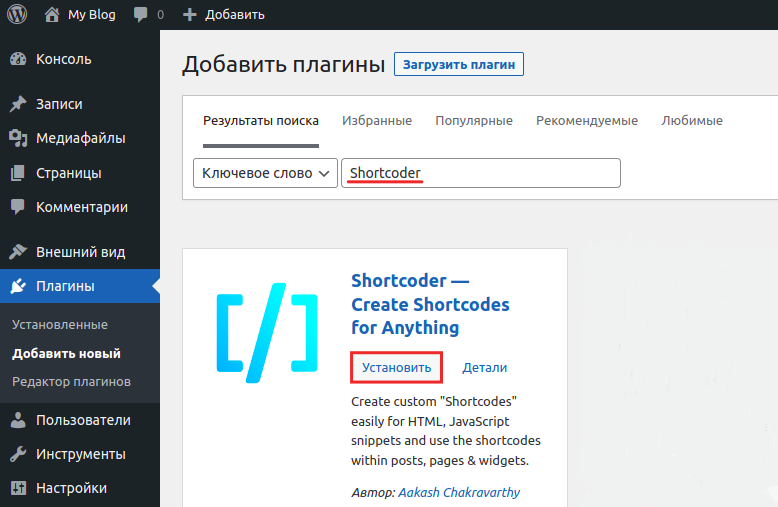
В поисковой строке введите название плагина. Когда поиск отобразит результат, нажмите Установить:
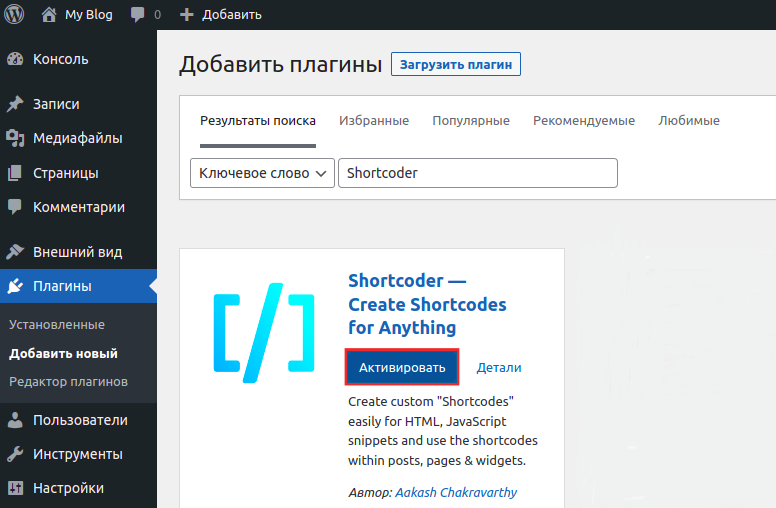
Кликните Активировать:

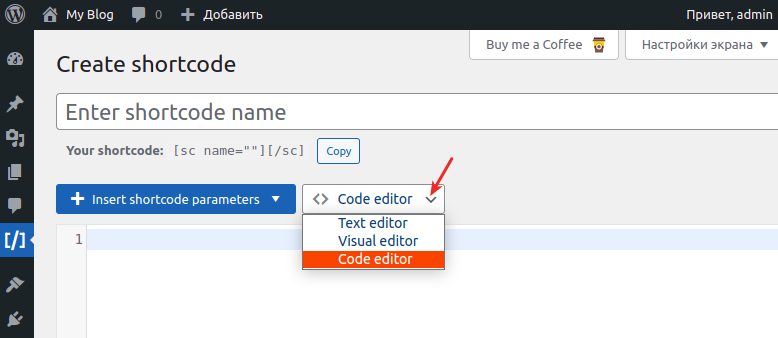
В разделе «Shortcoder» нажмите Create shortcode:
- Text editor — для добавления простого текста,
- Visual editor — для верстки небольшого элемента с текстом и изображением,
- Code editor — для добавления скрипта. Рекомендуем использовать его.
Введите название и вставьте код. Вы можете сохранить этот фрагмент в качестве черновика, но до публикации добавить его на страницу не получится. Для создания черновика кликните Сохранить: 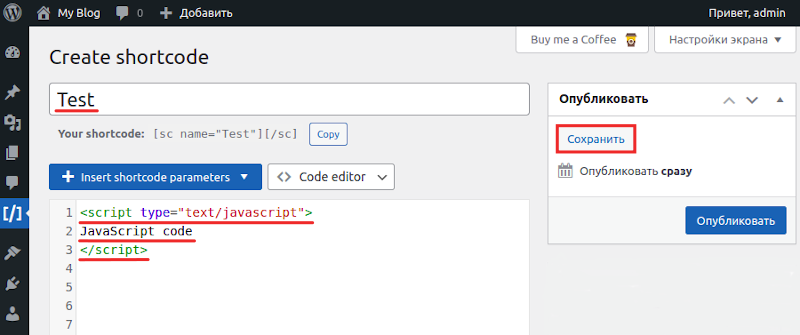 Если скрипты для сайта WordPress добавлены и вы хотите сохранить готовый шаблон, нажмите Опубликовать:
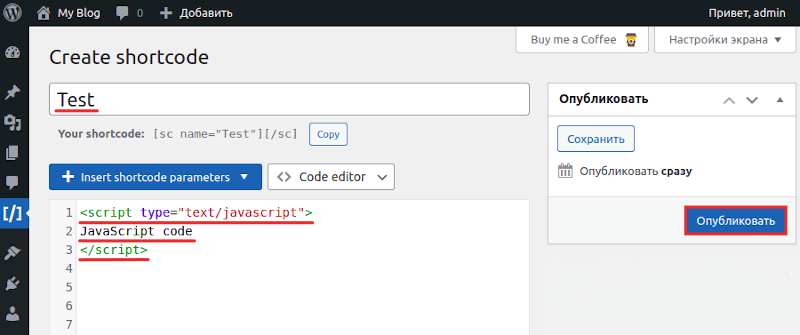
Готовый шаблон вы сможете добавить на любую страницу через админку.
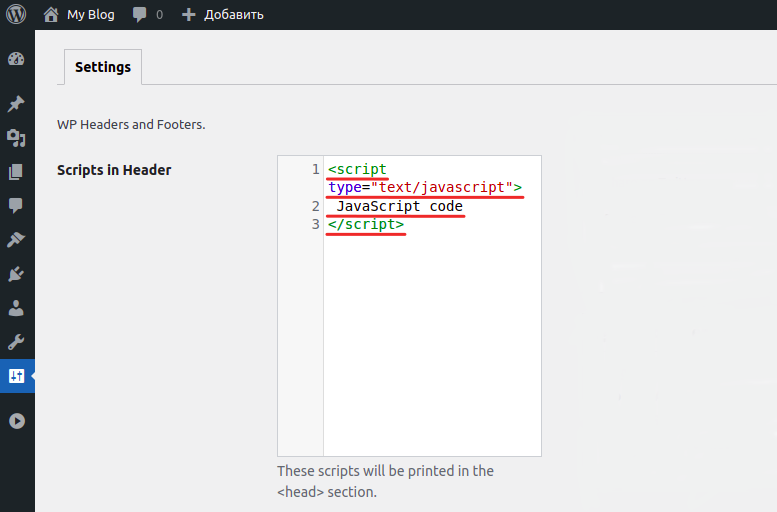
С помощью плагина Insert Headers and Footers
Insert Headers and Footers — это плагин, с помощью которого можно создать шаблон кода. В этом шаблоне можно обозначить, в какой части страницы должен отрабатываться скрипт.
Чтобы установить Insert Headers and Footers:
Откройте раздел Плагины — Добавить новый:
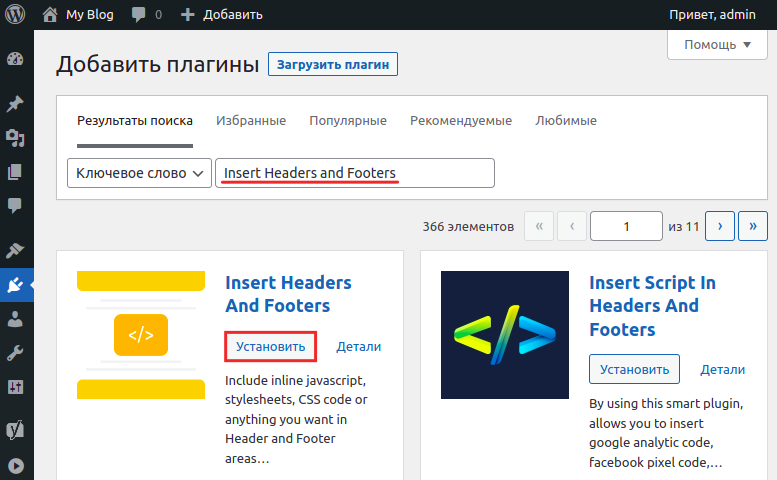
В поисковой строке укажите имя плагина. Когда поиск отобразит результат, кликните Установить:

Нажмите Активировать:
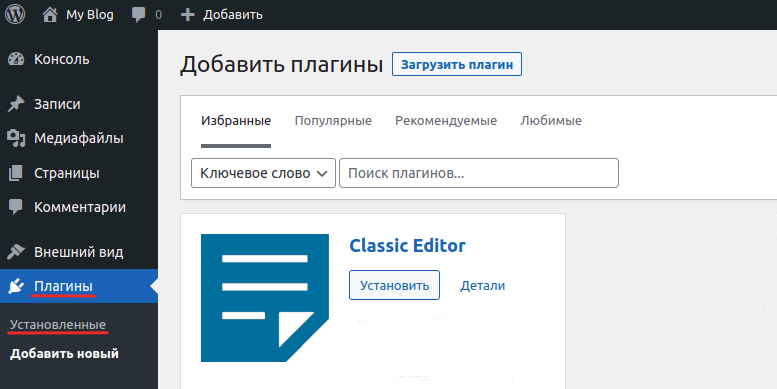
Перейдите в раздел Плагины — Установленные:
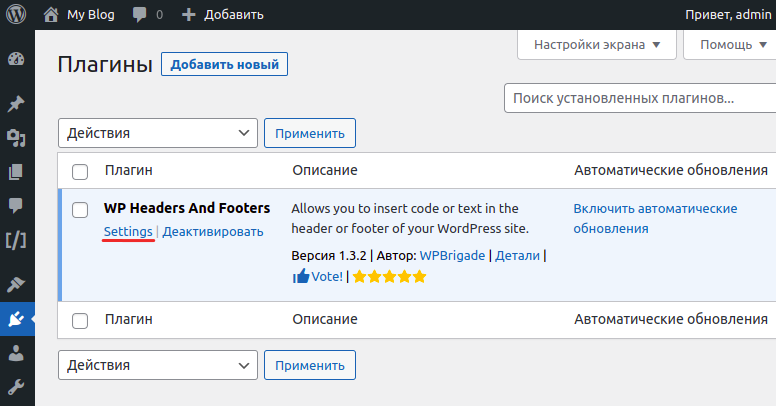
В списке найдите WP Headers and Footers и кликните Settings:
- Header — шапку сайта,
- Body — тело сайта,
- Footer — подвал сайта. Добавьте код в нужную часть страницы:
WordPress: как подключить скрипт
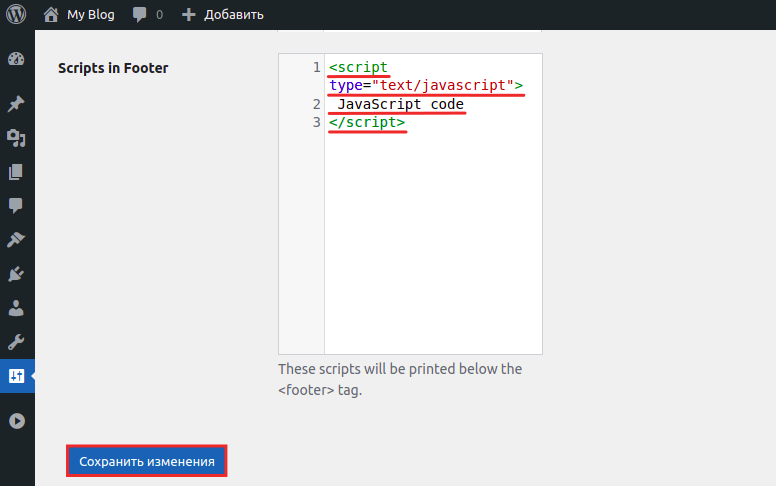
Кликните Сохранить изменения:
С помощью изменения файла functions.php
В корневой директории сайта перейдите в папку wp-includes. Затем выберите инструкцию для вашей панели управления.