- How To Create User Interface (UI) Website Using HTML
- How To Make User Interface (UI) Website Using HTML, CSS and jQuery.
- User Interface
- Build your entire UI with HTML
- Defining an HTML UI
- www/index.html
- Server function
- Building the Shiny app object
- Learn more
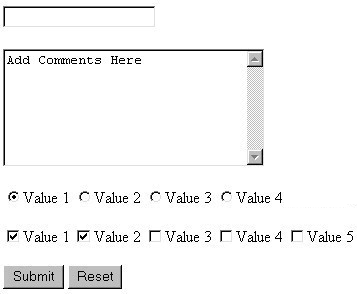
- HTML User Interface Controls
- Interactive HTML user interfaces
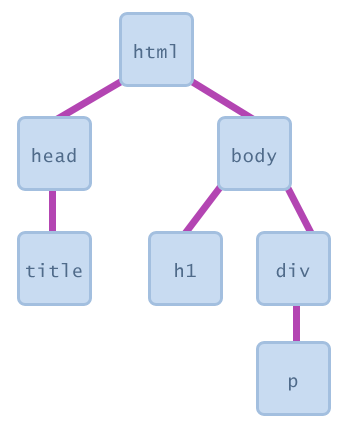
- Document Object Model (DOM)
- Global DOM objects
- Recall: event handlers
- onclick="myFunction();"
- Click me!
- document object and getElementById
- onclick="makeRed();"
- Sell
- DOM style property
- The DOM innerHTML property
- Another example
- Text boxes: (DOM)
- Practice problem: Shuffle
- Drop-down list: (DOM), (DOM)
- Using for lists
- Radio buttons (DOM)
- Checkboxes (DOM)
- Practice problem: Colored text
How To Create User Interface (UI) Website Using HTML

Learn how to make User Interface(UI) Website Design Using HTML, CSS, and JavaScript. Easy way to create a Responsive UI website Using HTML, CSS, and JS. You will make this UI website by following my video tutorial or by following the steps, Which I have given below.
How To Make User Interface (UI) Website Using HTML, CSS and jQuery.
- 0.0 — 1.30 min : Intro
- 1.30 — 35.0 min: Building User Interface (UI) Website Using HTML, CSS, and jQuery.
In this tutorial, I will teach you how to make a User Interface(UI) website design using HTML, CSS, and JavaScript(Js). The site is fully responsive and supports all browsers. In the tutorial first, I will show you the design which I will create in this tutorial. After, I will start to make this design. I will make the structure of the site using HTML. I Design the site using CSS. I use jQuery To make blur the background when the menu is visible. I hope you like this tutorial. If you have any questions or any problems, contact me.
Follow These Steps:-
1) Open any text editor.
2) Create HTML, CSS, And Javascript files. I recommended you to create separate folders for CSS File And JS File.
3) Link the CSS and JS File With HTML File.
4) Copy the HTML code, which I gave below, and paste in the HTML which you create.
User Interface
Minimal And Beautiful User Interface For Your Upcoming Projects.
Build your entire UI with HTML
Many Shiny apps use a UI object file to build their user interfaces. While this is a fast and convenient way to build user interfaces, some applications will inevitably require more flexiblity. For this type of application, you can define your user interface directly in HTML.
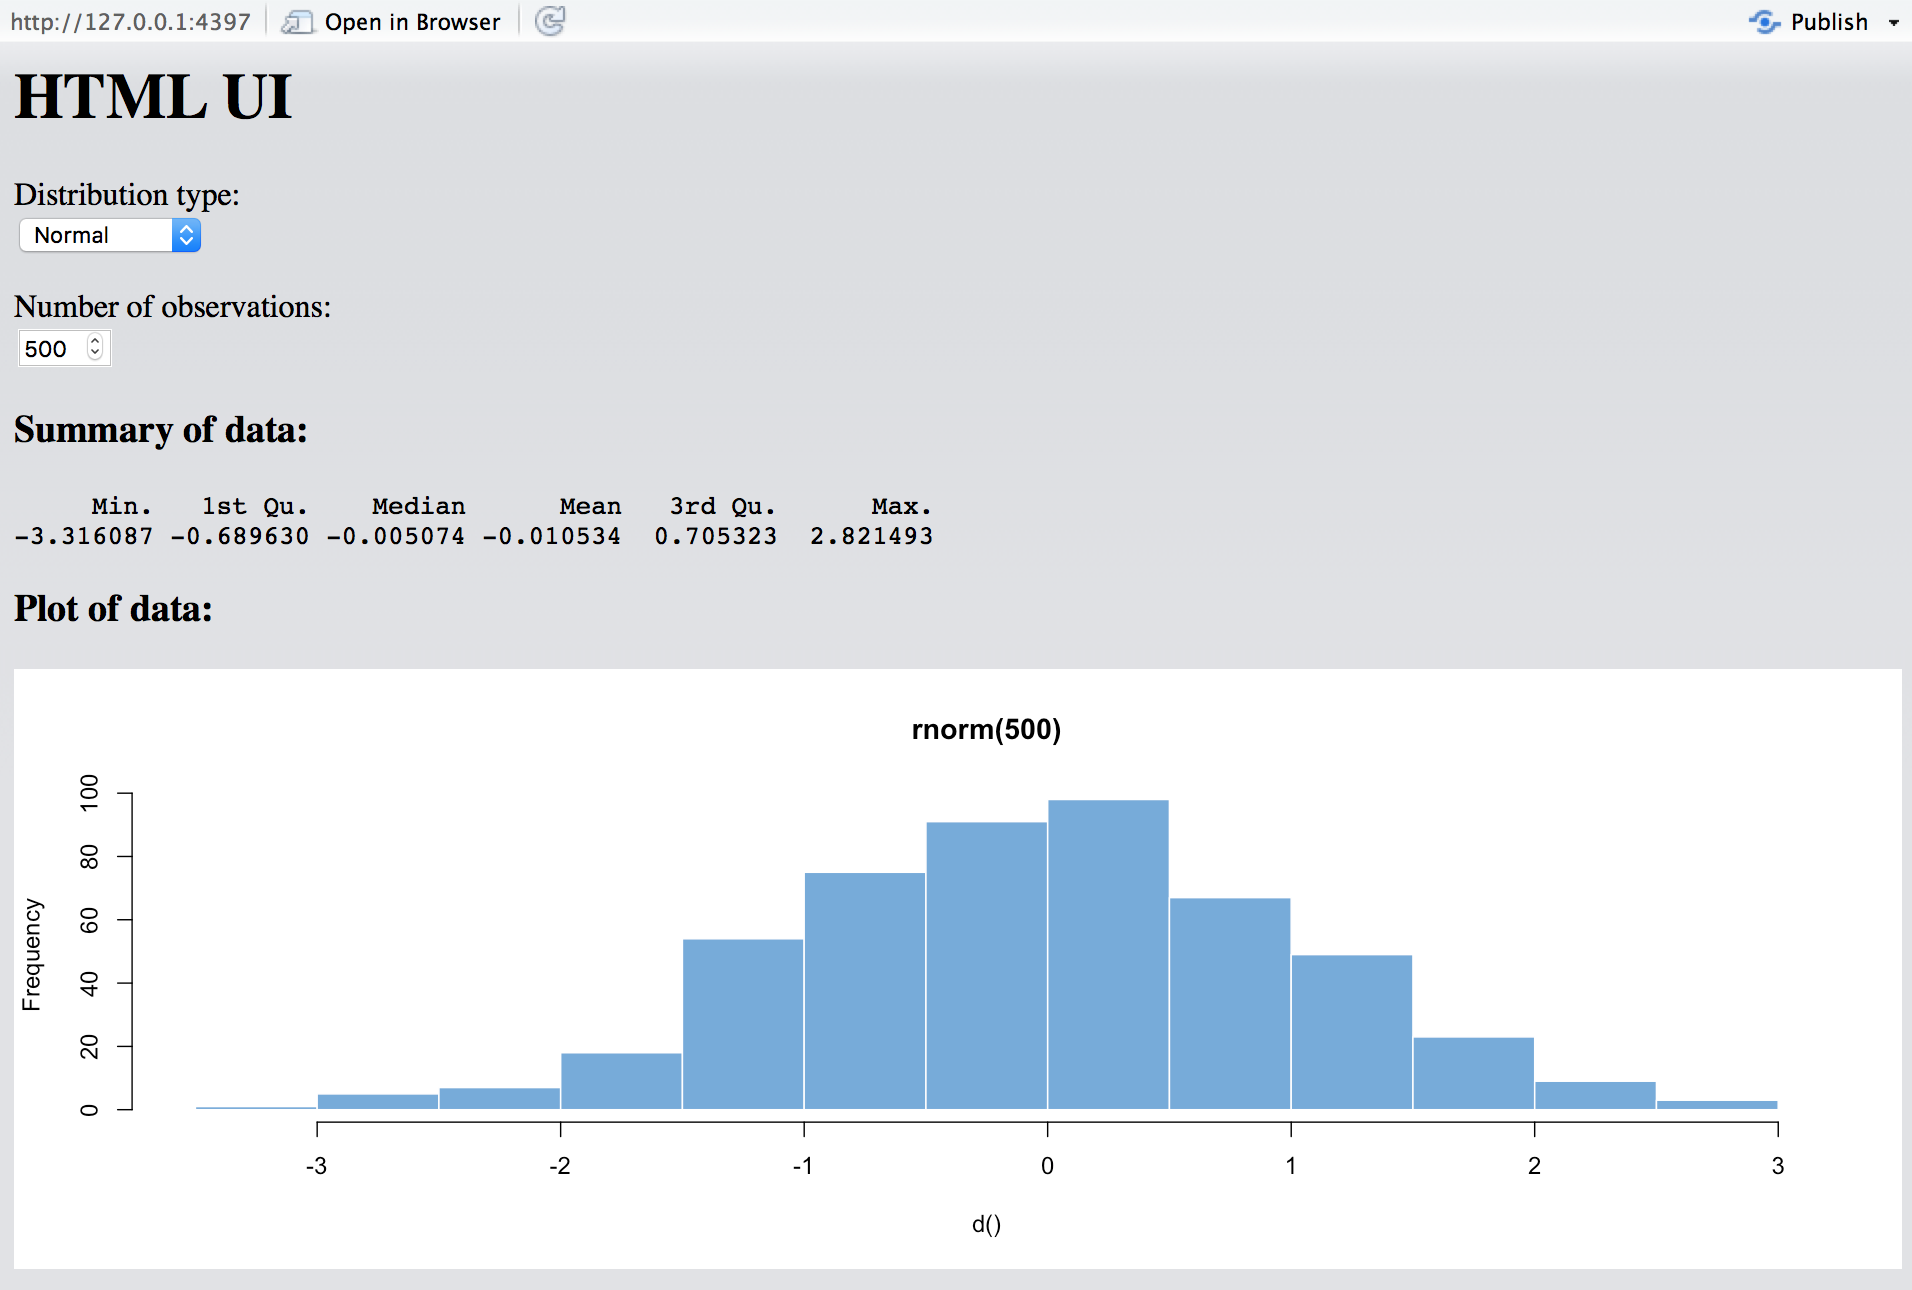
The HTML UI application demonstrates defining a Shiny user interface using a standard HTML page rather than a UI object. To run the example type:
library(shiny) runExample("08_html") Defining an HTML UI
Many Shiny apps use a UI object file to build their user interfaces. While this is a fast and convenient way to build user interfaces, some applications will inevitably require more flexiblity. For this type of application, you can define your user interface directly in HTML. For such apps, the directory structure looks like this:
application-dir> |-- app.R |-- www |-- index.html In this example we re-write the front-end of the Tabsets application ( runExample(«06_tabsets») ) using HTML directly. Here is the source code for the new user interface definition:
www/index.html
html> src="shared/jquery.js" type="text/javascript"> src="shared/shiny.js" type="text/javascript"> rel="stylesheet" type="text/css" href="shared/shiny.css"/> HTML UI Distribution type: /> name="dist"> value="norm">Normal value="unif">Uniform value="lnorm">Log-normal value="exp">Exponential Number of observations: /> type="number" name="n" value="500" min="1" max="1000" /> Summary of data: id="summary" class="shiny-text-output"> Plot of data: id=«plot» class=«shiny-plot-output» style=«width: 100%; height: 300px»>