- Installing packages using pip and virtual environments
- Installing pip
- Installing virtualenv
- Creating a virtual environment
- Activating a virtual environment
- How to Upgrade Python Packages with Pip
- How to use pip to upgrade Python packages
- 1. List outdated packages
- 2. Upgrade a specific package
- 3. Upgrade package to specific version
- 4. Upgrade every package using Pip
- Wrapping Up
Installing packages using pip and virtual environments
This guide discusses how to install packages using pip and a virtual environment manager: either venv for Python 3 or virtualenv for Python 2. These are the lowest-level tools for managing Python packages and are recommended if higher-level tools do not suit your needs.
This doc uses the term package to refer to a Distribution Package which is different from an Import Package that which is used to import modules in your Python source code.
Installing pip
pip is the reference Python package manager. It’s used to install and update packages. You’ll need to make sure you have the latest version of pip installed.
Debian and most other distributions include a python-pip package; if you want to use the Linux distribution-provided versions of pip, see Installing pip/setuptools/wheel with Linux Package Managers .
You can also install pip yourself to ensure you have the latest version. It’s recommended to use the system pip to bootstrap a user installation of pip:
python3 -m pip install --user --upgrade pip python3 -m pip --version
Afterwards, you should have the latest version of pip installed in your user site:
pip 21.1.3 from $HOME/.local/lib/python3.9/site-packages (python 3.9)
The Python installers for Windows include pip. You can make sure that pip is up-to-date by running:
py -m pip install --upgrade pip py -m pip --version
Afterwards, you should have the latest version of pip:
pip 21.1.3 from c:\python39\lib\site-packages (Python 3.9.4)
Installing virtualenv
If you are using Python 3.3 or newer, the venv module is the preferred way to create and manage virtual environments. venv is included in the Python standard library and requires no additional installation. If you are using venv, you may skip this section.
virtualenv is used to manage Python packages for different projects. Using virtualenv allows you to avoid installing Python packages globally which could break system tools or other projects. You can install virtualenv using pip.
python3 -m pip install --user virtualenv
py -m pip install --user virtualenv
Creating a virtual environment
venv (for Python 3) and virtualenv (for Python 2) allow you to manage separate package installations for different projects. They essentially allow you to create a “virtual” isolated Python installation and install packages into that virtual installation. When you switch projects, you can simply create a new virtual environment and not have to worry about breaking the packages installed in the other environments. It is always recommended to use a virtual environment while developing Python applications.
To create a virtual environment, go to your project’s directory and run venv. If you are using Python 2, replace venv with virtualenv in the below commands.
The second argument is the location to create the virtual environment. Generally, you can just create this in your project and call it env .
venv will create a virtual Python installation in the env folder.
You should exclude your virtual environment directory from your version control system using .gitignore or similar.
Activating a virtual environment
Before you can start installing or using packages in your virtual environment you’ll need to activate it. Activating a virtual environment will put the virtual environment-specific python and pip executables into your shell’s PATH .
You can confirm you’re in the virtual environment by checking the location of your Python interpreter:
How to Upgrade Python Packages with Pip
When was the last that you updated Python packages installed via Pip? Most of the users tend to forget that those packages also need to be updated, as just updating the system repository is not going to work here.
So let’s take a moment and see how to update old Python packages with Pip.
How to use pip to upgrade Python packages
Pip (Pip Installs Packages) is a command line utility to manage python packages. You can think of this as how we use apt to manage packages in Ubuntu and Debian.
So let’s dive deep into how you can use this fab utility to manage everything related to Python packages.
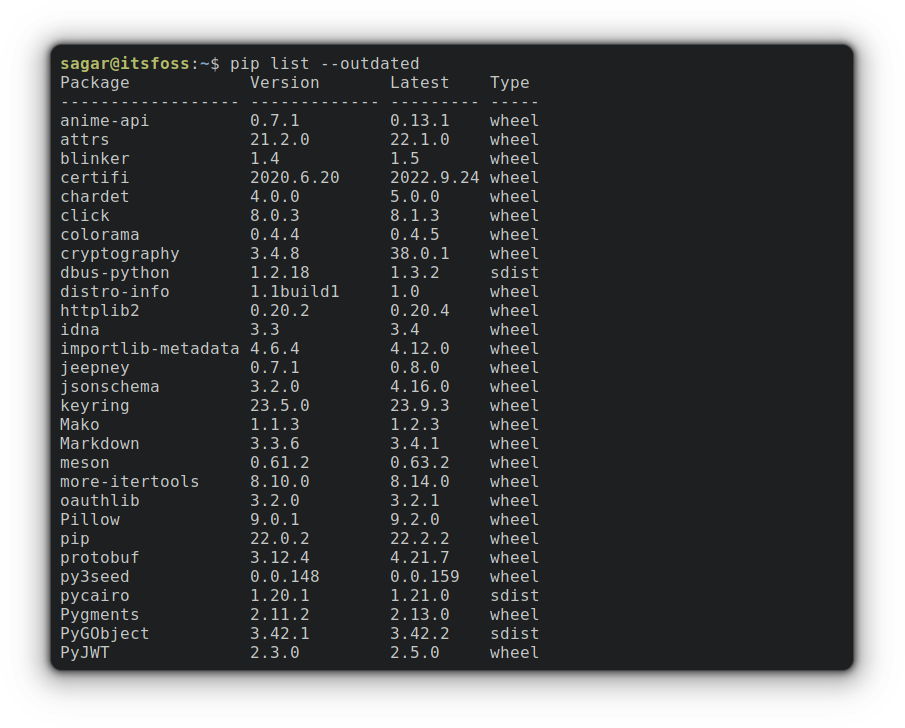
1. List outdated packages
Listing the outdated packages is the best idea to plan how you want to update packages as not many want to update their entire library of packages at once and wants to be selective.
To list outdated packages of Python, you just have to pair pip command with list option and —outdated flag as shown:
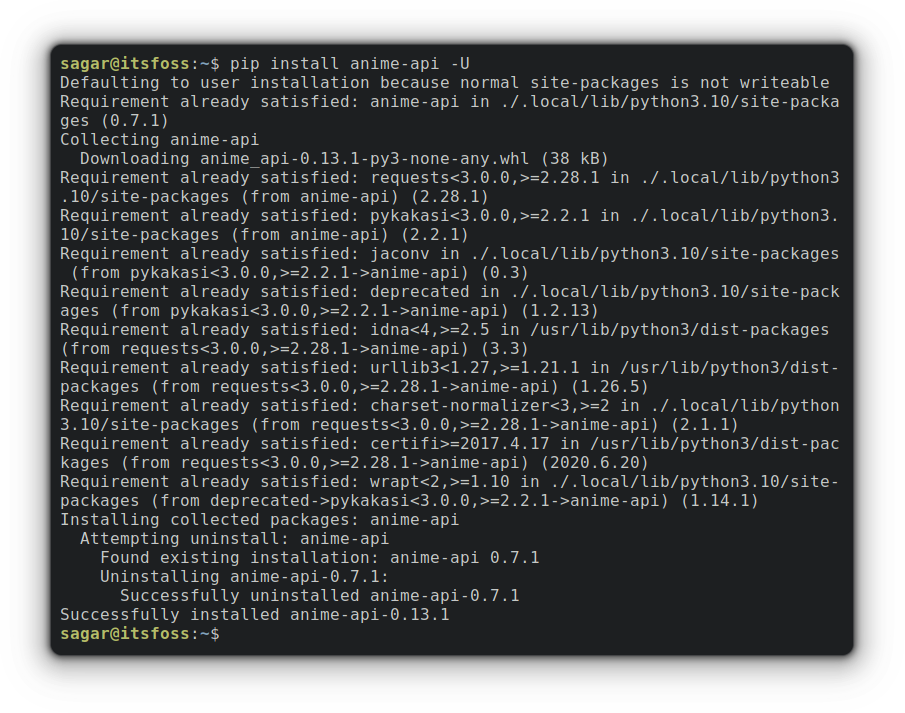
2. Upgrade a specific package
Once you get the list of the packages that need to be updated, you can be selective as I mentioned earlier, and to update a specific package, you’ll need to follow the given command syntax:
pip install package_name -UFor example, I want to upgrade the package named anime-api to the most recent version, so I’ll be using the given command:
3. Upgrade package to specific version
It is not necessary to use only the most recent version of the software (cough Debian cough) and if you are in need of using packages to a specific version that may or may not be the most recent software, can be done using the given command syntax:
So I want to update the package named xdg to version 5.1 which is one point release behind the most recent build so my command would be:
pip install --upgrade xdg==5.1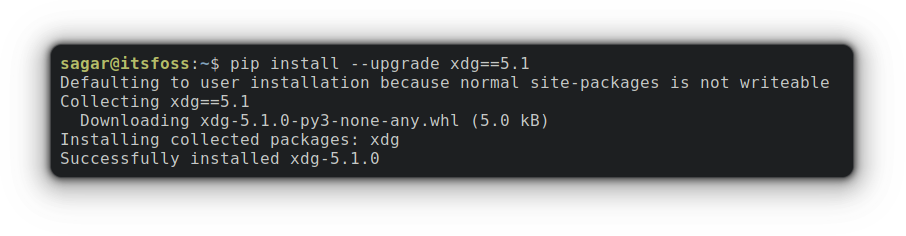
4. Upgrade every package using Pip
NOTE: I do not recommend upgrading every package at once as most of the time, the dependencies are too complex to be handled.
To upgrade every python package, you’d need to follow the given command:
pip3 list --outdated --format=freeze | grep -v '^\-e' | cut -d = -f 1 | xargs -n1 pip3 install -U 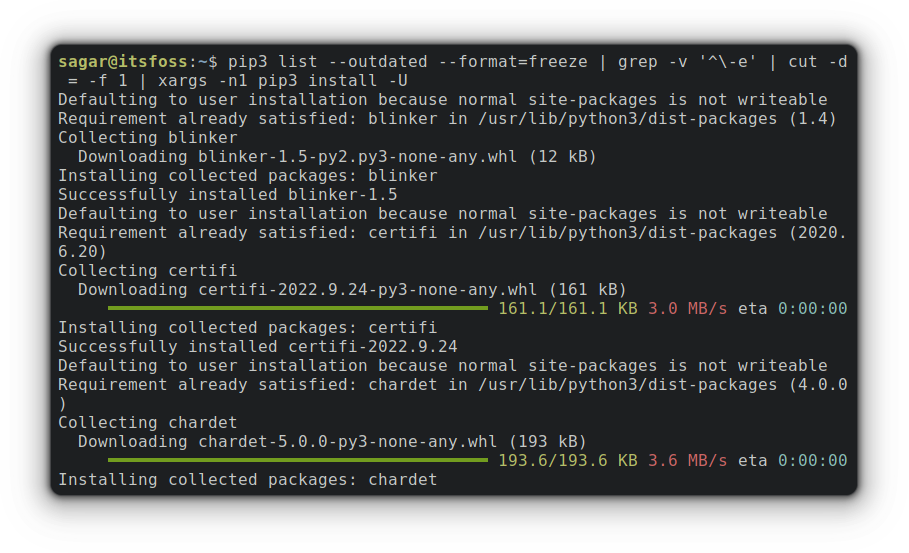
The above command utilizes xargs. First, it will grab the packages that are needed to be updated and then perform pip3 install -U command over each package.
And I used pip3 here instead of pip. In Ubuntu 22.04 and later, both pip and pip3 commands are available.
Wrapping Up
Upgrading everything at once has never been a good idea in the case of pip. And I found myself in a state of broken dependencies so make sure you know what you will have.
And if you have any queries, feel free to ask in the comments.