- Update PHP Version to PHP 8 In XAMPP On Windows
- Step 1 — Open XAMPP Control Panel
- Step 2 — Open Apache Config Panel
- Step 3 — Open Config File
- Step 4 — Update PHP Installation Path
- Step 5 — Save Configuration and Start Apache
- Step 6 — Verify PHP
- Summary
- Upgrade PHP on Windows – Do it with ease
- How to upgrade PHP on windows
- Upgrade PHP on Windows manually
- Conclusion
- PREVENT YOUR SERVER FROM CRASHING!
- How to update PHP version
- Update PHP using Homebrew (Mac)
- Update PHP for Linux Ubuntu
- Update PHP for Windows
- Update PHP version in cPanel
- Take your skills to the next level ⚡️
- About
- Search
- Tags
Update PHP Version to PHP 8 In XAMPP On Windows
It provides all the steps required to update and upgrade the PHP version to PHP 8 in XAMPP on Windows 10.
XAMPP is a complete package to install the Apache Web Server, MySQL, PHP, Perl, FTP Server, and phpMyAdmin for Linux, Solaris, Windows, and Mac OS X. It also provides an interface to admin Apache Web Server, MySQL, and PHP. Though XAMPP is being released frequently, it might be required to use the most recent version of PHP till XAMPP include it in its distribution. This tutorial provides all the steps required to update or upgrade the PHP version to PHP 8 in XAMPP.
You can also follow the tutorials How To Install XAMPP On Windows and How To Install PHP 8 On Windows to install the most recent version of XAMPP and PHP on Windows.
Step 1 — Open XAMPP Control Panel
Open the XAMPP Control Panel as shown in Fig 1.
Step 2 — Open Apache Config Panel
Click the Config Button next to apache. It will show the configuration options as shown in Fig 2.
Step 3 — Open Config File
Choose the option Apache(httpd-xampp.conf) as highlighted in Fig 2. It will open the configuration file httpd-xampp.conf as shown in Fig 3.
Step 4 — Update PHP Installation Path
I have highlighted some of the PHP configurations in Fig 3. I have installed the most recent version of PHP i.e. PHP 7.4.0 while writing this tutorial by following How To Install PHP 7 On Windows. Also, I have updated the PHP installation path as highlighted in Fig 4.
Step 5 — Save Configuration and Start Apache
Now save the changes and start the Apache Web Server. It will show the Apache status as shown in Fig 5.
Step 6 — Verify PHP
In this step, we will verify the PHP version used by XAMPP. Open the Browser and type the URL http://localhost. It will show the XAMPP Dashboard. Now click the PHPInfo Link to open the PHP info page as shown in Fig 6.
It reflects the most recent version of PHP i.e. PHP 8.0.3.
Summary
In this tutorial, we have discussed using the multiple versions of PHP using XAMPP by configuring the apache configuration file. I have provided all the steps required to upgrade the PHP distributed by XAMPP to the most recent version of PHP i.e. PHP 8.0.3.
Upgrade PHP on Windows – Do it with ease
Trying to upgrade PHP on windows? We can help you with it.
Here at Bobcares, we have seen several such Windows related queries as part of our Server Management Services for web hosts and online service providers.
Today we’ll see how to upgrade PHP on Windows.
How to upgrade PHP on windows
Now let’s take a look at how to upgrade the PHP in Windows.
1. First, make sure that Web Platform Installer is present in IIS. For that, open the Internet Information Systems and click on the server name. If Web Platform Installer is not present then click on the “Get New Web Platform Components”.
2. Now click on the “Install this extension” option on the web browser window that is opened. Then accept the license agreement and follow the prompts to install that Web Platform Installer.
3. Now re-open the IIS and click on the Server Name then Double-Click on the Web Platform Installer.
4. At the top-right of the Web Platform Installer, you can find a Search Window where you need to type “PHP”.
5. Then select the PHP version that you wish to install and click “Add” and “Install”. Also, ensure that you select the 64-bit or 32-bit, depending on the server environment.
6. Finally, now you have successfully upgraded the PHP installation. Then open the command prompt and enter the command iisreset to apply the new settings or you can simply reboot the server to apply the changes.
Selecting and Upgrading PHP on a Plesk server is as simple as selecting the version of your choice from a drop-down menu.
Upgrade PHP on Windows manually
1. First, open the Control Panel >> click on Programs and Features >> Turn Windows features on or off. Under the Internet Information Services, World Wide Web Services, Application Development Features, make sure that option CGI is checked. This will enable both the CGI and FastCGI services, which are recommended for PHP applications.
2. For Windows, download PHP from the below link.
http://windows.php.net/download/We are using PHP as FastCGI. So we shall use the 64-bit Non-Thread Safe (NTS) version (i.e., php-7.1.1-nts-Win32-VC14-x64.zip).
3. Extract the file php-7.1.1-nts-Win32-VC14-x64.zip to its own folder.
4. Copy current PHP7 installation from v7.0 and rename the copy to v7.1.
5. Then copy all files from the PHP7 zip folder to the new renamed v7.1 folder.
6. Now edit the php.ini (C:\Program Files\PHP\v7.1\php.ini) to reflect the new version (7.1) under [WebPIChanges]:
error_log=C:\WINDOWS\temp\PHP71x64_errors.log extension_dir=”C:\Program Files\PHP\v7.1\ext\” ;extension=php_mysql.dll extension=php_mysqli.dll [PHP_WINCACHE] extension=php_wincache.dllMySQL extension was deprecated on PHP version 5.5 and removed on version 7. If it’s not excluded, you’ll see the following error:
PHP Warning: PHP Startup: Unable to load dynamic library ‘C:\Program Files\PHP\v7.1\ext\php_mysql.dll’ – The specified module could not be found.
7. Now open the IIS Manager and click on FastCGI Settings.
8. Then double-click on the PHP 7.0 settings and copy all the property values including the Environment Variables (PHP_FCGI_MAX_REQUESTS, PHPRC) and Advanced Settings. We are now going to reuse all the values from the existing installation instead of starting from scratch.
Once done, click the Cancel button.
9. Now from the FastCGI Settings window, click on Add Application… on the Actions pane on the right.
10. Then type in C:\Program Files\PHP\v7.1\php-cgi.exe on the Full Path box.
11. Now enter all the values that you have copied from the Steps 8, except for the PHPRC where you want to update the value to 7.1 (i.e., C:\Program Files\PHP\v7.1 ).
After completion, click on OK.
12. Then go back to IIS Manager and click on Handler Mappings.
13. Search for PHP_via_FastCGI and double-click on it.
14. Now locate the new php-cgi.exe and change the value on the Executable (optional): accordingly. Click Yes when there is a dialog box asking you to create a FastCGI application for this executable.
Finally, click OK and exit the IIS Manager.
[Need any further assistance with Windows queries? – We are here to help you.]
Conclusion
In today’s writeup, we saw how our Support Engineers upgrade PHP on Windows.
PREVENT YOUR SERVER FROM CRASHING!
Never again lose customers to poor server speed! Let us help you.
Our server experts will monitor & maintain your server 24/7 so that it remains lightning fast and secure.
How to update PHP version

Posted on Jul 25, 2022
Since the release of version 7, PHP has seen steady improvements with a new version released each year.
A PHP version usually gets active support for 2 years and security fixes for one year, which means a version is supported for three years since its initial release.
You can view the versions supported by PHP maintainer in php.net.
This tutorial shows how you can update the PHP version installed on your computer.
Update PHP using Homebrew (Mac)
For Mac computers, you can update the PHP version installed on your computer using Homebrew.
Run the brew upgrade command from the terminal as shown below:
Once the upgrade is completed, check your PHP version using php -v command:
You should see the latest PHP version shown in the terminal.
Update PHP for Linux Ubuntu
If you’re using an Ubuntu computer, you can update the installed PHP by running the following commands:
Once the installation is finished, you can check the installed PHP version using php -v command:
If that doesn’t work, then you need to add the PPA repository created by Ondřej Surý to install the latest PHP version.
To install PPA easily, you need to get software-properties-common installed on your computer:
At the time of this writing, php8.1 is the latest PHP version. You should update the version to match the latest available PHP version when you follow this guide.
Once the installation is finished, check your PHP version again. You should have the latest PHP version printed on the terminal.
Update PHP for Windows
When you use a Windows computer, you can download a PHP distribution from windows.php.net and install it manually on your computer.
Download and extract the zip file from the website, then replace your existing PHP installation with the one you just downloaded.
Don’t change the folder name because Windows won’t be able to find the PHP folder if you do.
Run php -v from the command line to check your PHP version.
If you don’t want to update PHP manually, you can use the Chocolatey package manager to install and update PHP version for you.
Chocolatey is a package manager for Windows computers, it works like Homebrew for Mac computers.
Install Chocolatey on your computer, then install the PHP package with the following command:
Once the update process is finished, you should have the latest PHP version available from Chocolatey.
Update PHP version in cPanel
To update the PHP version in cPanel, you need to log into the cPanel system first.
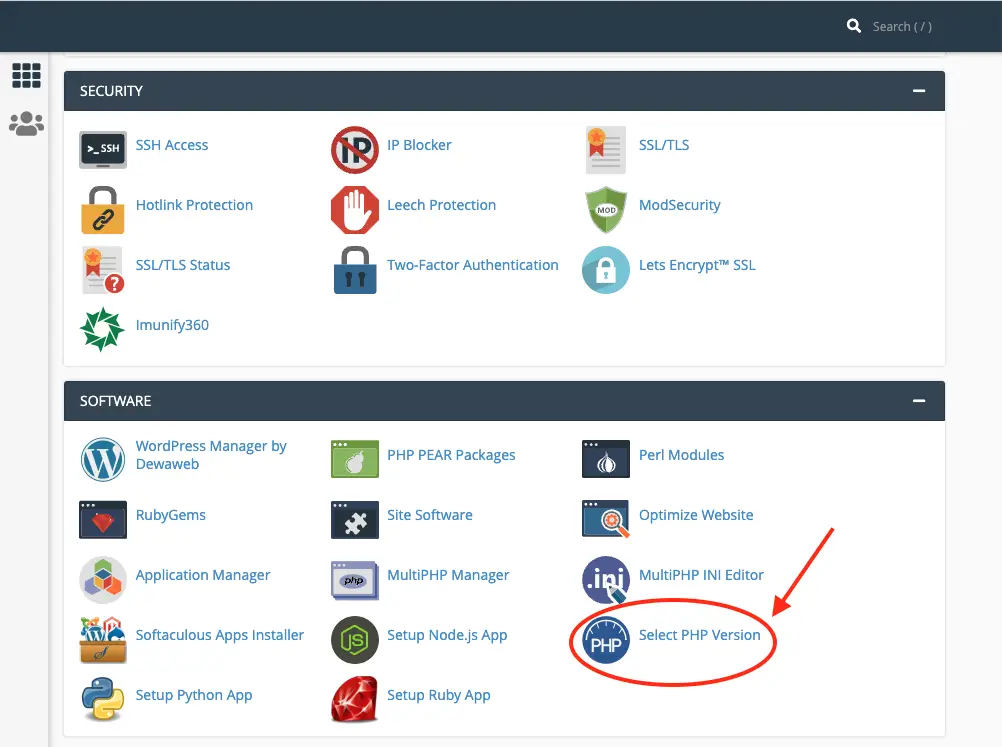
Inside the cPanel, you need to find the Select PHP version menu located in the Software tab:
Click on the menu, then change the Current PHP version option as shown below:

Once you change the PHP version, click the Set as current link that appears beside the version number.
cPanel will work to switch the PHP version and restart your website server.
Please keep in mind that not all web hosting provider provides you with a cPanel.
If you use BlueHost or SiteGround as your web host, you can visit the Update PHP for WordPress guide that I’ve written previously.
There are also several other hosting provider guides that you can find here.
Now you’ve learned how to update PHP version installed on your computer with this tutorial. Good work! 👍
Take your skills to the next level ⚡️
I’m sending out an occasional email with the latest tutorials on programming, web development, and statistics. Drop your email in the box below and I’ll send new stuff straight into your inbox!
About
Hello! This website is dedicated to help you learn tech and data science skills with its step-by-step, beginner-friendly tutorials.
Learn statistics, JavaScript and other programming languages using clear examples written for people.
Search
Type the keyword below and hit enter
Tags
Click to see all tutorials tagged with: