- Ubuntu install java mission control
- System Requirements and Supported Platforms
- Download and License Information
- Installation Instructions
- Install JMC Standalone Application
- Install JMC and Associated Eclipse Plug-ins
- Plug-in Details
- Ubuntu install java mission control
- Prerequisite
- JMC Usage Instructions
- Specify the JDK Version to be Used by JMC
- Мониторинг рабочих нагрузок Java и управление ими с помощью JDK Flight Recorder и Mission Control
- Установка JDK Mission Control и подключение к виртуальной машине Java
- Ресурсы
Ubuntu install java mission control
Review the prerequisites and system requirements before you install JMC . Apart from the base JMC application, there are many plug-ins available that you can install depending on your requirements.
You can install JMC as a standalone application or as an Eclipse plug-in.
System Requirements and Supported Platforms
JMC system requirements and supported platforms.
Download and License Information
JDK Mission Control homepage provides access to JMC and related plug-in downloads.
Download JMC or Eclipse IDE as per your requirement.
Standalone JMC and Plug-ins Download
Download JMC from: JDK Mission Control (JMC) 8 Downloads; ensure that you accept the license agreement.
JMC Plug-ins for the Eclipse IDE
You can also download the Core APIs from Maven Central. See MVN Repository to view the list of JMC bundles. You can download the JMC Core APIs by adding the dependency in the pom.xml file. For example, to download org.openjdk.jmc.common API, provide the following dependency values in pom.xml file:
Installation Instructions
You can install JMC as a standalone application or as a plug-in within the Eclipse IDE.
Apply the latest Critical Patch Update (CPU) or Security Alert; older versions are not updated with the latest security patches.
Install JMC Standalone Application
- Install JDK 11 64-bit (or later); see Download and License Information.
- Ensure that you set the /bin PATH environment variable and the $TEMP directory is accessible.
- For configuration details, see JDK Mission Control 8 Installation Instructions.
Note: If you have multiple JDK versions installed and you want to configure a specific JDK version, see the Specify the JDK Version to be Used by JMC section in JDK Mission Control 8 Installation Instructions.
- Windows: \jmc- _windows-x64\bin\jmc.exe
- Linux: /jmc- _linux-x64_bin/bin/jmc
- macOS: open /jmc- _macos-x64/JDK\ Mission\ Control.app
Install Plug-ins for JMC Standalone Application
The plug-ins for JMC are a set of artifacts designed to extend its functionality.
There are several plug-ins that are built for JMC. These plug-ins are not distributed with the base JMC application. They are hosted on remote locations (update sites) from where they can be download. Some plug-ins are open source while some are provided by Oracle.
The URL of the remote locations (update site) is updated in the JMC application.
The available plug-ins are categorized into Mission Control, Mission Control (Oracle), and Mission Control (Experimental).
- If JMC is unable to contact the update sites, then check the JMC application proxy.
- Go to Windows and Preferences (in macOS, go to JDK Mission Control and Preferences ). In General and Network Connections window, verify the Host proxy setting for HTTP , HTTPs , and Port value.
Install JMC and Associated Eclipse Plug-ins
The JDK Mission Control plug-ins for Eclipse are a set of artifacts for the Eclipse IDE designed to help develop, profile, and diagnose applications running on supported JDKs.
- Install Eclipse 4.24 and later
- Uninstall previous versions of JMC, if any
- Ensure that Eclipse is running on a supported JDK version (not JRE)
- Open Eclipse IDE. Go to Help and Install New Software .
- In the Work with field, enter the URL https://download.oracle.com/technology/products/missioncontrol/updatesites/openjdk/ 8.3.1 /ide/ .
The available plug-ins are categorized into Mission Control, Mission Control (Oracle), and Mission Control (Experimental).
Plug-in Details
You can install Oracle, Open source, and Experimental plug-ins according to your requirement.
Install the latest version of the plug-ins to get the most recent security patches.
- Oracle plug-ins: Developed and supported by Oracle, which extends the base JMC functionality.
- Open source plug-ins: Developed by open source community, which provides additional functionality.
- Experimental plug-ins: Developed by Oracle as a technology preview that may later be incorporated into the main distribution, depending on the feedback. These plug-ins are currently not supported and are provided only for evaluation purposes. The experimental plug-ins are not included in the JDK Mission Control product distribution.
Plug-ins for JMC Standalone Application
- JDK Mission Control RCP Updates
- Flight Recorder Metadata Page
- JavaFX Page
- Subscription Tab
- Twitter Action
- G1 Page
JMC Plug-ins for Eclipse IDE
- Open Source plug-ins:
- JDK Mission Control IDE Integration
- Flight Recorder Metadata Page
- JavaFX Page
- Subscription Tab
- Twitter Action
- G1 Page
- Flight Recorder Launch Configuration Tab
- JDK Mission Control PDE Integration
- Japanese Language Support (for IDE Integration)
- Simplified Chinese Language Support (for IDE Integration)
Ubuntu install java mission control
JDK Mission Control (JMC) 8.0 and 8.0.1 starts with Oracle JDK 8 (64-bit), and from JMC 8.1.0 onwards it requires Oracle JDK 11 and later. However, JMC 8 supports Java Management Console (JMX) monitoring and Java Flight Recorder (JFR) profiling of JVMs (JDK 7u40 and later) on any supported platform.
Prerequisite
- Ensure you install JDK 8 for JMC 8.0 and JMC 8.0.1, and JDK 11 or later for JMC 8.1.0 onwards. See: JDK 11 Installation Instructions or JDK 8 Installation Instructions as applicable.
- Ensure that the hsperfdata_username directory is present in the Windows $TEMP directory (for example, C:\Users\user_name\AppData\Local\Temp\hsperfdata_username) and is writable by the user. In case there are any issues while starting JMC with user permissions, then start JMC as an administrator. Also ensure that you are using a file system that supports ACL.
- For monitoring or recording a 32-bit JVM (JDK 7u40 and later), start the JVM with the following VM argument: -Dcom.sun.management.jmxremote
JMC Usage Instructions
Depending on your platform, run the following commands:
$ tar zxf jmc-_linux-x64.tar.gz $ ./jmc-_linux-x64/JDK\ Mission\ Control/jmcFor example:
$ tar zxf jmc-8.3.1_linux-x64.tar.gz $ ./jmc-8.3.1_linux-x64/JDK\ Mission\ Control/jmc$ tar zxf jmc-_macos-x64.tar.gz $ open ./jmc-_macos-x64/JDK\ Mission\ Control.appFor example:
$ tar zxf jmc-8.3.1_macos-x64.tar.gz $ open ./jmc-8.3.1_macos-x64/JDK\ Mission\ Control.app$ tar zxf jmc-_macos-aarch64.tar.gz $ open ./jmc-_macos-aarch64/JDK\ Mission\ Control.appFor example:
$ tar zxf jmc-8.3.1_macos-aarch64.tar.gz $ open ./jmc-8.3.1_macos-aarch64/JDK\ Mission\ Control.appDouble-click JDK Mission Control from Finder or drag JDK Mission Control.app to the Applications directory to access from Launchpad.
jar xvf "jmc-_windows-x64.zip" ".\jmc-_windows-x64\JDK Mission Control\jmc.exe"For example:
jar xvf "jmc-8.3.1_windows-x64.zip" ".\jmc-8.3.1_windows-x64\JDK Mission Control\jmc.exe"Double-click jmc.exe from Windows Explorer.
Specify the JDK Version to be Used by JMC
If there are multiple JDK versions installed, it is recommended to use the latest version of JDK to run JMC.
Edit the JMC launch configuration (jmc.ini) file and add the location of the JDK version to use (JDK 8 (64-bit) or later required). In Windows and Linux, the jmc.ini file is found under the JDK Mission Control directory; and in macOS, under JDK\ Mission\ Control.app/Contents/Eclipse directory.
Add the -vm flag and /bin ( \bin for windows) as shown in the following example. Ensure it is added just before the -vmargs flag.
-vm C:\Program Files\Java\jdk-11.0.19\bin -vmargs-vm /Library/Java/JavaVirtualMachines/jdk-11.0.19.jdk/Contents/Home/bin -vmargs-vm /usr/java/jdk-11.0.19/bin -vmargsBelow is a sample of jmc.ini from the Windows platform:
-startup plugins/org.eclipse.equinox.launcher_1.6.400.v20210924-0641.jar --launcher.library plugins/org.eclipse.equinox.launcher.win32.win32.x86_64_1.2.500.v20220509-0833 --launcher.appendVmargs -vm C:\Program Files\Java\jdk-11.0.19\bin -vmargs -XX:+IgnoreUnrecognizedVMOptions -XX:+UnlockDiagnosticVMOptions -XX:+DebugNonSafepoints -XX:FlightRecorderOptions=stackdepth=128 -XX:+FlightRecorder -XX:StartFlightRecording=name=JMC_Default,maxsize=100m -Djava.net.preferIPv4Stack=true -Djdk.attach.allowAttachSelf=true --add-exports=java.xml/com.sun.org.apache.xerces.internal.parsers=ALL-UNNAMED --add-exports=jdk.internal.jvmstat/sun.jvmstat.monitor=ALL-UNNAMED --add-exports=java.management/sun.management=ALL-UNNAMED --add-exports=java.management/sun.management.counter.perf=ALL-UNNAMED --add-exports=jdk.management.agent/jdk.internal.agent=ALL-UNNAMED --add-exports=jdk.attach/sun.tools.attach=ALL-UNNAMED --add-opens=java.base/java.net=ALL-UNNAMED --add-opens=jdk.attach/sun.tools.attach=ALL-UNNAMED -Dsun.java.command=JMC --add-exports=java.desktop/sun.awt.windows=ALL-UNNAMEDМониторинг рабочих нагрузок Java и управление ими с помощью JDK Flight Recorder и Mission Control
Из этой статьи вы узнаете, как выполнять мониторинг и администрирование рабочих нагрузок Java с помощью JDK Flight Recorder и JDK Mission Control.
Она была представлена компанией Oracle в 2018 году и управляется как проект на базе OpenJDK. Flight Recorder и Mission Control вместе предоставляют интерактивные возможности управления и мониторинга с минимальными затратами для рабочих нагрузок Java.
Установка JDK Mission Control и подключение к виртуальной машине Java
Выполните приведенные ниже действия, чтобы установить JDK Mission Control, подключиться к виртуальной машине Java (JVM) и получать представление обо всех аспектах запущенного приложения в реальном времени.
- Убедитесь в том, что JDK установлен.
- Найдите двоичный файл JDK Mission Control в репозитории OpenJDK JMC Project на GitHub. Затем выберите необходимую версию для системы, сохраните ее в локальном расположении и перейдите к этому каталогу.
- Разверните скачанный файл. Приведенные ниже примеры предназначены для Azul Zulu Mission Control. Linux:
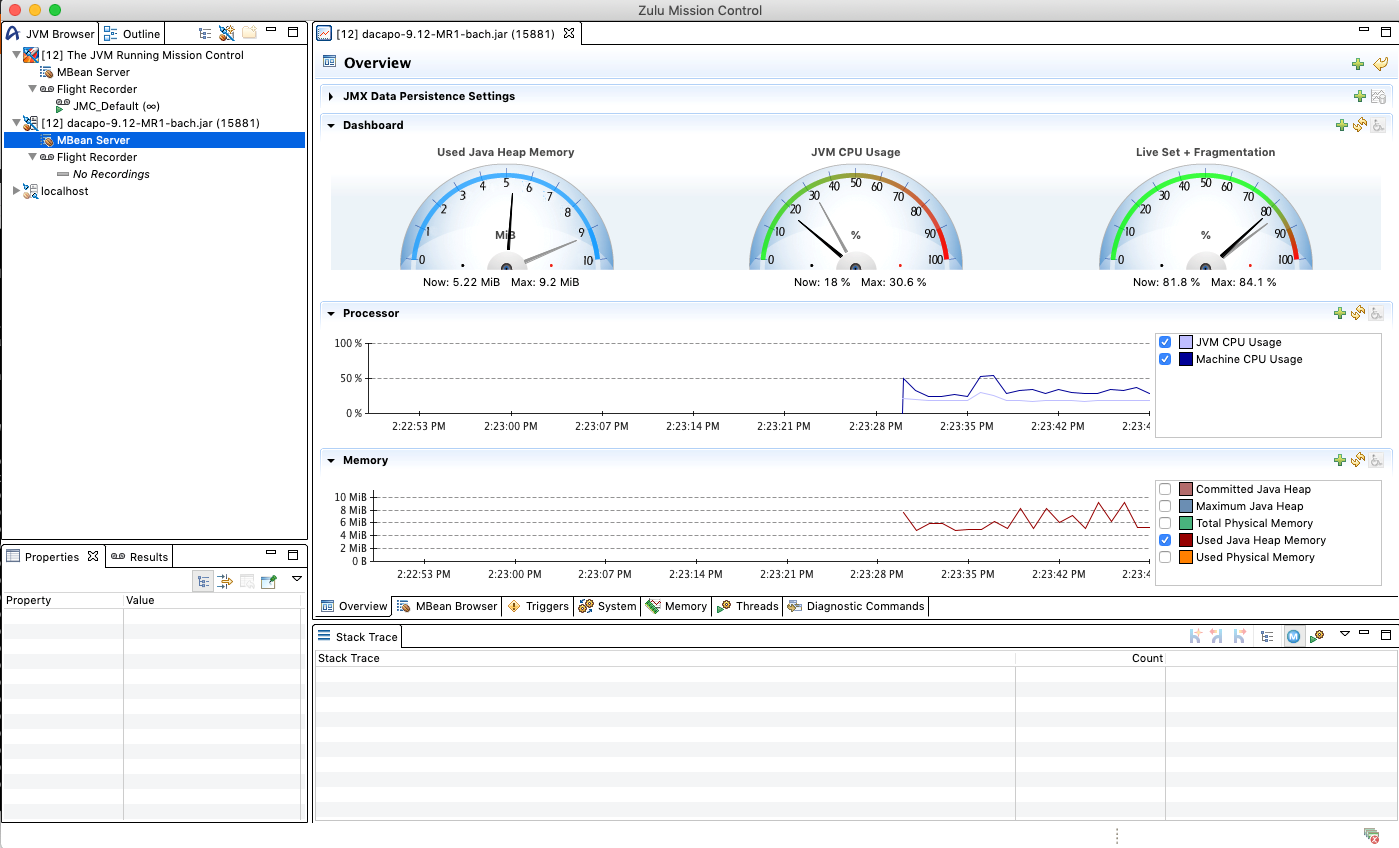
tar -xzvf zmc8.0.0.17-ca-linux_x64.tar.gzunzip -zxvf zmc8.0.0.17-ca-win_x64.ziptar -xzvf zmc8.0.0.17-ca-macos_x64.tar.gz$JAVA_HOME/bin/java -jar MyApplication.jarzmc8.0.0.17-ca-macos_x64/Zulu\ Mission\ Control.app/Contents/MacOS/zmc- На верхней левой панели окна Zulu Mission Control откройте вкладку JVM Browser (Браузер JVM).
- Выберите и разверните элемент списка в верхнем левом углу для экземпляра JVM, на котором запущено приложение.

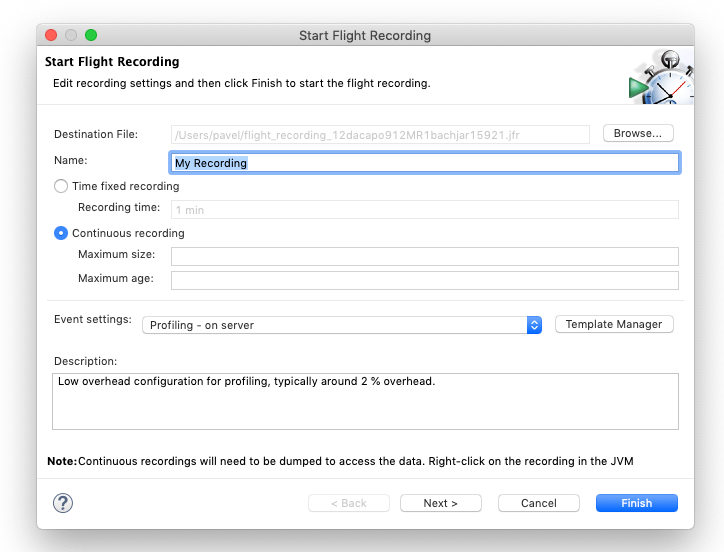
- Если в окне инструмента отобразится сообщение No Recordings (Нет записей), создайте запись. Чтобы начать запись, щелкните правой кнопкой мыши строку Java Flight Recorder на вкладке браузера JVM и щелкните Start Flight Recording (Начать запись).
- Выберите запись с фиксированной продолжительностью или непрерывную запись, а также конфигурацию профилирования (точную) или непрерывную конфигурацию (меньшие общие расходы), а затем нажмите кнопку Finish (Готово).
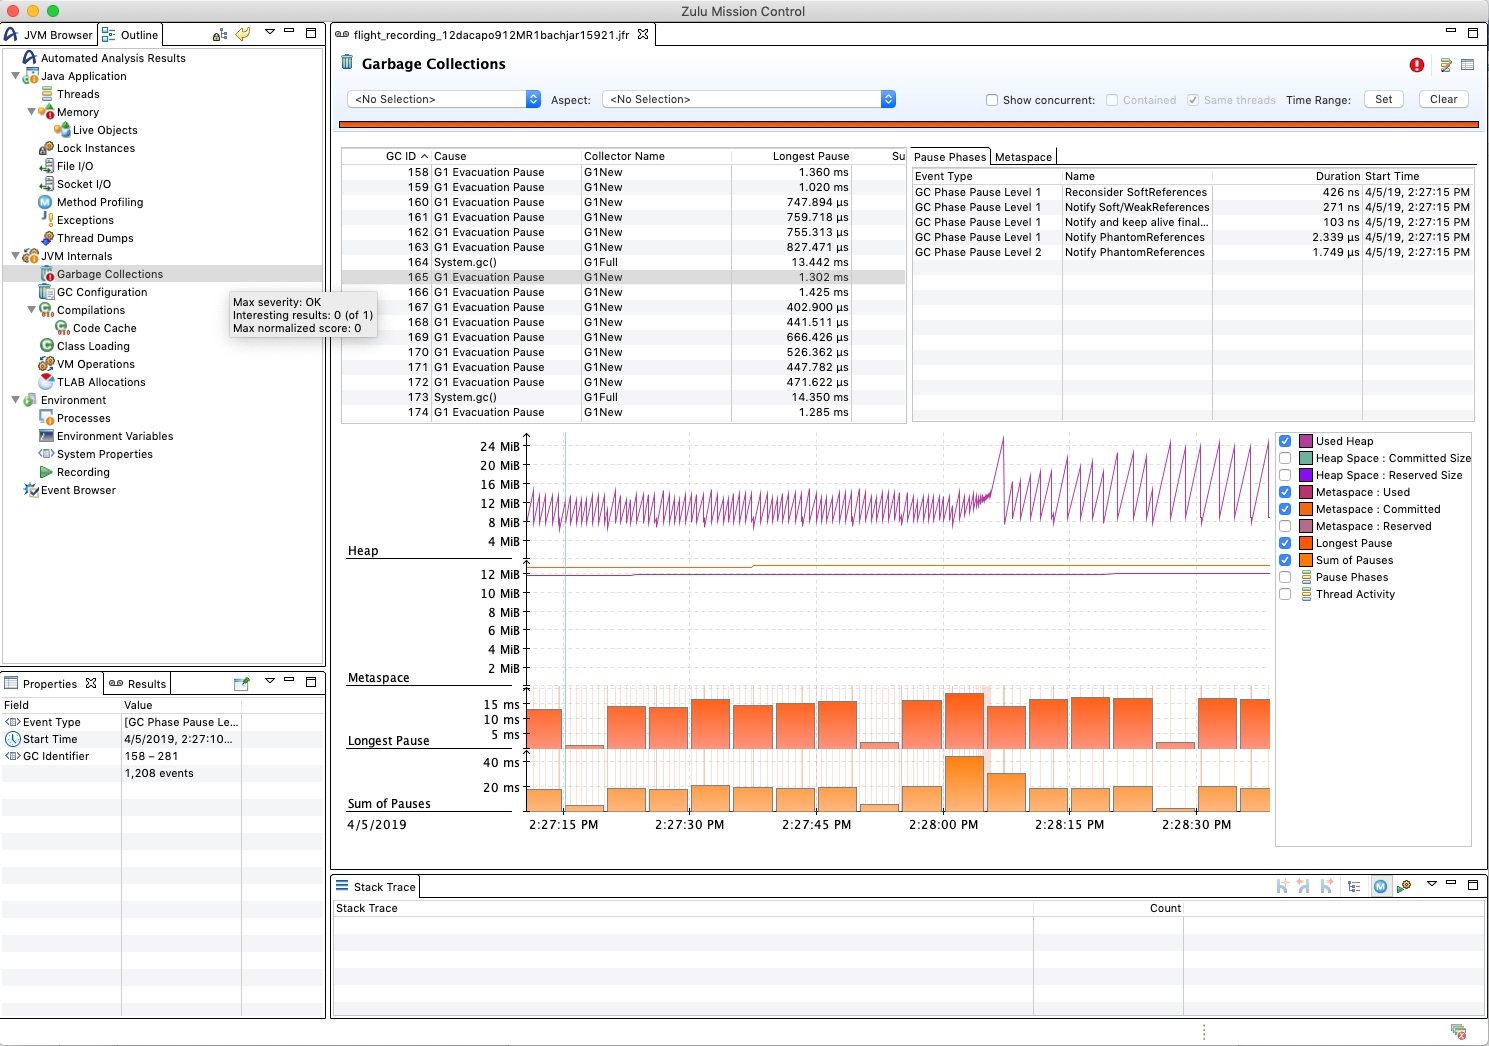
- Строка записи, осуществляемой во время выполнения приложения, должна отобразиться под строкой Flight Recorder на вкладке JVM Browser (Браузер JVM). Щелкните правой кнопкой мыши строку с записью, осуществляемой во время выполнения приложения, и выберите Dump whole recording (Создать дамп всей записи).
- Отобразится новая вкладка в большой области справа от окна Zulu Mission Control. Эта область представляет запись, осуществляемую во время выполнения приложения, дамп которой создан из JVM, на которой запущено приложение.
- Если активация еще не выполнена, откройте вкладку Outline (Структура) в левой области окна Zulu Mission Control. Эта вкладка содержит различные представления данных, собранных в рамках записи, осуществляемой во время выполнения приложения.
Ресурсы
Azul Systems предоставляет демонстрационное видео с комментариями технического директора Azul Systems Саймона Риттера (Simon Ritter). В этом видео описывается настройка и установка Flight Recorder и Zulu Mission Control. Обсуждение Flight Recorder начинается на отметке времени 31:30.