- Ubuntu get java home
- How to Set JAVA_HOME Variable in Ubuntu Linux Correctly
- Step 1: Check if JDK is installed
- Step 2: Get the location of JDK executable (Java Compiler)
- Step 3: Setting JAVA_HOME variable
- How to Set JAVA_HOME Path in Ubuntu 20.04 and Ubuntu 22.04
- Install OpenJDK on Ubuntu
- Install OpenJDK 8
- Install OpenJDK 11
- Install OpenJDK 14
- Install OpenJDK 16
- Install OpenJDK 17
- Install OpenJDK 18
- Set JAVA_HOME Path
- Add JAVA bin directory to the PATH variable
- Test JAVA setup
- Search
- About This Site
- Latest Tutorials
- How to set JAVA_HOME Environment Variable in Ubuntu
- Set JAVA_HOME Variable
- Add JAVA_HOME to the PATH variable
Ubuntu get java home
- The basics of TOGAF certification and some ways to prepare TOGAF offers architects a chance to learn the principles behind implementing an enterprise-grade software architecture, including.
- Haskell vs. PureScript: The difference is complexity Haskell and PureScript each provide their own unique development advantages, so how should developers choose between these two .
- A quick intro to the MACH architecture strategy While not particularly prescriptive, alignment with a MACH architecture strategy can help software teams ensure application .
- Postman API platform will use Akita to tame rogue endpoints Akita’s discovery and observability will feed undocumented APIs into Postman’s design and testing framework to bring them into .
- How to make use of specification-based test techniques Specification-based techniques can play a role in efficient test coverage. Choosing the right techniques can ensure thorough .
- GitHub Copilot Chat aims to replace Googling for devs GitHub’s public beta of Copilot Chat rolls out GPT-4 integration that embeds a chat assistant into Visual Studio, but concerns .
- Navigate multi-cloud billing challenges Keeping track of cloud bills from multiple clouds or accounts can be complex. Learn how to identify multi-cloud billing .
- 5 Google Cloud cost optimization best practices Cost is always a top priority for enterprises. For those considering Google Cloud, or current users, discover these optimization .
- How to create and manage Amazon EBS snapshots via AWS CLI EBS snapshots are an essential part of any data backup and recovery strategy in EC2-based deployments. Become familiar with how .
- BrightTALK @ Black Hat USA 2022 BrightTALK’s virtual experience at Black Hat 2022 included live-streamed conversations with experts and researchers about the .
- The latest from Black Hat USA 2023 Use this guide to Black Hat USA 2023 to keep up on breaking news and trending topics and to read expert insights on one of the .
- API keys: Weaknesses and security best practices API keys are not a replacement for API security. They only offer a first step in authentication — and they require additional .
- AWS Control Tower aims to simplify multi-account management Many organizations struggle to manage their vast collection of AWS accounts, but Control Tower can help. The service automates .
- Break down the Amazon EKS pricing model There are several important variables within the Amazon EKS pricing model. Dig into the numbers to ensure you deploy the service .
- Compare EKS vs. self-managed Kubernetes on AWS AWS users face a choice when deploying Kubernetes: run it themselves on EC2 or let Amazon do the heavy lifting with EKS. See .
How to Set JAVA_HOME Variable in Ubuntu Linux Correctly
If you are running Java programs on Ubuntu using Eclipse, Maven or Netbeans etc, you’ll need to set JAVA_HOME to your path. Otherwise, your system will complain that “java_home environment variable is not set”.
In this beginner’s tutorial, I’ll show the steps to correctly set Java Home variable on Ubuntu. The steps should be valid for most other Linux distributions as well.
The process consists of these steps:
- Making sure Java Development Kit (JDK) is installed.
- Finding the correct location of JDK executable.
- Setting the JAVA_HOME variable and making the change permanent.
Step 1: Check if JDK is installed
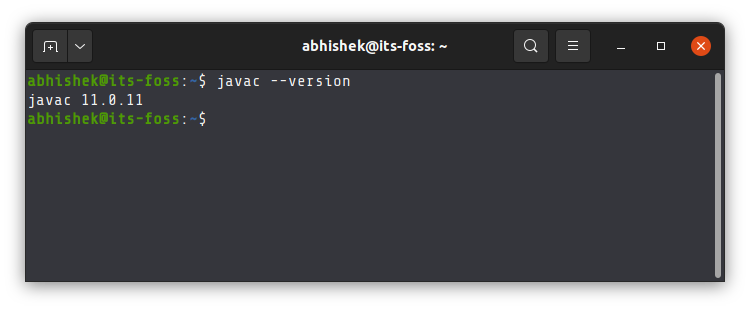
The simplest way to check if Java Development Kit (JDK) is installed on your Linux system is by running this command:
The above command checks the version of Java compiler. If it is installed, it will show the Java version.
If the command shows an error like javac command not found, you’ll have to install JDK.
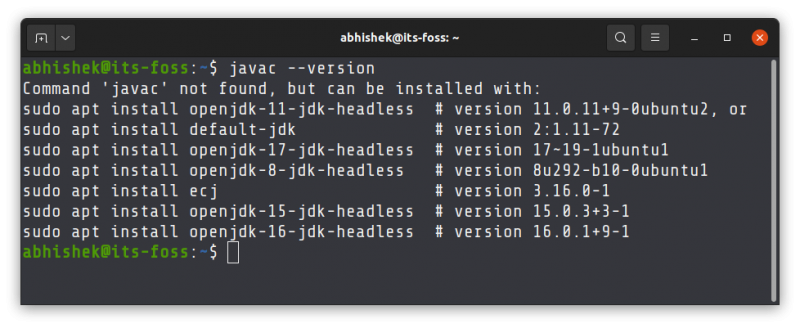
If Java Compiler is not installed on your system, install Java Development Kit using this command:
sudo apt install default-jdkThis will install the default Java version in your current Ubuntu version. If you need some other specific Java version, you’ll have to specify it while installing Java on Ubuntu.
Once you have made sure that Java Compiler is present on your system, it’s time to find its location.
Step 2: Get the location of JDK executable (Java Compiler)
The executable is usually located in the /usr/lib/jvm directory. I won’t left you on your own for a guessing game. Instead, let’s find out the path of the Java executable.
Use the which command to get the location of Java Compiler executable:
The problem here is that the location it gives is actually a symbolic link. You’ll have to follow it a couple of times:
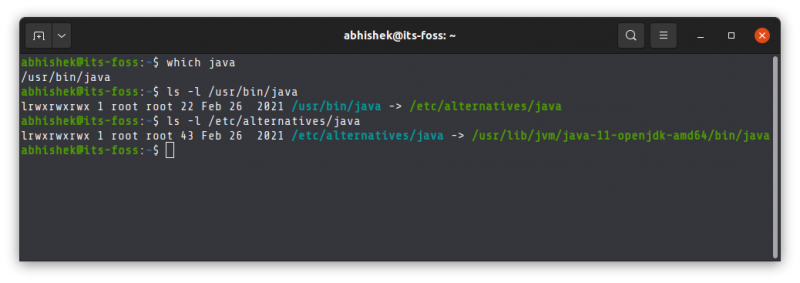
And when you find a path like /usr/lib/jvm/java-11-openjdk-amd64/bin/javac, you remove the /bin/javac from it to get something like /usr/lib/jvm/java-11-openjdk-amd64
An easier method is to follow the symbolic link and get to the actual executable file directly using this command:
readlink -f `which javac` | sed "s:/bin/javac::"The readlink command follows a symbolic link. I have used ` around which java. This is called command substitution and it replaces the command with its output. Sed is then used to replace /bin/javac by nothing and thus removing it altogether.
In my example, the location of the executable file is /usr/lib/jvm/java-11-openjdk-amd64. It could be different for you. Copy the correct path you got from the above command in your system. You know, you can copy paste in the Ubuntu terminal.
Step 3: Setting JAVA_HOME variable
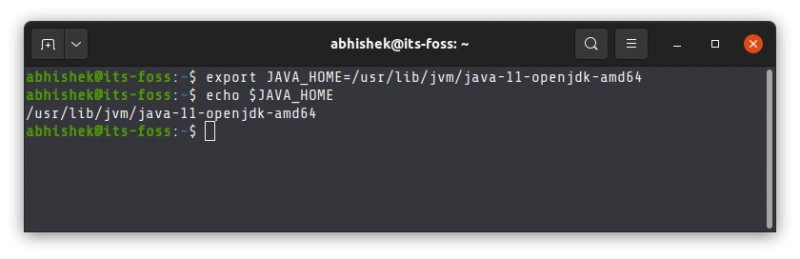
Now that you have got the location, use it to set the JAVA_HOME environment variable:
export JAVA_HOME=/usr/lib/jvm/java-11-openjdk-amd64/bin/javaCheck the value of JAVA_HOME directory:
Try to run your program or project in the SAME TERMINAL and see if it works.
This is not over yet. The JAVA_HOME variable you just declared is temporary. If you close the terminal or start a new session, it will be empty again.
To set JAVA_HOME variable ‘permanently’, you should add it to the bashrc file in your home directory.
You can use the Nano editor for editing files in the Linux terminal. If you do not want that and take a simple copy-paste approach, use the following commands:
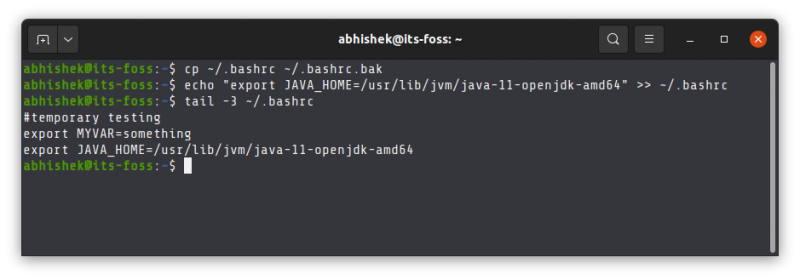
Back up your bashrc file (in case you mess it, you can get it back):
Next, use the echo command to append the export command you used at the beginning of this section. Change the command below to use the correct path as displayed by your system in.
echo "export JAVA_HOME=/usr/lib/jvm/java-11-openjdk-amd64" >> ~/.bashrcVerify that it has been correctly added to the end of the file:
The above tail command will show the last 3 lines of the specified file.
Here’s the entire output of the above three commands.
Now, even if you exit the session or restart the system, the JAVA_HOME variable will still be set to the value you specified. That’s what you want, right?
Do note that if you change the default Java version in the future, you’ll have to change the value of JAVA_HOME and point it to the correct executable path.
I hope this tutorial not only helped you to set Java Home, it also taught you how you are doing it.
If you are still facing issues or have any questions or suggestions, please let me know in the comments.
How to Set JAVA_HOME Path in Ubuntu 20.04 and Ubuntu 22.04

Many Java-based programs require the Java Runtime Environment (JRE) to run smoothly regardless of the operating system. For development, most IDEs like Eclipse and NetBeans require the Java Development Kit (JDK) on your computer. Whether you’re a newbie who wants to learn how to develop or an application you have installed requires a Java installation on your system, we’ve got you covered. Setting up the JAVA_HOME path is quite simple.
In this tutorial, we will learn how to install the JDK on Ubuntu 20.04 and Ubuntu 22.04 and set up the Java_HOME path. Let’s start with the installation of the JDK.
Install OpenJDK on Ubuntu
Note: Make sure that you have updated the Advanced Package Tool (APT) before you move forward to install OpenJDK.
Press Ctrl + Alt + T to open the terminal and enter the following command mentioned in the box. You can either install OpenJDK 8 or the newer versions OpenJDK 11 to OpenJDK 18. Not all versions are available on any Ubuntu version, you can check for available versions with the command:
Install OpenJDK 8
sudo apt install openjdk-8-jdk
Install OpenJDK 11
sudo apt install openjdk-11-jdk
Install OpenJDK 14
sudo apt install openjdk-14-jdk
Install OpenJDK 16
sudo apt install openjdk-16-jdk
Install OpenJDK 17
sudo apt install openjdk-17-jdk
Install OpenJDK 18
sudo apt install openjdk-18-jdk
You will be prompted to enter your sudo password to continue with the installation.

Once you’ve entered that, wait for the system to finish the installation and then move on to step 2.
Set JAVA_HOME Path
All you have to do now is to set the “JAVA_HOME” and “PATH” environment variables and then you are done. Enter the following commands to set your environment variables. Make sure that your environment variables point to a valid installation of JDK on your machine. For Ubuntu 18.04, the path is /usr/lib/jvm/java-8-openjdk-amd64/
export JAVA_HOME=/usr/lib/jvm/java-8-openjdk-amd64
To check whether your JAVA_HOME path has been successfully saved, enter the following command to check.
The value stored in the JAVA_HOME variable will be displayed on the terminal as you can see in the screenshot

Add JAVA bin directory to the PATH variable
Like we have added JAVA_HOME path, we will now update the PATH variable as well. To do that, enter the following command on the terminal.
export PATH=$PATH:$JAVA_HOME/bin
This will append the java bin directory to the existing PATH variable. You can also check the PATH variable by entering the following command

Test JAVA setup
You have successfully installed OpenJDK on your machine. You can verify your installation by entering the following command on your terminal.

Through this simple tutorial, you have now configured the JAVA_HOME variable in your operating system. You can now easily run java based applications as well as development environments on your machine.
Search
About This Site
Vitux.com aims to become a Linux compendium with lots of unique and up to date tutorials.
Latest Tutorials
How to set JAVA_HOME Environment Variable in Ubuntu
Some applications require you to set the JAVA_HOME environment variable to your JDK installation directory. So in this tutorial I will explain how to find the path to the Java installation directory and set JAVA_HOME in Ubuntu Linux.
First of all we need to identify the path to the JAVA_HOME environment variable. It should be the full path to the Java installation folder where the bin directory is located.
Following command should output the correct path to JAVA_HOME (Not always).
type -p javac|xargs readlink -f|xargs dirname|xargs dirnameFor example, If you Install Openjdk 8, path is something similar to the following.
/usr/lib/jvm/java-8-openjdk-amd64For OpenJDK 9 the path is:
/usr/lib/jvm/java-9-openjdk-amd64If you Install Oracle JDK, The path is the location where you stored the development kit.
For example, If you stored java development kit on /opt directory, The full path to the JAVA_HOME should be something similar to the following:
Set JAVA_HOME Variable
To set JAVA_HOME environment variable on Ubuntu, open the /etc/bash.bashrc file and add the following line:
export JAVA_HOME=/opt/jdk-9.0.1(The value should be the path to the Java folder)
Then, use the source command to reload the /etc/bash.bashrc file:
To check the variable, run the echo command:
Add JAVA_HOME to the PATH variable
The bin directory contains the Java executable, including javac, java, and jar. We need to add the bin directory to the PATH variable To access Java executable from anywhere within the command line.
Again, Open the /etc/bash.bashrc and add the bin directory to the PATH variable as shown below:
export JAVA_HOME=/opt/jdk-9.0.1 export PATH=$PATH:$JAVA_HOME/binTo check the PATH variable, source the environment file and run the echo command:
source /etc/bash.bashrc echo $PATH