- Tkinter Toplevel
- Introduction to Tkinter Toplevel window
- A simple Tkinter Toplevel Window example
- Summary
- Окна
- Удаление окна
- Определение окна в объектно-ориентированном стиле
- Окно поверх других окон
- Tkinter Toplevel Widget – Python
- Difference between Tk() and Toplevel()
- Toplevel syntax
- Tkinter Toplevel Options
- Toplevel Widget Example in Tkinter
- Toplevel Widget Example#2
- Tkinter Toplevel Methods
- Further Reading…
Tkinter Toplevel
Summary: in this tutorial, you’ll learn how to create multiple windows in a Tkinter application using the Tkinter Toplevel class.
Introduction to Tkinter Toplevel window
In a Tkinter application, the instance of the Tk class represents the main window.
When you destroy the main window, the application exits, and the event loop finishes.
Sometimes, you need to create additional windows. For example, you may want to create a custom dialog or a wizard form.
To do that, you can use top-level windows which are instances of the Toplevel class.
Unlike the main window, you can create as many top-level windows as you want.
To show a Toplevel window from the main window, you follow these steps:
First, create an instance of the Toplevel class and set its parent to the root window:
window = tk.Toplevel(root)Code language: Python (python)The moment you create the Toplevel window, it’ll display on the screen.
Second, add widgets to the Toplevel window like you do with the frames and main window.
Third, call the grab_set() method of the Toplevel window instance to allow it to receive events and prevent users from interacting with the main window:
window.grab_set()Code language: Python (python)A simple Tkinter Toplevel Window example
The following program displays a window that has one button:
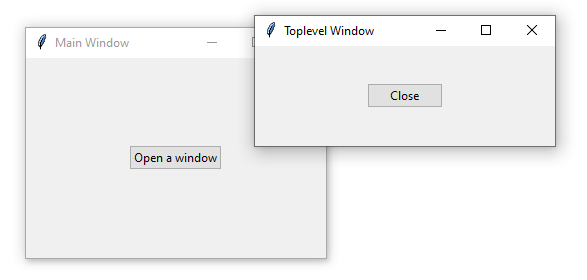
When you click the button, it’ll open a Toplevel window. The Toplevel window also consists of a button.
If you click or press the Close button, the Toplevel window closes.
import tkinter as tk from tkinter import ttk class Window(tk.Toplevel): def __init__(self, parent): super().__init__(parent) self.geometry('300x100') self.title('Toplevel Window') ttk.Button(self, text='Close', command=self.destroy).pack(expand=True) class App(tk.Tk): def __init__(self): super().__init__() self.geometry('300x200') self.title('Main Window') # place a button on the root window ttk.Button(self, text='Open a window', command=self.open_window).pack(expand=True) def open_window(self): window = Window(self) window.grab_set() if __name__ == "__main__": app = App() app.mainloop()Code language: Python (python)First, define a class Window that inherits from the Toplevel window. The Window will be closed once the Close button is clicked.
Second, assign the command of the Open a window button to the open_window() method in the App class
Third, in the open_window() method, create a new instance of the Window and call the grab_set() method so that it can receive events. The grab_set() method also prevents users from interacting with the main window.
Summary
- Show additional windows by creating instances of the Toplevel class.
- Use grab_set() method so that the Toplevel window can receive events and prevents users from interacting with the main window.
Окна
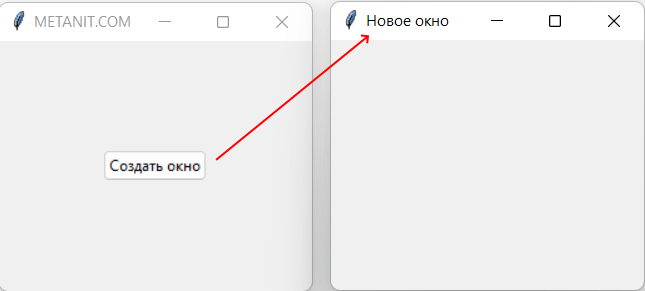
По умолчанию приложение Tkinter имеет одно главное окно, которое представляет класс tkinter.Tk . Запуск приложение приводит к запуску главного окно, в рамках которого помещаются все виджеты. Закрытие главного окна приводит к завершению работы приложения. Однако в рамках главного окна также можно запускать вторичные, неглавные окна. Например, октроем новое окно по нажатию на кнопку:
from tkinter import * from tkinter import ttk root = Tk() root.title("METANIT.COM") root.geometry("250x200") def click(): window = Tk() window.title("Новое окно") window.geometry("250x200") button = ttk.Button(text="Создать окно", command=click) button.pack(anchor=CENTER, expand=1) root.mainloop() Здесь по нажатию на кнопку создается новый объект window, у него устанавливается заголовок и размеры.
Стоит отметить, что приложение завершит работу, когда будут закрыты все его окна.
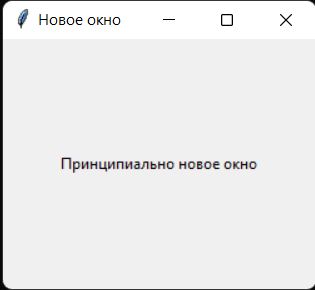
Как и главное окно, вторичные окна могут иметь виджеты. Например, определим на новом окне метку:
from tkinter import * from tkinter import ttk root = Tk() root.title("METANIT.COM") root.geometry("250x200") def click(): window = Tk() window.title("Новое окно") window.geometry("250x200") label=ttk.Label(window, text="Принципиально новое окно") label.pack(anchor=CENTER, expand=1) button = ttk.Button(text="Создать окно", command=click) button.pack(anchor=CENTER, expand=1) root.mainloop() Единственное не надо забывать у добавляемых виджетов устанавливать окно в качестве родительского контейнера
Удаление окна
Для удаления окна применяется меnод destroy()
from tkinter import * from tkinter import ttk root = Tk() root.title("METANIT.COM") root.geometry("250x200") def click(): window = Tk() window.title("Новое окно") window.geometry("250x200") close_button = ttk.Button(window, text="Закрыть окно", command=lambda: window.destroy()) close_button.pack(anchor="center", expand=1) open_button = ttk.Button(text="Создать окно", command=click) open_button.pack(anchor="center", expand=1) root.mainloop() В данном случае в новом окне по нажатию на кнопку close_button срабатывает метод window.destroy() , который закрывает окно и по сути аналогичен нажатию на крестик в верхнем правом углу окна.
Определение окна в объектно-ориентированном стиле
В примере выше новое окно, его параметры и вложенные виджеты определялись внутри функции, однако это приводит к разбуханию кода функции. И гораздо проще вынести определение окна в отдельный класс:
from tkinter import * from tkinter import ttk class Window(Tk): def __init__(self): super().__init__() # конфигурация окна self.title("Новое окно") self.geometry("250x200") # определение кнопки self.button = ttk.Button(self, text="закрыть") self.button["command"] = self.button_clicked self.button.pack(anchor="center", expand=1) def button_clicked(self): self.destroy() root = Tk() root.title("METANIT.COM") root.geometry("250x200") def click(): window = Window() open_button = ttk.Button(text="Создать окно", command=click) open_button.pack(anchor="center", expand=1) root.mainloop() Здесь определение окна вынесено в отдельный класс Window, который наследуется от класса tkinter.Tk. Благодаря этому мы можем вынести весь код определения окна в отдельную структурную единицу — класс, что позволит упростить управление кодом.
Окно поверх других окон
Для создания диалогового окна, которое располагается поверх главного окна, применяется класс Toplevel :
from tkinter import * from tkinter import ttk root = Tk() root.title("METANIT.COM") root.geometry("250x200") def dismiss(window): window.grab_release() window.destroy() def click(): window = Toplevel() window.title("Новое окно") window.geometry("250x200") window.protocol("WM_DELETE_WINDOW", lambda: dismiss(window)) # перехватываем нажатие на крестик close_button = ttk.Button(window, text="Закрыть окно", command=lambda: dismiss(window)) close_button.pack(anchor="center", expand=1) window.grab_set() # захватываем пользовательский ввод open_button = ttk.Button(text="Создать окно", command=click) open_button.pack(anchor="center", expand=1) root.mainloop() Toplevel по сути то же самое окно Tk, которое располагается поверх других окон. В примере выше оно также имеет кнопку. Но кроме того, чтобы пользователь не мог перейти обратно к главному окну пока не закроет это диалоговое окно, применяется ряд методов. Прежде всего захватываем весь пользовательский ввод с помощью метода grab_set() :
В функции dismiss() , которая закрывает окно, освобождаем ввод с помощью метода grab_release()
Tkinter Toplevel Widget – Python
Tkinter works with a hierarchical system, where there is one root window from where all other widgets and windows expand from. Calling the Tk() function initializes the whole Tkinter application.
Often while creating a GUI, you wish to have more than just one window. Instead of calling the Tk() function again (which is the incorrect way) you should use the Tkinter Toplevel widget instead.
Difference between Tk() and Toplevel()
Calling the Tk() function creates a whole Tkinter instance, while calling the Toplevel() function only creates a window under the root Tkinter instance.
Destroying the Tk() function instance will destroy the whole GUI, whereas destroying the Toplevel() function only destroys that window and it’s child widgets, but not the whole program.
Toplevel syntax
If you have imported Tkinter as “tk” (which is a fairly common approach), you will need to do tk.Toplevel() .
Tkinter Toplevel Options
Toplevel Widget Example in Tkinter
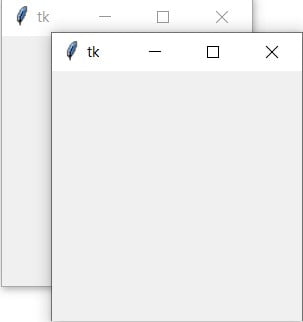
This is a simple Toplevel function example simply to demonstrate how it works. Just by calling the TopLevel() Class, a new window will popup, just like when we call Tk() .
from tkinter import * root = Tk() window = Toplevel() root.mainloop()
This isn’t a very practical approach though, so lets discuss a more real life scenario in the next example.
Toplevel Widget Example#2
In this example we’ll show you another way calling a new window. In most software, you start off with one window and can spawn multiple windows such as a “Settings Window”. This is in contrast to the previous example where we started directly with 2 windows.
The code below creates a button, that when clicked calls a function that creates a new Toplevel window with a widget in it. You might find this approach more suitable for your GUI.
from tkinter import * def NewWindow(): window = Toplevel() window.geometry('150x150') newlabel = Label(window, text = "Settings Window") newlabel.pack() root = Tk() root.geometry('200x200') myframe = Frame(root) myframe.pack() mybutton = Button(myframe, text = "Settings", command = NewWindow) mybutton.pack(pady = 10) root.mainloop() 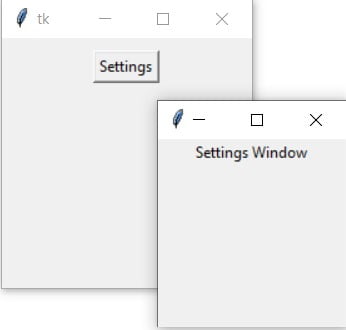
Only use multiple windows when it makes sense to have more than one. It makes sense to have a separate window dedicated to settings, especially when it’s a large software when dozens of different settings.
Tkinter Toplevel Methods
Another benefit of using Toplevel is the dozen different methods available to it that provide extra functionality.
Amongst the most useful these methods are withdraw() and deiconify() which can be used to withdraw and display the window respectively. Useful if you want to make the window disappear without destroying it. And also the resizable, maxsize() , minsize() and title methods. Explanations mentioned below in the table.
Further Reading…
This marks the end of the Python Tkinter Toplevel article. Any suggestions or contributions for CodersLegacy are more than welcome. Relevant questions regarding the article material can be asked in the comments section below.
To learn about other awesome widgets in Tkinter, follow this link!