Tkinter Entry
Summary: in this tutorial, you’ll learn how to use the Tkinter Entry widget to create a textbox.
Introduction to Tkinter Entry widget
The Entry widget allows you to enter a sing-line text. In Tkinter, to create a textbox, you use the Entry widget:
textbox = ttk.Entry(container, **options)Code language: Python (python)- The container is the parent frame or window. on which you want to place the widget.
- The options is one or more keyword arguments used to configure the Entry widget.
Note that if you want to enter multi-line text, you should use the Text widget.
To get the current text of a Entry widget as a string, you use the get() method:
textbox.get()Code language: Python (python)Typically, you associate the current value of the textbox with a StringVar object like this:
text = tk.StringVar() textbox = ttk.Entry(root, textvariable=text)Code language: Python (python)- First, create a new instance of the StringVar class. The text will be the value holder for a string variable.
- Second, assign the text variable to the textvariable of the Entry widget.
In this case, you can use call the get() method of the StringVar() object to get the current value of the entry widget:
text.get()Code language: CSS (css)Setting the focus to the Tkinter Entry widget
To provide a better user experience, you can place move the focus to the first Entry widget after the window appears. Once the Entry widget has focus, it’s ready to accept the user input.
To do it, you use the focus() method of the Entry widget like this:
textbox.focus()Code language: Python (python)Showing a Tkinter password entry
To hide sensitive information on the Entry widget e.g., a password, you can use the show option.
The following creates a password entry. When you enter a password, it doesn’t show the actual characters but the asterisks (*) specified in the show option:
password = tk.StringVar() password_entry = ttk.Entry( root, textvariable=password, show='*' ) password_entry.pack()Code language: Python (python)Tkinter Entry widget example
The following program shows how to use the Entry widgets to create a sign-in form:
import tkinter as tk from tkinter import ttk from tkinter.messagebox import showinfo # root window root = tk.Tk() root.geometry("300x150") root.resizable(False, False) root.title('Sign In') # store email address and password email = tk.StringVar() password = tk.StringVar() def login_clicked(): """ callback when the login button clicked """ msg = f'You entered email: and password: ' showinfo( title='Information', message=msg ) # Sign in frame signin = ttk.Frame(root) signin.pack(padx=10, pady=10, fill='x', expand=True) # email email_label = ttk.Label(signin, text="Email Address:") email_label.pack(fill='x', expand=True) email_entry = ttk.Entry(signin, textvariable=email) email_entry.pack(fill='x', expand=True) email_entry.focus() # password password_label = ttk.Label(signin, text="Password:") password_label.pack(fill='x', expand=True) password_entry = ttk.Entry(signin, textvariable=password, show="*") password_entry.pack(fill='x', expand=True) # login button login_button = ttk.Button(signin, text="Login", command=login_clicked) login_button.pack(fill='x', expand=True, pady=10) root.mainloop()Code language: Python (python)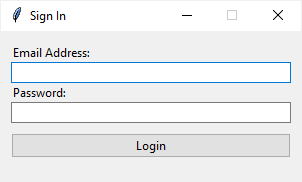
First, create two string variables to hold the current text of the email and password Entry widgets:
# store email address and password email = tk.StringVar() password = tk.StringVar()Code language: Python (python)Second, create the email Entry widget and associate it with the email variable:
email_entry = ttk.Entry(signin, textvariable=email)Code language: Python (python)The following sets focus on the email entry:
email_entry.focus()Code language: Python (python)Third, create the password entry widget and assign the password variable to its textvariable :
password_entry = ttk.Entry(signin, textvariable=password, show="*")Code language: Python (python)Finally, display a message box that shows the entered email and password if the login button is clicked.
Summary
- Use the ttk.Entry widget to create a textbox.
- Use an instance of the StringVar() class to associate the current text of the Entry widget with a string variable.
- Use the show option to create a password entry.
# Entry — Однострочное текстовое поле
Элемент Entry представляет поле для ввода текста. Конструктор Entry принимает следующие параметры:
где master — ссылка на родительское окно, а options — набор следующих параметров:
- bg: фоновый цвет
- bd: толщина границы
- cursor: курсор указателя мыши при наведении на текстовое поле
- fg: цвет текста
- font: шрифт текста
- justify: устанавливает выравнивание текста. Значение LEFT выравнивает текст по левому краю, CENTER — по центру, RIGHT — по правому краю
- relief: определяет тип границы, по умолчанию значение FLAT
- selectbackground: фоновый цвет выделенного куска текста
- selectforeground: цвет выделенного текста
- show: задает маску для вводимых символов
- state: состояние элемента, может принимать значения NORMAL (по умолчанию) и DISABLED
- textvariable: устанавливает привязку к элементу StringVar
- width: ширина элемента
from tkinter import * root = Tk() root.title("Welcome to entry app") text = Entry(root, width=50) text.pack() root.mainloop() from tkinter import * root = Tk() root.title("Welcome to the second entry app") text1 = Entry(root, width=20) text1.pack() text2 = Entry(root, width=50) text2.pack() root.mainloop() from tkinter import * root = Tk() root.title("Welcome to the second entry app") label_login = Label(root, text="Login") label_login.pack() text1 = Entry(root, width=50) text1.pack() label_pass = Label(root, text="Password") label_pass.pack() text2 = Entry(root, width=50) text2.pack() button = Button(root, text="Enter") button.pack() root.mainloop() from tkinter import * def check_pass(): if entry_login.get() and entry_pass.get(): label_welcome.configure(text="Welcome. ") else: label_welcome.configure(text="Please enter the login\nand the password.") root = Tk() root.title("Welcome to the second entry app") label_login = Label(root, text="Login") label_login.pack() entry_login = Entry(root, width=10) entry_login.pack() label_pass = Label(root, text="Password") label_pass.pack() entry_pass = Entry(root, width=10, show='%') entry_pass.pack() button = Button(root, text="Enter", command=check_pass) button.pack() label_welcome = Label(root) label_welcome.pack() root.mainloop() Для работы с текстом, находящимся в текстовом поле, необходимо создать переменную в которой будут храниться значения, которые будут выводиться или считываться в текстовом поле. Общий вид программы зададим следующий:
from tkinter import * root = Tk() root.title("Welcome to entry app") message = StringVar() message.set("Any") text = Entry(root, width=10, textvariable=message) text.pack() root.mainloop() Здесь команда message.set(«Any») — устанавливает значение переменной равное строке «Any». И параметру textvariable присваивается значение переменной message.
Исследуйте переменную message добавив недостающий следующий код:
message = StringVar() print(message) print(type(message)) message.set("Any") print(message) print(message.get()) Подумайте над последовательностью и работой команд message.set() и message.get() . Что происходит при выполнении каждой из команд?
Определим элемент Entry и по нажатию на кнопку выведем его текст в отдельное окно с сообщением:
from tkinter import * from tkinter import messagebox def show_message(): messagebox.showinfo("GUI Python", message.get()) root = Tk() root.title("GUI на Python") root.geometry("300x250") message = StringVar() message_entry = Entry(textvariable=message) message_entry.pack() message_button = Button(text="Click Me", command=show_message) message_button.pack() root.mainloop() Для вывода сообщения здесь применяется дополнительный модуль messagebox, содержащий функцию showinfo() , которая собственно и выводит введенный в текстовое поле текст. Для получения введенного текста используется StringVar .
Теперь создадим более сложный пример с формой ввода:
from tkinter import * from tkinter import messagebox def display_full_name(): messagebox.showinfo("GUI Python", name.get() + " " + surname.get()) root = Tk() root.title("GUI на Python") name_label = Label(text="Введите имя:") name_label.grid(row=0, column=0, sticky="w") name = StringVar() name_entry = Entry(textvariable=name) name_entry.grid(row=0, column=1) surname_label = Label(text="Введите фамилию:") surname_label.grid(row=1, column=0, sticky="w") surname = StringVar() surname_entry = Entry(textvariable=surname) surname_entry.grid(row=1, column=1) message_button = Button(text="Click Me", command=display_full_name) message_button.grid(row=2, column=1) root.mainloop() # Методы Entry
Методы для виджетов — это встроенные функции, которые позволяют менять объект или получать информацию о нем.
Виджет Entry имеет ряд методов. Основные из них:
- insert(index, str) : вставляет в текстовое поле строку по определенному индексу;
- get() : возвращает введенный в текстовое поле текст;
- delete(first, last=None) : удаляет символ по индексу first . Если указан параметр last , то удаление производится до индекса last . Чтобы удалить до конца, в качестве второго параметра можно использовать значение END .
Используем методы в программе:
from tkinter import * from tkinter import messagebox def clear(): name_entry.delete(0, END) surname_entry.delete(0, END) def display(): messagebox.showinfo("GUI Python", name_entry.get() + " " + surname_entry.get()) root = Tk() root.title("GUI на Python") name_label = Label(text="Введите имя:") name_label.grid(row=0, column=0, sticky="w") name_entry = Entry() name_entry.grid(row=0,column=1) name_entry.insert(0, "Tom") surname_label = Label(text="Введите фамилию:") surname_label.grid(row=1, column=0, sticky="w") surname_entry = Entry() surname_entry.grid(row=1, column=1) surname_entry.insert(0, "Soyer") display_button = Button(text="Display", command=display) display_button.grid(row=2, column=0) clear_button = Button(text="Clear", command=clear) clear_button.grid(row=2, column=1) root.mainloop() При запуске программы в оба текстовых поля добавляется текст по умолчанию:
name_entry.insert(0, "Tom") surname_entry.insert(0, "Soyer") Кнопка Clear очищает оба поля, вызывая метод .delete() :
def clear(): name_entry.delete(0, END) surname_entry.delete(0, END) Вторая кнопка, используя метод .get() , получает введенный текст:
def display(): messagebox.showinfo("GUI Python", name_entry.get() + " " + surname_entry.get()) Как видно из примера, нам необязательно обращаться к тексту в Entry() через переменные типа StringVar() , можно это сделать напрямую через метод .get() .
# Упражнения
- Создайте окно с текстовым полем Entry , и задайте значение текстового поля: «Текстовое поле вводит и выводит текст только одной строкой», используя метод .insert() .
- Используя переменную StringVar() . Создайте окно с текстовым полем и двумя кнопками:
- кнопкой «Paste», при нажатии на которую, в текстовом поле выводится текст: «The button clicked!».
- кнопкой «Clear», при нажатии на которую, текст в текстовом поле стирается.
- кнопкой «Paste», при нажатии на которую, в текстовом поле выводится текст: «The button clicked!».
- кнопкой «Clear», при нажатии на которую, текст в текстовом поле стирается.
The first line The second line - при нажатии на вторую кнопку, должны выводиться значения первого и второго полей в консоль с пояснениями в виде:
"Значение первого поля: " "Значение второго поля: "