- Selenium JavaScript Automation Testing Tutorial For Beginners
- Table of Contents – Selenium JavaScript Automation Testing Tutorial For Beginners
- Intro to JavaScript and Selenium?
- Prerequisites
- Setting up Node.js
- Installing a Package Manager and Adding a Path Variable
- Create and Run Automation Testing using Selenium JavaScript
- About the author
- A complete Guide on how to run Jest Testing with Selenium and JavaScript
- What Is Jest Testing Framework?
- Why to Use Jest Testing Framework?
- Jest Testing 101 – Installation, Configuration, and Prerequisites
Selenium JavaScript Automation Testing Tutorial For Beginners

Users play a vital role in the success of any product, especially when it comes to user interface – we cannot compromise. We need to introduce functional automation testing to our product and make sure the product’s functionality is as expected and deliver a flawless experience to our end users. There are many tools to do so, Selenium being the most popular among them for web automation (Check out all the latest updates to Selenium 4). In this tutorial, we will focus on JavaScript with Selenium for web automation.
📍 If you are looking for an all-in-one test automation framework for web & mobile that supports JavaScript – there is also an easy open source solution provided by TestProject. The free platform recently introduced its OpenSDK which opens a whole new chapter for supporting developers as well as testers in their work. By using OpenSDK you can easily develop your native Selenium & Appium tests (or plug in any of your existing tests), while benefiting from built-in FREE dashboards, local test reports & automated modern CI flows.
Table of Contents – Selenium JavaScript Automation Testing Tutorial For Beginners
Intro to JavaScript and Selenium?
- JavaScript is a text-based programming language used both on the client-side and server-side, allowing you to transform static web pages into interactive ones.
- WebDriver is a remote control interface that enables introspection and control of user agents. It provides a platform and language-neutral wire protocol as a way for out-of-process programs to remotely instruct the behavior of web browsers – WebDriver W3C Recommendation. The cross-platform behavior of web browsers is controlled by web driver. Different web browsers such as Chrome, Firefox, Edge, etc have their own implementation of WebDriver Standards. They all possess browser-specific functionalities using the standard APIs.
- Selenium is an extra wrapper outside the WebDrivers in order to make the WebDriver implementation more smooth and easier for the supporting browsers. For example, if you have Chrome Driver installed on the machine with correct path, Selenium will automatically detect it. The same is the case with other browsers as well. It provides ease to the developers to run the same test script on multiple browser platforms.
Prerequisites
- Node.js (with npm and node installed).
- A package manager for handling open source JavaScript projects.
- Any code editor (I will choose Visual Studio).
- Any internet browser (I will be using Firefox in my case).
Setting up Node.js
Open the command prompt and type “node -v” (verifying Node.js is installed):
Then type “npm -v” (verifying npm is installed):
If you are not getting these outputs, then you have to install node and npm manually. Click on the following link https://nodejs.org/en/download/ and it will take you to the Node.js official downloads page. Download the version according to the required system you are using. You will see the following page when you click the link given above.

Installing a Package Manager and Adding a Path Variable
Now we are going to set up the package manager for our project which will be “selenium-web driver”. Just click on the link https://www.npmjs.com/. It will take you to the following page:

In the search bar type ‘selenium-web driver’ and hit enter. You will be taken to the next page where you will find selenium web drivers for different browsers:

Click on Firefox (or whichever browser you would like to use). Then, you’ll see options for different kinds of operating systems you are working on. Simply select the one you are using:

Now we need to set up the path variable for our web driver. In order to do so, just unzip the file in your C directory inside the folder “seleniumWebdrivers” (you have to make a new folder) as seen below:

Copy the above path to your clipboard:

Then go to search and type “environmental variables”. You will see the following pop-up showing:

Click on it and you will have the following window opened:

Click on environmental variables and you will get to the following window:

Simply select the path and click on the edit button:

You will see this window appearing up:

Click on new and add the path you recently copied and click on the OK button.
Now, go to the folder in the C drive where you put the geckodriver.exe file and open it. You should see this type of output confirming that your path has been set correctly:

Create and Run Automation Testing using Selenium JavaScript
Now that we’ve completed the dependencies part, it’s time to create a JavaScript project and write our first testing code. Go to any directory and create a new project by typing “npm init”:
Then, open the terminal in vs-code or in the command line and type “npm install selenium-webdriver” and hit enter. Open the package.json file, it should look like the following:

Now, let’s create a new file with the name “index.js”. This is our time to start writing some code! 💪
Piece-wise code with explanation:
const = require("selenum-webdriver"); In the above Code we are simply pulling out functions from the node module.
Created the function with the name “example” and waiting for the browser to build and load properly.
await driver.get("http://google.com"); Trying to fetch http://google.com from the browser with our code.
await driver.findElement(By.name("q").sendKeys("Selenium",Key.RETURN)); Sending a search query by the name selenium.
Below is the complete code:
const = require("selenum-webdriver"); async function example() < let driver = await new Builder.forBrowser("firefox").build(); await driver.get("http://google.com"); await driver.findElement(By.name("q").sendKeys("Selenium",Key.RETURN)); >example(); In order to run this, go to the terminal and type node index (name of the file in which you put the above code). You should be getting the desired output as below:

We’ve got our first Selenium JavaScript test up and running! 🌟
I invite you to dive even further to learn some Selenium with JavaScript best practices, and read more content on JavaScript and automation testing in this JavaScript category.
About the author
Mujtaba is a Software Engineer from NUST. He was working with Telenor microfinance Bank before joining APIMatic. He’s been writing blogs & articles, conducting training & workshops related to Test Automation. He’s interested in hiking, football and likes to travel when he gets time.
A complete Guide on how to run Jest Testing with Selenium and JavaScript

This article is a part of our Content Hub. For more in-depth resources, check out our content hub on Selenium JavaScript Tutorial.
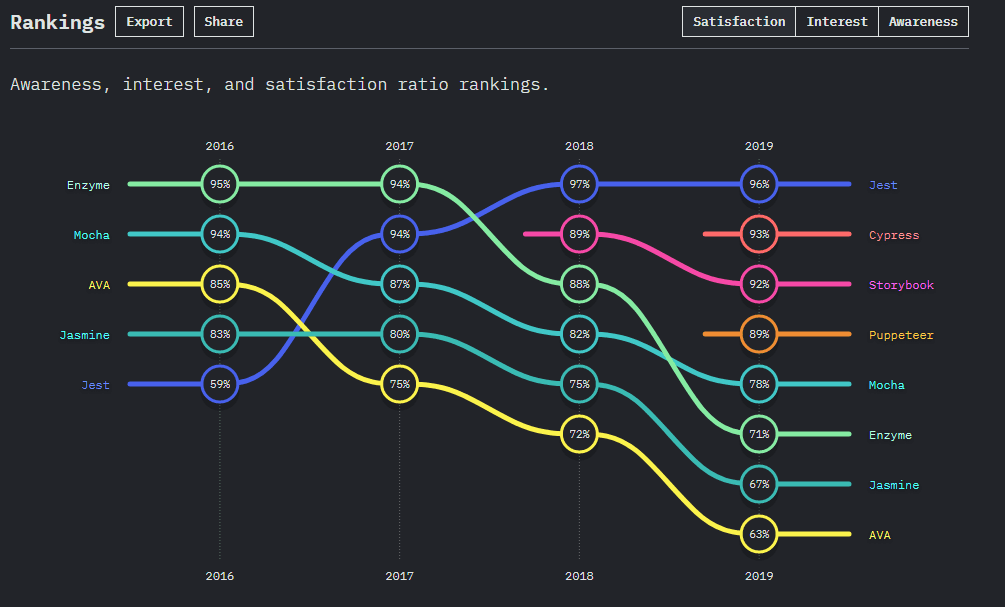
As a developer, I know for a fact that I have to constantly brush up myself with new updates. This means that not only I have to keep learning more about the frameworks and language I work with. But also to look for new frameworks that gives me an edge over others. One such survey that I am always looking forward to as a developer is the ‘StateofJS’. It is revered by all the JavaScript developers as a key source of information. ‘StateofJS’ provides key insights on the major trends in front-end, back-end, testing, etc. As per StateofJS 2019, Jest has been the most interesting and satisfying framework for JavaScript testing.
Being a fan of Selenium test automation, I was curious to get my hands on Jest testing framework JavaScript automation testing. I wanted to quickly validate my recent code changes and Jest testing framework was a big help in reducing my unit testing efforts. Which is why I thought of sharing what I learned with you, so you can go ahead and automate your unit test cycles.
In this Jest testing tutorial, I am going to help you execute Selenium JavaScript testing through the Jest testing framework. We will start off with basics to Jest, its advantages, and then we will hop over to the practical demonstration where we will execute our first Selenium test automation script for Jest and get our hands dirty on this framework.
Now run Jest testing scripts in parallel faster than any other automation testing grid on LambdaTest’s online grid.
What Is Jest Testing Framework?
Developed by Facebook, Jest is an open-source testing framework built on JavaScript, designed majorly to test React and React Native based web applications. We generally observe that unit tests for the frontend layer are not much suitable as it requires a lot more configuration to be done which can be complex at times. This complexity can be reduced to a great extent with the Jest testing framework.
Moreover, Jest testing framework can be used to validate almost everything around JavaScript, especially the browser rendering of your web-applications. Jest is a preferred framework for automated browser testing too and this makes it one of the most popular and renowned Javascript testing libraries framework!!
Jest also provides an excellent blended package of an assertion library along with a test runner and a built-in mocking library. The feature that makes it stand out is it’s simplicity and that is what makes it compatible to test any JavaScript Library Projects such as AngularJS, Vue JS, Node JS, Babel and TypeScript.
Another great feature that it offers is snapshot testing, which basically helps us to get a test of the delta changes of the web-applications that are transformed after a particular time. Additionally, Jest also has a built-in support for code coverage which can generate reports to figure out the areas or the part of the code that is not covered as a part of the test execution. Now that we’ve covered what is Jest, in this Jest testing tutorial, let’s explore why you should use Jest for automation testing.
Why to Use Jest Testing Framework?
In the world of Selenium JavaScript testing, there are many automated frameworks that are used for cross browser testing. So why Jest? Well, here are a few killer points that make Jest testing better than other test frameworks. Some of them are:
- Speed and Performance – Jest testing framework is fast when it comes to executing the test cases. Not only it boosts up the entire test suite, but it also offers great efficiency in the watch mode that can be enabled in this framework.

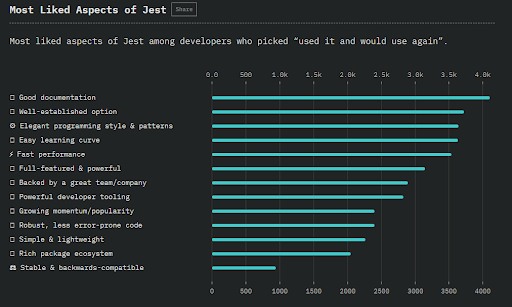
Other than the ones listed above, here are some pros of using Jest testing framework by the StateofJS survey.
Jest Testing 101 – Installation, Configuration, and Prerequisites
Before I start with, how to write our first Selenium test automation script with Jest. There are certain basic prerequisites and installations to get started with this Jest testing tutorial for Selenium JavaScript Testing. Below are some of the libraries and packages required to be installed on the system in order to run Jest testing scripts.
- Node JS and Node Package Manager (npm) : Node JS can be installed either using the npm manager: nodejs.org/en/download/package-manager or directly using the Windows Installer binary from the nodejs.org web site here.
- Selenium Web Driver: The Selenium web driver is required as a dependency for the Jest Module and should be installed in the root directory. The latest version of the selenium web driver can installed using the npm command as shown below: