- Saved searches
- Use saved searches to filter your results more quickly
- License
- clementw168/install-and-test-gpu
- Name already in use
- Sign In Required
- Launching GitHub Desktop
- Launching GitHub Desktop
- Launching Xcode
- Launching Visual Studio Code
- Latest commit
- Git stats
- Files
- README.md
- About
- Check if TensorFlow Is Using GPU
- Use DirectML to Enable TensorFlow to Use GPU
- tf.test.is_gpu_available
Saved searches
Use saved searches to filter your results more quickly
You signed in with another tab or window. Reload to refresh your session. You signed out in another tab or window. Reload to refresh your session. You switched accounts on another tab or window. Reload to refresh your session.
Step by step guide to create your venv with Tensorflow or Pytorch using CUDA
License
clementw168/install-and-test-gpu
This commit does not belong to any branch on this repository, and may belong to a fork outside of the repository.
Name already in use
A tag already exists with the provided branch name. Many Git commands accept both tag and branch names, so creating this branch may cause unexpected behavior. Are you sure you want to create this branch?
Sign In Required
Please sign in to use Codespaces.
Launching GitHub Desktop
If nothing happens, download GitHub Desktop and try again.
Launching GitHub Desktop
If nothing happens, download GitHub Desktop and try again.
Launching Xcode
If nothing happens, download Xcode and try again.
Launching Visual Studio Code
Your codespace will open once ready.
There was a problem preparing your codespace, please try again.
Latest commit
Git stats
Files
Failed to load latest commit information.
README.md
How to use GPU with python libraries in a Virtual Environment
Basic repository to install CUDA and create your venv with Tensorflow or Pytorch using CUDA. When I am writing this, I am on a Windows 11 laptop with a GTX 1050. I will not use Conda.
If you have previously installed a version of CUDA, you should get rid of it before proceeding. If not, you can skip this part.
To uninstall CUDA on Windows,
- Go to the Program and Features widget in the control panel on Windows
- Search for «CUDA» and uninstall everything related to this previous version of CUDA:
- NVIDIA CUDA Visual Studio Integration
- NVIDIA CUDA Samples
- NVIDIA CUDA Runtime
- NVIDIA CUDA Documentation
- NVIDIA CUDA Development
DO NOT SKIP THIS STEP. I had to reinstall CUDA because of that. Before proceeding, you should know which version of Cuda you want according to which version your GPU can handle AND what library you will use.
All GPUs are not Cuda compatible. You have to check here. For instance, my GTX 1050 has a compute compatibility of 6.1 which can support any versions of CUDA for the moment. I could go on with any CUDA version from 10.0 to 10.2 and from 11.0 to 11.7.
However, if you are installing Cuda, you probably want to use another library such as Tensorflow and Pytorch. Your version of CUDA has to be compatible with any library you will use. For Pytorch, you can easily check here. For Tensorflow, you can check here. If there is wheel that matches your desired CUDA version then it is ok! Be careful about what you read on the Internet. The latest version of Tensorflow right now is 2.9.0 which is optimized for CUDA 11.2. However, more recent versions of CUDA can still be compatible as long as the correct wheel does exist!
I will go on with CUDA 11.6 as though Tensorflow supports 11.7, Pytorch does not support 11.7 yet.
- Click on this link
- Click on the button «Download» and you will be redirected to the latest version of CUDA.
- If that is not the correct version,
- Scroll down to the resources
- Click on «Archive of Previous CUDA Releases»
- Find your version and download it.
You might need to update your CUDA Drivers.
Cuda is a library that allows you to use the GPU efficiently. However, to use your GPU even more efficiently, cuDNN implements some standard operations for Deep Neural Networks such as forward propagation, backpropagation for convolutions, pooling, normalization, etc. In order to use Pytorch and Tensorflow, you need to install cuDNN.
- Click on this link
- Click on the button «Download» and you will be redirected to the latest version of cuDNN. If any doubt, you can check this compatibility matrix.
- You might be asked to register and fill a form.
- Find the version corresponding to your version of CUDA and download it.
- Extract all folders:
- lib
- include
- bin
Note : Some people just replace CUDA folders by cuDNN folders so it should not a problem.
- Open a Command line interface and type nvcc -V ( V is uppercase). It should display the correct Cuda version.
- Try to run a test with Pytorch or Tensorflow.
Run a test with Pytorch or Tensorflow
Get started with Virtual Environment
Skip this part if you already know what virtual environments are and how to use them.
You could just install all your packages in your default Python environment. You would have all your packages by default, and that is not so bad if you just want to test something on your computer. However, more often than not, you will want to use virtual environments to have a clean environment, especially when you are working in a team or when you are working on a project that will be used by others.
Main reasons for using virtual environments are:
- You want to isolate your packages from the rest of your computer. Then you know exactly what packages with which version are used by your project. This is useful, especially for someone else, to know what packages are used by your project.
- You can break your environment if you want to. You can easily delete a virtual environment and create a new one. Everyone has already broken python because of dependencies issues.
- Conda does the same more or less and is sometimes more convenient. However, it takes a lot more memory on the computer. Conda is also more likely to break because of dependencies issues, as it automatically downloads many packages. Virtual environments make you more flexible, so less likely to break as you know what you are doing.
Good practice is to create a virtual environment for each project.
Virtual environments need a requirements.txt file. This file contains the packages needed by your project. Then you can install them with pip install -r requirements.txt . That way, anyone can use your project, and you will not have to worry about dependencies issues.
To create a virtual environment, you can use the following command:
You can then activate the virtual environment with the following command:
Now you can install your packages with
You can also install all dependencies of a project with a requirements.txt file:
pip install -r requirements.txtYou can get the list of all installed packages in your environment with:
Create a virtual environment for your project.
Before proceeding, you should check the correct version of Pytorch for your version of CUDA here. Choose a stable version to install with pip, which corresponds to your version of CUDA. Then, open pytorch_utils/pytorch_requirements.txt and change the wheel for Pytorch installation if necessary.
You can then install your packages with
pip install -r pytorch_utils/pytorch_requirements.txtIf something went wrong, I also put an exact requirements.txt file in the repository : pytorch_utils/pytroch_exact_requirements.txt . To test your installation, you can run the following command:
It should display some information on your GPU and train a multiperceptron on MNIST. You can check that your GPU is used on your task Manager . Open it with Ctrl+Shift+Esc .
Run a test with Tensorflow
Create a virtual environment for your project.
You can then install your packages with
pip install -r tensorflow_utils/tf_requirements.txtIf something went wrong, I also put an exact requirements.txt file in the repository : tensorflow_utils/tf_exact_requirements.txt . To test your installation, you can run the following command:
It should display some information on your GPU and train a multiperceptron on MNIST. You can check that your GPU is used on your task Manager . Open it with Ctrl+Shift+Esc .
About
Step by step guide to create your venv with Tensorflow or Pytorch using CUDA
Check if TensorFlow Is Using GPU

In the machine learning domain, it is often required to perform higher computations. In this regard, the default CPU cannot give the level of backup a GPU can.
When a system does not have GPU, there are platforms like Google Colab, Kaggle, etc.
Generally, TensorFlow uses a CPU, but the computation rate is almost 20x slower than GPU. So, we need our work to save time and perform with grit.
Whatever computer system you use, you need to ensure you have a CUDA-enabled GPU system. Specifically, you will require a GPU in your system to merge TensorFlow with it.
There are many solutions, and the most acceptable one is the docker container method that requires installations for CUDA Toolkit, cudNN, GPU drivers, etc. Mainly, Nvidia supplies specialized GPUs for machine learning; thus, most tutorials are Nvidia-oriented.
However, we will focus on a new addition in this field that successively works for most common GPU vendors such as — AMD, Nvidia, Intel, and Qualcomm. It is a low-level machine learning API named DirectML.
The API provides hardware-accelerated machine-learning primitive operators. In the following sections, we will examine how to install it in the local Anaconda environment and how it binds the TensorFlow with GPU.
Use DirectML to Enable TensorFlow to Use GPU
The task is simple and only needs a few lines of commands to operate. But to mention specifically, for the case of DirectML, only some specific versions of TensorFlow and python work.
It is recommended to use TensorFlow of version 1.15.5 and Python 3.6-3.7.
Initially, you can open the Anaconda prompt to write the commands or open the CMD.exe Prompt application from the Anaconda navigator. Next, we will create an environment to perform our task and install the necessary packages.
Let’s check the following commands.
conda create -n tfdml python=3.6pip install tensorflow-directmlAfter creating the tfdml environment, there will be a proceeding message and input y there. And then activate and install the DirecML.
Later, we will deactivate the environment and follow the commands below in the base environment.
conda install -c conda-forge jupyterlabconda install -c conda-forge nb_conda_kernelsSoon after installing these, we will again activate the tfdml environment and write the commands as follows.
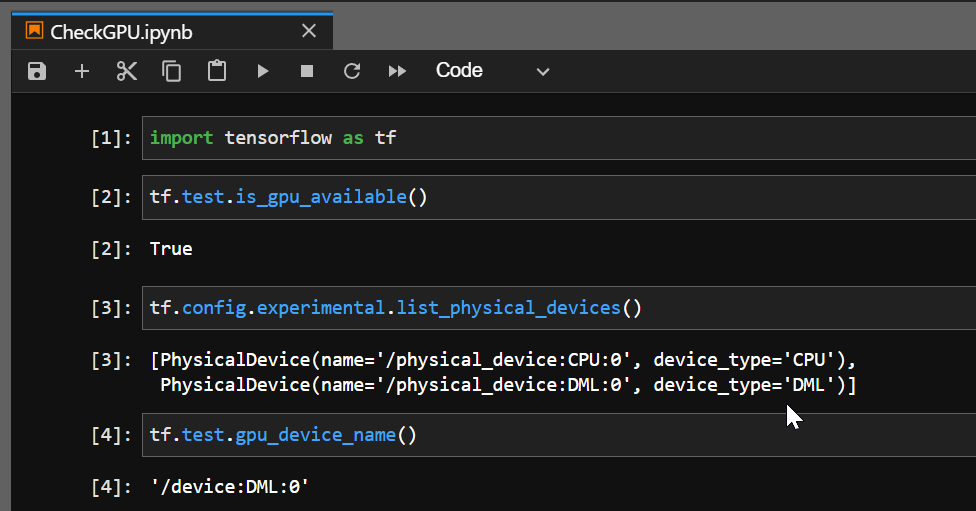
So, when we execute ipython , we enter the python shell, and here we will check if the DirectML device is created over our prebuilt GPU. When we get a True , our TensorFlow is now using the GPU.
import tensorflow as tf tf.test.is_gpu_available()As can be seen, the GPU AMD Radeon(TM) has a DirectML device over it, and thus, TensorFlow can use the GPU. And when you check the GPU device name, it will return as DML .
Era is an observer who loves cracking the ambiguos barriers. An AI enthusiast to help others with the drive and develop a stronger community.
tf.test.is_gpu_available
Устарело: ЭТА ФУНКЦИЯ УСТАРЕЛА. Он будет удален в будущей версии. Инструкции по обновлению: вместо этого используйте tf.config.list_physical_devices(‘GPU’) . Предупреждение: если установлена версия пакета без GPU, функция также вернет False. Используйте tf.test.is_built_with_cuda , чтобы проверить, был ли TensorFlow собран с поддержкой CUDA.
>>> gpu_available = tf.test.is_gpu_available() >>> is_cuda_gpu_available = tf.test.is_gpu_available(cuda_only=True) >>> is_cuda_gpu_min_3 = tf.test.is_gpu_available(True, (3,0))
Args cuda_only ограничить поиск графическими процессорами CUDA. min_cuda_compute_capability пара (major,minor),указывающая минимальную требуемую вычислительную способность CUDA,или None,если требования отсутствуют. Обратите внимание,что ключевое слово arg-«только cuda_only»-вводит в заблуждение (поскольку рутина возвращает true,когда GPU устройство доступно,независимо от того,был ли собран TF с поддержкой CUDA или ROCm.Однако никаких изменений здесь не произошло,потому что
++ Изменение имени cuda_only на более общее нарушит обратную совместимость
++ Добавление эквивалентного rocm_only потребует от реализации проверки типа сборки. Это, в свою очередь, потребует того же для CUDA и, таким образом, потенциально нарушит обратную совместимость.
++ Добавление нового «cuda_or_rocm_only» не нарушит обратную совместимость, но потребует от большинства (если не всех) вызывающих абонентов обновить вызов, чтобы использовать «cuda_or_rocm_only» вместо «cuda_only»