- How to create a seaborn correlation heatmap in Python?
- Installation
- Correlation heatmap
- Mataplotlib heatmap for correlation matrix using dataframe
- Create a dataframe
- Create a correlation matrix of the Dataframe
- what is a correlation matrix?
- Plot Matplotlib heatmap of correlation matrix
- Using Pandas background_gradient for heatmap
- Share on
- You may also enjoy
- pandas count duplicate rows
- Pandas value error while merging two dataframes with different data types
- How to get True Positive, False Positive, True Negative and False Negative from confusion matrix in scikit learn
- Pandas how to use list of values to select rows from a dataframe
How to create a seaborn correlation heatmap in Python?
Seaborn is a Python library that is based on matplotlib and is used for data visualization. It provides a medium to present data in a statistical graph format as an informative and attractive medium to impart some information. A heatmap is one of the components supported by seaborn where variation in related data is portrayed using a color palette. This article centrally focuses on a correlation heatmap and how seaborn in combination with pandas and matplotlib can be used to generate one for a dataframe.
Installation
Like any another Python library, seaborn can be easily installed using pip:
This library is a part of Anaconda distribution and usually works just by import if your IDE is supported by Anaconda, but it can be installed too by the following command:
Correlation heatmap
A correlation heatmap is a heatmap that shows a 2D correlation matrix between two discrete dimensions, using colored cells to represent data from usually a monochromatic scale. The values of the first dimension appear as the rows of the table while of the second dimension as a column. The color of the cell is proportional to the number of measurements that match the dimensional value. This makes correlation heatmaps ideal for data analysis since it makes patterns easily readable and highlights the differences and variation in the same data. A correlation heatmap, like a regular heatmap, is assisted by a colorbar making data easily readable and comprehensible.
The following steps show how a correlation heatmap can be produced:
- Import all required modules first
- Import the file where your data is stored
- Plot a heatmap
- Display it using matplotlib
For plotting heatmap method of the seaborn module will be used.
Except for data all other attributes are optional and data obviously will be the data to be plotted. The data here has to be passed with corr() method to generate a correlation heatmap. Also, corr() itself eliminates columns which will be of no use while generating a correlation heatmap and selects those which can be used.
For the example given below, here a dataset downloaded from kaggle.com is being used. The plot shows data related to bestseller novels on amazon.
Dataset used – Bestsellers
Mataplotlib heatmap for correlation matrix using dataframe
We will first create a dataframe of list of countries and their GDP, Population, GDP per capita, Agricutural land and CO2 emission as a separate columns in this dataframe. The values for these columns that I will be showing here is fake and doesn’t represent their real worth.
Once this dataframe is created then we will generate a correlation matrix to find out the correlation between each column of the dataframe and plot this correlation matrix heatmap using Matplotlib. Finally, we will also explore the pandas background_gradient style function that colors the background in a gradient style.
Create a dataframe
Let’s create a dataframe with all the following six columns: countries, GDP_trillion, population, GDP_per_capita, Agricultural_land and Co2_emission
import numpy as np import matplotlib import matplotlib.pyplot as plt import pandas as pd countries = ["china", "usa", "france", "russia", "japan", "india", "UK"] GDP_trillion = [16, 23, 2, 1, 5, 3, 3] Population = [1.4, 0.3, 0.068, 0.14, 0.12, 1.3, 0.067] GDP_per_capita = [2.12, 3.45, 6.23, 7.89, 4.23, 5.34, 6.9] Agricultural_land = [0.92, 1.2, 0.45, 0.73, 0.21, 0.34, 0.91] Co2_emission = [0.40, 0.45, 0.34, 0.23, 0.97, 0.21, 0.74] df=pd.DataFrame( 'countries': countries, 'GDP_trillion': GDP_trillion, 'Population': Population, 'GDP_per_capita': GDP_per_capita, 'Agricultural_land': Agricultural_land, 'Co2_emission': Co2_emission >) 
Create a correlation matrix of the Dataframe
what is a correlation matrix?
A correlation matrix basically shows the degree of correlations of every variable in the dataset with every other variable in the dataset.
Ideally, the correlation matrix is a representation of all these correlation coefficients of every single variable in the data with every other variable in the data.
The degree of correlation among any two variables has been depicted in two ways, the color of the box and the number inside the box.
The closer the number to 1, the greater the correlation. If the number is positive it states a positive correlation. If it is negative it states a negative correlation. 1 and -1 states perfect correlations among variables.
pear_corr=df.corr(method='pearson') pear_corr 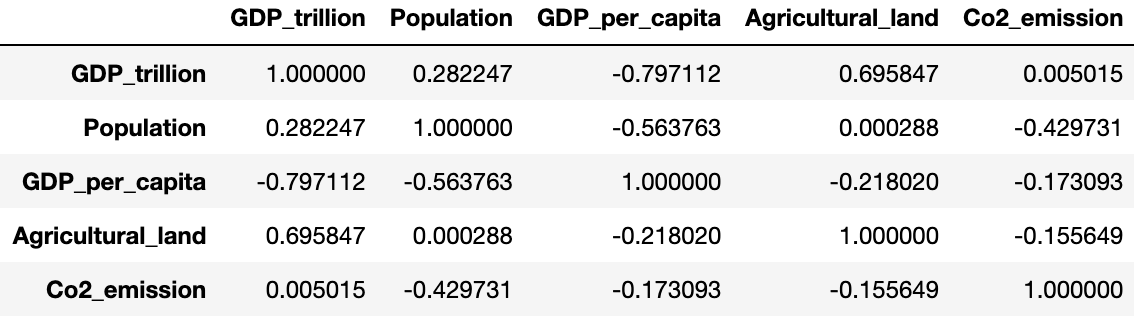
Plot Matplotlib heatmap of correlation matrix
we will create the heatmap of correlation matrix using matplotlib and we have to just pass the pear_corr matrix defined above in the matplotlib imshow function.
so we have first created a subplot of size 8×8 and then pass the pear_corr in the imshow function and set the interpolation to nearest. since we want a colorbar to represent the intensity of correlation values in this heatmap we have added that as well.
fig, ax = plt.subplots(figsize=(8,8)) im = ax.imshow(pear_corr, interpolation='nearest') fig.colorbar(im, orientation='vertical', fraction = 0.05) 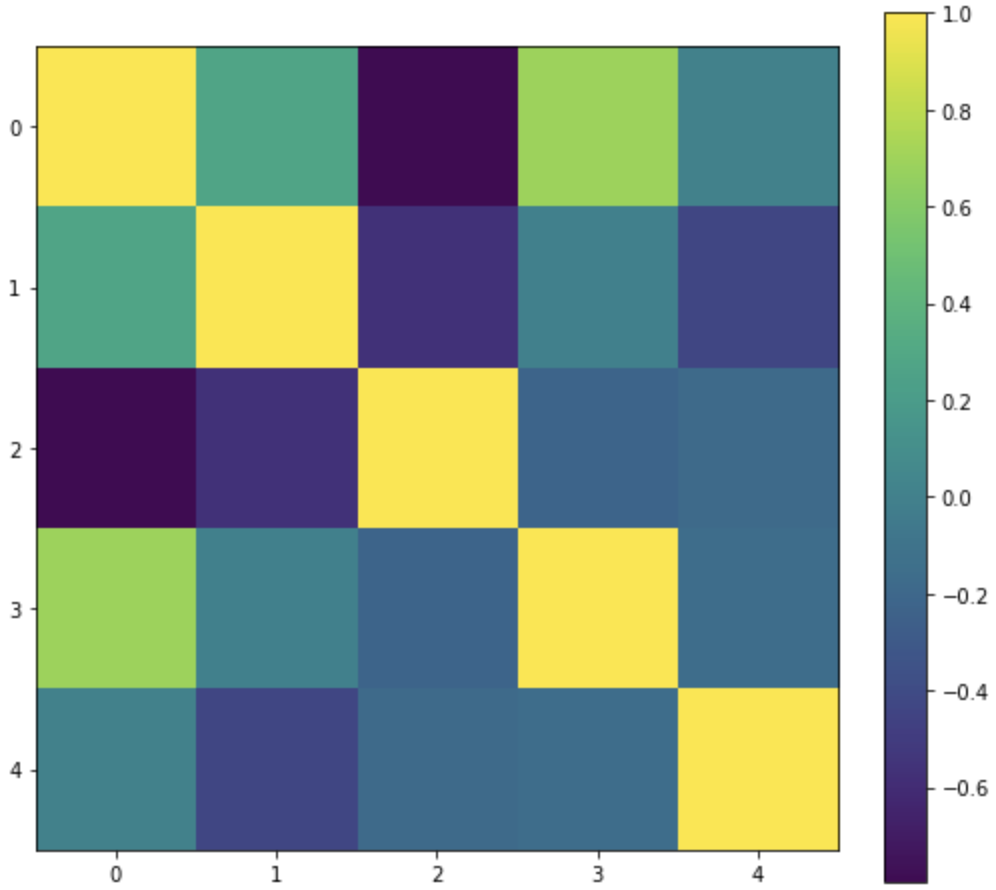
The output is just a color-coded heatmap but the axes labels and correlation score for each cell in the heatmap is missing
To create the axes ticks and to label them, we will use set_xticklabels and set_yticklabels function and the list of labels will be our dataframe column names i.e. df.columns
And to annotate the correlation score on the cells of this heatmap we will use text method of matplotlib to position and color the score labels
fig, ax = plt.subplots(figsize=(8,8)) im = ax.imshow(pear_corr, interpolation='nearest') fig.colorbar(im, orientation='vertical', fraction = 0.05) # Show all ticks and label them with the dataframe column name ax.set_xticklabels(df.columns, rotation=65, fontsize=15) ax.set_yticklabels(df.columns, rotation=0, fontsize=15) # Loop over data dimensions and create text annotations for i in range(len(df.columns)-1): for j in range(len(df.columns)-1): text = ax.text(j, i, round(pear_corr.to_numpy()[i, j], 2), ha="center", va="center", color="black") plt.show() 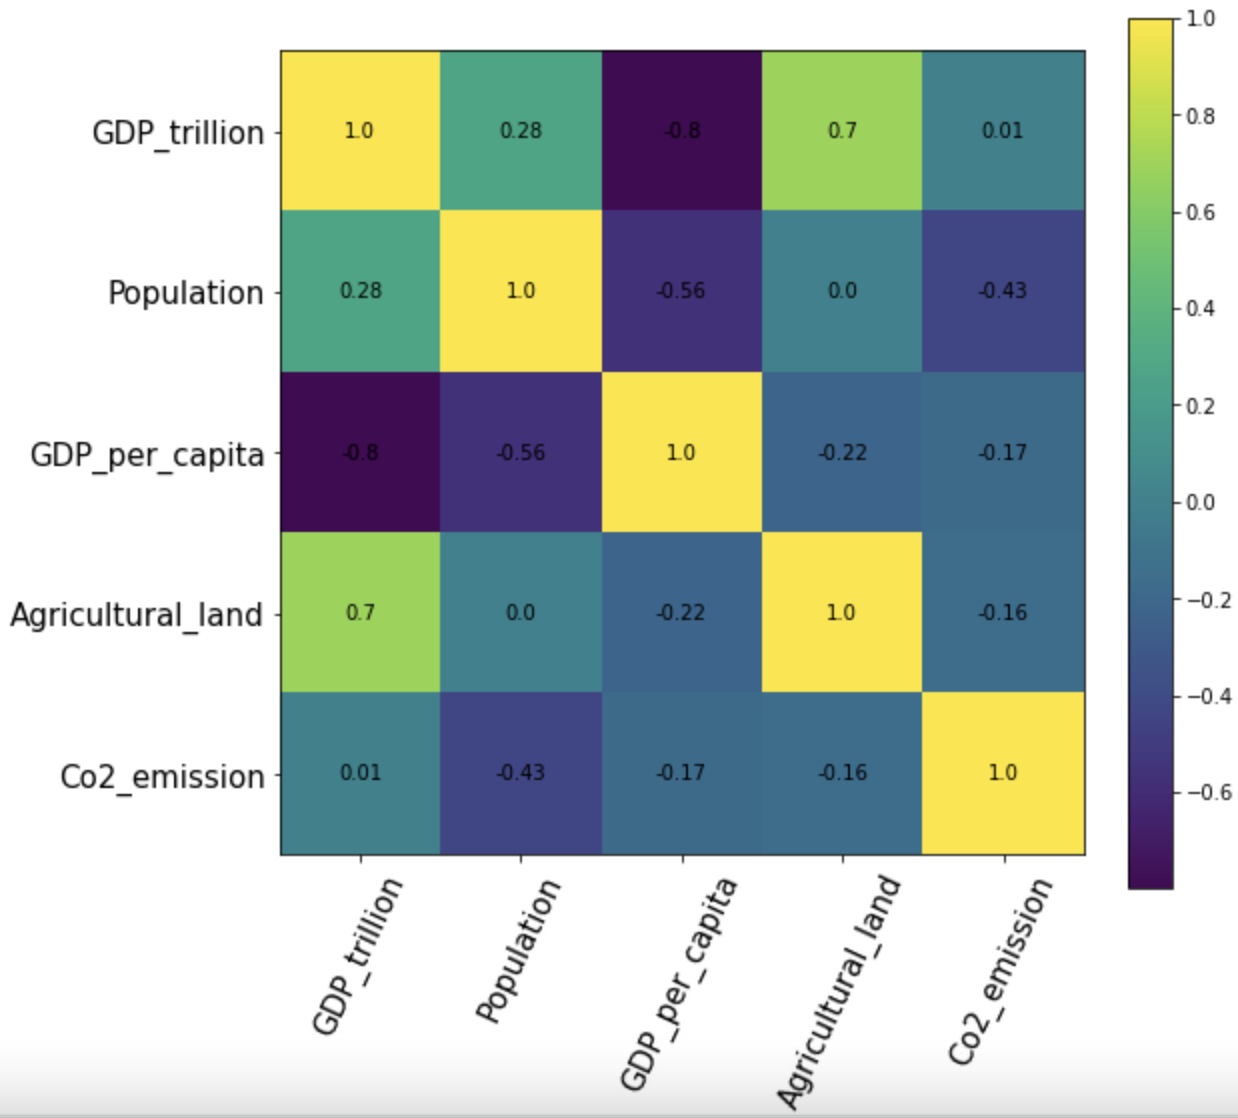
Using Pandas background_gradient for heatmap
Alternatively, if you are working on a dataframe like the correlation matrix dataframe(pears_corr) created above we can use pandas background_gradient style function as well.
The background color is determined according to the data in each column, row or frame, or by a given gradient map. It requires a matplotlib too as a background.
Across Column
Just in case you wanted to only apply the color code heatmap along the column of the dataframe then set the axis=0. Also, in the below figure, the darker the green color, the greater the positive correlation, the darker the red color of the box the greater the negative correlation across each column.
pear_corr.style.background_gradient(cmap='Greens', axis=0) 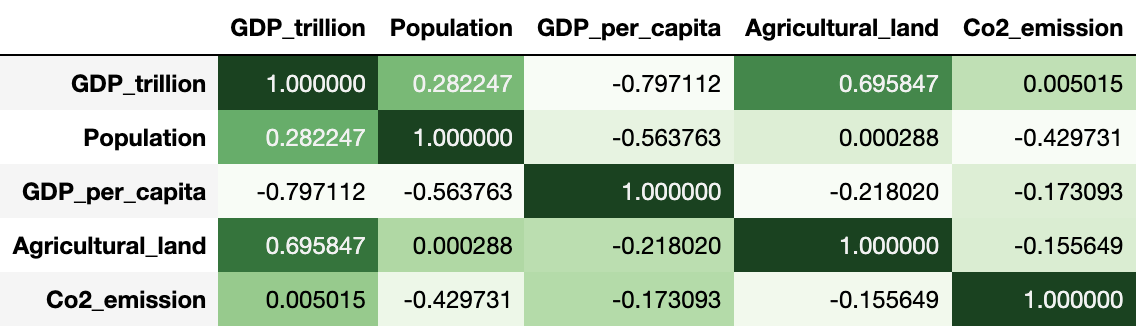
Across Rows
if we want to apply the color code heatmap just across each rows in the dataframe then set the axis=1
pear_corr.style.background_gradient(cmap='Greens', axis=1) 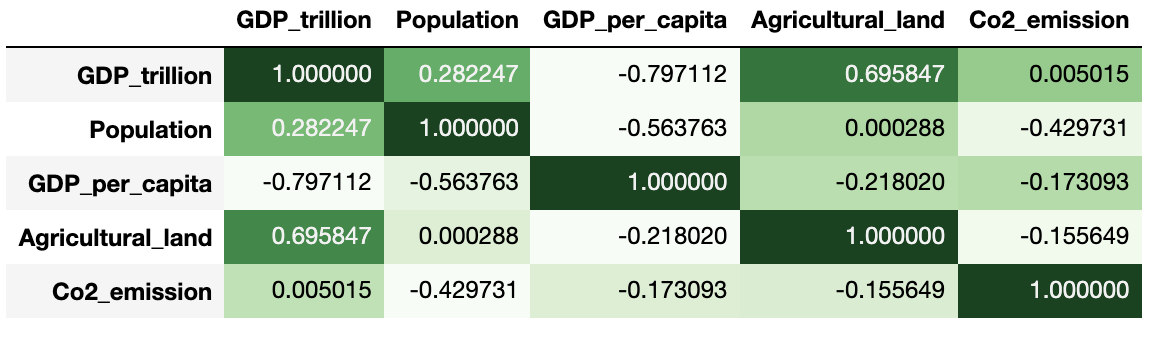
For entire Dataframe
Finally, if axis = None then it is applied across the entire dataframe
pear_corr.style.background_gradient(cmap='Greens') There is an optional parameter called gmap or Gradient map for determining the background colors. You can either pass the entire dataframe as a gmap or pass a ndarray or list-like must be an identical shape to the underlying data
pear_corr.style.background_gradient(cmap='Greens', gmap=gmap) 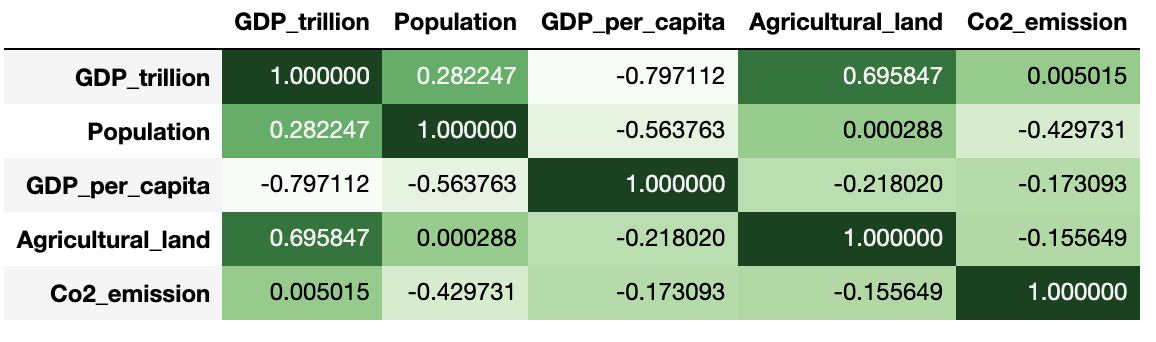
Updated: January 17, 2022
Share on
You may also enjoy
pandas count duplicate rows
DataFrames are a powerful tool for working with data in Python, and Pandas provides a number of ways to count duplicate rows in a DataFrame. In this article.
Pandas value error while merging two dataframes with different data types
If you’re encountering a “value error” while merging Pandas data frames, this article has got you covered. Learn how to troubleshoot and solve common issues .
How to get True Positive, False Positive, True Negative and False Negative from confusion matrix in scikit learn
In machine learning, we often use classification models to predict the class labels of a set of samples. The predicted labels may or may not match the true .
Pandas how to use list of values to select rows from a dataframe
In this post we will see how to use a list of values to select rows from a pandas dataframe We will follow these steps to select rows based on list of value.