- How To Take A Screenshot In Python Using PIL
- Python Screenshot Tutorial – How To Take Screenshot Using Python
- Python Screenshot Tutorial – Getting Started
- Taking Screenshot Using PyAutoGUI
- Installing PyAutoGUI
- Code For Screenshot Using PyAutoGUI
- Taking Screenshot With Time
- Take Screenshots in Python
- Take Screenshots Using the pyautogui Module in Python
- Take Screenshots Using the pyscreenshot Module in Python
- Conclusion
How To Take A Screenshot In Python Using PIL
In this tutorial, I will demonstrate how to take a screenshot using PIL in Python. Window, macOS and Linux are all supported.
PIL (Python Imaging Library / Pillow) is a Python library that adds support for opening, manipulating, and saving many different image file formats. It has a very friendly API with lots of help online including good documentation.
PIL supports Windows macOS and Linux and supports many versions of Python; see the installation notes to identify which version of PIL you will need for the version of Python you are using. At the time of wiring this, PIL 7 has been released and supports Python 3.8 — 3.5.
To install PIL, execute the following in a terminal:
python -m pip install Pillow To install an older version of PIL, execute python -m pip install pip= eg. python -m pip install pip=7.2.0 . You can find older versions released in the release notes.
To validate it was installed correctly, go to IDLE or a python shell and execute:
If no import error is raised, it was installed successfully.
Make sure you have executed the install command above; if you’re not sure you have executed it already, it is safe to execute it a second time.
If there were no errors when installing it and it says PIL is installed successfully, make sure you’re 100% sure that you installed PIL in the same distribution of Python that you’re trying to import it in. Go to my tutorial on How to Manage Multiple Python Distributions if you’re having some issues or are unsure about this.
To take a screenshot, we first need to import the ImageGrab module from PIL.
After we have the ImageGrab module, we can call .grab() to take a screenshot
from PIL import ImageGrab screenshot = ImageGrab.grab() # Take the screenshot On Linux, you must be using PIL 7.1.0 or higher for this to work; see release notes.
To view the screenshot, we can call .show() on the returned Image object. For example, using the code from above:
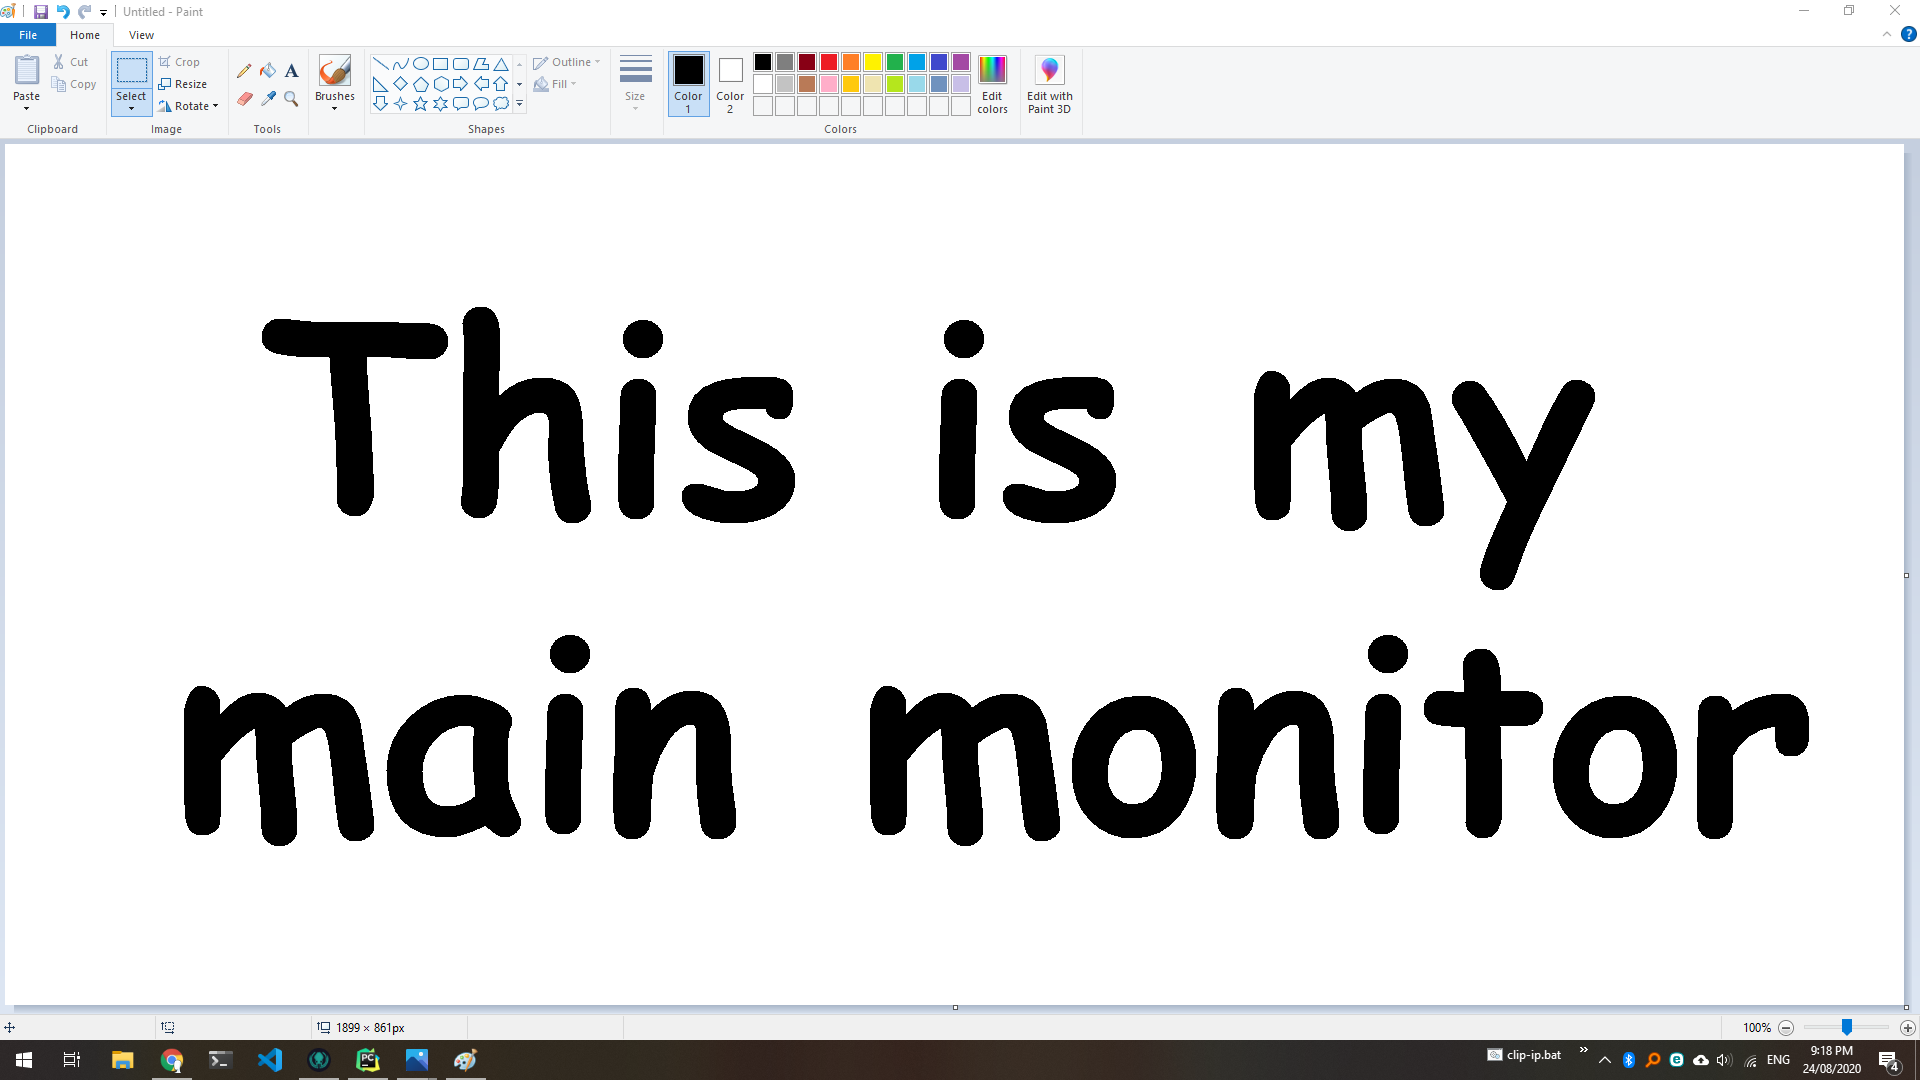
from PIL import ImageGrab screenshot = ImageGrab.grab() screenshot.show() # Show the image using the default image viewer Executing this will open the screenshot in your default image viewer. If you have more than one display, you will notice that this screenshot is only of the first display; I will expand on this further below.
Here is an example of a screenshot I took:
Saving images in PIL is very easy, calling .save() on the returned Image object will allow us to save the image into a file.
from PIL import ImageGrab filepath = 'my_image.png' screenshot = ImageGrab.grab() screenshot.save(filepath, 'PNG') # Equivalent to `screenshot.save(filepath, format='PNG')` Now if you go and open the file filepath («my_image.png» in the current working directory for this example), you will see the screenshot has been saved.
If you provide a file path with an extension of a supported image format, you can omit the format.
If you have a file already open in write mode or want to save the image to a file object, you can pass that instead of the filename. For example:
from PIL import ImageGrab file = open('my_file.png', 'w') screenshot = ImageGrab.grab() screenshot.save(file, 'PNG') # Save the image to the file object as a PNG file.close() # Make sure to close the file when you're done from io import BytesIO from PIL import ImageGrab bytes_io = BytesIO() screenshot = ImageGrab.grab() screenshot.save(bytes_io, 'PNG') # Save the image to bytes_io as a PNG # Do what you want with the bytes_io object Taking A Screenshot Of A Different Display
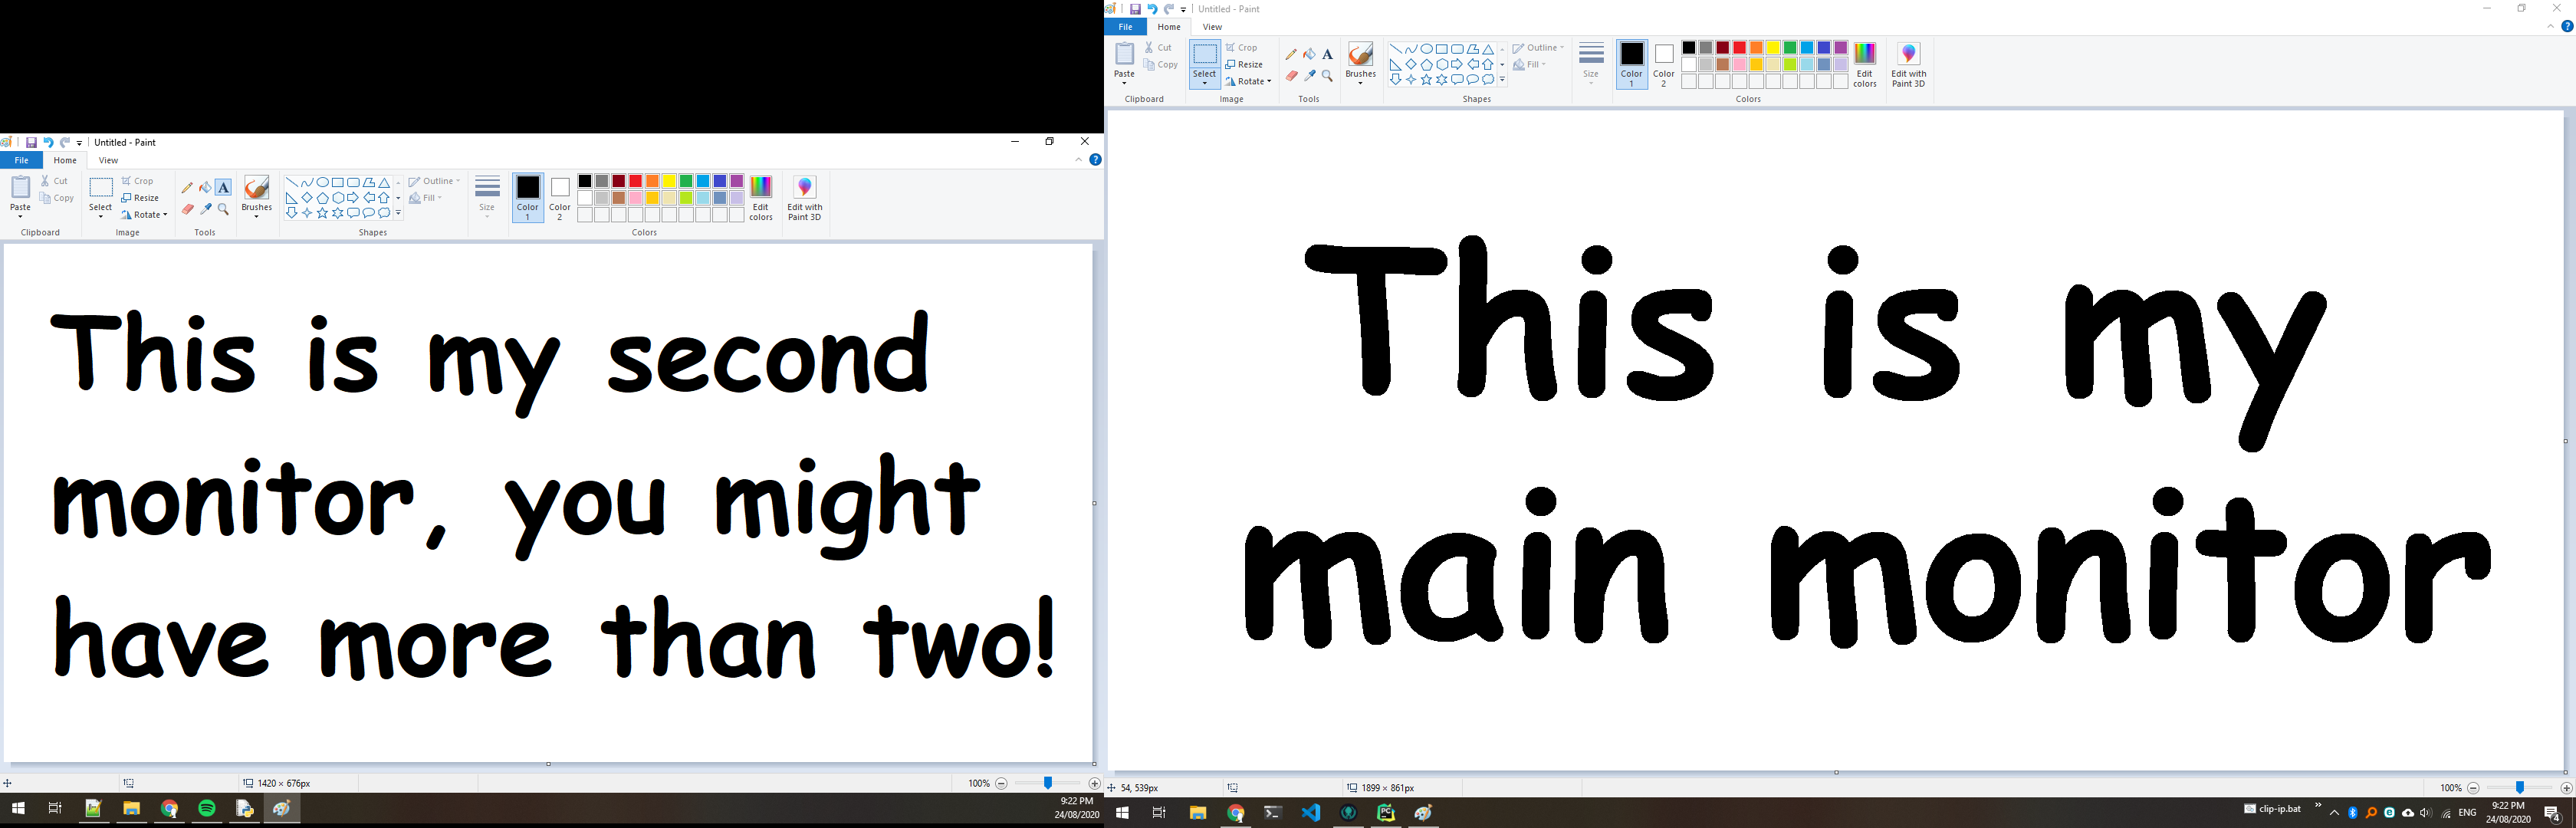
Back when we took a screenshot using ImageGrab.grab() , it only captured the main display. To take a screenshot of all displays, we can pass all_screens=True :
from PIL import ImageGrab screenshot = ImageGrab.grab(all_screens=True) # Take a screenshot that includes all screens Please note that all_screens is currently only supported in Windows
Now when you call screenshot.show() , you will see that multiple monitors are now displayed. Here is an example of my monitors:
Now that you have this larger image, you can crop it using other methods in PIL: How to crop an image using PIL.
Using MSS to Screenshot Each Displays
I also have a tutorial How To Take A Screenshot In Python Using MSS which goes over how to take screenshots using the Python MSS library. The tutorial is very similar, however MSS has better support for screenshots of different individual displays (including macOS and Windows).
Owner of PyTutorials and creator of auto-py-to-exe. I enjoy making quick tutorials for people new to particular topics in Python and tools that help fix small things.
Python Screenshot Tutorial – How To Take Screenshot Using Python
Hey guys, taking screenshot is necessary for most of the application so in this post you will learn how to take screenshot using python. So let’s start Python Screenshot Tutorial.
There are various ways to take screenshot using python. The first and most popular way is using PyAutoGUI module. You can also use pillow module for taking screenshots in python. And you will also learn here, how to take screenshots in tkinter application. So let’s move towards our main topic.
Python Screenshot Tutorial – Getting Started
Taking Screenshot Using PyAutoGUI
PyAutoGUI is a cross-platform GUI automation Python module for human beings. Used to programmatically control the mouse & keyboard.
Installing PyAutoGUI
To install PyAutoGUI module, you have to run following code on your command prompt.
Code For Screenshot Using PyAutoGUI
- screenshot( ) method of pyautogui class is used to take screenshot of your screen.
Now write the following code on your python IDE.
- First of all import pyautogui module.
- Then create a variable(file) that will store the screenshot.
- screenshot( ) method will take screenshot of your screen.
- Now save this image by calling save( ) method. You have to pass name of screenshot to the save( ) function.
- Now you can see, the screenshot of your screen has been captured.
Taking Screenshot With Time
In the above example, you have seen that the screenshot of current screen is captured, but if you want to take screenshot of another screen such as your desktop or anything else, so what can you do. For this you have to use time module. sleep( ) method of time module is used to add delay in the execution of a program.
So now write the following program.
Take Screenshots in Python
We often need to take screenshots on our PC or laptop to capture images from videos or from a website. In this article, we will discuss two ways to take screenshots in python.
Take Screenshots Using the pyautogui Module in Python
We can use the pyautogui module to take screenshots in python. Along with the pyautogui module, we will also need OpenCV and numpy module to capture screenshots. You can install these modules using PIP as follows.
pip install pyautogui numpy opencv-pythonAfter installing the modules, you can use them in the program. The pyautogui module provides us with the screenshot() function with the help of which we can take a screenshot. The screenshot() function, when executed, returns a PIL(python image library) file in RGB format. First, we will convert the PIL file into a numpy array using the numpy.array() function.

After creating the numpy array, we will convert the RGB format of the image to BGR before storing it in storage. For this, we will use the opencv.cvtColor() function to perform this operation. The opencv.cvtColor() takes the numpy array created in the previous step as its first input argument and a constant cv2.COLOR_RGB2BGR as its second input argument to show that we are converting the RGB format to BGR. After execution, the opencv.cvtColor() returns the final image.
To store the final screenshot, we will use the cv2.imwrite() function. It takes the name of the image file as its first input argument and the array representing the image as its second input argument. After execution of the imwrite() function, the screenshot is saved in the permanent storage.
Following is the code to take screenshots in python using the pyautogui and opencv module.
import cv2 import pyautogui import numpy pil_file = pyautogui.screenshot() numpy_arr = numpy.array(pil_file) image = cv2.cvtColor(numpy_arr, cv2.COLOR_RGB2BGR) cv2.imwrite('screenshot.png', image)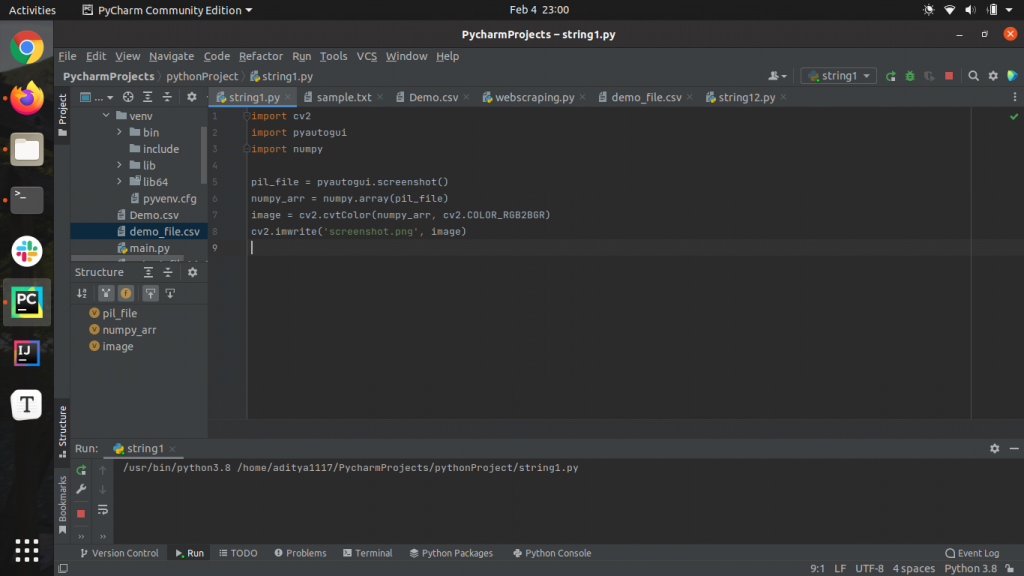
Take Screenshots Using the pyscreenshot Module in Python
While taking screenshots with the pyautogui module, we have to perform various operations to produce the output image. To avoid the hassle, we can take screenshots using the pyscreenshot module in Python.
The pyscreenshot module provides us with the grab() function with the help of which can take screenshots. The grab() function, when executed, returns the screenshot in the form of an array. You can store the screenshot in the storage using the save() method defined in the pyscreenshot module. The save() method, when invoked on an array containing the image captured using the grab() function, takes the file name as the input argument and saves the image in the storage.
import pyscreenshot image = pyscreenshot.grab() image.save('Output_screenshot.png')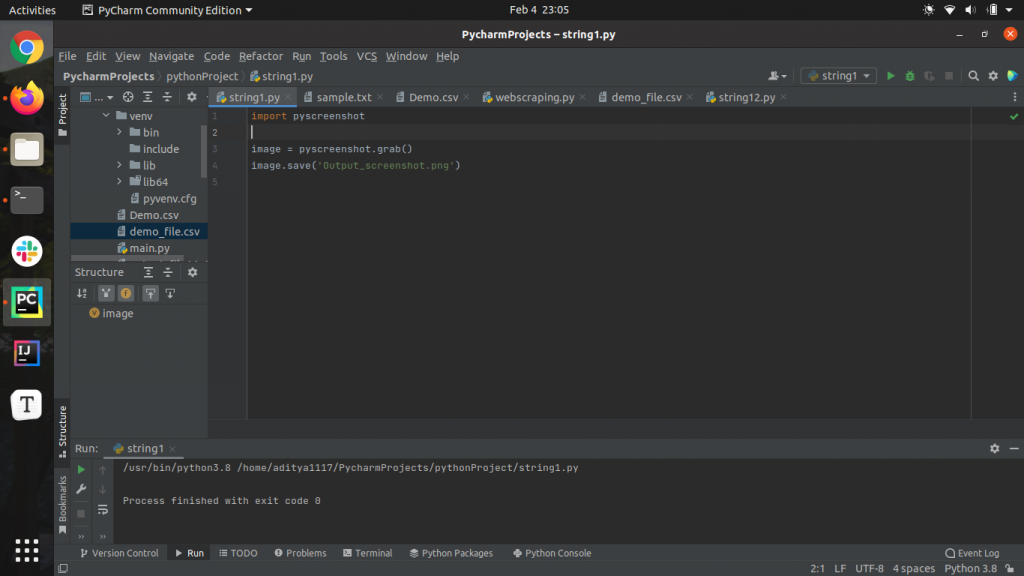
You can also view the screenshot using the show() method defined in the pyscreenshot module. The show() method, when invoked on an array containing the image captured using the grab() function, displays the image on the screen.
Conclusion
In this article, we have discussed two ways to take screenshots in python. To learn more about python programming, you can read this article on list comprehension in python. You might also like this article on set comprehension in python.