- Табличная HTML верстка сайта
- How to make a table row a link
- The problem
- Solutions
- Solution 1: Use JavaScript
- Solution 2: Use anchor elements in every table cell
- Solution 3: Use CSS grid to create a table
- Real-world examples
- GitHub
- Should table rows be links in the first place?
- Resources
- Ссылки а-ля ячейки в HTML таблицах
- Хитовые статьи про разработку сайтов
Табличная HTML верстка сайта
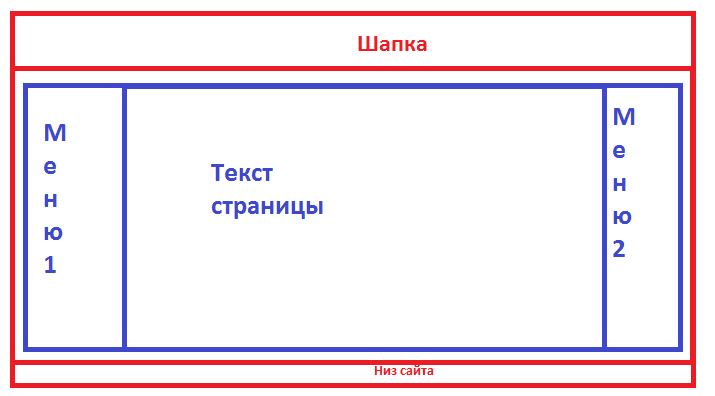
При таком типе вёрстки элементы сайта располагаются по ячейкам. Создаётся файл-шаблон с разметкой и используется как основа для всех остальных страниц. Фактически от файла к файлу меняется только основной контент. Шапка сайта, его низ и меню берутся из уже готового шаблона и обычно остаются неизменными.
Табличная вёрстка проста и во всех браузерах выглядит одинаково. Но состоящие из таблиц страницы много весят, медленно загружаются и содержат избыточный код. К тому же структура таблиц позволяет создать только строгий дизайн.
Вёрстка этого типа делается просто: в теле документа создаётся таблица (и ничего, кроме неё), в ячейки которой добавляется весь контент. Вёрстка потому и называется табличной, что вся страница состоит из таблиц, а вся выводимая информация находится внутри их ячеек. Даже область с основным содержимым страницы (например, со статьёй) — это всего лишь ячейка, текст из которой отображается на экране.
HTML-документ не обязательно должен состоять из одной таблицы — их можно вкладывать друг в друга, получая более интересное оформление.
Теги для создания таблиц были рассмотрены в соответствующей статье. Ниже приведён пример их использования.
Итак, пример табличной вёрстки:
Если поместить этот код в тело HTML-документа и открыть получившийся файл в браузере, то страница будет выглядеть так:

Вот и вся разметка. Для создания страниц вам остаётся только сделать копию файла и вместо отображаемых слов вставить свой контент. Так, копируя файлы и редактируя содержащийся в ячейках текст, вы можете создать сколь угодно большой веб-сайт с табличной вёрсткой.
Но взглянем на код с пояснениями.
- Тег открывает таблицу.
- Атрибут border задаёт толщину табличных рамок.
- Cellspacing устанавливает расстояние между ячейками. В данном случае оно сделано нулевым, чтобы таблица не расползалась.
шапка сайта (логотип, слоган, телефон)
- — открывающий тег ячейки заголовка таблицы. В отличие от других, текст в этой ячейке будет выровнен по центру и выделен полужирным.
- Colspan — атрибут, значение которого определяет, сколько ячеек по горизонтали относительно других строк текущий элемент будет занимать. закрывает ячейку.
- Текст между тегами и — это и есть содержимое ячейки, ради него всё и делалось.
Я разделил 100% ширины страницы на две части: 20% отдал под блок навигации, 80% — под основной контент.
Вёрстка блока навигации. Создаю ячейку, занимающую 20% ширины таблицы. Внутри тегов расположен список ссылок. На его основе можно сделать меню сайта.
Низ сайта (баннеры, счетчики, информация)
В следующей строке настраиваю подвал (низ) сайта. Для этого использую уже знакомые теги. При помощи colspan=2 делаю, чтобы низ сайта занимал по горизонтали сразу две ячейки, как шапка — эти части, в отличие от тела страницы, на блоки в моём случае делить не нужно.
Таким образом, для создания табличной вёрстки сайта, содержащего все основные элементы (шапку, низ, меню, контент страницы) понадобилась таблица, состоящая из четырёх строк и шести ячеек (строки головы и ног сайта содержат по одному элементу).
На современных сайтах практикуется блочная верстка, а таблицы уже вчерашний день.
Полезные ссылки:
- Основы HTML — бесплатный 2-х часовой видеокурс по основам HTML;
- Бесплатный курс по верстке сайта — пример блочной вёрстки с чистого листа;
- Вёрстка сайта с нуля 2.0 — полноценный платный курс;
- Создание приложений для Android — для тех, кто давно хотел попробовать себя в мобильной разработке (не для новичков).
How to make a table row a link
Allowing a table row to be a link is not as simple as one might think. This article explains what the main issue is with making links out of table rows, provides some solutions to the problem, showcase some real-world examples, and question whether having a table row as a link is something that should even be done.
The problem
Solutions
Solution 1: Use JavaScript
JavaScript can be used to programmatically navigate a user to another page when a table row is clicked. There are many ways to do this with JavaScript, but one way is to add an event listener on every table row element and use window.location.href to navigate the user to another page. See the Pen Table Row Links — JavaScript navigation by Robert (@robertcooper_rc) on CodePen. A link has been added in the cells of the last column to demonstrate that this solution works fine when some of the table rows contain links (which cannot be said for some of the other solutions to be proposed). Note that with this solution, users will not be able to control/command click on a row to open the linked page in a new tab (as is normal behavior when using elements). However, you could add an event listener to detect if the control/command key is pressed and open the page in a new tab if the row is clicked while the control/command key is pressed. Opening a page in a new window can be done programmatically using window.open([url], ‘_blank’) . See the Pen Table Row Links — JavaScript navigation using ⌘ + click by Robert (@robertcooper_rc) on CodePen. This is the same javascript solution as above, except it handles control/command clicking a row to open it in a new table. The only remaining issue with this solution is that the user doesn’t get the URL preview provided by browsers when hovering over anchor elements. There is currently no workaround for this. Link preview in the bottom left of the browser window when hovering over an anchor element.
Solution 2: Use anchor elements in every table cell
Anchor elements can be used to link a row if they are used in every cell. To prevent every table cell to be focusable (which would be annoying when tabbing through the table with a keyboard), only allow the first cell to be focusable by adding a tabindex=»-1″ to all anchor elements except for the one in the first column. Using the :focus-within pseudo selector, it’s possible to apply styles to the entire row when the first cell is focused, giving the impression that the entire row is focused while tabbing through the table. See the Pen Table Row Links — Links in each cell by Robert (@robertcooper_rc) on CodePen. One issue with this solution is that it’s not valid HTML to nest anchor elements within one another. That means that it would not be possible to add another element inside the table row. When nesting elements in an HTML file, they will appear as siblings when rendered in a browser. Here’s what happens in the table when trying to nest elements: See the Pen Table Row Links — Invalid HTML with nested links by Robert (@robertcooper_rc) on CodePen. Inspecting the cell with the nested link, you can see that the anchor elements go from being nested to being siblings.
1a href="#" tabindex="-1" class="row-link">a>2 a href="#link">Linka>
Chris Coyier has a great article going in-depth on nested links and some attempts at getting around them. I should point out that if you’re using React and you try to nest links, they will end up showing up in the rendered HTML markup as nested. This is because React uses JavaScript to create the HTML markup, so this kind of thing is possible. However, just because this can be done in React, doesn’t mean it’s valid HTML. It’s probably a good idea to avoid using invalid HTML since other tools, such as screen readers or search engine crawlers, likely expect the HTML to use valid syntax. One workaround that can be done is to not wrap the content inside of a table cell with an element, but instead, add an empty in each cell and then absolutely position it relative to the cell so that it covers the entire cell area. This way, it’s possible to have other links within the table cells. See the Pen Table Row Links — Nested row link workaround by Robert (@robertcooper_rc) on CodePen. Note that the links that are not absolutely positioned should have the position: relative and z-index: 1 CSS styles applied to allow them to sit above the absolutely positioned element in the stacking context (which allows them to be clickable).
Solution 3: Use CSS grid to create a table
Real-world examples
Although the following examples might be better classified as «lists» rather than «tables», the same logic/observations apply to tables.
GitHub
GitHub doesn’t make the entire row in their pull request list/table clickable. You need to click on the title of the pull request in each row to navigate to that page. This makes things straight-forward from an implementation and accessibility point of view.
Reddit uses
Should table rows be links in the first place?
From a user experience point of view, it can be very convenient to be able to click anywhere on a table row in order to navigate to another page. For that reason, I think it is an acceptable pattern. However, I would not use an anchor element, but rather use JavaScript (as suggested in option #2) to handle the click event on a table row and try to have an anchor element within the row pointing to the linked page for users to be able to hover over it and get a preview of the page’s URL. I would also prevent entire table rows to be focusable and instead rely on the links within the table row for keyboard navigation.
Resources
Stack Overflow discussion on making an entire row clickable React Table: React hooks to help you build tables Inclusive components — Data tables: building tables with accessibility in mind Nested Links: article by Cris Coyier explaining how to deal with nested elements Flexible data tables with CSS Grid: Explains how to style data tables with CSS Grid

Hey, I’m Robert Cooper and I write articles related to web development. If you find these articles interesting, follow me on Twitter to get more bite-sized content related to web development.
Ссылки а-ля ячейки в HTML таблицах
Как сделать на CSS «кликабельные» вертикально и горизонтально расположенные ссылки-ячейки?
В своё время Азат писал заметку про ссылки в ячейках в разделе JavaScript. Предложенный метод, конечно, очень хорош, но недавно на своём любимом сайте anfrax.ru я столкнулся с совершенно замечательным CSS трюком, который, во-первых, в точности воспроизводит JavaScipt’овый метод, а во-вторых, очень лаконичен и красив. Странно, я встречал подобное решение (переопределение свойства display ) раннее, но не принял во внимание, что оно может пригодиться и в данной ситуации…
Итак, вот, что необходимо для достижения нирваны в случаях с вертикальным и горизонтальным расположением ячеек (спасибо тов. dragster за дельные замечания):
Вариант с вертикальными ячейками:
a background-color:#CCCCCC;
border:2px dotted #000000;
display:block;
line-height:100%;
margin:3px;
padding:20px
>
a:hover background-color:#FFC0CB;
>
В итоге мы имеем следующее:
Вариант с горизонтальными ячейками:
a background-color:#CCCCCC;
border:2px dotted #000000;
display:»inline-block»; /* кавычки необходимы, чтобы NN6 нормально воспринимал (т. е. игнорировал) нестандартное, IE’шное значение inline-block, которое правильно вписывает тег A в layout страницы (для NN6 и Opera не нашлось подобного, правильно работающего значения display) */
margin:3px;
padding:20px
>
a:hover background-color:#FFC0CB;
>
А можно поступить с горизонтальными ячейками по-другому, как любезно указал г-н Серега (я почему-то забыл о замечательном свойстве float ):
a background-color:#CCCCCC;
border:2px dotted #000000;
display:block;
float:left;
margin:3px;
padding:20px
>
a:hover background-color:#FFC0CB;
>
В итоге мы имеем следующее:
Большим плюсом использования одного из указанных методов является тот факт, что они безоговорочно работают в IE5.5+ (в IE5.0 не работают варианты с горизонтальными ячейками) и в NN6+ и Opera5+ (иногда, правда, с некоторыми причудливыми глюками). Согласитесь, это неплохая совместимость.