- Implement Swipe Gesture in Kotlin
- Swipeable RecyclerView in Android using Kotlin.
- What is Recycler view?
- Why Swipeable Recycler View over simple one?
- Creating a New Project:
- Adding Dependencies to Gradle:
- Create swipe views with tabs and viewpager in Android using Kotlin
- Add TabLayout and ViewPager to your Main/Host Layout
- Create Fragments which we want to display
- Create FragmentPagerAdapter
- Lets Add tabs Dynamically to host Screen
- Initialize Adapter with viewpager
- Add On tab Click Listener
- Did you find this article valuable?
- How to create a swipe refresh layout in Android using Kotlin?
Implement Swipe Gesture in Kotlin
I’m trying to implement a gesture detector for my application written in Kotlin. I’m following the comment on this question: link So, I created the OnSwipeTouchListener class and I implemented the listener in my class:
class DetailActivity : AppCompatActivity() < override fun onBackPressed() < super.onBackPressed() >override fun onCreate(savedInstanceState: Bundle?) < super.onCreate(savedInstanceState) setContentView(R.layout.detail_activity) window.decorView.setOnTouchListener(object: OnSwipeTouchListener(this@DetailActivity) < override fun onSwipeLeft() < onBackPressed() >override fun onSwipeRight() < onBackPressed() >>) > The problem is that it doesn’t get recognized and I don’t get any error. I tried to put a Log.i to check if the program enters in the two overrides methods, but nothing get printed. Can it be a View problem? EDIT: this is the Listener code:
open class OnSwipeTouchListener(ctx: Context) : OnTouchListener < private val gestureDetector: GestureDetector companion object < private val SWIPE_THRESHOLD = 100 private val SWIPE_VELOCITY_THRESHOLD = 100 >init < gestureDetector = GestureDetector(ctx, GestureListener()) >override fun onTouch(v: View, event: MotionEvent): Boolean < return gestureDetector.onTouchEvent(event) >private inner class GestureListener : SimpleOnGestureListener() < override fun onDown(e: MotionEvent): Boolean < return true >override fun onFling(e1: MotionEvent, e2: MotionEvent, velocityX: Float, velocityY: Float): Boolean < var result = false try < val diffY = e2.y - e1.y val diffX = e2.x - e1.x if (Math.abs(diffX) >Math.abs(diffY)) < if (Math.abs(diffX) >SWIPE_THRESHOLD && Math.abs(velocityX) > SWIPE_VELOCITY_THRESHOLD) < if (diffX >0) < onSwipeRight() >else < onSwipeLeft() >result = true > > else if (Math.abs(diffY) > SWIPE_THRESHOLD && Math.abs(velocityY) > SWIPE_VELOCITY_THRESHOLD) < if (diffY >0) < onSwipeBottom() >else < onSwipeTop() >result = true > > catch (exception: Exception) < exception.printStackTrace() >return result > > open fun onSwipeRight() <> open fun onSwipeLeft() <> open fun onSwipeTop() <> open fun onSwipeBottom() <> > Swipeable RecyclerView in Android using Kotlin.
Let’s, first of all, see what is swipeable. Swipeable in terms of swiping items or elements both right and left side, to perform specific operations on it as shown in the sample output below. Before starting, let’s see what is Recycler View and when it should be used.
What is Recycler view?
Many apps need to display UI elements based on large data sets, or data that frequently changes. For example, a music app might need to display information about thousands of albums, but only a dozen of those albums might be on-screen at a time or an app like Gmail, which has lots of emails with different categories like sent and received etc. If the app created UI widgets for each of those albums or E-mails, the app would end up using a lot of memory and storage, potentially making the app slow and crash-prone. On the other hand, if the app created UI widgets each time a new album scrolled onto the screen and destroyed the widgets when it scrolled off, that would also cause the app to run slowly, since creating UI objects is a resource-intensive operation.
For this type of situations, we can use Recycler view, instead of List views to handle a large amount of data.
Why Swipeable Recycler View over simple one?
With swipeable recycler view, it would be easy to provide specific functionalities like edit an element or delete an element permanently etc.
Seems Interesting right? So let’s get started!
Creating a New Project:
Open your Android Studio & create a new Project. For Kotlin support, check the checkbox of Kotlin support. Now give name whatever you like and We’ll keep all the things by default and clicked finish.
Adding Dependencies to Gradle:
To create recycler view, add following dependencies.
compile 'com.android.support:recyclerview-v7:25.3.1' compile 'com.android.support:design:25.3.1'
We don’t need any permissions from the user for Recycler view.
If your Android studio is not updated (lower version than 3.0), then you have to manually configure Kotlin. So add following line to your dependencies of a project (NOT module as above).
classpath "org.jetbrains.kotlin:kotlin-gradle-plugin:$kotlin_version"
So the whole file will look like:
// Top-level build file where you can add configuration options common to all sub-projects/modules. buildscript < ext.kotlin_version = '1.1.2-4' repositories < jcenter() >dependencies < classpath 'com.android.tools.build:gradle:2.3.2' classpath "org.jetbrains.kotlin:kotlin-gradle-plugin:$kotlin_version" // NOTE: Do not place your application dependencies here; they belong // in the individual module build.gradle files >> allprojects < repositories < jcenter() >> task clean(type: Delete)
Now rebuild your project. Thus you’ve configured Kotlin manually! Now let’s go ahead.
Now add following `Kotlin` code in your main activity.
MainActivity.kt
package com.example.admin.swipablerecyclerview import android.content.DialogInterface import android.graphics.Bitmap import android.graphics.BitmapFactory import android.graphics.Canvas import android.graphics.Color import android.graphics.Paint import android.graphics.RectF import android.support.design.widget.FloatingActionButton import android.support.v7.app.AlertDialog import android.support.v7.app.AppCompatActivity import android.os.Bundle import android.support.v7.widget.LinearLayoutManager import android.support.v7.widget.RecyclerView import android.support.v7.widget.helper.ItemTouchHelper import android.view.View import android.view.ViewGroup import android.widget.EditText import java.util.ArrayList class MainActivity : AppCompatActivity(), View.OnClickListener < private val names = ArrayList() private var adapter: DataAdapter? = null private var recyclerView: RecyclerView? = null private var alertDialog: AlertDialog.Builder? = null private var et_name: EditText? = null private var edit_position: Int = 0 private var view: View? = null private var add = false private val p = Paint() override fun onCreate(savedInstanceState: Bundle?) < super.onCreate(savedInstanceState) setContentView(R.layout.activity_main) initViews() initDialog() >private fun initViews() < val fab = findViewById(R.id.fab) as FloatingActionButton fab.setOnClickListener(this) recyclerView = findViewById(R.id.card_recycler_view) as RecyclerView recyclerView. setHasFixedSize(true) val layoutManager = LinearLayoutManager(applicationContext) recyclerView. layoutManager = layoutManager adapter = DataAdapter(names) recyclerView. adapter = adapter names.add("Kaushal") names.add("Alex") names.add("Ram") names.add("Abhishek") names.add("Narendra Modi") adapter. notifyDataSetChanged() initSwipe() >private fun initSwipe() < val simpleItemTouchCallback = object : ItemTouchHelper.SimpleCallback(0, ItemTouchHelper.LEFT or ItemTouchHelper.RIGHT) < override fun onMove(recyclerView: RecyclerView, viewHolder: RecyclerView.ViewHolder, target: RecyclerView.ViewHolder): Boolean < return false >override fun onSwiped(viewHolder: RecyclerView.ViewHolder, direction: Int) < val position = viewHolder.adapterPosition if (direction == ItemTouchHelper.LEFT) < adapter. removeItem(position) >else < removeView() edit_position = position alertDialog. setTitle("Edit Name") et_name. setText(names[position]) alertDialog. show() >> override fun onChildDraw(c: Canvas, recyclerView: RecyclerView, viewHolder: RecyclerView.ViewHolder, dX: Float, dY: Float, actionState: Int, isCurrentlyActive: Boolean) < val icon: Bitmap if (actionState == ItemTouchHelper.ACTION_STATE_SWIPE) < val itemView = viewHolder.itemView val height = itemView.bottom.toFloat() - itemView.top.toFloat() val width = height / 3 if (dX >0) < p.color = Color.parseColor("#388E3C") val background = RectF(itemView.left.toFloat(), itemView.top.toFloat(), dX, itemView.bottom.toFloat()) c.drawRect(background, p) icon = BitmapFactory.decodeResource(resources, R.drawable.ic_edit_white) val icon_dest = RectF(itemView.left.toFloat() + width, itemView.top.toFloat() + width, itemView.left.toFloat() + 2 * width, itemView.bottom.toFloat() - width) c.drawBitmap(icon, null, icon_dest, p) >else < p.color = Color.parseColor("#D32F2F") val background = RectF(itemView.right.toFloat() + dX, itemView.top.toFloat(), itemView.right.toFloat(), itemView.bottom.toFloat()) c.drawRect(background, p) icon = BitmapFactory.decodeResource(resources, R.drawable.ic_delete_white) val icon_dest = RectF(itemView.right.toFloat() - 2 * width, itemView.top.toFloat() + width, itemView.right.toFloat() - width, itemView.bottom.toFloat() - width) c.drawBitmap(icon, null, icon_dest, p) >> super.onChildDraw(c, recyclerView, viewHolder, dX, dY, actionState, isCurrentlyActive) > > val itemTouchHelper = ItemTouchHelper(simpleItemTouchCallback) itemTouchHelper.attachToRecyclerView(recyclerView) > private fun removeView() < if (view. parent != null) < (view. parent as ViewGroup).removeView(view) >> private fun initDialog() < alertDialog = AlertDialog.Builder(this) view = layoutInflater.inflate(R.layout.dialog_layout, null) alertDialog. setView(view) alertDialog. setPositiveButton("Save") < dialog, which ->if (add) < add = false adapter. addItem(et_name. text.toString()) dialog.dismiss() >else < names[edit_position] = et_name. text.toString() adapter. notifyDataSetChanged() dialog.dismiss() >> et_name = view. findViewById(R.id.et_name) as EditText > override fun onClick(v: View) < when (v.id) < R.id.fab -> < removeView() add = true alertDialog. setTitle("Add Name") // et_country.setText(""); alertDialog. show() >> > > Note the method named, onSwiped() here we are detecting swipe on the recycler view item and according to the direction of the swipe, we’ll decide the action: delete or. edit
And using the method named method, onChildDraw() we can draw the background of the element when it is swiped. We are creating an alert dialog when the user clicks on floating action button, for asking new name to be entered.When the user enters the new name we will notify recycler view to add that new name using method notifyDataSetChanged() .
Here is our DataAdapter class.
DataAdapter.kt
package com.example.admin.swipablerecyclerview /** * Created by ADMIN on 5/26/2017. */ import android.support.v7.widget.RecyclerView import android.view.LayoutInflater import android.view.View import android.view.ViewGroup import android.widget.TextView import java.util.ArrayList internal class DataAdapter(private val names: ArrayList) : RecyclerView.Adapter() < override fun onCreateViewHolder(viewGroup: ViewGroup, i: Int): DataAdapter.ViewHolder < val view = LayoutInflater.from(viewGroup.context).inflate(R.layout.row_layout, viewGroup, false) return ViewHolder(view) >override fun onBindViewHolder(viewHolder: ViewHolder, i: Int) < viewHolder.tv_names.text = names[i] >override fun getItemCount(): Int < return names.size >fun addItem(country: String) < names.add(country) notifyItemInserted(names.size) >fun removeItem(position: Int) < names.removeAt(position) notifyItemRemoved(position) notifyItemRangeChanged(position, names.size) >internal inner class ViewHolder(view: View) : RecyclerView.ViewHolder(view) < var tv_names: TextView init < tv_names = view.findViewById(R.id.tv_names) as TextView >> >
Using this we are setting data items to recycler view. Below are the necessary layout files.
row_layout.xml
activity_main.xml
dialog_layout.xml
Now run the app and you will able to see the recycler view with different names. Swipe left to delete and swipe right to edit the swiped item.
Create swipe views with tabs and viewpager in Android using Kotlin
We will learn about how to add TabLayout with ViewPager in an app. TabLayout provides a horizontal layout to display tabs.
Add TabLayout and ViewPager to your Main/Host Layout
It can be a activity or fragment, I have used fragment here rootlayout can be constraintlayout or LinearLayout.
Remember this should be in Host Activity/Fragment.
com.google.android.material.tabs.TabLayout android:id="@+id/tab_sliding_tabs" android:layout_width="match_parent" android:layout_height="wrap_content" android:layout_marginTop="16dp" app:layout_constraintEnd_toEndOf="parent" app:layout_constraintStart_toStartOf="parent" app:layout_constraintTop_toBottomOf="@+id/tv_mindful_points" app:tabMode="fixed" /> androidx.viewpager.widget.ViewPager android:id="@+id/viewpager" android:layout_width="match_parent" android:layout_height="0dp" android:background="@android:color/white" app:layout_constraintBottom_toBottomOf="parent" app:layout_constraintEnd_toEndOf="parent" app:layout_constraintStart_toStartOf="parent" app:layout_constraintTop_toBottomOf="@+id/tab_sliding_tabs" /> Above We have Created tablayout which is the container which will contain the tabs Button for eg: tab 1 or tab 2.
The Viewpager is where the screen or fragments loads.
Create Fragments which we want to display
Here I want to display 2 fragment So I will be adding 2 fragments.
Let me show sample of Each Fragment:
ProfileListFragment.kt
class ProfileListFragment : Fragment() < val ARG_PAGE = "ARG_PAGE" private lateinit var binding: FragmentProfileListBinding override fun onCreate(savedInstanceState: Bundle?) < super.onCreate(savedInstanceState) > override fun onViewCreated(view: View, savedInstanceState: Bundle?) < super.onViewCreated(view, savedInstanceState) //here will be data to show what you want to show > override fun onCreateView( inflater: LayoutInflater, container: ViewGroup?, savedInstanceState: Bundle? ): View < // Inflate the layout for this fragment binding = DataBindingUtil.inflate(inflater, R.layout.fragment_profile_list, container, false) return binding.root > companion object < @JvmStatic fun newInstance(page: Int) = ProfileListFragment().apply < val bundle = Bundle() bundle.putInt(ARG_PAGE, page); val fragment = ProfileListFragment() fragment.arguments = bundle return fragment > > > Please Note I use Data Binding.
You can add any data which you want to display here, now create another fragment based on prefences.
Create FragmentPagerAdapter
This will be used as adapter for Fragments such as this will help to change fragments giving counts of fragments, as adapter works.
- Add private val myContext: Context, fm: FragmentManager?, var totalTabs: Int to Constructor
- In getItem add fragment to position which you want to show, 0 means first tab , 1 means 2nd tab and so on.
class AppFragmentPagerAdapter( private val myContext: Context, fm: FragmentManager?, var totalTabs: Int ) : FragmentPagerAdapter(fm!!) < // this is for fragment tabs override fun getItem(position: Int): Fragment < return when (position) < 0 -> < ProfileListFragment() >1 -> < ProfileListFragment2() >else -> ProfileListFragment() > > // this counts total number of tabs override fun getCount(): Int < return totalTabs > > Lets Add tabs Dynamically to host Screen
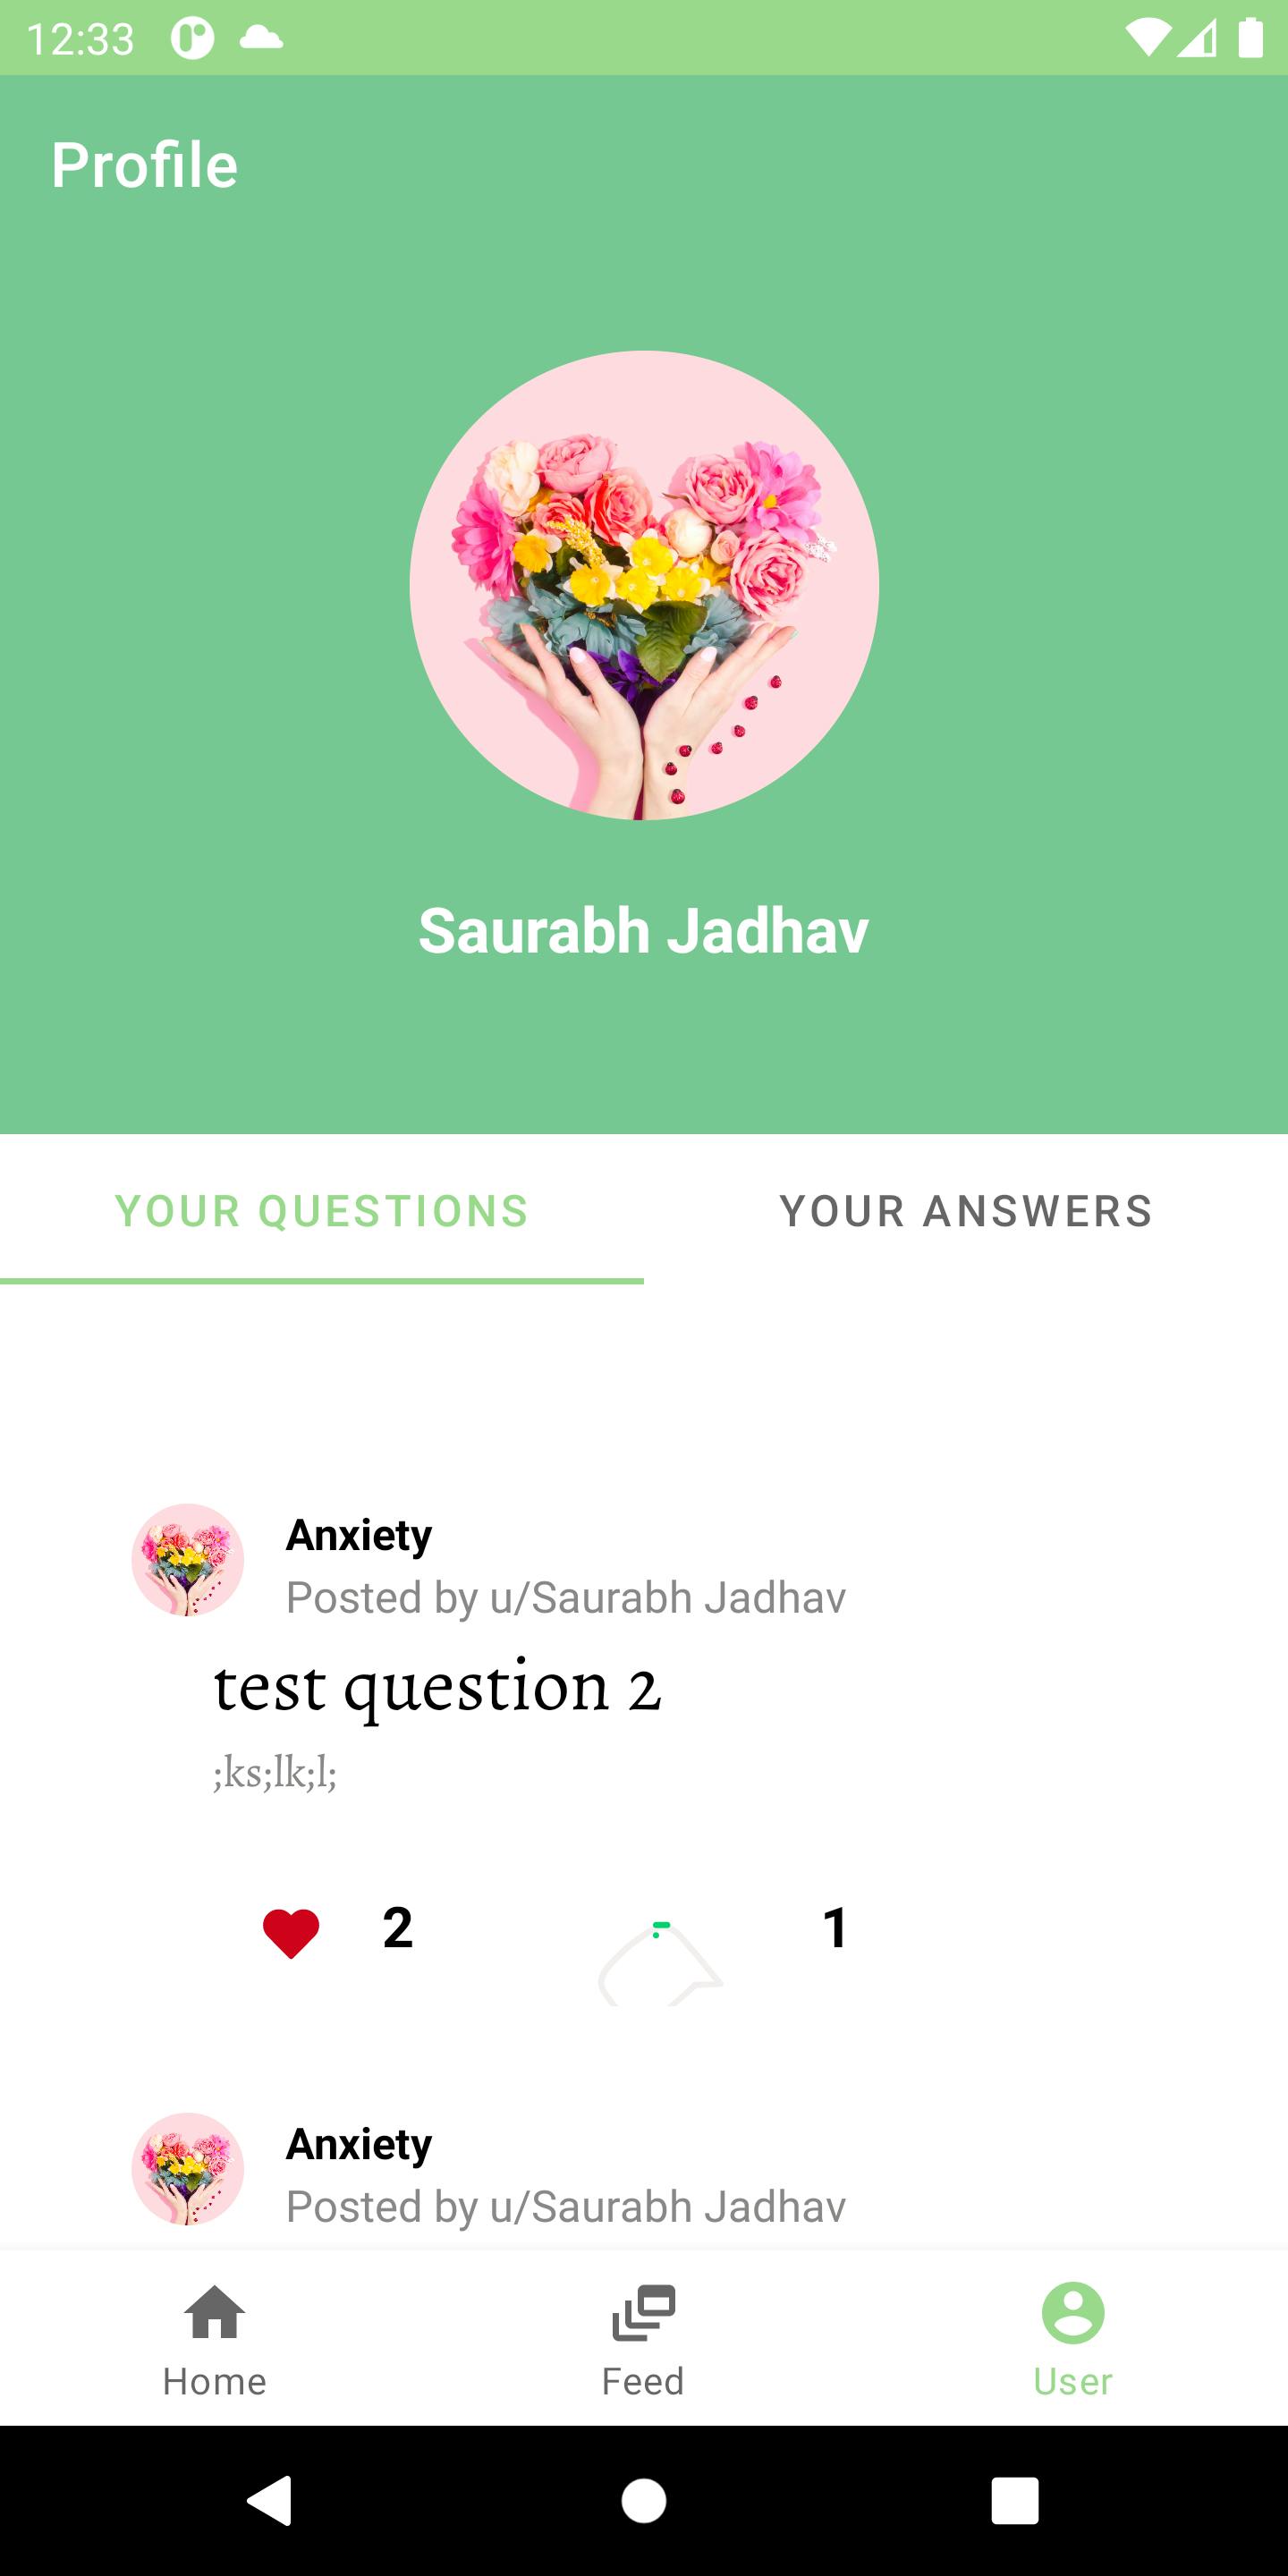
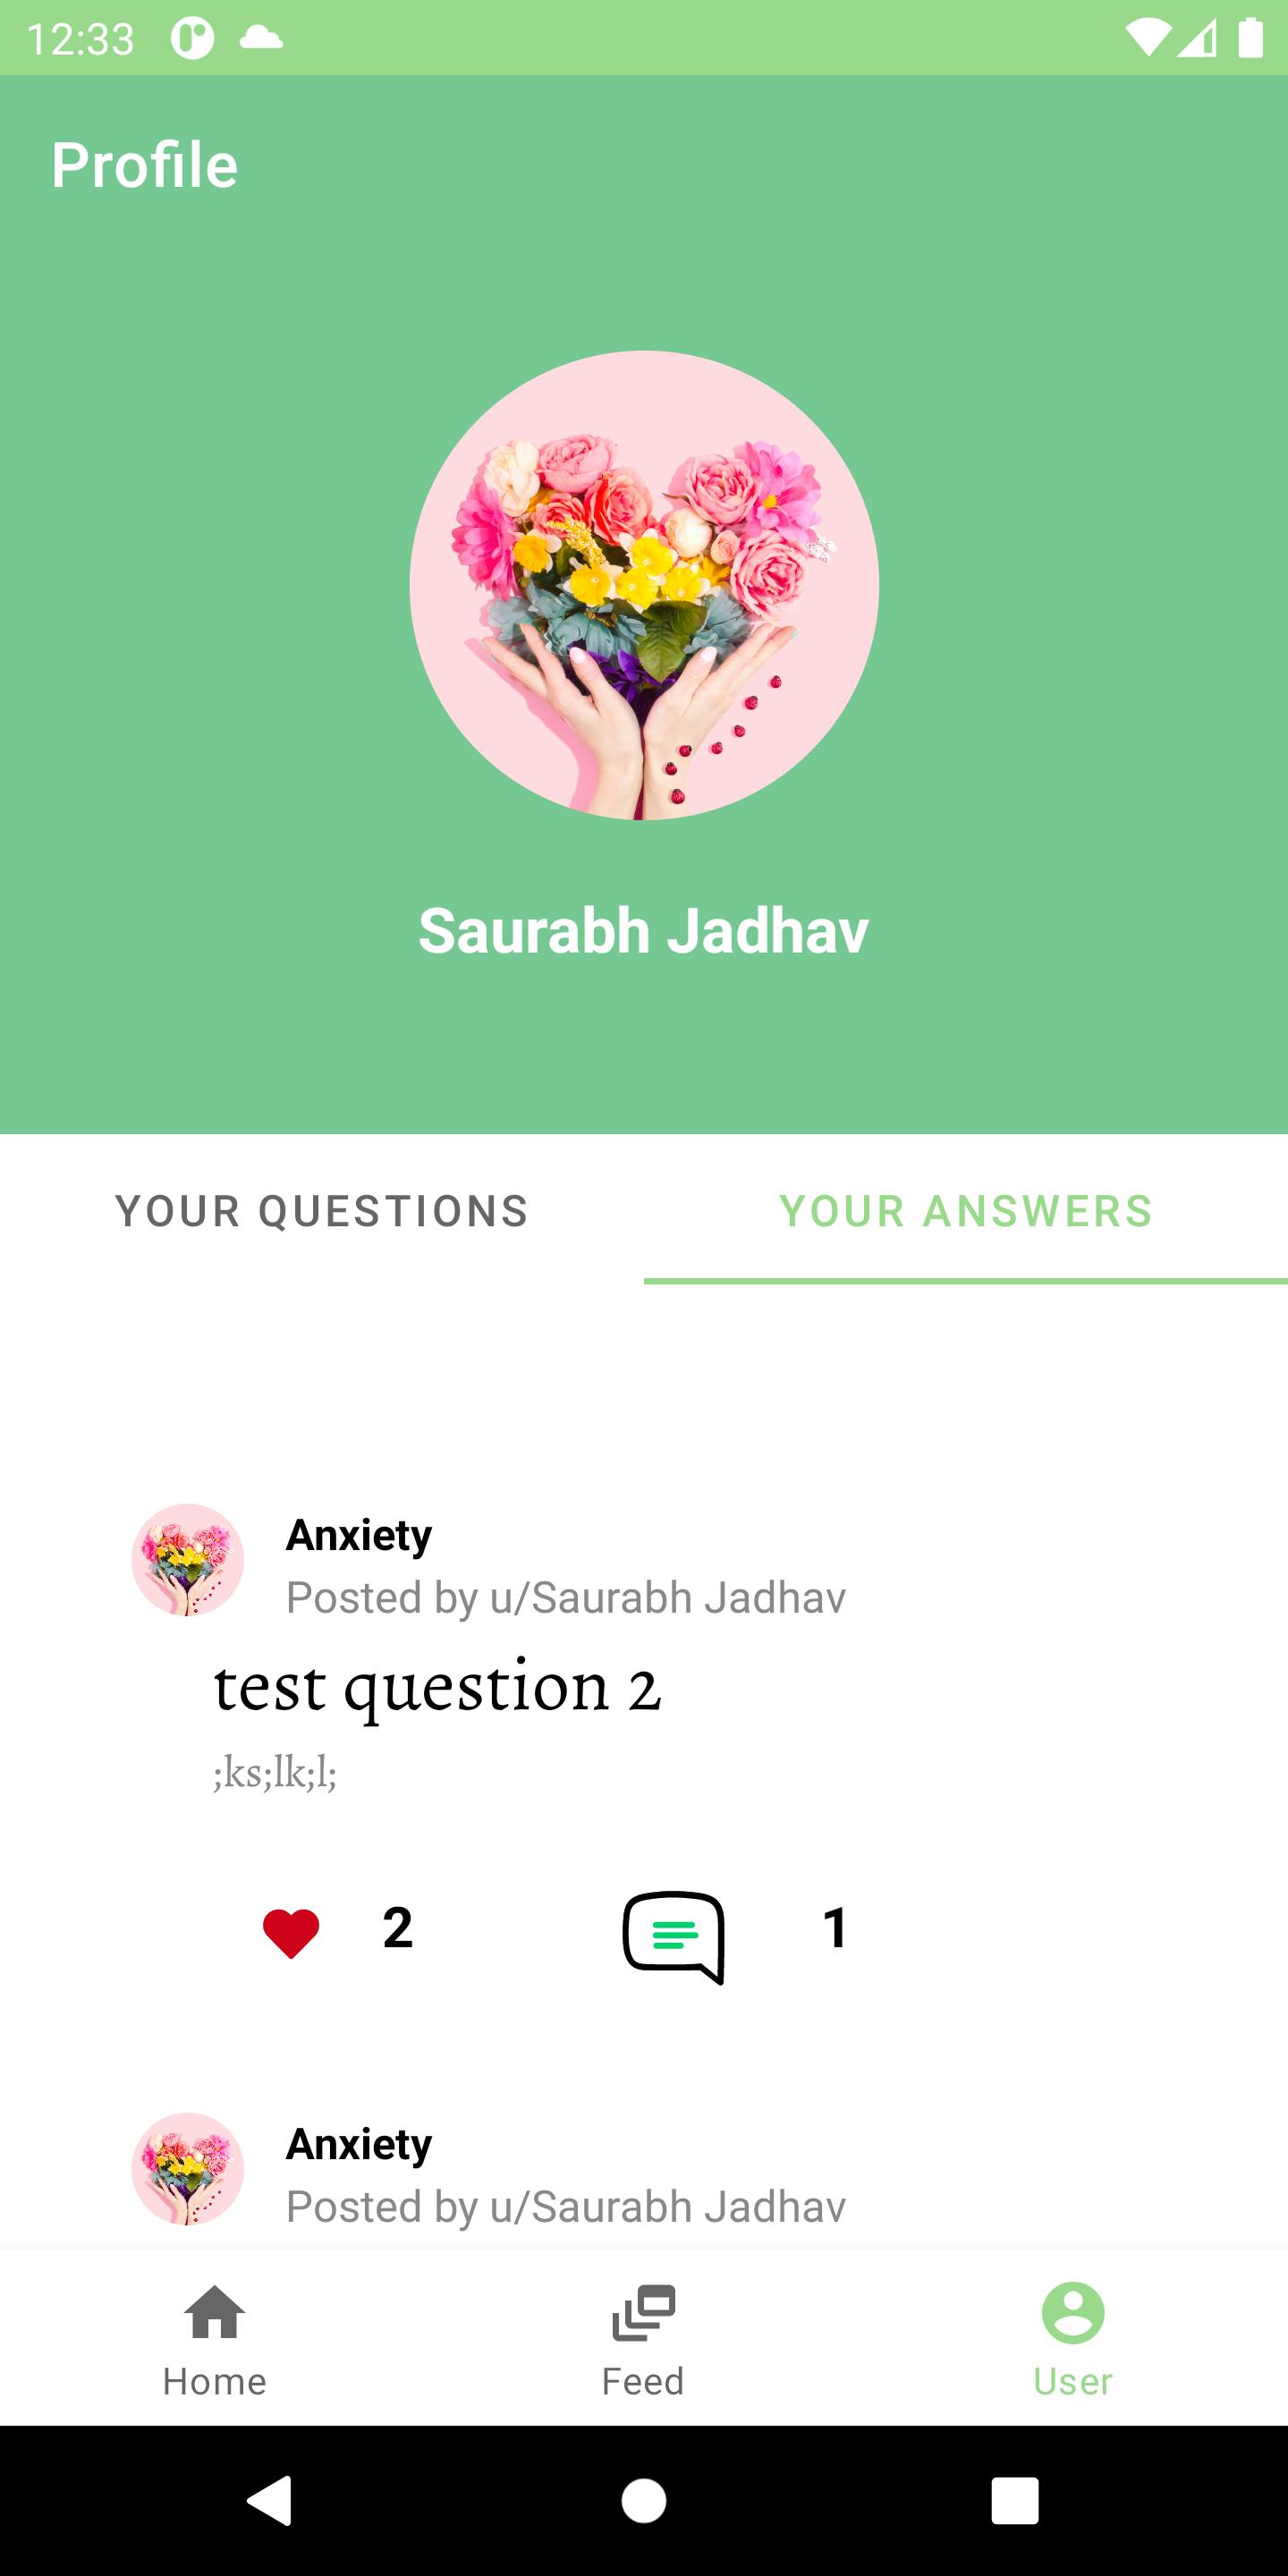
binding.tabSlidingTabs.addTab(binding.tabSlidingTabs.newTab().setText("Your Questions")); binding.tabSlidingTabs.addTab(binding.tabSlidingTabs.newTab().setText("Your Answers")); The above code will add two tabs now the screen not setup but two tabs/buttons are set with title.
Initialize Adapter with viewpager
- Initialize the recently created AppFragmentPagerAdapter to adapter variable.
- Pass adapter to the viewpager.
- add addOnPageChangeListener to viewpager.
val adapter = AppFragmentPagerAdapter( requireContext(), childFragmentManager, binding.tabSlidingTabs.tabCount ) binding.viewpager.adapter = adapter binding.viewpager.addOnPageChangeListener(TabLayout.TabLayoutOnPageChangeListener(binding.tabSlidingTabs)) Add On tab Click Listener
Here we will setup tabs on click listener.
binding.tabSlidingTabs.addOnTabSelectedListener(object : TabLayout.OnTabSelectedListener < override fun onTabSelected(tab: TabLayout.Tab) < binding.viewpager.currentItem = tab.position >override fun onTabUnselected(tab: TabLayout.Tab) < >override fun onTabReselected(tab: TabLayout.Tab) < binding.viewpager.currentItem = tab.position >>) Lets me show you final screen after adding data to screen.
I hope you have liked it Lets learn more about Android Development together.
Did you find this article valuable?
Support saurabh jadhav by becoming a sponsor. Any amount is appreciated!
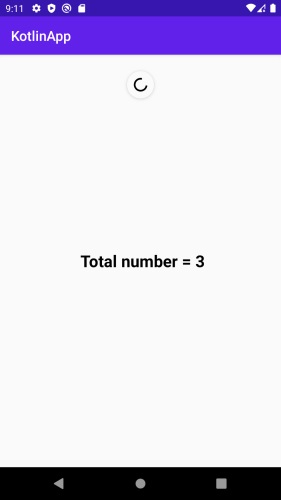
How to create a swipe refresh layout in Android using Kotlin?
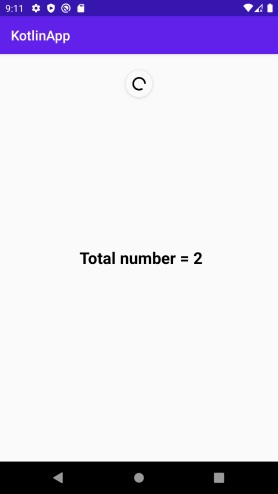
This example demonstrates how to create a swipe refresh layout in Android using Kotlin.
Step 1 − Create a new project in Android Studio, go to File ⇒ New Project and fill all required details to create a new project.
Step 2 − Add the following code to res/layout/activity_main.xml.
Step 3 − Add the following code to src/MainActivity.kt
import androidx.appcompat.app.AppCompatActivity import android.os.Bundle import android.os.Handler import android.widget.TextView import androidx.swiperefreshlayout.widget.SwipeRefreshLayout class MainActivity : AppCompatActivity() < lateinit var swipeRefreshLayout: SwipeRefreshLayout lateinit var textView: TextView var number: Int = 0 override fun onCreate(savedInstanceState: Bundle?) < super.onCreate(savedInstanceState) setContentView(R.layout.activity_main) title = "KotlinApp" swipeRefreshLayout = findViewById(R.id.swipe) textView = findViewById(R.id.textView) swipeRefreshLayout.setOnRefreshListener < number++ textView.text = " Total number = $number" Handler().postDelayed(Runnable < swipeRefreshLayout.isRefreshing = false >, 4000) > > >
Step 4 − Add the following code to androidManifest.xml
Let’s try to run your application. I assume you have connected your actual Android Mobile device with your computer. To run the app from android studio, open one of your project’s activity files and click the Run icon from the toolbar. Select your mobile device as an option and then check your mobile device which will display your default screen.
Click here to download the project code.