Saved searches
Use saved searches to filter your results more quickly
You signed in with another tab or window. Reload to refresh your session. You signed out in another tab or window. Reload to refresh your session. You switched accounts on another tab or window. Reload to refresh your session.
Implementing Pull to Refresh Guide
- Overview
- Using SwipeRefreshLayout
- RecyclerView with SwipeRefreshLayout
- Step 1: Wrap RecyclerView
- Step 2: Update RecyclerView.Adapter
- Step 3: Setup SwipeRefreshLayout
- Using with Paging Library
- SwipeRefreshLayout with ListView (deprecated)
- Step 1: Setting SwipeRefreshLayout
- Step 2: Set your ListView inside Layout
- Step 3: Now in your main_activity set your code
- Troubleshooting
- References
Finding these guides helpful?
We need help from the broader community to improve these guides, add new topics and keep the topics up-to-date. See our contribution guidelines here and our topic issues list for great ways to help out.
Check these same guides through our standalone viewer for a better browsing experience and an improved search. Follow us on twitter @codepath for access to more useful Android development resources.
Clone this wiki locally
In Android, the common «pull to refresh» UX concept is not built in to a ListView/RecyclerView. However, many Android applications would like to make use of this concept for their feeds. This is useful for all sorts of feeds such as a Twitter timeline. This effect can be achieved using the SwipeRefreshLayout class
SwipeRefreshLayout is a ViewGroup that can hold only one scrollable view as a child. This can be either a ScrollView or an AdapterView such as a ListView or a RecyclerView .
Edit your app/build.gradle file to include a library:
apply plugin: 'com.android.application' //. dependencies < // . implementation 'androidx.swiperefreshlayout:swiperefreshlayout:1.1.0' >
Make sure your libraries is up to date by adding to your root gradle.file :
allprojects < repositories < // requires Gradle v4.1+ google() > >
RecyclerView with SwipeRefreshLayout
Just like the previous section, wrap the scrollable view, in this case a RecyclerView with a SwipeRefreshLayout in the XML layout:
androidx.swiperefreshlayout.widget.SwipeRefreshLayout xmlns:android="http://schemas.android.com/apk/res/android" android:id="@+id/swipeContainer" android:layout_width="match_parent" android:layout_height="match_parent"> androidx.recyclerview.widget.RecyclerView android:id="@+id/rvItems" android:layout_width="match_parent" android:layout_height="wrap_content" android:layout_alignParentLeft="true" android:layout_alignParentTop="true" /> androidx.swiperefreshlayout.widget.SwipeRefreshLayout>
Step 2: Update RecyclerView.Adapter
Make sure to have helper methods in your RecyclerView adapter to clear items from the underlying dataset or add items to it.
/* Within the RecyclerView.Adapter class */ // Clean all elements of the recycler public void clear() < items.clear(); notifyDataSetChanged(); > // Add a list of items -- change to type used public void addAll(ListTweet> list) < items.addAll(list); notifyDataSetChanged(); >
/* Within the RecyclerView.Adapter class */ // Clean all elements of the recycler fun clear() < tweets.clear() notifyDataSetChanged() >// Add a list of items — change to type used fun addAll(tweetList: ListTweet>)
Step 3: Setup SwipeRefreshLayout
Next, we need to configure the SwipeRefreshLayout during view initialization in the activity. The activity that instantiates SwipeRefreshLayout should add an OnRefreshListener to be notified whenever the swipe to refresh gesture is completed.
The SwipeRefreshLayout will notify the listener each and every time the gesture is completed again; the listener is responsible for correctly determining when to actually initiate a refresh of its content.
Next, we need to configure the SwipeRefreshLayout during view initialization in the activity:
public class TimelineActivity extends Activity < private SwipeRefreshLayout swipeContainer; @Override protected void onCreate(Bundle savedInstanceState) < super.onCreate(savedInstanceState); // Only ever call `setContentView` once right at the top setContentView(R.layout.activity_main); // Lookup the swipe container view swipeContainer = (SwipeRefreshLayout) findViewById(R.id.swipeContainer); // Setup refresh listener which triggers new data loading swipeContainer.setOnRefreshListener(new SwipeRefreshLayout.OnRefreshListener() < @Override public void onRefresh() < // Your code to refresh the list here. // Make sure you call swipeContainer.setRefreshing(false) // once the network request has completed successfully. fetchTimelineAsync(0); > >); // Configure the refreshing colors swipeContainer.setColorSchemeResources(android.R.color.holo_blue_bright, android.R.color.holo_green_light, android.R.color.holo_orange_light, android.R.color.holo_red_light); > public void fetchTimelineAsync(int page) < // Send the network request to fetch the updated data // `client` here is an instance of Android Async HTTP // getHomeTimeline is an example endpoint. client.getHomeTimeline(new JsonHttpResponseHandler() < public void onSuccess(JSONArray json) < // Remember to CLEAR OUT old items before appending in the new ones adapter.clear(); // . the data has come back, add new items to your adapter. adapter.addAll(. ); // Now we call setRefreshing(false) to signal refresh has finished swipeContainer.setRefreshing(false); > public void onFailure(Throwable e) < Log.d("DEBUG", "Fetch timeline error: " + e.toString()); > >); > >
class TimelineActivity: Activity < lateinit var swipeContainer: SwipeRefreshLayout override fun void onCreate(savedInstanceState: Bundle) < super.onCreate(savedInstanceState) // Only ever call `setContentView` once right at the top setContentView(R.layout.activity_main) // Lookup the swipe container view swipeContainer = findViewById(R.id.swipeContainer) // Setup refresh listener which triggers new data loading swipeContainer.setOnRefreshListener < // Your code to refresh the list here. // Make sure you call swipeContainer.setRefreshing(false) // once the network request has completed successfully. fetchTimelineAsync(0) > // Configure the refreshing colors swipeContainer.setColorSchemeResources(android.R.color.holo_blue_bright, android.R.color.holo_green_light, android.R.color.holo_orange_light, android.R.color.holo_red_light); > fun fetchTimelineAsync(page: Integer) < // Send the network request to fetch the updated data // `client` here is an instance of Android Async HTTP // getHomeTimeline is an example endpoint. client.getHomeTimeline(object: JsonHttpResponseHandler() < override fun onSuccess(statusCode: Int, headers: okhttp3.Headers, json: JSON) < // Remember to CLEAR OUT old items before appending in the new ones adapter.clear() // . the data has come back, add new items to your adapter. adapter.addAll(...) // Now we call setRefreshing(false) to signal refresh has finished swipeContainer.setRefreshing(false) > override fun onFailure( statusCode: Int, headers: okhttp3.Headers, response: String, throwable: Throwable ) < Log.d("DEBUG", "Fetch timeline error", throwable) > >) > >
Note that upon successful reload, we must also signal that the refresh has completed by calling setRefreshing(false) . Also note that you should clear out old items before appending the new ones during a refresh.
Using with Paging Library
If you are using SwipeRefreshLayout with Android’s new Paging Library, the data sources used to provide data to the RecyclerView need to be invalidated. Review this guide for more information.
SwipeRefreshLayout with ListView (deprecated)
Note: ListView is an old UI component that is no longer used in modern Android applications. Only refer this guide if you intend to update some old code that still relies on ListView.
Step 1: Setting SwipeRefreshLayout
Set SwipeRefreshLayout at the Layout you want the SwipeRefresh functionality
activity_main.xml
androidx.swiperefreshlayout.widget.SwipeRefreshLayout xmlns:android="http://schemas.android.com/apk/res/android" android:id="@+id/swipe_container" android:layout_width="match_parent" android:layout_height="match_parent"> androidx.swiperefreshlayout.widget.SwipeRefreshLayout>
Step 2: Set your ListView inside Layout
activity_main.xml
androidx.swiperefreshlayout.widget.SwipeRefreshLayout xmlns:android="http://schemas.android.com/apk/res/android" android:id="@+id/swipe_container" android:layout_width="match_parent" android:layout_height="match_parent"> ListView android:id="@+id/listView" android:layout_width="match_parent" android:layout_height="wrap_content"> ListView> androidx.swiperefreshlayout.widget.SwipeRefreshLayout>
You could use a ScrollView instead a ListView
Step 3: Now in your main_activity set your code
In the activity who points to activity_main.xml, which is main_activity(in this example), this code should be enough
main_activity.java
public class MainActivity extends AppCompatActivity < SwipeRefreshLayout swipeLayout; @Override protected void onCreate(Bundle savedInstanceState) < super.onCreate(savedInstanceState); setContentView(R.layout.activity_main); // Getting SwipeContainerLayout swipeLayout = findViewById(R.id.swipe_container); // Adding Listener swipeLayout.setOnRefreshListener(new OnRefreshListener() < @Override public void onRefresh() < // Your code here Toast.makeText(getApplicationContext(), "Works!", Toast.LENGTH_LONG).show(); // To keep animation for 4 seconds new Handler().postDelayed(new Runnable() < @Override public void run() < // Stop animation (This will be after 3 seconds) swipeLayout.setRefreshing(false); > >, 4000); // Delay in millis > >); // Scheme colors for animation swipeLayout.setColorSchemeColors( getResources().getColor(android.R.color.holo_blue_bright), getResources().getColor(android.R.color.holo_green_light), getResources().getColor(android.R.color.holo_orange_light), getResources().getColor(android.R.color.holo_red_light) ); > >
Now just run your application!
You could check this example on GitHub.
If you aren’t able to get the swipe to refresh working, check the following tips:
- Did you accidentally call setContentView twice? Ensure that inside your activity, you’ve only called setContentView once as the 2nd line of your onCreate method.
- Did you invoke setRefreshing(false) after data finished loading? With the swipe to refresh control, you are responsible for notifying the system once the new data has been loaded into the list. You must make sure to invoke setRefreshing only after the data has come back and not before. This means if you are loading data from the network, calling this within the onSuccess method.
- Did you clear out the old items before updating the list? Make sure that in order for the new items to be displayed that you clear the list of any old items if needed. In other words, if you are replacing items in the list with new versions, be sure to remove the old versions from the adapter first with adapter.clear();
- Are you using CoordinatorLayout? If you are using a CoordinatorLayout to manage scrolling, be sure to move the app:layout_behavior=»@string/appbar_scrolling_view_behavior» property to the SwipeRefreshLayout rather than the child RecyclerView or ListView .
Created by CodePath with much help from the community. Contributed content licensed under cc-wiki with attribution required. You are free to remix and reuse, as long as you attribute and use a similar license.
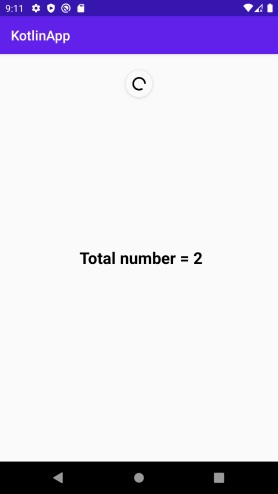
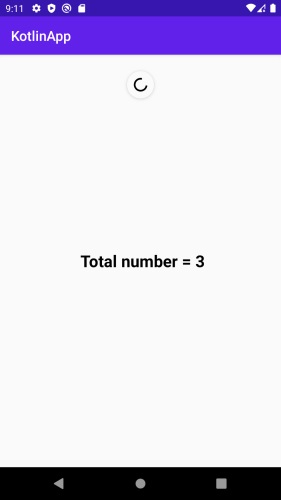
How to create a swipe refresh layout in Android using Kotlin?
This example demonstrates how to create a swipe refresh layout in Android using Kotlin.
Step 1 − Create a new project in Android Studio, go to File ⇒ New Project and fill all required details to create a new project.
Step 2 − Add the following code to res/layout/activity_main.xml.
Step 3 − Add the following code to src/MainActivity.kt
import androidx.appcompat.app.AppCompatActivity import android.os.Bundle import android.os.Handler import android.widget.TextView import androidx.swiperefreshlayout.widget.SwipeRefreshLayout class MainActivity : AppCompatActivity() < lateinit var swipeRefreshLayout: SwipeRefreshLayout lateinit var textView: TextView var number: Int = 0 override fun onCreate(savedInstanceState: Bundle?) < super.onCreate(savedInstanceState) setContentView(R.layout.activity_main) title = "KotlinApp" swipeRefreshLayout = findViewById(R.id.swipe) textView = findViewById(R.id.textView) swipeRefreshLayout.setOnRefreshListener < number++ textView.text = " Total number = $number" Handler().postDelayed(Runnable < swipeRefreshLayout.isRefreshing = false >, 4000) > > >
Step 4 − Add the following code to androidManifest.xml
Let’s try to run your application. I assume you have connected your actual Android Mobile device with your computer. To run the app from android studio, open one of your project’s activity files and click the Run icon from the toolbar. Select your mobile device as an option and then check your mobile device which will display your default screen.
Click here to download the project code.