- How to Create Excel File in Python
- Library
- Create Excel Workbook and Add Worksheets using Python
- Copy A Worksheet
- Changing Sheet/tab Color
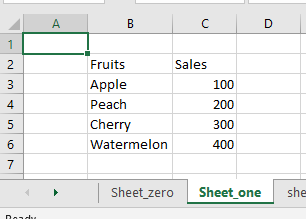
- Write Some Data Into Excel
- Saving Excel File
- Tutorial
- Working with a checkout
- Create a workbook
- Playing with data
- Accessing one cell
- Accessing many cells
- Values only
- Data storage
- Saving to a file
- Saving as a stream
- Loading from a file
- Errors loading workbooks
How to Create Excel File in Python
We can use the openpyxl library to create an Excel File in Python. This ability is an essential step for any Excel process automation. The best part – we don’t even need to have the Excel program installed.
Library
Open up a command prompt, and use pip install to download openpyxl library:
Create Excel Workbook and Add Worksheets using Python
For this step, we are creating an Excel file in Python and don’t need to open the Excel program. The below code creates an Excel file in memory, then adds two sheets, namely “Sheet_one” and “Sheet_two”.
- When a Workbook is created, by default it contains at least one sheet. So this file will contain three (3) sheets in total.
- This Excel file doesn’t exist on the hard drive yet and it doesn’t have a name.
We can change the sheet name any time by setting the ws.title attribute:
Copy A Worksheet
To copy a worksheet, call the wb.copy_worksheet() method:
Note that openpyxl has limitations and can not copy everything on a sheet. For example, Images and Charts will not be copied.
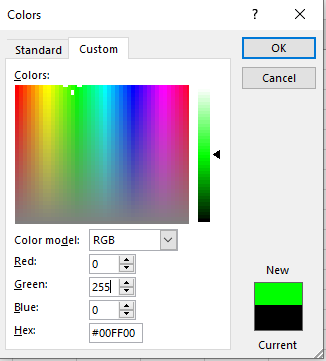
Changing Sheet/tab Color
We can use the .sheet_properties.tabColor attribute to set tab colors. The value has to be a RGB hex value, and the easiest way to get those values is from the “Hex” box on Excel’s color palette.
Write Some Data Into Excel
Let’s put some values into “Sheet_one”. As the below code shows, it’s easy to access a cell using the column-row notation.
To enter values into Sheet programmatically, it’s easier to use the cell() method, which takes two arguments: row and column, both starting from an index of 1.
Saving Excel File
Up to this point, the entire Excel file including everything we’ve done is still inside our computer’s memory. We need to save the file to our disk by calling the wb.save() method. If we don’t do this step, our Excel file will disappear after shutting down the Python environment.
This is how we can create an Excel file using Python. Check the below for more resources.
Tutorial
Install openpyxl using pip. It is advisable to do this in a Python virtualenv without system packages:
There is support for the popular lxml library which will be used if it is installed. This is particular useful when creating large files.
To be able to include images (jpeg, png, bmp,…) into an openpyxl file, you will also need the “pillow” library that can be installed with:
or browse https://pypi.python.org/pypi/Pillow/, pick the latest version and head to the bottom of the page for Windows binaries.
Working with a checkout
Sometimes you might want to work with the checkout of a particular version. This may be the case if bugs have been fixed but a release has not yet been made.
$ pip install -e hg+https://foss.heptapod.net/openpyxl/openpyxl/@3.1#egg=openpyxl
Create a workbook
There is no need to create a file on the filesystem to get started with openpyxl. Just import the Workbook class and start work:
>>> from openpyxl import Workbook >>> wb = Workbook()
A workbook is always created with at least one worksheet. You can get it by using the Workbook.active property:
This is set to 0 by default. Unless you modify its value, you will always get the first worksheet by using this method.
You can create new worksheets using the Workbook.create_sheet() method:
>>> ws1 = wb.create_sheet("Mysheet") # insert at the end (default) # or >>> ws2 = wb.create_sheet("Mysheet", 0) # insert at first position # or >>> ws3 = wb.create_sheet("Mysheet", -1) # insert at the penultimate position
Sheets are given a name automatically when they are created. They are numbered in sequence (Sheet, Sheet1, Sheet2, …). You can change this name at any time with the Worksheet.title property:
Once you gave a worksheet a name, you can get it as a key of the workbook:
You can review the names of all worksheets of the workbook with the Workbook.sheetname attribute
>>> print(wb.sheetnames) ['Sheet2', 'New Title', 'Sheet1']
You can loop through worksheets
>>> for sheet in wb: . print(sheet.title)
You can create copies of worksheets within a single workbook:
>>> source = wb.active >>> target = wb.copy_worksheet(source)
Only cells (including values, styles, hyperlinks and comments) and certain worksheet attributes (including dimensions, format and properties) are copied. All other workbook / worksheet attributes are not copied — e.g. Images, Charts.
You also cannot copy worksheets between workbooks. You cannot copy a worksheet if the workbook is open in read-only or write-only mode.
Playing with data
Accessing one cell
Now we know how to get a worksheet, we can start modifying cells content. Cells can be accessed directly as keys of the worksheet:
This will return the cell at A4, or create one if it does not exist yet. Values can be directly assigned:
There is also the Worksheet.cell() method.
This provides access to cells using row and column notation:
>>> d = ws.cell(row=4, column=2, value=10)
When a worksheet is created in memory, it contains no cells . They are created when first accessed.
Because of this feature, scrolling through cells instead of accessing them directly will create them all in memory, even if you don’t assign them a value.
>>> for x in range(1,101): . for y in range(1,101): . ws.cell(row=x, column=y)
will create 100×100 cells in memory, for nothing.
Accessing many cells
Ranges of cells can be accessed using slicing:
Ranges of rows or columns can be obtained similarly:
>>> colC = ws['C'] >>> col_range = ws['C:D'] >>> row10 = ws[10] >>> row_range = ws[5:10]
You can also use the Worksheet.iter_rows() method:
>>> for row in ws.iter_rows(min_row=1, max_col=3, max_row=2): . for cell in row: . print(cell)
Likewise the Worksheet.iter_cols() method will return columns:
>>> for col in ws.iter_cols(min_row=1, max_col=3, max_row=2): . for cell in col: . print(cell)
For performance reasons the Worksheet.iter_cols() method is not available in read-only mode.
If you need to iterate through all the rows or columns of a file, you can instead use the Worksheet.rows property:
>>> ws = wb.active >>> ws['C9'] = 'hello world' >>> tuple(ws.rows) ((, , ), (, , ), (, , ), (, , ), (, , ), (, , ), (, , ), (, , ), (, , ))
or the Worksheet.columns property:
For performance reasons the Worksheet.columns property is not available in read-only mode.
Values only
If you just want the values from a worksheet you can use the Worksheet.values property. This iterates over all the rows in a worksheet but returns just the cell values:
for row in ws.values: for value in row: print(value)
Both Worksheet.iter_rows() and Worksheet.iter_cols() can take the values_only parameter to return just the cell’s value:
>>> for row in ws.iter_rows(min_row=1, max_col=3, max_row=2, values_only=True): . print(row) (None, None, None) (None, None, None)
Data storage
Once we have a Cell , we can assign it a value:
>>> c.value = 'hello, world' >>> print(c.value) 'hello, world' >>> d.value = 3.14 >>> print(d.value) 3.14
Saving to a file
The simplest and safest way to save a workbook is by using the Workbook.save() method of the Workbook object:
>>> wb = Workbook() >>> wb.save('balances.xlsx')
This operation will overwrite existing files without warning.
The filename extension is not forced to be xlsx or xlsm, although you might have some trouble opening it directly with another application if you don’t use an official extension.
As OOXML files are basically ZIP files, you can also open it with your favourite ZIP archive manager.
If required, you can specify the attribute wb.template=True , to save a workbook as a template:
>>> wb = load_workbook('document.xlsx') >>> wb.template = True >>> wb.save('document_template.xltx')
Saving as a stream
If you want to save the file to a stream, e.g. when using a web application such as Pyramid, Flask or Django then you can simply provide a NamedTemporaryFile() :
>>> from tempfile import NamedTemporaryFile >>> from openpyxl import Workbook >>> wb = Workbook() >>> with NamedTemporaryFile() as tmp: wb.save(tmp.name) tmp.seek(0) stream = tmp.read()
You should monitor the data attributes and document extensions for saving documents in the document templates and vice versa, otherwise the result table engine can not open the document.
>>> wb = load_workbook('document.xlsx') >>> # Need to save with the extension *.xlsx >>> wb.save('new_document.xlsm') >>> # MS Excel can't open the document >>> >>> # or >>> >>> # Need specify attribute keep_vba=True >>> wb = load_workbook('document.xlsm') >>> wb.save('new_document.xlsm') >>> # MS Excel will not open the document >>> >>> # or >>> >>> wb = load_workbook('document.xltm', keep_vba=True) >>> # If we need a template document, then we must specify extension as *.xltm. >>> wb.save('new_document.xlsm') >>> # MS Excel will not open the document
Loading from a file
You can use the openpyxl.load_workbook() to open an existing workbook:
>>> from openpyxl import load_workbook >>> wb = load_workbook(filename = 'empty_book.xlsx') >>> sheet_ranges = wb['range names'] >>> print(sheet_ranges['D18'].value) 3
There are several flags that can be used in load_workbook.
formula (default) or the value stored the last time Excel read the sheet.
not (default). If they are preserved they are still not editable.
memory and is faster but not all features are available (charts, images, etc.)
preserved. The default is False .
openpyxl does currently not read all possible items in an Excel file so shapes will be lost from existing files if they are opened and saved with the same name.
Errors loading workbooks
Sometimes openpyxl will fail to open a workbook. This is usually because there is something wrong with the file. If this is the case then openpyxl will try and provide some more information. Openpyxl follows the OOXML specification closely and will reject files that do not because they are invalid. When this happens you can use the exception from openpyxl to inform the developers of whichever application or library produced the file. As the OOXML specification is publicly available it is important that developers follow it.
You can find the spec by searching for ECMA-376, most of the implementation specifics are in Part 4.
This ends the tutorial for now, you can proceed to the Simple usage section
© Copyright 2010 — 2023, See AUTHORS Revision de5eaa97998c .
Versions latest stable 3.1.2 3.1.1 3.1.0 3.1 3.0 2.6 2.5.14 2.5 2.4 Downloads html On Read the Docs Project Home Builds Free document hosting provided by Read the Docs.