- CSS Combinators
- Descendant Selector
- Example
- Child Selector (>)
- Example
- Adjacent Sibling Selector (+)
- Example
- General Sibling Selector (~)
- Complex CSS Selectors Inside Selectors
- Select Properties A or B
- Full Selector Support
- Deprecated :-webkit-any
- Rejecting Complete Selectors
- Counting Elements
- Dynamic Specificity
- Final Word
- CSS Selector inside a selector (CSS)
- CSS Style
- HTML Body
- Related
- Grouping and Nesting CSS Selectors
- Grouping CSS Selectors
- Nesting CSS Selectors
- Descendant Selector
- Child Selector
- Adjacent Sibling Selector
- General Sibling Selector
- Resources
CSS Combinators
A combinator is something that explains the relationship between the selectors.
A CSS selector can contain more than one simple selector. Between the simple selectors, we can include a combinator.
There are four different combinators in CSS:
- descendant selector (space)
- child selector (>)
- adjacent sibling selector (+)
- general sibling selector (~)
Descendant Selector
The descendant selector matches all elements that are descendants of a specified element.
The following example selects all
elements inside elements:
Example
Child Selector (>)
The child selector selects all elements that are the children of a specified element.
The following example selects all
elements that are children of a element:
Example
Adjacent Sibling Selector (+)
The adjacent sibling selector is used to select an element that is directly after another specific element.
Sibling elements must have the same parent element, and «adjacent» means «immediately following».
The following example selects the first
element that are placed immediately after elements:
Example
General Sibling Selector (~)
The general sibling selector selects all elements that are next siblings of a specified element.
The following example selects all
elements that are next siblings of elements:
Complex CSS Selectors Inside Selectors
Since last year, WebKit supports many selectors defined in the draft of CSS Selectors Level 4.
In this post, we will see a special subset of new selectors: new pseudo classes that take other selectors as arguments. Those are :matches() , :not() , :nth-child() , and :nth-last-child() .
All the selectors discussed in this post work for styling with CSS, and for querying with JavaScript ( querySelector() , querySelectorAll() , closest() , etc).
Select Properties A or B
The pseudo class :matches() takes a list of selector as argument. It matches an element if any of the selector in the list matches.
:matches(.foo, .bar) < background-color: green; > Any element with the class “foo”, “bar”, or both will have a green background.
This new selector is used extensively inside WebKit itself to simplify stylesheets. For example, code like the following used to appear in Web Inspector:
.syntax-highlighted .css-keyword, .syntax-highlighted .css-tag < color: rgb(170, 13, 145); > With :matches() , scoped selectors do not required any repetition:
.syntax-highlighted :matches(.css-keyword, .css-tag) < color: rgb(170, 13, 145); > Full Selector Support
The argument inside :matches() does not have to be a list of simple selectors. Any selector is supported, including the use of combinators.
For example, the following rule removes the top margin whenever two title levels follow each other:
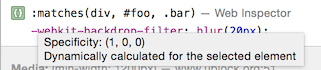
:matches(h1+h2, h2+h3, h3+h4, h4+h5) < margin-top: 0; > There has been some confusion about the subject of the selector when using combinators with :matches() . For example, take the following rule:
It matches every image with a class “icon” and that has a link among its ancestors. It does not match links containing image elements. In fact, it is strictly equivalent to:
If you are unsure what element :matches() would be applied to, you can just think of it as if the selector was invoking Element.matches() on the active element.
Deprecated :-webkit-any
WebKit already had a similar but more limited feature, the pseudo class :-webkit-any() . It is now deprecated.
The old :-webkit-any() has problems that cannot be fixed in a backward compatible way. It is best to avoid it. We removed all of its use inside WebKit.
Make sure to carefully test your pages when replacing :-webkit-any() by :matches() as they are not strictly equivalent. In particular, :-webkit-any() does not handle the specificity correctly.
Rejecting Complete Selectors
The pseudo class :not() has always been very popular in CSS. It selects an element if the element does not match a simple selector. For example:
What is new is the argument you can pass to :not() . Just like :matches() , the new :not() supports any selector list as arguments.
Code that used to chain multiple :not() can now use comma separated selectors to achieve the same. For example:
You can use complex selectors, which means you can exclude multiple properties. For example, it is now possible to select any element that does not have simultaneously the classes “.important” and “.dialog”:
And you can use combinators which is becoming one of my favorite features. For example, it is possible to select any image that is not part of a link:
Counting Elements
The pseudo class :nth-child() and :nth-last-child() are also being augmented with similar capabilities.
Previously, it was only possible to count elements indistinguishably with :nth-child() , or count elements having the same qualified name with :nth-of-type() . With the extended :nth-child() , you can specify what kind of element to count.
For example, if you want to select every other element that is not hidden, you can now do:
The general syntax is of the form:
:nth-child(An+B of selector list)
As for the previous selectors, the argument has full support for selectors, including complex selectors, combinators, etc.
Dynamic Specificity
Nesting selectors inside other selectors creates a new interesting question: what is the resulting specificity?
The answer is: it depends. The specificity varies with what is being matched. The final specificity is the largest of all the sub-selectors.
Let’s take a concrete example. If we take the following selector:
When the following element is selected:
The specificity is (1, 0, 0), the same as if we only had the selector “#foo”. The reason is for all the selector that match (“div” and “#foo”), the highest specificity of the two is the one of “#foo”.
This definition is great because it’s compatible with existing selectors. You can take any selector, wrap it inside a :matches() , and its specificity works exactly the same.
With complicated selectors, finding the specificity is not always this easy. Fortunately, the Web Inspector is there to help us.
In the Inspector, when hovering a selector in the Rules Style sidebar, the tooltip shows the real specificity of the selector for the current element. If the specificity varies with the element like in the example above, the Inspector also indicates that the specificity is dynamic:
Final Word
There are many new possibilities created by the new selectors. Play with them, invent new combinations, and tell us what you think.
For short questions, you can contact me and Yusuke on Twitter. For longer questions, you can email webkit-help or file bug report.
CSS Selector inside a selector (CSS)
The following tutorial shows you how to use CSS to do «CSS Selector inside a selector (CSS)».
CSS Style
The CSS style to do «CSS Selector inside a selector (CSS)» is
.element a:after < content:' default'; > .element a:last-of-type:after < content:' last'; color:red; > a < display:block; >
HTML Body
body> div >"element"> a>something a>something a>something a>something a>something a>something The following iframe shows the result. You can view the full source code and open it in another tab.
html> head> meta name="viewport" content="width=device-width, initial-scale=1"> style id="compiled-css" type="text/css"> .element a:after < content: ' default'; > .element a:last-of-type:after < content: ' last'; color:red; > a !-- w w w . d e mo 2 s . co m--> display:block; > body> div >"element"> a>something a>something a>something a>something a>something a>something Related
- CSS Selector for the 2nd child of a child dvi
- CSS Selector for when child of brother is present
- CSS Selector in CSS is affecting other elements
- CSS Selector inside a selector (CSS)
- CSS Selector inside a selector (CSS) (Demo 2)
- CSS Selector Jquery
- CSS Selector li + li trouble
demo2s.com | Email: | Demo Source and Support. All rights reserved.
Grouping and Nesting CSS Selectors
When you start to write bigger and bigger HTML files, and your CSS styles start to become longer and longer, it might be worth looking into if you can shorten and simplify them a bit by grouping CSS selectors and nesting CSS selectors.
Grouping CSS Selectors
The easiest way to identify where you might be able to group selectors in one line is to see where you have repetition in your styles.
For example, let’s say these are your current styles:
Instead of writing those three selectors, you can group them into a single line.
To group them, all you need to do is separate them with a comma, and the styles inside will get applied to them all. For example:
Look how much shorter that is! Now you can apply the same styles to multiple elements at once.
Nesting CSS Selectors
Just like in HTML where you can have elements nested inside other elements, the same can be done in CSS. There are cases where you might want to style elements differently depending on what they are nested inside of. This is where nesting comes in handy.
Descendant Selector
When you want to target elements that are inside another element, you can use the descendant selector, also known as the descendant selector.
Let’s say you have a paragraph tag inside your main content and also one in your footer, but you want the footer’s font size to be smaller.
You can simply target paragraph tags inside main differently than you would paragraph tags inside footer by nesting the paragraph tag inside its parent.
It’s that simple. To nest a selector, you simply separate them with a space.
But what if you had a third paragraph tag in the header, and also wanted it to be the same font size of the footer? Well, you can both group and nest CSS selectors at the same time:
This will make paragraph tags inside main have one font size, and paragraph tags inside either header or footer have another font size.
Descendant selectors target all elements inside the other, no matter how deeply nested it is.
But what if you don’t want this, and only want to target the direct children instead?
Child Selector
For the cases where you only want to target direct children (nested only one level under), you can use a child selector. Instead of using a space, you use a greater-than character to specify direct children:
If you had those paragraphs tags first nested inside a div tag, neither styles would apply because they wouldn’t be direct children of main or header .
Adjacent Sibling Selector
There will sometimes be cases where you want to target an element based on whether or not it came right after another element.
Let’s say you wanted the first paragraph after every h1 tag to be in a larger font size:
I am paragraph #1
I am paragraph #2
I am paragraph #3
You can use an adjacent sibling selector to say «hey, I want to style only the paragraph tag right after my header»:
Now your first paragraph will be in a larger font, but the following paragraphs will be in their usual font size. This is useful for when you want to style the next element in a list, or the next element in a row.
To use an adjacent sibling selector, you need to specify the element you want to target, and then the element you want to target it after, then a plus sign.
General Sibling Selector
General sibling selectors are similar to adjacent selectors, but instead of targeting the element right after the target element, they target all elements that come after the target element.
Let’s say you wanted to style all paragraphs after an h1 :
I am a header
I am paragraph #2
I am paragraph #3
This will make all paragraphs after the header be in a larger font, but the paragraphs before the header will be in their usual font size. This is useful for when you want to style all elements after a certain element, but not the element itself.
Try out the demo for yourself: