Select Option Dropdown

Show selected option value from Array & MySQL DB using PHP

In this tutorial, you will learn how to create an array of categories, display the values inside HTML select box and have selected options pre-defined with PHP and also I will show you how to get the selected options from a database using the ID of the record.

Читайте также:  Utf 8 таблица символов html

         body < font-size: 2em; >.container < display: grid; grid-template-rows: repeat(2, 1fr); grid-template-columns: repeat(2, 1fr); grid-gap: 6rem; padding: 5rem; border: 1px solid #ccc; justify-content: space-evenly; >select 
Selected From Array
Selected From DB Record
"; foreach($options as $option)< if($selected == $option) < echo ""; > else < echo ""; > > echo ""; ?>
if(isset($_GET['category'])) < $categoryName = $_GET['category']; $sql = "SELECT * FROM categories WHERE if($result = mysqli_query($link, $sql)) < if(mysqli_num_rows($result) >0) < while($row = mysqli_fetch_array($result))< $dbselected = $row['category']; >// Function frees the memory associated with the result mysqli_free_result($result); > else < echo "Something went wrong. "; >> else < echo "ERROR: Could not execute $sql." . mysql_error($link); >> $options = array('Comedy', 'Adventure', 'Drama', 'Crime', 'Adult', 'Horror'); echo ""; ?>

Thank you for reading this article. Please consider subscribing to my YouTube Channel.

Источник

Многоуровневый select из базы данных

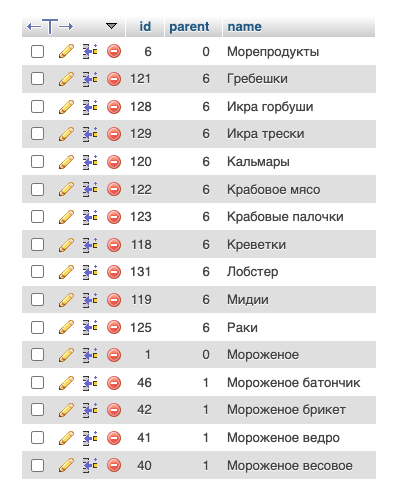
Примеры построения многоуровневых выпадающих списков (select option) и базы данных с применением рекурсии PHP.

В скриптах используется MySQL-таблица `category` с полями `id` , `parent` , `name` , где поле `parent` содержит id родителя.

MySQL-таблица `category`

Оформление вложенности пробелами

  1. В начале получаем все записи из БД в виде ассоциативного массива.
  2. С помощью функции array_to_tree() преобразуем его в древовидный, к элементам массива добавляется элемент «children» в который перемещаются все дочерние элементы.
  3. С помощью функции out_options() рекурсивно выводятся все элементы массива.
  4. Во втором аргументе функции out_options() указывается id элемента, которому нужно установить selected .
prepare("SELECT * FROM `category` ORDER BY `name`"); $sth->execute(); $category = $sth->fetchAll(PDO::FETCH_ASSOC); $category = array_to_tree($category); function array_to_tree($array, $sub = 0) < $a = array(); foreach($array as $v) < if($sub == $v['parent']) < $b = array_to_tree($array, $v['id']); if(!empty($b)) < $a[$v['id']] = $v; $a[$v['id']]['children'] = $b; >else < $a[$v['id']] = $v; >> > return $a; > function out_options($array, $selected_id = 0, $level = 0) < $level++; $out = ''; foreach ($array as $i =>$row) < $out .= ''; if (!empty($row['children'])) < $out .= out_options($row['children'], $selected_id, $level); >> return $out; > ?>

Результат:

Оформление символами псевдографики

Оформление ветвей дерева с помощью символов ├ и └:

prepare("SELECT * FROM `category` ORDER BY `name`"); $sth->execute(); $category = $sth->fetchAll(PDO::FETCH_ASSOC); $category = array_to_tree($category); function array_to_tree($array, $sub = 0) < $a = array(); foreach($array as $v) < if($sub == $v['parent']) < $b = array_to_tree($array, $v['id']); if(!empty($b)) < $a[$v['id']] = $v; $a[$v['id']]['children'] = $b; >else < $a[$v['id']] = $v; >> > return $a; > function out_options($array, $selected_id = 0, $level = 0) < $level++; $out = ''; foreach ($array as $i =>$row) < $out .= ''; if (!empty($row['children'])) < $out .= out_options($row['children'], $selected_id, $level); >> return $out; > ?>

Результат:

Использование optgroup

Использование . оправдано если необходимо выбрать только крайнюю категорию в дереве, но optgroup не поддерживает вложенность и никакие пробельные символы в начале label=». » . Поэтому в примере используется — – широкое тире.

prepare("SELECT * FROM `category` ORDER BY `name`"); $sth->execute(); $category = $sth->fetchAll(PDO::FETCH_ASSOC); $category = array_to_tree($category); function array_to_tree($array, $sub = 0) < $a = array(); foreach($array as $v) < if($sub == $v['parent']) < $b = array_to_tree($array, $v['id']); if(!empty($b)) < $a[$v['id']] = $v; $a[$v['id']]['children'] = $b; >else < $a[$v['id']] = $v; >> > return $a; > function out_optgroup_options($array, $selected_id = 0, $level = 0) < $level++; $out = ''; foreach ($array as $i =>$row) < if (empty($row['children'])) < $out .= ''; > else < $out .= ''; $out .= out_optgroup_options($row['children'], $selected_id, $level); > > return $out; > ?>

Источник

How to Insert Select Option Value in Database Using PHP & MySQL

In this tutorial, You will learn to insert select option values in the database using PHP & MySQL with some simple steps. These steps are very easy to understand and implement in web applications.

Here, I have taken only a single dropdown input field to store select option values in the database. Once you learn it, you will easily customize it according to your project requirement.

php insert select option in database

How to Store Dropdown Value in Database in PHP

Before getting started it’s coding, you should create the following folder structure –

codingstatus/ |__database.php |__ select-option.php |__ insert-option.php

Learn Also –

Now, let’s start to store dropdown values in the database step by step –

1. Create SQL Database & Table

First of all, You will have to create a database with the name of “codingstatus”.

Database Name – codingstatus

CREATE DATABASE codingstatus;

After that, create a table with the name of “courses” in the database “codingstatus.

CREATE TABLE `courses` ( `id` int(10) UNSIGNED PRIMARY KEY NOT NULL AUTO_INCREMENT, `courseName` varchar(255) DEFAULT NULL, );

2. Connect PHP to MySQL

To insert select option value in the database, you must connect PHP to MySQL database with the help of the following query.

  • $hostName – It must contain hostname.
  • $userName – It must contain username of the database.
  • $password – It must contain password of the database
  • $database – It must contain database name.
connect_error) < die("Connection failed: " . $conn->connect_error); > ?>

3. Create Input Field for Select Option

Here, I have created a single dropdown input field with some select options that contain some course name.

File Name – select-option.php


4. Insert Select Option in Database

To insert select option in the database, you will have to implement the following steps to write its code –

Step-1: First of all, apply if condition withisset($_POST[‘submit’]) to check form is set or not

Step-2: Assign course name input to the variable $courseName

Step-3: check course name is empty or not using empty() with if statement. if it is true then follow the next step

Step-4: write MySQL insert query to insert the select option value in the “courses” table

Step-5: if select option is inserted into database successfully then print a success message

File Name – insert-option.php

Insert Select Option Value with another Input Value using PHP & MySQL

Now, You will learn to insert a section option value with another input field like fullName into another table. In the previous step, we have inserted static option values. But In this step, We will display select option values from a database and then insert them into another table of the same database

Before getting started, You will have to create the following two files –

Also, Create another table Name – students with the help of the following query –

CREATE TABLE `students` ( `id` int(10) UNSIGNED PRIMARY KEY NOT NULL AUTO_INCREMENT, `fullName` varchar(255) DEFAULT NULL, `courseName` varchar(255) DEFAULT NULL, );

Create a form and display select option values

First of all, Include database.php and insert-script.php file

Then create an HTML form with a select option & text input field and display data from the database in the select option

Insert Select Option value & Text Input Value

In this step, Write a MySQL query to insert select option value and text input value into the dabase.

File Name – insert-script.php

Источник

Display Data From Database in Select Options using PHP & MYSQL

In this tutorial, You will learn to display data from the database in select options using PHP & MySQL with some simple steps. These steps are very easy to understand and implement in web applications.

php display data in select option

Here, I have shared source code to display data in a single dropdown select option. Once you learn it, you will easily customize it according to your project requirement.

How to Fetch Data From Database in PHP and Display in Select Option

Before getting started it’s coding, you should create the following folder structure –

codingstatus/ |__database.php |__ fetch-data.php |__ display-data.php |

Learn Also –

1. Insert Select Option Value

To display data from the database in a select option value, First of all, You will have to insert the select option value into the database. So, Make sure, you have already done it.

2. Connect Database to display data

To insert a select option value in the database, you must connect PHP to MySQL database with the help of the following query.

  • $hostName – It must contain hostname.
  • $userName – It must contain username of the database.
  • $password – It must contain password of the database
  • $database – It must contain database name.
connect_error) < die("Connection failed: " . $conn->connect_error); > ?>

3. Fetch Data From Database

To fetch data from database, you will have to implement the following steps –

Step-1: Write SQL query to select from the “course”

Step-2: store option data in the $options by fetching from the database

query($query); if($result->num_rows> 0) < $options= mysqli_fetch_all($result, MYSQLI_ASSOC); >?>

4. Display Data in Select Option

To display data in select option, you will have to follow the following steps –

Step-1: First of all, Include database.php and then also include the fetch-data.php

Step-2: Apply foreach loop to the $option and print the option value within select option input field.

File Name – display-data.php

Источник

Edit and Update Dropdown Value in PHP & MySQL

In this tutorial, You will learn to edit and update dropdown value in PHP & MySQL with some simple steps. These steps are very easy to understand and implement in web applications.

Here, I have shared source code to edit and update values of a single dropdown select option with a single text input. Once you learn it, you will easily customize it according to your project requirement.

php edit and update dropdown

Edit and Update Select Option Value in PHP & MySQL

Before getting started it’s coding, you should create the following folder structure –

codingstatus/ |__ database.php |__ edit-button.php |__ fetch-script.php |__ edit-form.php |__ edit-script.php |__ update-script.php

Also, Insert select option values into database and then proceed the following steps –

2. Connect to MySQL Database

To edit and update dropdown value, you must connect PHP to MySQL database with the help of the following query.

  • $hostName – It must contain hostname.
  • $userName – It must contain username of the database.
  • $password – It must contain password of the database
  • $database – It must contain database name.
connect_error) < die("Connection failed: " . $conn->connect_error); > ?>

3. Fetch values from the database

In this step, Write MySQL query to fetch id, course name & full name from the “students” table to display them in a HTML table.

File Name – fetch-script.php

query($query); if($result->num_rows> 0)< $options= mysqli_fetch_all($result, MYSQLI_ASSOC); >else < $options=[]; >?>

4. Display values with Edit Button

To display values with edit button, you have to follow the following steps –

Step-1: Create a HTML table with column S.N, Full Name, Course Name & edit

Step-2: Include database.php and fetch-script.php file

Step-3: check total number of records using count() method. if it is greater then zero then implement the next step within the if block of statement

Step-4: Apply foreach loop to the $options and print the value of full name, course name & id


Edit and Update Dropdown Value in PHP & MySQL

0) < $sn=1; foreach ($options as $option) < ?> > ?>
S.N Full Name Course Name Edit
">Edit

5. Fetch values Based on Id

When you click the edit button then you will get a id of the current record. Now, We will fetch values from the database based on this id by using the following query –

query($query); $editData=$result->fetch_assoc(); $fullName= $editData['fullName']; $courseName= $editData['courseName']; > ?

6. Display values in Edit Form

When you will the edit button, It will redirect to the edit-form.php with a id of the current records. So, We have to display values in the edit form based on the getting id from the edit button.

Step-1: Include the database.php, edit-scritp.php & update-script.php

Step-2: Create a HTML form with select option & a text input field

Step-3: Display data from the database in the select option and set the selected options value

  ">  

7. Updated Values based on Id

After change the value of select option and input field, you can update values by submitting the form. But to update values, you will have to write the following MySQL Update Query.

File Name – update-script.php

Источник

Оцените статью