- и | JavaScript
- HTMLSelectElement.type : получить тип
- HTMLSelectElement.multiple : получить и изменить тип
- HTMLSelectElement.length : получить и изменить количество пунктов
- HTMLSelectElement.add() : добавить новый пункт
- Select html and javascript
- События элемента select
- Manipulation of HTML Select Element with Javascript
- Important Properties and Methods of Select Element
- Important Properties of Option Element
- Setting Value of Select Element
- Getting the Value and Text/Label of the Selected Options
- Adding an Option
- Deleting an Option
и | JavaScript
В Mozilla Firefox и в IE не срабатывает клик, если щёлкать по уже выбранному пункту, и весь подсчёт сбивается.
Тип тега
HTMLSelectElement.type : получить тип
Возвращает select-one или select-multiple , если есть атрибут multiple .
HTMLSelectElement.multiple : получить и изменить тип
Возвращает false или true , если есть атрибут multiple .
Количество пунктов
HTMLSelectElement.length : получить и изменить количество пунктов
HTMLSelectElement.add() : добавить новый пункт
Получить значение
select.value : выводится значение атрибута value или при его отсутствии текст выбранного тега option [whatwg.org].
Select html and javascript

Для создания списка используется html-элемент select. Причем с его помощью можно создавать как выпадающие списки, так и обычные с ординарным или множественным выбором. Например, стандартный список:
Атрибут size позволяет установить, сколько элементов будут отображаться одномоментно в списке. Значение size=»1″ отображает только один элемент списка, а сам список становится выпадающим. Если установить у элемента select атрибут multiple , то в списке можно выбрать сразу несколько значений.
Каждый элемент списка представлен html-элементом option, у которого есть отображаемая метка и есть значения в виде атрибута value .
В JavaScript элементу select соответствует объект HTMLSelectElement , а элементу option — объект HtmlOptionElement или просто Option .
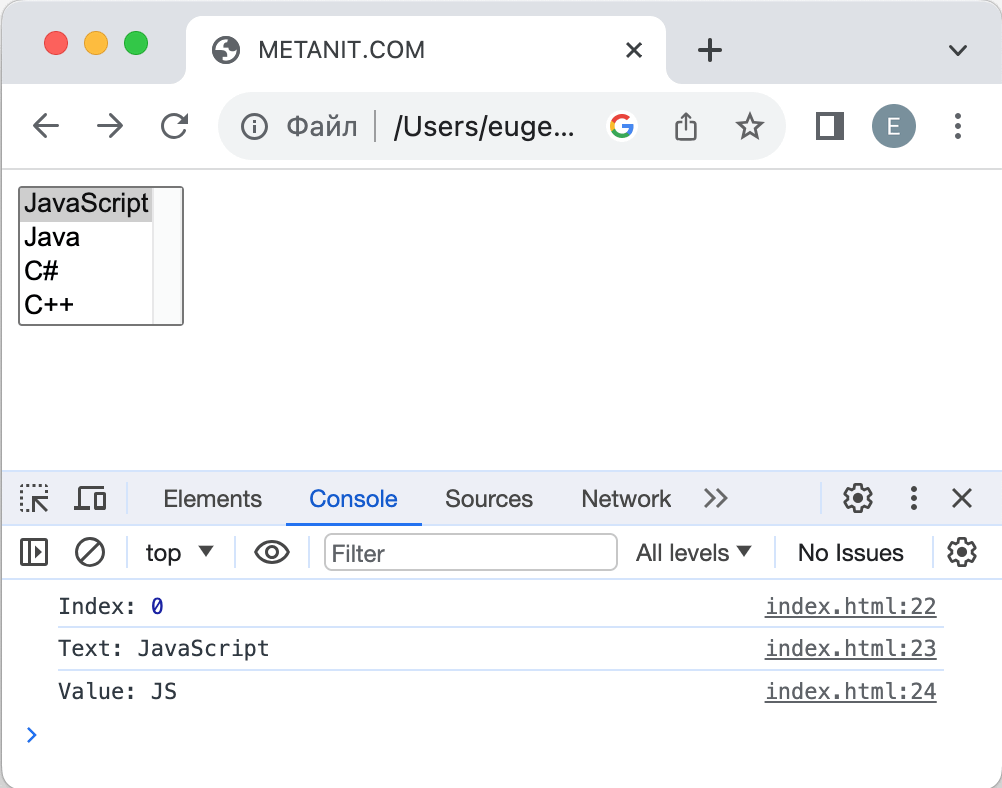
Все элементы списка в javascript доступны через коллекцию options . А каждый объект HtmlOptionElement имеет свойства: index (индекс в коллекции options), text (отображаемый текст) и value (значение элемента). Например, получим первый элемент списка и выведем о нем через его свойства всю информацию:
В javascript мы можем не только получать элементы, но и динамически управлять списком. Например, применим добавление и удаление объектов списка:
Для добавления на форме предназначены два текстовых поля (для текстовой метки и значения элемента option) и кнопка. Для удаления выделенного элемента предназначена еще одна кнопка.
За добавление в коде javascript отвечает функция addOption , в которой получаем введенные в текстовые поля значения, создаем новый объект Option и добавляем его в массив options объекта списка.
За удаление отвечает функция removeOption , в которой просто получаем индекс выделенного элемента с помощью свойства selectedIndex и в коллекции options приравниваем по этому индексу значение null.
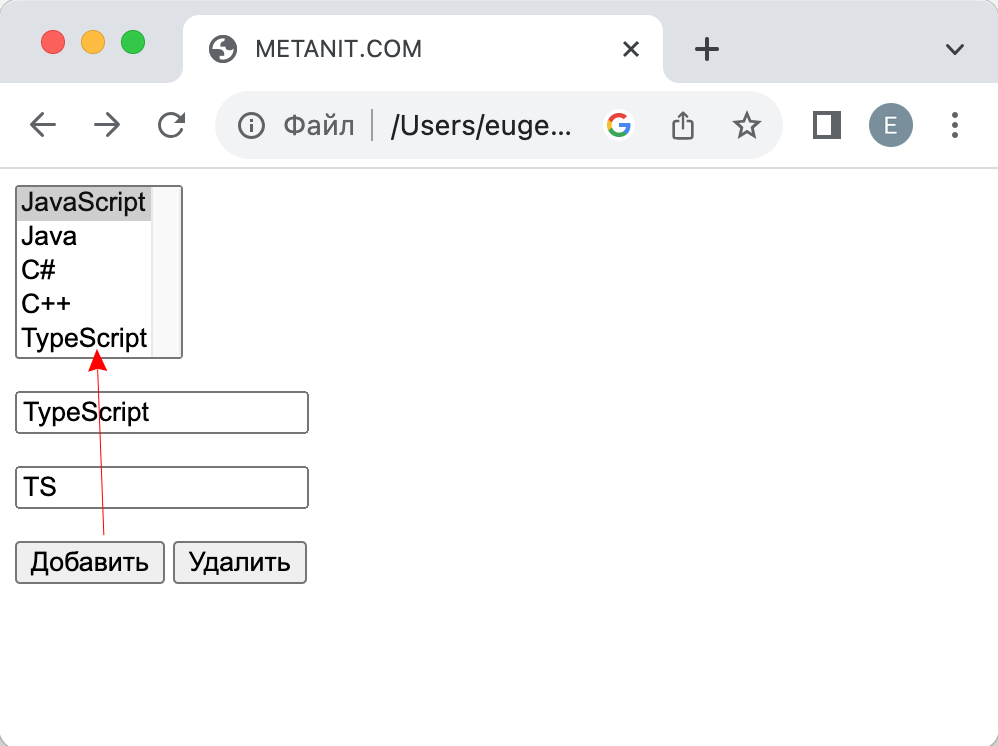
Для добавления/удаления также в качестве альтернативы можно использовать методы элемента select:
// вместо вызова // languagesSelect.options[languagesSelect.options.length]=newOption; // использовать для добавления вызов метода add languagesSelect.add(newOption); // вместо вызова // languagesSelect.options[selectedIndex] = null; // использовать для удаления метод remove languagesSelect.remove(selectedIndex);
События элемента select
Элемент select поддерживает три события: blur (потеря фокуса), focus (получение фокуса) и change (изменение выделенного элемента в списке). Рассмотрим применение события select:
Manipulation of HTML Select Element with Javascript

Manipulation of the element with Javascript is quite commonly required in web applications. This tutorial explains how you can perform common operations on select element with vanilla Javascript — adding/deleting options or getting/setting the selected options.
Important Properties and Methods of Select Element
- value : It gives the value of the first selected option (a multi-valued select may have multiple selected options)
- options : It gives the list of all option elements in the select
- selectedOptions : It gives the list of option elements that are currently selected
- selectedIndex : It is an integer that gives the index of first selected option. In case no option is selected, it gives -1
- add() : This method adds a new option to the list of options
- remove() : This method removes an option from the select element
Important Properties of Option Element
- value : It gives the value of the option
- text : It gives the text inside the option
- selected : It tells whether the option is selected or not
Setting Value of Select Element
For a single valued select, setting its value can be done with the value or the selectedIndex property.
// Set option with value 'Orange' as selected document.querySelector('#choose-fruit').value = 'Orange'; // Set the option with index 2 as selected => Sets the 'Banana' option as selected document.querySelector('#choose-fruit').selectedIndex = 2; For a multiple valued select, setting multiple selected options can be done by setting the selected attribute of the required option.
// choose the first option document.querySelector('#choose-fruit-multiple').options[0].selected = true; // also choose the third option document.querySelector('#choose-fruit-multiple').options[2].selected = true; This will obviously work for single valued select also, but using the value property is much direct for them.
Getting the Value and Text/Label of the Selected Options
The selectedOptions property of the select element gives the list of options that are currently selected. Each element in this list is a DOM element — so you can use the value and text property to get the value and inside text of the option.
// For a normal select (and not multi-select) the list would contain only a single element var text = document.querySelector('#choose-fruit').selectedOptions[0].text; var value = document.querySelector('#choose-fruit').selectedOptions[0].value; For a multiple select element, you can loop over the list to get all selected options.
var selected_options = document.querySelector('#choose-fruit-multiple').selectedOptions; for(var i=0; i // output Orange 2 Grapes 5 Adding an Option
The add method can be used to add a new option in the select. You can also specify the exact positon where the option needs to be inserted.
var option = document.createElement('option'); option.text = 'BMW'; // append option at the end // new options will be Volvo, Audi, Mercedes & BMW document.querySelector('#choose-car').add(option, null); var option = document.createElement('option'); option.text = 'BMW'; // append option before index 0 // new options will be BMW, Volvo, Audi & Mercedes document.querySelector('#choose-car').add(option, 0); var option = document.createElement('option'); option.text = 'BMW'; // append option before index 2 // new options will be Volvo, Audi, BMW & Mercedes document.querySelector('#choose-car').add(option, 2); Deleting an Option
The remove method can be used to delete an option at a specified index.
// remove the option at index 1 // new options will be Volvo & Mercedes document.querySelector('#choose-car').remove(1);