- How do we use a simple drop-down list of items in HTML forms?
- Example
- HTML Drop-down Menu – How to Add a Drop-Down List with the Select Element
- How to Create an HTML Dropdown List
- How to Create a Hover-able Drop-down Menu
- Wrapping Up
- How to make an HTML dropdown select with a searchbox
- Making an HTML dropdown select with a search box
- HTML form with dropdown select
- Bootstrap form with dropdown select
- Adding a search box to the dropdown select
- 1. Using Select2 from a CDN
- 2. Manual Installation
- Initializing Select2 in your form dropdown select
- Examples
- HTML form with dropdown select and search box
- Bootstrap form with dropdown select and search box
- Conclusion
- Related Articles
How do we use a simple drop-down list of items in HTML forms?
With HTML, you can create a simple drop-down list of items to get user input in HTML forms. A select box also called drop-down box provides an option to list down various options in the form of drop-down list, from where a user can select one or more options. The tag is used to create a drop-down list in HTML, with the tag.
Here’s the list of attributes of tag:
| Sr.No | Attribute & Description |
| 1 | Name Used to give a name to the control which is sent to the server to be recognized and get the value. |
| 2 | Size This can be used to present a scrolling list box. |
| 3 | Multiple If set to «multiple» then allows a user to select multiple items from the menu. |
Here’s the list of attributes of tag:
| Sr.No | Attribute & Description |
| 1 | Value The value that will be used if an option in the select box is selected. |
| 2 | Selected Specifies that this option should be the initially selected value when the page loads. |
| 3 | Label An alternative way of labeling options. |
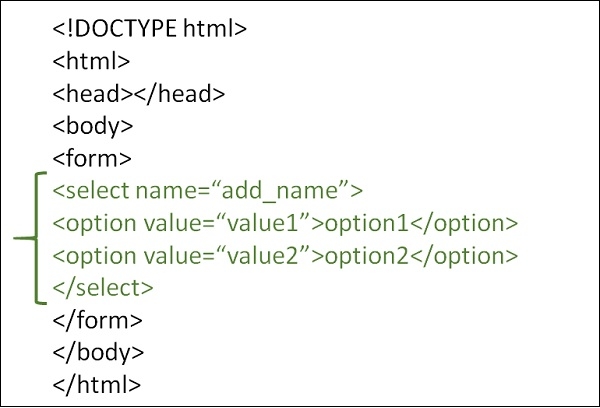
Example
You can try to run the following to create a simple drop-down list of items to get user input in HTML forms:
Here's the list of subjects. Select any one:
HTML Drop-down Menu – How to Add a Drop-Down List with the Select Element

Joel Olawanle

Many websites, applications, and web pages use drop-down menus to help display a list of information. You can use them to create navigation menus, options for forms, and more.
If you’re looking at some of these menus or lists, you might imagine how complex creating them could be. And yes – in some cases, it gets a little bit complex.
A drop-down menu is a list of options that gets revealed vertically when a user interacts with the menu by either clicking on it or hovering over it with their cursor.
This menu also disappears when the user stops interacting with the menu by clicking again or taking the cursor away from the menu.
In this article, you will learn how to add a drop-down list to the select element on your webpage. You’ll also learn the various options available, and how to create a hoverable drop-down list/menu.
How to Create an HTML Dropdown List
In HTML, by default, you can always create a drop-down list with the select tag alongside the option tag. This is mainly used within forms to select a value from a list of many options.
The select tag has two primary attributes: the name and id attributes.
You use the name attribute to identify the drop-down when a selection is submitted in a form. You can connect the id attribute to a label that has similar values to its for attribute.
The select tag also has some optional boolean attributes like disabled (which disables the select fields), required (which makes the field required in a form), and lots more.
Within the select tag, you can add many options in the individual option tag. The option tag has an attribute of value that specifies a value that is submitted from the form when an option gets selected.
There are other boolean attributes like disabled (which disables the option in the menu), and selected (which you use to set a particular option as the default selected option when the page loads rather than the first option).
In the above code, the first option has an attribute of disabled , meaning you will not be able to select the option. The fourth option has an attribute of selected , meaning that instead of having JavaScript as the selected value by default, Java will be selected.
How to Create a Hover-able Drop-down Menu
When you scroll through or visit many advanced and modern webpages, you will notice that they have drop-down menus.
These menus are used for navigation to help hold similar links together. Most times, when you hover on the parent menu, then the drop-down list appears.

You can create these types of menues in various ways, as there is no direct syntax to build one.
You can create this using CSS styling to show and hide the drop-down list when the user hovers over the menu. A very good approach is to create a div that holds the menu and the drop-down.
This div serves as a container and you can style it to a position of relative and display of inline-block , so the drop-down options appear below the menu.
You can style your button and the dropdown-options however you wish. But the major style that controls the hover effect, by default, sets the dropdown-options not to display. Then when a mouse hovers over the menu, the display is not set to block , so the options are visible. You also set the position to absolute , so the options appear below the menu, and overflow to auto to enable scroll on small screens.
.dropdown-options < display: none; position: absolute; overflow: auto; >.dropdown:hover .dropdown-options
In the demo below, we add more styling to make the drop-down menu more attractive and nice:
Wrapping Up
In this article, you have learned how to create a drop-down list with the select tag. You’ve also learned how to create the hoverable drop-down menu with CSS to handle the hover effect.
How to make an HTML dropdown select with a searchbox
As a website developer, it is almost given that at some point you will work with HTML dropdown select, presenting the user with an array of options to select from.
This happens in the instances where you want the user to choose from already predefined answers/options instead of them entering their own.
This helps reduce redundancy in the system.
For instance, if you were to require the users to input their country, but let them type in the country name instead of selecting, this would create a disaster.
Let’s say the user’s country is USA. Some would write «United States of America», others «USA», others «United States», while others would misspell the name and write something totally different.
It would be a disaster trying to organize, analyze and present the information based on the users’ country. This shows why HTML dropdown select is quite an important form element.
However, this comes with some complexities when the select options are too many. Locating the desired option could become a headache.
For this reason, having a search box within the dropdown select options is such an incredible and life-saving feature that can save a lot of time for many users.
In this article, I will take you through a step-by-step process on how to add a search box to your forms dropdown select fields, using pure HTML or using bootstrap framework.
Making an HTML dropdown select with a search box
First, we will create a sample form on both pure HTML and in bootstrap, with a dropdown select option but without the search box. Then I will show you how to add it.
HTML form with dropdown select
body < background: #eee; >.signupdiv < background: #fff; border: 1px solid #ddd; box-shadow: 1px 2px 3px #ccc; border-radius: 7px; text-align: center; width: 35%; display: block; margin: auto; margin-top: 100px; >#signupform < padding: 15px; >input, select < margin-bottom: 10px; height: 38px; border: 1px solid #ddd; padding-left: 10px; >input < width: 97%; >button, select < width: 100%; >button Below is the screenshot of the above code:

And below is how it looks like when you click on the dropdown select.

Bootstrap form with dropdown select
body < background: #eee; >.signupdiv < background: #fff; border: 1px solid #ddd; box-shadow: 1px 2px 3px #ccc; padding: 10px; margin-top: 100px; >.form-group Below is the screenshot of the above code:

And below is how it looks like when you click on the dropdown select.

From the examples above, there seems to be no need for a search box since we have 7 countries in our options which are all visible at once. But when we include a full list of 195 countries. It’s incredibly important to have a search box to easily find the country when we start to type its name in the search box.
Adding a search box to the dropdown select
We now will go ahead and add a search box to the forms in the above examples.
We will use Select2 to add the search box functionality to the dropdown select fields.
Select2 is a jQuery-based replacement for select boxes. It supports searching remote data sets and infinite scrolling of results.
To start using it, we will need to include the Select2 compiled JavaScript and CSS files on our website. Then, we will initialize the select2 with dropdown select input using jQuery.
1. Using Select2 from a CDN
Including Select2 from a CDN (content delivery network) is the fastest way to set it up and start using it.
This is the recommended way to do include it. This makes it easier for you to deploy your project in different environments, and easily update Select2 when new versions are released.
To include it using this method, simply include the following lines of code in the section of your page.
2. Manual Installation
To manually install Select2 into your website project, download the select2 release of your choice from Github and copy the files in the dist directory to your project.
Then in the same way as using from CDN, add the following lines of code in the section of your page.
Replace above, the «path/to/file/» with the path to your files.
Note: In either of the two methods, make sure to import the jQuery library into your code before importing the select2 plugin or else it won’t work.
Initializing Select2 in your form dropdown select
Add the line of code below with the select input filed Id inside the jquery on ready function.
Examples
HTML form with dropdown select and search box
body < background: #eee; >.signupdiv < background: #fff; border: 1px solid #ddd; box-shadow: 1px 2px 3px #ccc; border-radius: 7px; text-align: center; width: 35%; display: block; margin: auto; margin-top: 100px; >#signupform < padding: 15px; >input, select < margin-bottom: 10px; height: 38px; border: 1px solid #ddd; padding-left: 10px; >input < width: 97%; >button, select < width: 100%; >button Below is the screenshot of the code above:

Take note of the selector «#country» in initializing the select2. We have used it because it is the id of our countries input field.
Bootstrap form with dropdown select and search box
body < background: #eee; >.signupdiv < background: #fff; border: 1px solid #ddd; box-shadow: 1px 2px 3px #ccc; padding: 10px; margin-top: 100px; >.form-group Below is the screenshot of the code above:

If you were keen, you may have noticed that after adding and initializing select on our dropdown select, its height was reduced compared to the other input fields.
To set it to your custom height, just code the CSS code below add it to your other CSS code in the head section, or in an external CSS file. Remember to height attribute values to your desired ones.
Conclusion
When working with HTML form dropdown select fields, you may get to a point where the select options are too many. In such a scenario, it may be tiring for the users to locate their preferred option.
Adding a search box on top of the dropdown options can save them a great deal, increasing the user experience of your site.
In this article, we have covered a comprehensive step-by-step process on how to design nice-looking forms in HTML and bootstrap framework. With have designed forms with dropdown select options and added a search box to them in order to simplify the finding of the preferred options.
It’s my hope that you have enjoyed this tutorial and found it useful. We strive to keep adding more incredible content on a regular basis. To get notified when we add new, subscribe to our email newsletter.
You may also consider linking to this page from your website or share it to your networks on social media to help reach more people.