- How to Run PHP Code on Your PC
- How to Run PHP Code
- Step 1: Install XAMPP, Run Apache and MySQL
- Step 2: Place Your Project Folder on the Local Server
- Step 3: Create a PHP File to Run PHP Code
- Step 4: Execute or Run PHP Code in Your Browser
- Things to Remember Before Running PHP Code:
- About The Author
- Muhammad Zeeshan
- Running a php program
- User Contributed Notes 7 notes
How to Run PHP Code on Your PC
Do you want to run PHP code on your PC? This tutorial will teach you everything.
PHP is a server-side scripting language, that’s why you can’t run it by just opening it in your browser.
You need two things to run PHP code on your PC.
- A Local Webserver software with Apache, MySQL, and PHP support,
- A Text Editor for example Visual Studio Code.
Note: You can use any text editor with PHP support.
Now, let’s see the steps to set up, install and run PHP code on your PC.
How to Run PHP Code
First of all, we’re going to teach you how to create a local web server on your computer to run PHP. Because PHP is a server-side language and you can’t run it without a server.
Fortunately, we have third-party software available on the internet like XAMPP, WAMP, MAMP, etc. These apps can make the job extremely easy for you to run PHP.
We’ll use XAMPP to create a local webserver. The reason I prefer XAMPP is that we can run XAMPP on multiple operating systems, like Windows, MAC, Linux, etc. And also, it has more features.
So, let’s begin with our first step.
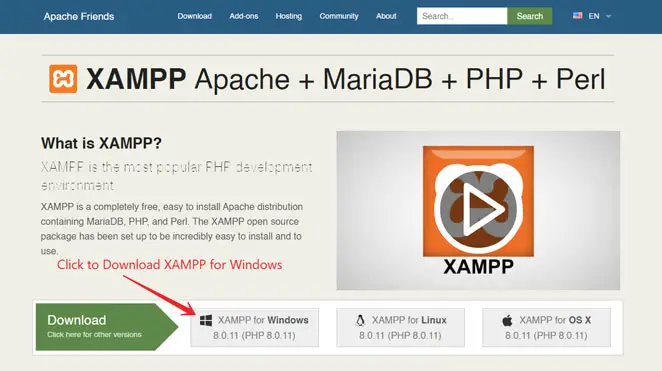
Step 1: Install XAMPP, Run Apache and MySQL
XAMPP is software that you can use to create a local webserver on your PC. Using XAMPP, you can run the Apache server that is required to run and execute PHP code.
There are other web server apps available on the internet like WAMP, MAMP, etc. But we choose XAMPP because it is open-source software and available for more than one operating system. It is available for Windows, Linux, and MAC OS.
To install XAMPP, visit the apachefriends.org website. Then, download and install XAMPP on your PC.
After installing XAMPP on your PC, open it. Then run Apache and MySQL as shown in the image below. MySQL is a database server, it is not mandatory. Because in this tutorial, we’ll not talk about the MySQL database. We’ll talk about the MySQL database in our later PHP tutorials.
So you can only Start Apache if you want.
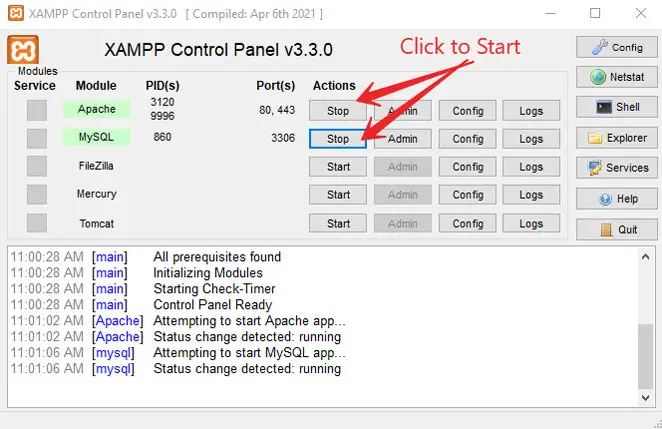
And done! you have successfully created a local web server on your PC. But wait! How you can access it in your browser?
Every web server has an IP address and a hostname. As this server is on our local computer. So, for XAMPP by default, our hostname is localhost and our localhost’s IP address is 127.0.0.1.
Just type localhost in your browser’s search bar to access your local web server.
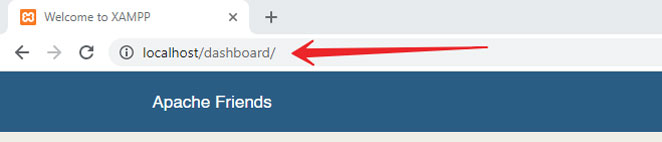
You will see a ‘Welcome to XAMPP’ page. This means the local web server or XAMPP is working on your PC.
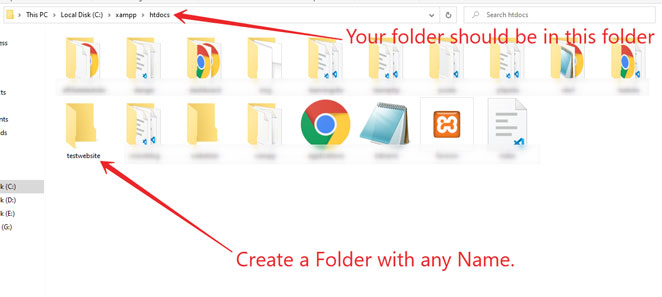
Step 2: Place Your Project Folder on the Local Server
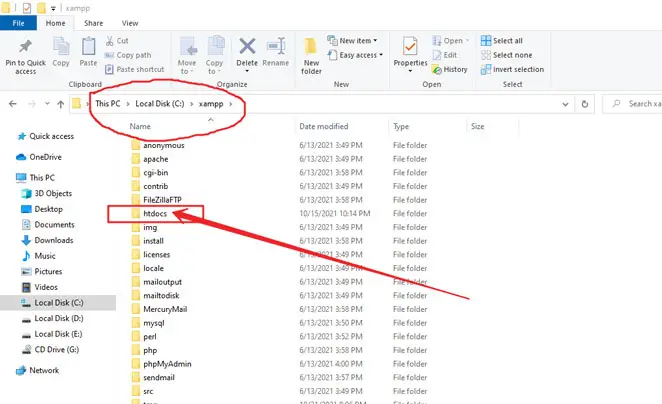
On a live web server your website files (aka your project files) are located in directories (mean folders). Same as the files and folders on your computer. Here, to run PHP code in XAMPP, your website files will store in the htdocs folder which is located in the XAMPP folder.
To do this, you have to copy-paste your PHP project folder into ‘htdocs‘ folder as shown in the image below and create a folder inside it with any name.
This is where your HTML, CSS, JS, and PHP files will store. The PHP files you’re going to create in the next step will also store in this folder.
So now, you have a web server running on your PC. It’s time to create a PHP file and execute PHP code in our Browser. So, let’s see the main step.
Step 3: Create a PHP File to Run PHP Code
I am using visual studio code to create a PHP file. You can download this text editor from their website, it’s free.
Before creating a PHP file, open the htdocs folder and create a new folder in that. You can give it any name. This is the folder where your website or project files are located. As you can see in the image below, I gave it a name testwebsite .
You can access this folder in your browser by typing localhost/testwebsite.
After that, open visual studio code and open this folder in your text editor as shown below.

Then, create a PHP file and give it the name sample.php.
After that, write some code in that file. You can copy/paste the code given below.
This will look like this as shown in the image below.
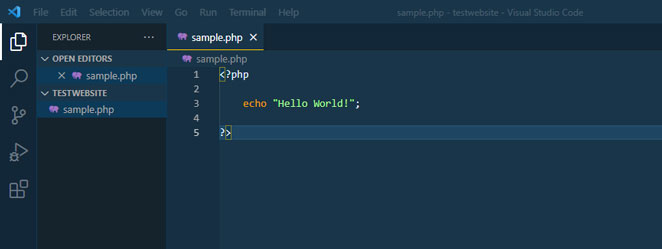
It is the simple hello world program that we’re going to run on your PC.
Now, we have created the PHP file and written some code in it. Now, you can run PHP in your browser.
Step 4: Execute or Run PHP Code in Your Browser
To do this, open your browser and type in the search bar localhost/testwebsite/sample.php. And hit enter. This will open a PHP file and run a PHP script in your browser.
According to our code. The ‘Hello World’ program has been executed. See the image below.

That’s it. Now, you know how to run PHP code on your PC. And you can create and run as many PHP files as you want.
Things to Remember Before Running PHP Code:
- Whenever you want to run PHP code, always make sure XAMPP is running with Apache and MySQL.
- Your project folder containing PHP files must be placed inside ‘htdocs‘ folder which is located in the XAMPP installation folder.
- Whenever you install XAMPP on your PC, just make sure you select the default location to install XAMPP which is usually C drive. To avoid errors.
What’s next? Now, you should learn PHP variables. Variables are containers for storing data. This tutorial is will help you to understand the concepts behind variables.
If you want to learn something advanced about PHP. Then, see this trending guide on how to connect HTML Form to MySQL database using PHP.
That’s it, if you have any questions related to this guide, then feel free to leave a comment below.
Keep learning and sharing!
About The Author
Muhammad Zeeshan
Hi everyone, I’m a Full Stack Web Developer and Technical Writer. I just love to share my knowledge to help others in this community. I mostly write about HTML, CSS, JS, MySQL, and PHP.
Running a php program
- Tell PHP to execute a certain file.
$ php my_script.php $ php -f my_script.php
$ php -r 'print_r(get_defined_constants());'
Note: Read the example carefully: there are no beginning or ending tags! The -r switch simply does not need them, and using them will lead to a parse error.
$ some_application | some_filter | php | sort -u > final_output.txt
As with every shell application, the PHP binary accepts a number of arguments; however, the PHP script can also receive further arguments. The number of arguments that can be passed to your script is not limited by PHP (and although the shell has a limit to the number of characters which can be passed, this is not in general likely to be hit). The arguments passed to the script are available in the global array $argv . The first index (zero) always contains the name of the script as called from the command line. Note that, if the code is executed in-line using the command line switch -r, the value of $argv[0] will be «Standard input code» ; prior to PHP 7.2.0, it was a dash ( «-» ) instead. The same is true if the code is executed via a pipe from STDIN .
A second global variable, $argc , contains the number of elements in the $argv array (not the number of arguments passed to the script).
As long as the arguments to be passed to the script do not start with the — character, there’s nothing special to watch out for. Passing an argument to the script which starts with a — will cause trouble because the PHP interpreter thinks it has to handle it itself, even before executing the script. To prevent this, use the argument list separator — . After this separator has been parsed by PHP, every following argument is passed untouched to the script.
# This will not execute the given code but will show the PHP usage $ php -r 'var_dump($argv);' -h Usage: php [options] [-f] [args. ] [. ] # This will pass the '-h' argument to the script and prevent PHP from showing its usage $ php -r 'var_dump($argv);' -- -h array(2) < [0]=>string(1) "-" [1]=> string(2) "-h" >
However, on Unix systems there’s another way of using PHP for shell scripting: make the first line of the script start with #!/usr/bin/php (or whatever the path to your PHP CLI binary is if different). The rest of the file should contain normal PHP code within the usual PHP starting and end tags. Once the execution attributes of the file are set appropriately (e.g. chmod +x test), the script can be executed like any other shell or perl script:
Example #1 Execute PHP script as shell script
Assuming this file is named test in the current directory, it is now possible to do the following:
$ chmod +x test $ ./test -h -- foo array(4) < [0]=>string(6) "./test" [1]=> string(2) "-h" [2]=> string(2) "--" [3]=> string(3) "foo" >
As can be seen, in this case no special care needs to be taken when passing parameters starting with — .
The PHP executable can be used to run PHP scripts absolutely independent of the web server. On Unix systems, the special #! (or «shebang») first line should be added to PHP scripts so that the system can automatically tell which program should run the script. On Windows platforms, it’s possible to associate php.exe with the double click option of the .php extension, or a batch file can be created to run scripts through PHP. The special shebang first line for Unix does no harm on Windows (as it’s formatted as a PHP comment), so cross platform programs can be written by including it. A simple example of writing a command line PHP program is shown below.
Example #2 Script intended to be run from command line (script.php)
if ( $argc != 2 || in_array ( $argv [ 1 ], array( ‘—help’ , ‘-help’ , ‘-h’ , ‘-?’ ))) ?>
This is a command line PHP script with one option.
can be some word you would like
to print out. With the —help, -help, -h,
or -? options, you can get this help.
The script above includes the Unix shebang first line to indicate that this file should be run by PHP. We are working with a CLI version here, so no HTTP headers will be output.
The program first checks that there is the required one argument (in addition to the script name, which is also counted). If not, or if the argument was —help, -help, -h or -?, the help message is printed out, using $argv[0] to dynamically print the script name as typed on the command line. Otherwise, the argument is echoed out exactly as received.
To run the above script on Unix, it must be made executable, and called simply as script.php echothis or script.php -h. On Windows, a batch file similar to the following can be created for this task:
Example #3 Batch file to run a command line PHP script (script.bat)
@echo OFF "C:\php\php.exe" script.php %*
Assuming the above program is named script.php , and the CLI php.exe is in C:\php\php.exe , this batch file will run it, passing on all appended options: script.bat echothis or script.bat -h.
See also the Readline extension documentation for more functions which can be used to enhance command line applications in PHP.
On Windows, PHP can be configured to run without the need to supply the C:\php\php.exe or the .php extension, as described in Command Line PHP on Microsoft Windows.
Note:
On Windows it is recommended to run PHP under an actual user account. When running under a network service certain operations will fail, because «No mapping between account names and security IDs was done».
User Contributed Notes 7 notes
On Linux, the shebang (#!) line is parsed by the kernel into at most two parts.
For example:
1: #!/usr/bin/php
2: #!/usr/bin/env php
3: #!/usr/bin/php -n
4: #!/usr/bin/php -ddisplay_errors=E_ALL
5: #!/usr/bin/php -n -ddisplay_errors=E_ALL
1. is the standard way to start a script. (compare «#!/bin/bash».)
2. uses «env» to find where PHP is installed: it might be elsewhere in the $PATH, such as /usr/local/bin.
3. if you don’t need to use env, you can pass ONE parameter here. For example, to ignore the system’s PHP.ini, and go with the defaults, use «-n». (See «man php».)
4. or, you can set exactly one configuration variable. I recommend this one, because display_errors actually takes effect if it is set here. Otherwise, the only place you can enable it is system-wide in php.ini. If you try to use ini_set() in your script itself, it’s too late: if your script has a parse error, it will silently die.
5. This will not (as of 2013) work on Linux. It acts as if the whole string, «-n -ddisplay_errors=E_ALL» were a single argument. But in BSD, the shebang line can take more than 2 arguments, and so it may work as intended.
Summary: use (2) for maximum portability, and (4) for maximum debugging.