- Saved searches
- Use saved searches to filter your results more quickly
- Nemolite/student
- Name already in use
- Sign In Required
- Launching GitHub Desktop
- Launching GitHub Desktop
- Launching Xcode
- Launching Visual Studio Code
- Latest commit
- Git stats
- Files
- README.md
- About
- Create a Registration and Login System with PHP and MySQL
- How to create a Registration and Login System with PHP and MySQL
- Create a Database and Database Table
- Connect to the Database
- Session Create for Logged in User
- Creating a Registration Form
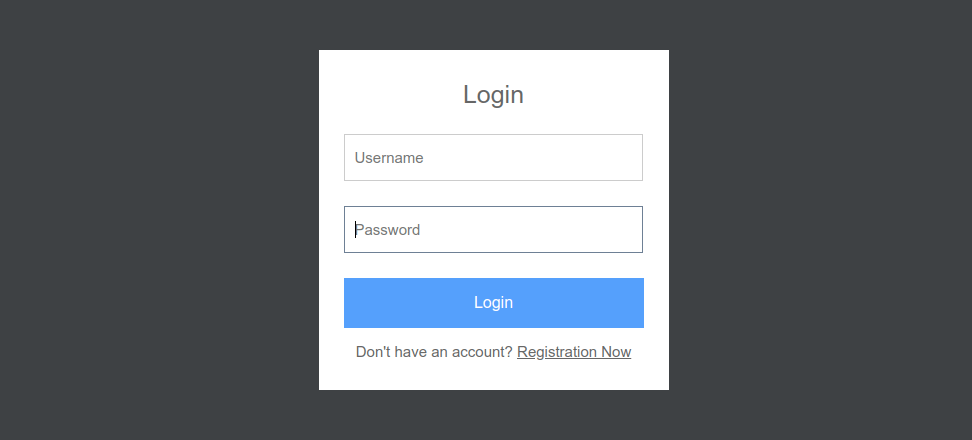
- Creating a Login Form
- Making a Dashboard Page
- Create a Logout (Destroy session)
- CSS File Create
- Final Thoughts
Saved searches
Use saved searches to filter your results more quickly
You signed in with another tab or window. Reload to refresh your session. You signed out in another tab or window. Reload to refresh your session. You switched accounts on another tab or window. Reload to refresh your session.
Простой пример сайта с админкой на php
Nemolite/student
This commit does not belong to any branch on this repository, and may belong to a fork outside of the repository.
Name already in use
A tag already exists with the provided branch name. Many Git commands accept both tag and branch names, so creating this branch may cause unexpected behavior. Are you sure you want to create this branch?
Sign In Required
Please sign in to use Codespaces.
Launching GitHub Desktop
If nothing happens, download GitHub Desktop and try again.
Launching GitHub Desktop
If nothing happens, download GitHub Desktop and try again.
Launching Xcode
If nothing happens, download Xcode and try again.
Launching Visual Studio Code
Your codespace will open once ready.
There was a problem preparing your codespace, please try again.
Latest commit
Git stats
Files
Failed to load latest commit information.
README.md
Проект «Портфолио достижений студента»
Структура файлов: index.php — стартовый (главный ) файл users.php — регистрация нового пользователя lk.php — личный кабинет пользователя, сюда попадаем только после авторизации chek.php — вход в систему (в личный кабинет) .htaccess — файл настроек (здесь можно изменить стартовый файл, например index.php на index.html , или на любой другой
Структура папок old_site — старый файлы сайта controllers — контроллеры (обрабочики, взаимодействие с базой данных), в основном php файлы css — файлы стилей (включая бутстрап) images — файлы изображений js — файлы JavaScript- скриптов sql — файлы структуры бд
About
Простой пример сайта с админкой на php
Create a Registration and Login System with PHP and MySQL
How to create a Registration and Login System with PHP and MySQL. Here is the quick solution to build a login system with PHP and MySQL. Nowadays almost every website provides Registration and login functionality. Thus, it is necessary to add a login system in modern web applications.
In this tutorial, we walk through the complete process of creating a user registration system. Users can create an account by providing username, password, email. After the account was created, the user can log in to their own account. Once the user login, it will redirect to the Dashboard page. Moreover, the user can logout from his panel. This whole system we are developed using PHP and MySQL.
Furthermore, we will show you how to build secure pages that are only accessed by logged in users. Without login, the user can not access the page.
How to create a Registration and Login System with PHP and MySQL
Here are Seven pretty simple steps you have to follow to create a login system.
- Create a Database and Database Table
- Connect to the Database
- Session Create for Logged in User
- Create a Registration and Login Form
- Make a Dashboard Page
- Create a Logout (Destroy session)
- CSS File Create
Create a Database and Database Table
First, you have to log in to PHPMyAdmin. Next, click on the Database tab to create a new database. Enter your database name and click on create database button. As soon as PHPMyAdmin will create a new database.
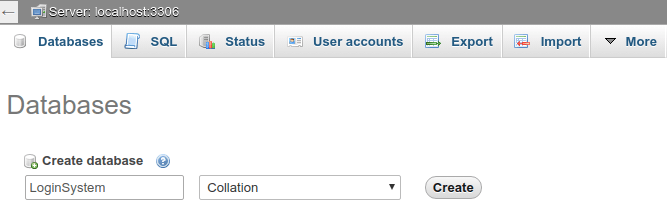
Similarly, you can execute the below query to create a database.
CREATE DATABASE LoginSystem;Once you create a database, the second step to creating a user table. The user’s table will have the following fields.
- id – int(11)
- username – varchar(100)
- email – varchar(100)
- password – varchar(100)
- create_datetime – datetime
CREATE TABLE IF NOT EXISTS `users` ( `id` int(11) NOT NULL AUTO_INCREMENT, `username` varchar(50) NOT NULL, `email` varchar(50) NOT NULL, `password` varchar(50) NOT NULL, `create_datetime` datetime NOT NULL, PRIMARY KEY (`id`) );Copy the above query and execute it in the SQL query area.
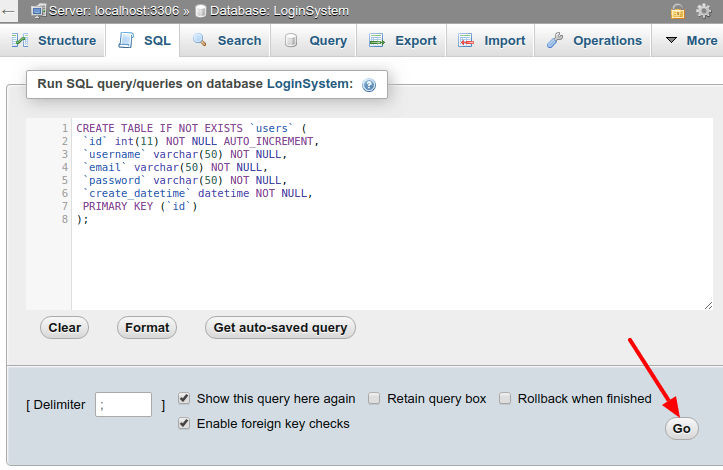
Your database table looks like the below screen.
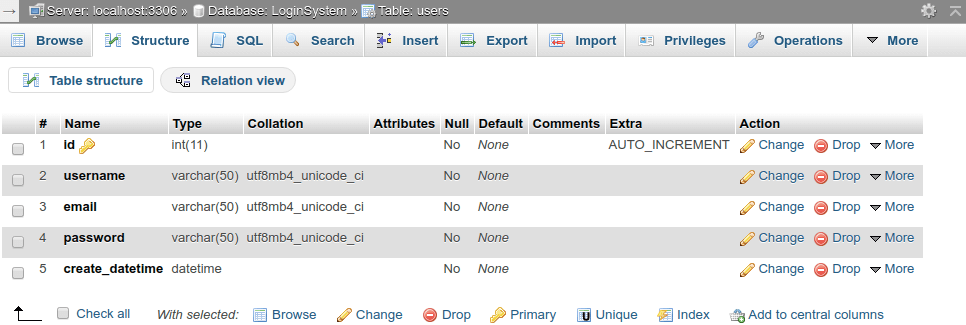
Connect to the Database
After creating the table, we have to create a PHP MySQL connector script to connect to the MySQL database server. Create a file named db.php and put the following code inside it.
db.php
Session Create for Logged in User
Next, we have to create a session for the user. Create a file named auth_session.php and paste the codes below.
auth_session.php
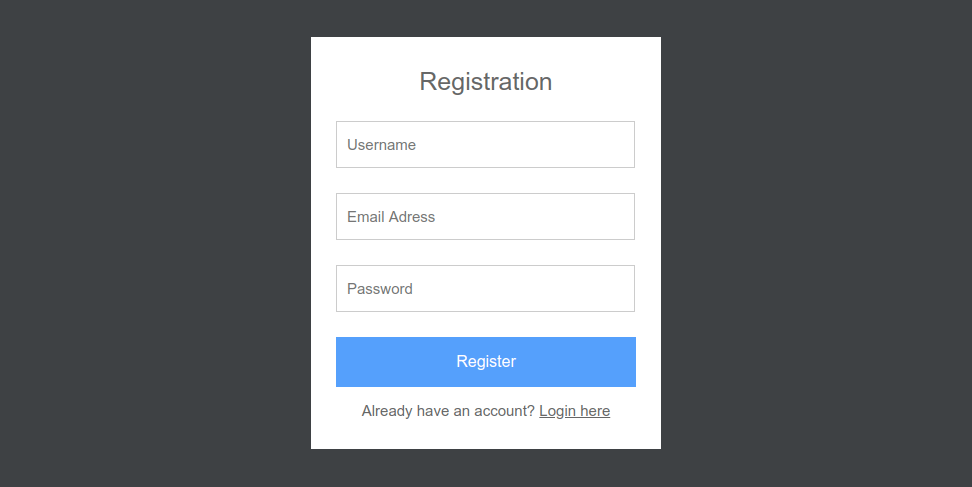
Creating a Registration Form
Furthermore, create PHP file registration.php and paste the following example code in it. This will create an HTML form. It will allow users to register.
registration.php
       You are registered successfully.
Click here to Login