- Setting Up Your Python Environment With Venv and requirements.txt
- What Is requirements.txt?
- Creating Your requirements.txt
- Installing From Your requirements.txt
- Using Virtual Environments
- Next Steps
- Installing packages using pip and virtual environments
- Installing pip
- Installing virtualenv
- Creating a virtual environment
- Activating a virtual environment
- Введение в Virtual Environments
- Создание виртуальной среды — venv в Windows
- Активация и деактивация виртуальной среды Python
- Установка пакетов в виртуальную среду
- Как сохранить пакеты в файл requirements.txt
- Установить пакеты из файла requirements.txt
- Как запустить скрипт Python в виртуальной среде. Пример автоматизации с помощью cmd
- Создание виртуальной среды с помощью PyCharm
- Создание виртуальной среды в Ubuntu 20.14
- С помощью пакета venv
Setting Up Your Python Environment With Venv and requirements.txt
By default, all the Python packages you install on your computer are used within all of your projects. But, what if one project requires version 1 of a package and another project requires version 2?
Or, if you have multiple people working on a project, how do you tell them which dependencies are needed and make sure everyone is using the same versions?
This is where using requirements.txt and virtual environments come in.
What Is requirements.txt?
When you usually install a package, you probably do something like:
But, imagine if you have someone else working on the project and they also install pandas. Or, maybe you are deploying your project to Netlify or are using Docker. How do you make sure the right dependencies get installed and the correct version?
With requirements.txt, you can list all the required packages for your project and what version is needed. If you are familiar with NPM or Composer, you may have seen a similar concept in their package.json or composer.json files.
Creating Your requirements.txt
In your project, you can create a requirements.txt file. Inside, you can list each package that is needed.
matplotlib numpy openpyxl pandas To make it easy to scan and read, the list is normally alphabetical. If you want a specific version, you could add an equal sign like this:
matplotlib==3.3.3 numpy==1.19.3 openpyxl==3.0.5 pandas==1.0.5 Now, it would be challenging to manually write out all your dependencies and remember to change the version number when you upgrade. Luckily, pip can help with this.
If you ever want to see what packages you have installed, you can run pip list . This will output all the packages installed and their version numbers.
Package Version --------------- --------- matplotlib 3.3.3 numpy 1.19.3 openpyxl 3.0.5 pandas 1.0.5 Even better, you can use pip freeze > requirements.txt to automatically take this list and store it in your requirements.txt file.
As you add, update, and remove packages, you can run that command again to update your requirements.txt file.
Installing From Your requirements.txt
Let’s say you just cloned a git repo. This repo contains a requirements.txt file. What do you do next?
Once again, pip is here to help. We can run pip install -r requirements.txt to have pip automatically install all dependencies listed in the requirements.txt file.
Using Virtual Environments
Now, if you only have one Python project on your computer, this may be fine as-is. But, what if you start cloning or creating several projects all with their own requirements.txt files? You can quickly end up with package versions that are not compatible with each other.
This is where virtual environments come in. You can set up your project to exist within its own environment and packages only installed within that environment. Each project will have its own environment and its own packages installed within it.
To create your virtual environment, go into your project and run:
The last parameter, .venv , is the name of the directory to install the virtual environment into. You can name this whatever you would like, but I like to stick with .venv as it’s easy to tell what it is and it doesn’t conflict with directory names I use with other systems.
Once the command is finished, your virtual environment will be ready. Next, you can «activate» it by running the activation script.
If you are on Windows, you will use .venv\Scripts\activate.bat .
On other OSes, you will use source .venv/bin/activate .
Once activated, you will see the name of the environment within the terminal.
(.venv) fpcorso:~$ pip install -r requirements.txt Now, you will be able to install packages and run Python within the environment without interfering with packages installed globally.
Once you are finished, just use the deactivate command to exit the virtual environment.
Next Steps
Going forward, you will want to install a virtual environment within all of your projects and install packages within. Then, use the pip freeze > requirements.txt command to generate your requirements.txt file to keep everyone working on the project in-sync.
Installing packages using pip and virtual environments
This guide discusses how to install packages using pip and a virtual environment manager: either venv for Python 3 or virtualenv for Python 2. These are the lowest-level tools for managing Python packages and are recommended if higher-level tools do not suit your needs.
This doc uses the term package to refer to a Distribution Package which is different from an Import Package that which is used to import modules in your Python source code.
Installing pip
pip is the reference Python package manager. It’s used to install and update packages. You’ll need to make sure you have the latest version of pip installed.
Debian and most other distributions include a python-pip package; if you want to use the Linux distribution-provided versions of pip, see Installing pip/setuptools/wheel with Linux Package Managers .
You can also install pip yourself to ensure you have the latest version. It’s recommended to use the system pip to bootstrap a user installation of pip:
python3 -m pip install --user --upgrade pip python3 -m pip --version
Afterwards, you should have the latest version of pip installed in your user site:
pip 21.1.3 from $HOME/.local/lib/python3.9/site-packages (python 3.9)
The Python installers for Windows include pip. You can make sure that pip is up-to-date by running:
py -m pip install --upgrade pip py -m pip --version
Afterwards, you should have the latest version of pip:
pip 21.1.3 from c:\python39\lib\site-packages (Python 3.9.4)
Installing virtualenv
If you are using Python 3.3 or newer, the venv module is the preferred way to create and manage virtual environments. venv is included in the Python standard library and requires no additional installation. If you are using venv, you may skip this section.
virtualenv is used to manage Python packages for different projects. Using virtualenv allows you to avoid installing Python packages globally which could break system tools or other projects. You can install virtualenv using pip.
python3 -m pip install --user virtualenv
py -m pip install --user virtualenv
Creating a virtual environment
venv (for Python 3) and virtualenv (for Python 2) allow you to manage separate package installations for different projects. They essentially allow you to create a “virtual” isolated Python installation and install packages into that virtual installation. When you switch projects, you can simply create a new virtual environment and not have to worry about breaking the packages installed in the other environments. It is always recommended to use a virtual environment while developing Python applications.
To create a virtual environment, go to your project’s directory and run venv. If you are using Python 2, replace venv with virtualenv in the below commands.
The second argument is the location to create the virtual environment. Generally, you can just create this in your project and call it env .
venv will create a virtual Python installation in the env folder.
You should exclude your virtual environment directory from your version control system using .gitignore or similar.
Activating a virtual environment
Before you can start installing or using packages in your virtual environment you’ll need to activate it. Activating a virtual environment will put the virtual environment-specific python and pip executables into your shell’s PATH .
You can confirm you’re in the virtual environment by checking the location of your Python interpreter:
Введение в Virtual Environments

Если вы работали с несколькими проектами, в которых использовался Python, то наверняка вы встречались с проблемой поломки одного из проекта, потому что обновленная версия библиотеки для другого проекта, не применима для текущего. Т.е. если вы работаете с Python и не используете miniconda или anaconda, то установка и обновление библиотек python постоянно ломает ваши проекты. Эта проблема называется «Ад зависимостей».
Поэтому лучшим подходом будет создавать для каждого отдельного проекта свою среду. В этой статье будет рассмотрена библиотека venv для настройки Virtual Environment для Windows.
Виртуальная среда — это способ Python для разделения зависимостей между проектами.
Создание виртуальной среды — venv в Windows
venv -это пакет, поставляемый с Python 3.
venv (для Python 3) позволяет управлять отдельными установками пакетов для разных проектов. По сути, venv позволяет вам создавать «виртуальную» изолированную установку Python и устанавливать пакеты в эту виртуальную установку. При переключении проектов вы можете просто создать новую виртуальную среду и не беспокоиться о нарушении работы пакетов, установленных в других средах. При разработке приложений Python всегда рекомендуется использовать виртуальную среду.
Чтобы создать виртуальную среду, перейдите в каталог вашего проекта и запустите venv.
venv создаст виртуальную установку Python в директории venv .

Примечание: Вы должны исключить каталог виртуальной среды из своей системы управления версиями с помощью .gitignore .
Активация и деактивация виртуальной среды Python
Далее необходимо активировать виртуальную среду.
Для этого необходимо в консоли cmd запустить .\venv\Scripts\activate или файл .\venv\Scripts\activate.bat , или .\venv\Scripts\Activate.ps1 .
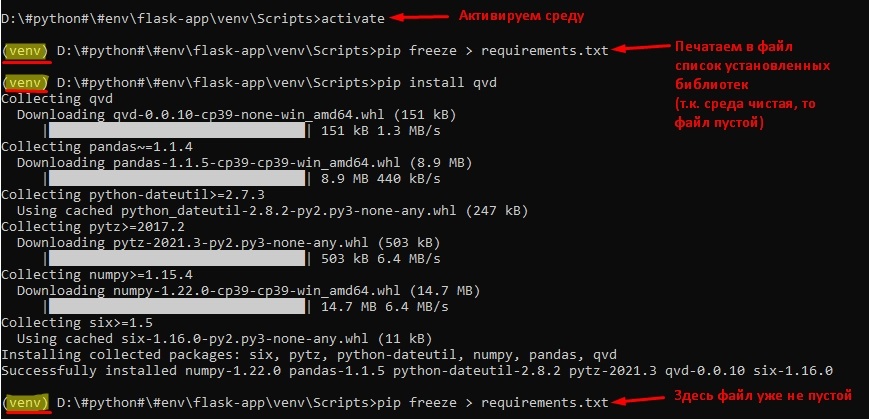
Префикс вашего рабочего каталога изменится (выделил желтым — venv)
Пока ваша виртуальная среда активирована, pip будет устанавливать пакеты в эту конкретную среду, и вы сможете импортировать и использовать пакеты в своем приложении Python.
Установка пакетов в виртуальную среду
pip позволяет вам указать, какую версию пакета установить, используя спецификаторы версии . Например, чтобы установить определенную версию requests :
Как сохранить пакеты в файл requirements.txt
Pip может экспортировать список всех установленных пакетов и их версий с помощью freeze команды: pip freeze > requirements.txt .
Будет выведен список спецификаторов пакетов, таких как:
backports.entry-points-selectable==1.1.0 certifi==2021.5.30 charset-normalizer==2.0.3 distlib==0.3.2 filelock==3.0.12 idna==3.2 platformdirs==2.0.2 requests==2.26.0 six==1.16.0 urllib3==1.26.6 virtualenv==20.6.0
Имейте в виду, что в этом случае в файле requirements.txt будут перечислены все пакеты, которые были установлены в виртуальной среде, независимо от того, откуда они пришли.
Установить пакеты из файла requirements.txt
pip install -r requirements.txt
Как запустить скрипт Python в виртуальной среде. Пример автоматизации с помощью cmd
Для того, чтобы запустить скрипт, достаточно внутри директории с проектом (со средой) запустить команду:
"D:\#python#\#env\flask-app\venv\Scripts\python.exe" "D:\#python#\#env\flask-app\app.py"
Либо создать файл cmd с содержимым и запустить его:
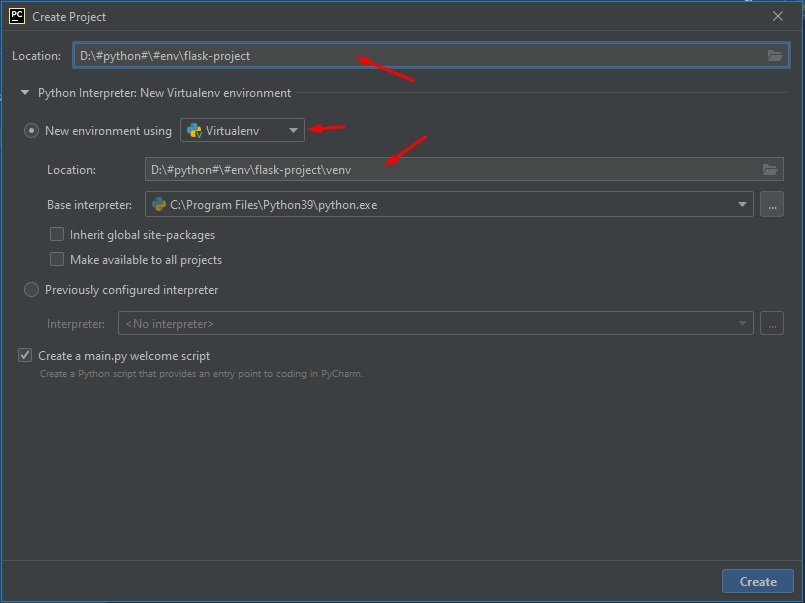
@echo off For /f "tokens=1-4 delims=/ " %%a in ('date /t') do (set mydate=%%c-%%a-%%b) For /f "tokens=1-2 delims=/:" %%a in ('time /t') do (set mytime=%%a%%b) rem %mydate%_%mytime% "D:\#python#\#env\flask-app\venv\Scripts\python.exe" "D:\#python#\#env\flask-app\app.py" 2>"D:\#python#\#env\flask-app\log_get_data_log_%mydate%_%mytime%.log" Создание виртуальной среды с помощью PyCharm
Для более легкой работы с виртуальными средами на Windows рекомендую установить PyCharm (Community Edition бесплатная). При создании проекта он сам создаст виртуальную среду и будет запускать файл в этой виртуальной среде:
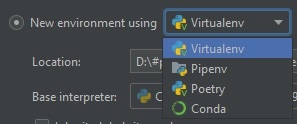
Новую виртуальную среду можно создать с помощью разных инструментов в Pycharm:
Создание виртуальной среды в Ubuntu 20.14
С помощью пакета venv
# Создаем директорию проекта mkdir flask-app # Переходим внутрь директории cd flask-app # Создаем среду myenv python3 -m venv myenv # Активируем среду source myenv/bin/activate