- How to Update Python
- How to Update Python in Linux, Mac, or Windows
- Updating Python in Linux
- Updating Python Using Apt-Get
- Updating Python in Mac
- Updating Python in Windows
- Conclusion
- Как обновить python на Ubuntu
- Подготавливаем данные с локальной версии
- Обновляем Ubuntu на сервере
- Обновляем python на сервере
- Меняем версию python в системе «по умолчанию»
- Устанавливаем новое окружение
- Install and Upgrade Python on Ubuntu
- Isn’t Python already installed?
- Install and Upgrade Python
- Python version in Ubuntu repositories is old?
- What should I do?
- I want updates!
- Using Deadsnakes PPA (if you really want the latest Python)
How to Update Python
Python receives a major update once every 12 months, with bug-fix updates and security patches being released every few months. The most recent version of Python – Python 3.9 – introduces features like Union Operators in dict, the Flexible function, and Type Hinting Generics. Updating Python can be confusing regardless of which OS you’re running. Do you remove the old version first? Or can you update the package directly? Here’s an easy tutorial on how to update Python.
How to Update Python in Linux, Mac, or Windows
It is possible to install two major versions of Python – say, Python 2.x and Python 3.x – on one computer and use both. If you want to move from Python 2.x to 3.x, you don’t have to uninstall the previous version unless you don’t want to use it anymore. Furthermore, Python 3 now comes with the “py.exe” launcher integrated by default. The launcher helps users in two ways:
- Users can run Python from any shell using the command “py.” Typing “python” is no longer required.
- Allows you to use two different versions of Python 3 at the same time. You can specify which version of Python you want to use to run code with simple switches in commands (like “py -3.6”).
In other words, you won’t need to change the PATH variable every time you want to use another version of Python. But the launcher only comes installed on the Windows version of Python 3. Updating Python in computers with Linux or macOS can be more complicated.
Note: If you’ve not installed Python on your computer yet, you cannot update to a newer version. If you’re having trouble installing Python on your computer, reading our Python installation guide will help.
Updating Python in Linux

Before you run any commands, you can save yourself a lot of effort by checking whether the Linux installation comes with the latest version of Python installed. To check what version of Python 3 your machine has, open the Terminal by pressing Ctrl+Alt +T, and type in the following command: python3 –version Or alternatively: python3 -V The output should look something like this: If you see that your machine doesn’t have Python 3.9, you must run the following commands: sudo apt update sudo apt install software-properties-common These commands will install the Python packages required to install the newest Python version. You can now install the latest version of Python in two ways: using Apt and using the source code. Using Apt to update Python is faster and easier. Here’s how you do it:
Updating Python Using Apt-Get
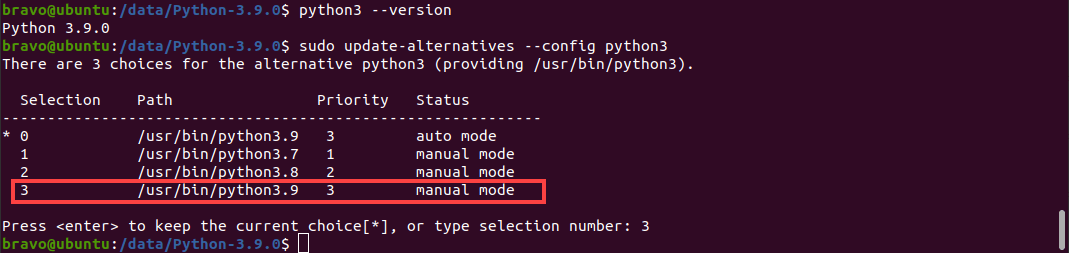
Using the Apt package manager is the easiest method of installing Python 3.9 on Linux. First, you must configure the deadsnakes PPA to your machine by running the following command: sudo add-apt-repository ppa:deadsnakes/ppa You can now update the apt cache and install the Python 3.9 package: sudo apt update sudo apt install python3.9 The Python update will install. However, by default, Python will point to the previously installed version of Python 3. After installation completes, you must update Python 3 to point to Python 3.9. Enter this command to configure Python 3: sudo update-alternatives —config python3 A list of options will appear, and you will be prompted to pick which version of Python you want Python 3 to point to. The prompt should look like this: All you have to do is type the right selection number, and you will have updated Python to the newest version on your Linux machine. To verify the version of Python being used, you can run: python3 —V
Updating Python in Mac
Updating Python on a machine with macOS is a lot easier than updating it on a Linux machine. A Mac can have more than one version of Python installed. Therefore, you can update Python by visiting https://www.python.org/downloads/mac-osx/ , downloading the installer, and running it. If you have Homebrew installed on your Mac, you can run the following command on the Terminal: brew install python After the process completes, your computer will have the latest version of Python 3. You can verify this by running the command: python3 —version If you want to upgrade pip and add a new library to it, you can enter the following command: pip3 install
Updating Python in Windows
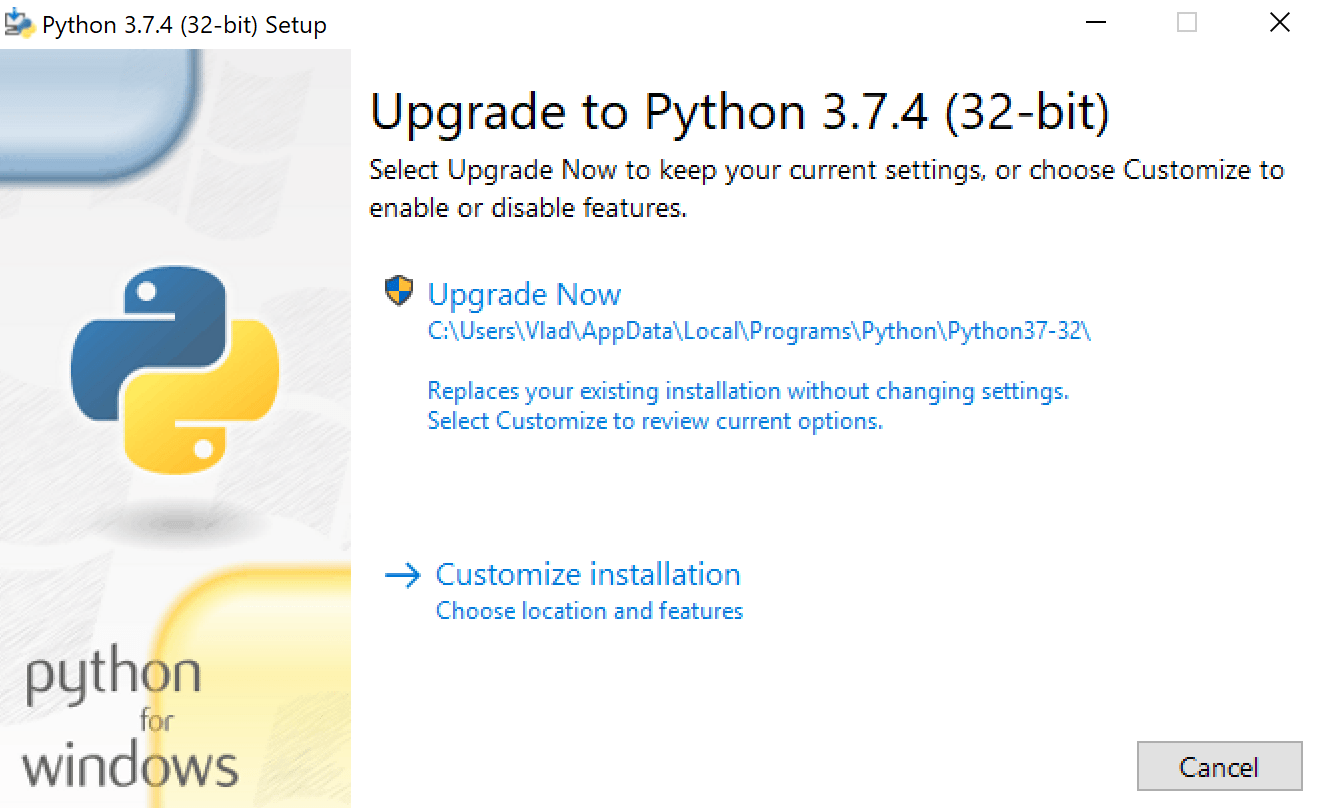
Updating to a new Python version is easy on a computer running Windows. All you have to do is visit the Python downloads page and download the latest version. If you’re updating to a new patch of Python (3.x.a to 3.x.b), when you run the installer, it will prompt you to “Upgrade Now.” The installer will look like this: Clicking on the button will replace the existing version of Python with the new version. The older version will be removed from your computer. After you restart the computer, the new patch will be installed on your machine. In contrast, if you’re updating Python to a new minor version (3.x to 3.y), you will see the “Install Now” prompt instead of the “Upgrade Now” prompt on the installer. Clicking the button will install the new version of Python. However, the old version will not be removed. Your computer can have more than one Python version installed. The py launcher is installed automatically regardless of the version of Python you’re using. It will enable you to select the version of Python you want to use. Running a program with a specific version is as simple as using the “py” command and entering the version you want to use, like so: py -3.8 or py -3.9 Suppose there are many projects on your machine that use the previous version of Python, and you use them all in a virtual environment. In that case, you can update Python just in that environment using the following command: python -m venv —upgrade
Conclusion
Every version of Python, including the newest release , has some limitations. However, updating to the latest version of Python allows you to use all the new features. Furthermore, updated versions also come with bug fixes and improved security measures. With this guide handy, you should be able to get your hands on the newest Python version in a matter of minutes. Going through our Python usage guide next will help you quickly pick up all that you can do with Python.
Как обновить python на Ubuntu
 Admin
Admin  30.10.2022
  Linux, Python, Ubuntu
Обновление на новые версии это всегда «весело». Вместе с новым функционалом понадобится убрать устаревшие функции, обновить потерявшие совместимость модули и в целом проделать большую работу.
Подготавливаем данные с локальной версии
Сначала обновляем версию локально, тестируем. Фиксируем изменения всех зависимостей командой:
Обновляем Ubuntu на сервере
Обновим систему и пакеты в ней:
Обновляем python на сервере
Если сразу запустить обновление, то возникнет ошибка:
sudo apt install python3.10
Чтение списков пакетов… Готово
Построение дерева зависимостей
Чтение информации о состоянии… Готово
E: Невозможно найти пакет python3.10
E: Не удалось найти ни один пакет с помощью шаблона «python3.10»
Сначала установим необходимые компоненты для добавления пользовательских PPA:
Добавим PPA-репозиторий deadsnakes/ppa в список источников диспетчера пакетов APT:
Запустим обновление APT для обновления менеджера пакетов — появится новый импортированный PPA:
Теперь можем установить новую версию python 3.10:
Проверим установленную версию:
Также проверим текущую версию по умолчанию:
Установим дополнительные модули стандартной библиотеки (venv):
Также могут пригодиться и другие модули:
sudo apt install python3.10-distutils -y
sudo apt install python3.10-lib2to3 -y
sudo apt install python3.10-gdbm -y
sudo apt install python3.10-tk -y
Многие дополнительные модули python нужны для работы библиотек, без них они не установятся и будут вылезать ошибки.
Меняем версию python в системе «по умолчанию»
По умолчанию python будет указывать на старую версию.
Например, Python 3 указывает на Python 3.8. Это значит, что когда мы запустим python3, он будет выполняться как python 3.8, мы же хотим выполнить его как python 3.10.
Для этого добавим альтернативы:
sudo update-alternatives —install /usr/bin/python3 python3 /usr/bin/python3.8 1
sudo update-alternatives —install /usr/bin/python3 python3 /usr/bin/python3.10 2
Устанавливаем новое окружение
Переименовываем старую директорию окружения (мы должны находится в директории сайта с виртуальным окружением):
Затем в этой директории создаем новое виртуальное окружение:
Install and Upgrade Python on Ubuntu

The Python language has been gaining popularity for several years, both as a programming and a scripting language.
Ubuntu and almost every other Linux distribution have been shipping with some version of Python for quite a long time.
You can check the version of python with the following command:
Running the command will show the version of Python v3 that you have installed.
Isn’t Python already installed?
Well yes, when you install Ubuntu, a version of Python is automatically installed as most system utilities also depend on it.
The problem here is that many people try to run python directly and they will be surprised when their Ubuntu system throws an error:
The thing is that in Ubuntu, the Python version 3.x is installed and its binary is named python3, not python.
Sometimes, the version that is pre-installed, or the latest version that is available from Ubuntu’s repositories is older than the one found on python.org.
To check the version of Python that is installed, run the following command in your terminal:
$ python3 --version Python 3.10.4At the time of writing this article, the latest version found on python.org is 3.10.4, which is exactly what I have installed from the first-party repository.
Weirdly, if Python is not found, you might get a similar error:
$ python3 --version python3: command not found![]()
Install and Upgrade Python
In case you do not have Python installed, fret not. You can easily install it from Ubuntu’s software repositories.
Use the apt package manager to install Python. Below is the command to run:
sudo apt update sudo apt install python3The first command will update the local package list, in case it was out of sync. The second command will install whatever the latest version of Python v3 is available at the moment.
Even if you have Python installed, the ‘apt’ package manager will install a newer version of Python, if available. This goes without saying, the dependencies will also be installed and/or upgraded as well.
Ubuntu takes care of the Python version it provides. If there are security or maintenance updates, you get them with the system updates. You just have to update your system to get Python upgrades (if there are any from Ubuntu).
Python version in Ubuntu repositories is old?
With the announcement of a new Annual Release Cycle for Python, a new version of Python will be released every year, as opposed to every 1.5 years.
This means the version available in repositories for Ubuntu’s LTS versions will not stay «latest and greatest» after a while.
This does not mean that you stop receiving updates to Python altogether. Even if the version of Python is old, you will get all the necessary security updates, including any additional bug fixes.
What should I do?
I recommend you use the version of Python provided by Ubuntu. As previously, Canonical (parent company of Ubuntu) will continue providing necessary updates to your stable version of Python. It includes up-to-date bug fixes and security updates for Python.
I want updates!
In any case, if you want to install a newer version of Python than what is available in Ubuntu’s repositories, you have a few options.
The easiest option is to use a third-party PPA. That way, you are out of the hassle of applying necessary patches and compiling every time a new version of Python is released.
Using Deadsnakes PPA (if you really want the latest Python)
The Deadsnakes PPA contains a more recent version of Python packaged for Ubuntu. This means you can install a newer version of Python even if the first-party repositories contain an older version.
A disclaimer from PPA maintainer themselves:
There is no guarantee of timely updates in case of security problems or other issues. If you want to use them in a security-or-otherwise-critical environment (say, on a production server), you do so at your own risk.
Before adding a PPA, the ‘software-properties-common’ package needs to be installed first. Do that with the following command:
sudo apt install software-properties-commonOnce the apt repositories manager package is installed, we can now easily add the Deadsnakes PPA. The command to do so is given below:
sudo add-apt-repository ppa:deadsnakes/ppaThe PPA is added. Now we need to update the local package list.
Finally, install the latest version of Python with the following command:
That will install the latest version of Python that is available.
Once the latest version of Python is installed, check it using the following command:
Ensure that the command’s output aligns with the version of Python you are in need of.
Well, that’s about it. You get to install Python version of your choice on Ubuntu. Enjoy scripting with Python.