Python tkinter scrollbar command
Виджет Scrollbar прокручивать содержимое контейнера, которое больше размеров этого контейнера.
Основные параметры конструктора Scrollbar:
- orient : направление прокрутки. Может принать следующие значения: vertical (вертикальная прокрутка) и horizontal (горизонтальная прокрутка).
- command : команда прокрутки
Scrollbar не используется сам по себе, он применяется лишь для прокручиваемого виджета. Не все виджеты в tkinter являются прокручиваемыми. Для прокрутки по вертикали прокручиваемый виджет имеет yview , а для прокрутки по горизонтали — метод xview (виджет может иметь только один из этих методов). Примером прокручиваемого виджета может служить Listbox или Text . Этот метод используется в качестве команды для Scrollbar:
listbox = Listbox() # вертикальная прокрутка scrollbar = ttk.Scrollbar(orient="vertical", command = listbox.yview)
Но прокручиваемый виджет должен также взаимодействовать со Scrollbar. Для этого у прокручиваемого виджета имеются параметры yscrollcommand и/или xscrollcommand , которые должны принимать вызов метода set объекта Scrollbar:
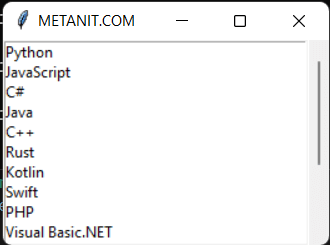
from tkinter import * from tkinter import ttk languages = ["Python", "JavaScript", "C#", "Java", "C++", "Rust", "Kotlin", "Swift", "PHP", "Visual Basic.NET", "F#", "Ruby", "R", "Go", "C", "T-SQL", "PL-SQL", "Typescript", "Assembly", "Fortran"] root = Tk() root.title("METANIT.COM") root.geometry("250x200") languages_var = StringVar(value=languages) listbox = Listbox(listvariable=languages_var) listbox.pack(side=LEFT, fill=BOTH, expand=1) scrollbar = ttk.Scrollbar(orient="vertical", command=listbox.yview) scrollbar.pack(side=RIGHT, fill=Y) listbox["yscrollcommand"]=scrollbar.set root.mainloop() В конструкторе scrollbar ассоциируется с функцией, которую надо выполнять при прокрутке. В данном случае это метод yview элемента listbox. В итоге мы сможем прокручивать элементы по вертикали:
И так как необходимо прокручивать listbox по вертикали, то у него задается параметр listbox[«yscrollcommand»]=scrollbar.set
Ручная прокрутка
В принципе для прокрутки виджета (который поддерживает прокрутку) использовать Scrollbar необязательно. Для прокрутки виджет может содержать специальные методы:
- yview_scroll(number, what) : сдвигает текущее положение по вертикали. Параметр number указывает количество, на которое надо сдвигать. А параметр what определяет единицы сдвига и может принимать следующие значения: «units» (элемент) и «pages» (страницы)
- xview_scroll(number, what) : сдвигает текущее положение по горизонтали
- yview_moveto(fraction) : сдвигает область просмотра по вертикали на определенную часть, которая выражается во float от 0 до 1
- xview_moveto(fraction) : сдвигает область просмотра на определенную часть по горизонтали
Например, сдвиг на два элемента списка вниз:
from tkinter import * from tkinter import ttk languages = ["Python", "JavaScript", "C#", "Java", "C++", "Rust", "Kotlin", "Swift", "PHP", "Visual Basic.NET", "F#", "Ruby", "R", "Go", "T-SQL", "PL-SQL", "Typescript"] root = Tk() root.title("METANIT.COM") root.geometry("250x200") languages_var = StringVar(value=languages) listbox = Listbox(listvariable=languages_var) listbox.pack(expand=1, fill=BOTH) # сдвигаем скрол на 1 элемент внизу listbox.yview_scroll(number=1, what="units") root.mainloop() Python — Tkinter Scrollbar
This widget provides a slide controller that is used to implement vertical scrolled widgets, such as Listbox, Text and Canvas. Note that you can also create horizontal scrollbars on Entry widgets.
Syntax
Here is the simple syntax to create this widget −
w = Scrollbar ( master, option, . )
Parameters
- master − This represents the parent window.
- options − Here is the list of most commonly used options for this widget. These options can be used as key-value pairs separated by commas.
The color of the slider and arrowheads when the mouse is over them.
The color of the slider and arrowheads when the mouse is not over them.
The width of the 3-d borders around the entire perimeter of the trough, and also the width of the 3-d effects on the arrowheads and slider. Default is no border around the trough, and a 2-pixel border around the arrowheads and slider.
A procedure to be called whenever the scrollbar is moved.
The cursor that appears when the mouse is over the scrollbar.
The width of the borders around the arrowheads and slider. The default is elementborderwidth=-1, which means to use the value of the borderwidth option.
The color of the focus highlight when the scrollbar does not have focus.
The color of the focus highlight when the scrollbar has the focus.
The thickness of the focus highlight. Default is 1. Set to 0 to suppress display of the focus highlight.
This option controls what happens when a user drags the slider. Normally (jump=0), every small drag of the slider causes the command callback to be called. If you set this option to 1, the callback isn’t called until the user releases the mouse button.
Set orient=HORIZONTAL for a horizontal scrollbar, orient=VERTICAL for a vertical one.
This option controls how long button 1 has to be held down in the trough before the slider starts moving in that direction repeatedly. Default is repeatdelay=300, and the units are milliseconds.
Normally, you can tab the focus through a scrollbar widget. Set takefocus=0 if you don’t want this behavior.
Width of the scrollbar (its y dimension if horizontal, and its x dimension if vertical). Default is 16.
Methods
Scrollbar objects have these methods −
Returns two numbers (a, b) describing the current position of the slider. The a value gives the position of the left or top edge of the slider, for horizontal and vertical scrollbars respectively; the b value gives the position of the right or bottom edge.
To connect a scrollbar to another widget w, set w’s xscrollcommand or yscrollcommand to the scrollbar’s set() method. The arguments have the same meaning as the values returned by the get() method.
Example
Try the following example yourself −
from Tkinter import * root = Tk() scrollbar = Scrollbar(root) scrollbar.pack( side = RIGHT, fill = Y ) mylist = Listbox(root, yscrollcommand = scrollbar.set ) for line in range(100): mylist.insert(END, "This is line number " + str(line)) mylist.pack( side = LEFT, fill = BOTH ) scrollbar.config( command = mylist.yview ) mainloop()
When the above code is executed, it produces the following result −