Python — Tkinter Menubutton
A menubutton is the part of a drop-down menu that stays on the screen all the time. Every menubutton is associated with a Menu widget that can display the choices for that menubutton when the user clicks on it.
Syntax
Here is the simple syntax to create this widget −
w = Menubutton ( master, option, . )
Parameters
- master − This represents the parent window.
- options − Here is the list of most commonly used options for this widget. These options can be used as key-value pairs separated by commas.
The background color when the mouse is over the menubutton.
The foreground color when the mouse is over the menubutton.
This options controls where the text is positioned if the widget has more space than the text needs. The default is anchor=CENTER, which centers the text.
The normal background color displayed behind the label and indicator.
To display a bitmap on the menubutton, set this option to a bitmap name.
The size of the border around the indicator. Default is 2 pixels.
The cursor that appears when the mouse is over this menubutton.
Set direction=LEFT to display the menu to the left of the button; use direction=RIGHT to display the menu to the right of the button; or use direction=’above’ to place the menu above the button.
The foreground color shown on this menubutton when it is disabled.
The foreground color when the mouse is not over the menubutton.
The height of the menubutton in lines of text (not pixels!). The default is to fit the menubutton’s size to its contents.
Color shown in the focus highlight when the widget has the focus.
To display an image on this menubutton,
This option controls where the text is located when the text doesn’t fill the menubutton: use justify=LEFT to left-justify the text (this is the default); use justify=CENTER to center it, or justify=RIGHT to right-justify.
To associate the menubutton with a set of choices, set this option to the Menu object containing those choices. That menu object must have been created by passing the associated menubutton to the constructor as its first argument.
How much space to leave to the left and right of the text of the menubutton. Default is 1.
How much space to leave above and below the text of the menubutton. Default is 1.
Selects three-dimensional border shading effects. The default is RAISED.
Normally, menubuttons respond to the mouse. Set state=DISABLED to gray out the menubutton and make it unresponsive.
To display text on the menubutton, set this option to the string containing the desired text. Newlines («\n») within the string will cause line breaks.
You can associate a control variable of class StringVar with this menubutton. Setting that control variable will change the displayed text.
Normally, no underline appears under the text on the menubutton. To underline one of the characters, set this option to the index of that character.
The width of the widget in characters. The default is 20.
Normally, lines are not wrapped. You can set this option to a number of characters and all lines will be broken into pieces no longer than that number.
Example
Try the following example yourself −
from Tkinter import * import tkMessageBox import Tkinter top = Tk() mb= Menubutton ( top, text="condiments", relief=RAISED ) mb.grid() mb.menu = Menu ( mb, tearoff = 0 ) mb["menu"] = mb.menu mayoVar = IntVar() ketchVar = IntVar() mb.menu.add_checkbutton ( label="mayo", variable=mayoVar ) mb.menu.add_checkbutton ( label="ketchup", variable=ketchVar ) mb.pack() top.mainloop()
When the above code is executed, it produces the following result −
Виджет Menu в tkinter
Меню – это виджет, который присутствует во многих пользовательских приложениях. Находится оно под строкой заголовка и представляет собой выпадающие списки под словами-пунктами меню. Пункты конечных списков представляют собой команды, обычно выполняющие какие-либо действия или открывающие диалоговые окна.
В tkinter экземпляр меню создается от класса Menu , далее его надо привязать к виджету, на котором оно будет расположено. Обычно таковым выступает главное окно приложения. Его опции menu присваивается экземпляр Menu через имя связанной с экземпляром переменной.
from tkinter import * root = Tk() mainmenu = Menu(root) root.config(menu=mainmenu) root.mainloop()
Если выполнить данный код, то никакого меню вы не увидите. Только тонкую полоску под заголовком окна, ведь ни одного пункта меню не было создано. Метод add_command добавляет пункт меню:
… mainmenu.add_command(label='Файл') mainmenu.add_command(label='Справка') …

В данном случае «Файл» и «Справка» – это команды. К ним можно добавить опцию command , связав тем самым с какой-либо функцией-обработчиком клика. Хотя такой вариант меню имеет право на существование, в большинстве приложений панель меню содержит выпадающие списки команд, а сами пункты на панели командами по сути не являются. Клик по ним приводит лишь к раскрытию соответствующего списка.
В Tkinter проблема решается созданием новых экземпляров Menu и подвязыванием их к главному меню с помощью метода add_cascade .
from tkinter import * root = Tk() mainmenu = Menu(root) root.config(menu=mainmenu) filemenu = Menu(mainmenu, tearoff=0) filemenu.add_command(label="Открыть. ") filemenu.add_command(label="Новый") filemenu.add_command(label="Сохранить. ") filemenu.add_command(label="Выход") helpmenu = Menu(mainmenu, tearoff=0) helpmenu.add_command(label="Помощь") helpmenu.add_command(label="О программе") mainmenu.add_cascade(label="Файл", menu=filemenu) mainmenu.add_cascade(label="Справка", menu=helpmenu) root.mainloop()

На основное меню mainmenu , добавляются не команды, а другие меню. У filemenu и helpmenu в качестве родительского виджета указывается не root , а mainmenu . Команды добавляются только к дочерним меню. Значение 0 опции tearoff отключает возможность открепления подменю, иначе его можно было бы делать плавающим кликом мыши по специальной линии. В случае tearoff=0 она отсутствует.
Точно также можно подвязывать дочерние меню к filemenu и helpmenu , создавая многоуровневые списки пунктов меню.
… helpmenu = Menu(mainmenu, tearoff=0) helpmenu2 = Menu(helpmenu, tearoff=0) helpmenu2.add_command(label="Локальная справка") helpmenu2.add_command(label="На сайте") helpmenu.add_cascade(label="Помощь",menu=helpmenu2) helpmenu.add_command(label="О программе") …

Метод add_separator добавляет линию разделитель в меню. Используется для визуального разделения групп команд.

В tkinter можно создать всплывающее меню, оно же контекстное (если настроить его появление по клику правой кнопкой мыши). Для этого экземпляр меню подвязывается не через опцию menu к родительскому виджету, а к меню применяется метод post , аргументами которого являются координаты того места, где должно появляться меню.
from tkinter import * def circle(): c.create_oval(x, y, x + 30, y + 30) def square(): c.create_rectangle(x, y, x + 30, y + 30) def triangle(): c.create_polygon(x, y, x - 15, y + 30, x + 15, y + 30, fill='white', outline='black') def popup(event): global x, y x = event.x y = event.y menu.post(event.x_root, event.y_root) x = 0 y = 0 root = Tk() c = Canvas(width=300, height=300, bg='white') c.pack() c.bind("", popup) menu = Menu(tearoff=0) menu.add_command(label="Круг", command=circle) menu.add_command(label="Квадрат", command=square) menu.add_command(label="Треугольник", command=triangle) root.mainloop()

Здесь при клике на холсте правой кнопкой мыши в этой точке всплывает меню. При выборе пункта меню рисуется соответствующая фигура в этом же месте.
Практическая работа
Измените программу из практической работы предыдущего урока так, чтобы открытие и сохранение файлов выполнялось не через экземпляры Button , а через Menu . Команду очистки текстового поля поместите в контекстное меню.

Курс с примерами решений практических работ: pdf-версия
Tkinter. Программирование GUI на Python
Python Tkinter Menu Button
This Article covers the use of the Menu Button in Tkinter Python.
What is the Python Tkinter Menu Button?
A combination of both the button and menu widget, the Python Tkinter Menu button widget displays a drop down menu with a list of options once clicked. Otherwise it will only be showing one option.
If you haven’t been through our Tkinter Menu Article, head over there first and read more about menu’s. A menu button is just a button to which a menu is attached. Refer to the article to understand how that menu is made.
Menu Button Syntax:
MenuBttn = Menubutton(master, option. )Menu Buttons Options
Menu Button Example 1.
This example explores the use of a Menu Button using a menu with Check Buttons.
Remember that the menu’s master option should always be the name of the Menu Button to which it is to be assigned. And you have to assign a menu to a Menu Button as shown in the example for it to actually display.
from tkinter import * root = Tk() root.geometry("200x150") frame = Frame(root) frame.pack() MenuBttn = Menubutton(frame, text = "Favourite food", relief = RAISED) Var1 = IntVar() Var2 = IntVar() Var3 = IntVar() Menu1 = Menu(MenuBttn, tearoff = 0) Menu1.add_checkbutton(label = "Pizza", variable = Var1) Menu1.add_checkbutton(label = "Cheese Burger", variable = Var2) Menu1.add_checkbutton(label = "Salad", variable = Var3) MenuBttn["menu"] = Menu1 MenuBttn.pack() root.mainloop() 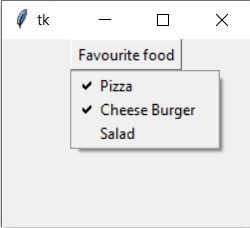
Menu Button Example 2.
This example is the same as the above one, except this time we’re using Radio buttons instead of check buttons. As expected, this causes only one option to be selected at a time.
from tkinter import * root = Tk() root.geometry("200x150") frame = Frame(root) frame.pack() MenuBttn = Menubutton(frame, text = "Favourite food", relief = RAISED) Var1 = IntVar() Menu1 = Menu(MenuBttn, tearoff = 0) Menu1.add_radiobutton(label = "Pizza", variable = Var1, value = 1) Menu1.add_radiobutton(label = "Cheese Burger", variable = Var1, value = 2) Menu1.add_radiobutton(label = "Salad", variable = Var1, value = 3) MenuBttn["menu"] = Menu1 MenuBttn.pack() root.mainloop() TTK MenuButton
The newer ttk library brings in some updated widgets which generally perform better than the originals. They offer more flexibility and have more options. Some of the above mentioned options only work with the ttk version of the Menu Button.
In the below section, we demonstrate how to do this, and we also use an option (textvariable) which is not available in the tkinter menu button.
from tkinter import * import tkinter from ttk import Menubutton def f(): var.set("Food") root = Tk() var = StringVar() mb = Menubutton (root, textvariable = var) mb.pack() mb.menu = Menu ( mb, tearoff = 0 ) mb["menu"] = mb.menu b = Button(root, text = "Click", command = f) b.pack() mayoVar = IntVar() ketchVar = IntVar() mb.menu.add_checkbutton ( label="mayo", variable=mayoVar ) mb.menu.add_checkbutton ( label="ketchup", variable=ketchVar ) mb.pack() root.mainloop() This marks the end of our Python Tkinter Menu Button article. You can head back to the main Tkinter article using this link. Any suggestions or contributions for CodersLegacy are more than welcome. Questions regarding the article tutorial content can be asked in the comments section below.