How to put a border around a Frame in Python Tkinter?
To put a border around a Frame in Tkinter, we have to use the highlightbackground and highlightthickeness parameters while creating the Frame. Let’s take an example and see how to use these two parameters.
Steps −
- Import the tkinter library and create an instance of tkinter frame.
- Set the size of the frame using geometry method.
- Create a frame with Frame() method. Highlight the border of the frame with a color, highlightbackground=»blue». Then, set the thickness of the border, highlightthickness=2.
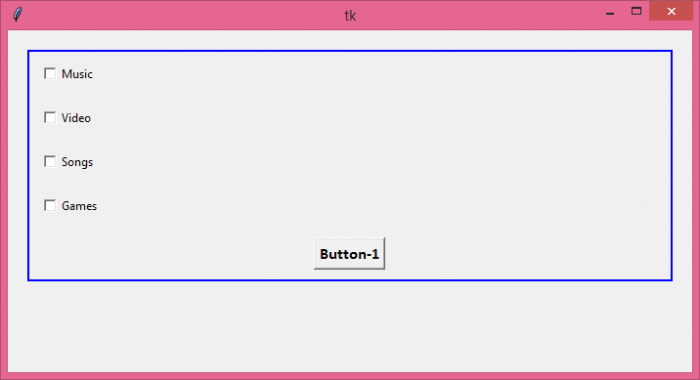
- Next, create some widgets inside the frame. In the example, we have placed four checkbuttons and a button inside the frame.
- Finally, run the mainloop of the application window.
Example
from tkinter import * top = Tk() top.geometry("700x350") frame1 = Frame(top, highlightbackground="blue", highlightthickness=2) frame1.pack(padx=20, pady=20) C1 = Checkbutton(frame1, text = "Music", width=200, anchor="w") C1.pack(padx=10, pady=10) C2 = Checkbutton(frame1, text = "Video", width=200, anchor="w") C2.pack(padx=10, pady=10) C3 = Checkbutton(frame1, text = "Songs", width=200, anchor="w") C3.pack(padx=10, pady=10) C4 = Checkbutton(frame1, text = "Games", width=200, anchor="w") C4.pack(padx=10, pady=10) Button(frame1, text="Button-1", font=("Calibri",12,"bold")).pack(padx=10, pady=10) top.mainloop() Output
It will produce the following output −
There’s an easier method to create a simple border around a frame. Instead of having a Frame, create a LabelFrame and it will automatically set a border around the frame widgets.
Tkinter Frame
Summary: in this tutorial, you’ll learn about the Tkinter Frame and how to manipulate its attributes including sizes, paddings, and borders.
Introduction to Tkinter Frame
A frame is a widget that displays as a simple rectangle. Typically, you use a frame to organize other widgets both visually and at the coding level.
To create a frame, you use the ttk.Frame class:
frame = ttk.Frame(container, **options)Code language: Python (python)A frame has various configuration objects which determine its appearance.
| borderwidth | Specify the border width of the frame. It defaults to zero |
| class_ | Set widget class name |
| cursor | Change the cursor appearance when the mouse cursor is over the frame |
| height | Set the height of the frame. |
| padding | To create padding inside the frame and outside of the contained widgets. |
| relief | Specify the relief style for the border. To make it effective, you also need to set the borderwidth . |
| style | Specify custom widget custom style name |
| takefocus | A boolean value specifies whether the frame is visited during focus traversal. By default, it is False . So the frame widget does not accept focus. |
| width | Set the width of the frame. |
Frame size
The size of a frame is determined by the size and layout of the widgets it contains. Also, you can explicitly specify the height and width of the frame when creating it:
frame = ttk.Frame(container, height, width)Code language: Python (python)Padding
The padding allows you to add extra space inside the frame and outside of the contained widgets. Paddings are in pixels.
To specify padding for each side of the frame separately, you use the following:
frame['padding'] = (left, top, right, bottom)Code language: Python (python)frame['padding'] = (5,10,5,10)Code language: Python (python)Or you can specify paddings for the left, right and top, bottom as follows:
frame['padding'] = (5, 10)Code language: Python (python)In this example, the left and right paddings are 5 and the top and bottom paddings are 10. If the paddings of all sides are the same, you can specify the padding like this:
frame['padding'] = 5Code language: Python (python)Frame borders
By default, the border width of a frame is zero. In other words, the frame has no border.
To set a border for a frame, you need to set both border’s width and style.
The border’s width of a frame is in pixels. The border’s style of a frame can be flat, groove, raised, ridge, solid, or sunken. The default border style of a frame is flat.
The following example sets the border width of the frame to 5 pixels and the border style of the frame to sunken .
frame['borderwidth'] = 5 frame['relief'] = 'sunken'Code language: Python (python)The following picture illustrates the border styles of a frame:
Tkinter Frame example
We’re going to create the following Replace window that is quite common in the text editors like Notepad:
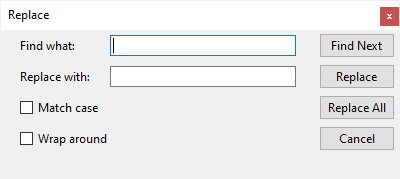
To make the widgets more organized, you can divide the window into two frames:
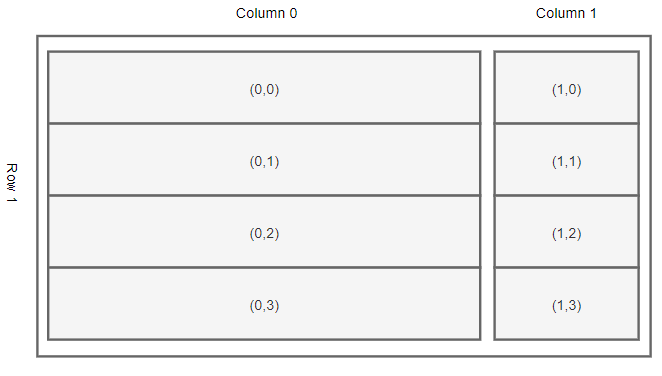
- The left frame consists of Label, Entry, and Checkbox widgets. The left frame will use the grid geometry manager that has two columns and four rows.
- The right frame consists of the Button widgets. The right frame will also use the grid geometry manager that has four rows and one column.
To place the left and right frames on the window, you can use the grid geometry manager that has one row and two columns:
The following program illustrates how to create the Replace window above:
import tkinter as tk from tkinter import TclError, ttk def create_input_frame(container): frame = ttk.Frame(container) # grid layout for the input frame frame.columnconfigure(0, weight=1) frame.columnconfigure(0, weight=3) # Find what ttk.Label(frame, text='Find what:').grid(column=0, row=0, sticky=tk.W) keyword = ttk.Entry(frame, width=30) keyword.focus() keyword.grid(column=1, row=0, sticky=tk.W) # Replace with: ttk.Label(frame, text='Replace with:').grid(column=0, row=1, sticky=tk.W) replacement = ttk.Entry(frame, width=30) replacement.grid(column=1, row=1, sticky=tk.W) # Match Case checkbox match_case = tk.StringVar() match_case_check = ttk.Checkbutton( frame, text='Match case', variable=match_case, command=lambda: print(match_case.get())) match_case_check.grid(column=0, row=2, sticky=tk.W) # Wrap Around checkbox wrap_around = tk.StringVar() wrap_around_check = ttk.Checkbutton( frame, variable=wrap_around, text='Wrap around', command=lambda: print(wrap_around.get())) wrap_around_check.grid(column=0, row=3, sticky=tk.W) for widget in frame.winfo_children(): widget.grid(padx=5, pady=5) return frame def create_button_frame(container): frame = ttk.Frame(container) frame.columnconfigure(0, weight=1) ttk.Button(frame, text='Find Next').grid(column=0, row=0) ttk.Button(frame, text='Replace').grid(column=0, row=1) ttk.Button(frame, text='Replace All').grid(column=0, row=2) ttk.Button(frame, text='Cancel').grid(column=0, row=3) for widget in frame.winfo_children(): widget.grid(padx=5, pady=5) return frame def create_main_window(): root = tk.Tk() root.title('Replace') root.resizable(0, 0) try: # windows only (remove the minimize/maximize button) root.attributes('-toolwindow', True) except TclError: print('Not supported on your platform') # layout on the root window root.columnconfigure(0, weight=4) root.columnconfigure(1, weight=1) input_frame = create_input_frame(root) input_frame.grid(column=0, row=0) button_frame = create_button_frame(root) button_frame.grid(column=1, row=0) root.mainloop() if __name__ == "__main__": create_main_window() Code language: Python (python)First, import the tkinter module and tkinter.ttk submodule:
import tkinter as tk from tkinter import ttkCode language: JavaScript (javascript)Second, create the left frame in the create_input_frame() function. The following code adds paddings to all widgets within the input_frame:
for widget in frame.winfo_children(): widget.grid(padx=0, pady=5)Third, create the right frame in the create_button_frame() function.
Fourth, create the root window in the create_main_window() function. The following code removes the minimize/maximize buttons from the window:
root.attributes('-toolwindow', True)Code language: PHP (php)Note that this code only works on Windows.
In the create_main_window() function, we also create the left frame, and right frame, and use the grid geometry manager to arrange them on the root window.
Finally, call the create_main_window() function on the if __name__ == «__main__»: block.
Summary
- A ttk.Frame is a simple rectangle widget that can hold other widgets.
- Tkinter frames are used to organize user interfaces visually and at the coding level.
# Frame() — рамка
Для сложных интерфейсов используют отдельные области позиционирования элементов.
Фрейм — вспомогательный виджет, создание которого происходит при помощи класса Frame() .
Фреймы размещают на главном окне, а уже в фреймах – виджеты:
from tkinter import * root = Tk() frame_top = Frame(root) # root можно не указывать frame_top.pack() label_1 = Label(frame_top, width=7, height=4, bg='yellow', text="1") label_1.pack(side=LEFT) label_2 = Label(frame_top, width=7, height=4, bg='orange', text="2") label_2.pack(side=LEFT) frame_bottom = Frame(root) frame_bottom.pack() label_3 = Label(frame_bottom, width=7, height=4, bg='lightgreen', text="3") label_3.pack(side=LEFT) label_4 = Label(frame_bottom, width=7, height=4, bg='lightblue', text="4") label_4.pack(side=LEFT) root.mainloop() Кроме Frame существует похожий класс LabelFrame – фрейм с подписью. В отличие от простого фрейма у него есть свойство text:
from tkinter import * root = Tk() frame_top = LabelFrame(text="Верх") frame_top.pack() label_1 = Label(frame_top, width=7, height=4, bg='yellow', text="1") label_1.pack(side=LEFT) label_2 = Label(frame_top, width=7, height=4, bg='orange', text="2") label_2.pack(side=LEFT) frame_bottom = LabelFrame(text="Низ") frame_bottom.pack() label_3 = Label(frame_bottom, width=7, height=4, bg='lightgreen', text="3") label_3.pack(side=LEFT) label_4 = Label(frame_bottom, width=7, height=4, bg='lightblue', text="4") label_4.pack(side=LEFT) root.mainloop() # Упражнения
- Допишите существующий код, добавив ниже фрэйм «Footer», в котором будут горизонтально находиться две метки с надписями «5», «6».
- Допишите существующий код, добавив на верх фрэйм «Header», в котором будут горизонтально находиться три кнопки с надписями «File», «View», «About». Реализуйте растяжение кнопок по ширине окна.
- Напишите программу с четырьмя кнопками, которые будут расположены в углах окна, и при изменении размера окна.
# Горизонтальное расположение
Как и для обычных виджетов, задавая параметры .pack() можно изменять положения фреймов. внеся изменения в наш код, мы получим левостороннее расположение фреймов:
frame_top.pack(side=LEFT) frame_bottom.pack(side=LEFT) Кроме side у pack() есть другие параметры-свойства. Можно задавать внутренние ( ipadx и ipady ) и внешние ( padx и pady ) отступы:
frame_top.pack(padx=100, pady=50) frame_bottom.pack(ipadx=10, ipady=10) В результате верхний фрейм отступает от всех ближайших элементов на заданное расстояние, область отступа обведена красной рамкой. В нижнем фрейме появились отступы элементов от рамки:
Когда устанавливаются внутренние отступы, то из-за того, что side прибивает виджет к левой границе, справа получаем отступ в 20 пикселей, а слева – ничего. Можно частично решить проблему, заменив внутренние отступы рамки на внешние отступы у меток. Изменим код следующим образом:
frame_bottom.pack() label_3.pack(side=LEFT, padx=10, pady=10) label_4.pack(side=LEFT, padx=10, pady=10) Но тут появляется промежуток между метками. Чтобы его убрать, пришлось бы каждый виджет укладывать в свой собственный фрейм. Отсюда делаем вывод, что упаковщик tkinter удобен только для относительно простых интерфейсов.
# Упражнения
from tkinter import * import time def tick(): # get the current local time from the PC time2 = time.strftime('%H:%M:%S') # if time string has changed, update it clock.config(text=time2) # calls itself every 200 milliseconds to update the time # display as needed could use >200 ms clock.after(200, tick) root = Tk() clock = Label(root, font=('times', 20, 'bold'), bg='green') clock.pack(fill=BOTH, expand=1) tick() root.mainloop() - Напишите программу с часами состоящую из трех рамок:
- рамка «Moscow time» выводит текущее время в виде: «Moscow time: 17:27:37»,
- рамка «Current time» выводит текущее время в виде: «Hour: 17 Minutes: 27 Second: 37»
- рамка «Left time until the new day» выводит сколько часов минут и секунд осталось до нового дня.
- одно-строчного текстового поля,
- метки с отображением знака «+»,
- второго одно-строчного текстового поля,
- кнопкой «=», при нажатии на которую результат вычисления выводиться в третье текстовое поле,
- третьего одно-строчного тестового поля.
- реализуйте растяжение виджетов по ширине в зависимости от ширины окна.
- Добавьте проверку деления на 0. С выводом сообщения об ошибке, в удобное для пользователя место. Консольный вывод сообщения об ошибке исключить.