- How To Position Buttons In Tkinter With Grid
- How to position a button in Tkinter with Grid
- Other Python Packages For Data Science, Web Development, Machine Learning, Code Quality And Security
- How To Position Buttons In Tkinter With Place
- How to Position Buttons With Place
- Other Python Packages For Data Science, Web Development, Machine Learning, Code Quality And Security
- Python tkinter button position
- Установка расположения
- Anchor
- Размеры
- How To Position Buttons In Tkinter With Pack
- How to Position Buttons With Pack
- Other Python Packages For Data Science, Web Development, Machine Learning, Code Quality And Security
How To Position Buttons In Tkinter With Grid
When a Python GUI application is designed with Tkinter, widgets (including buttons) require programming so that the underlying application logic can respond to mouse clicks and other actions. Additionally, in order for them to work as intended, widgets need to be positioned intuitively for the user.
Tkinter has three built-in layout managers that use geometric methods to position buttons in an application frame: pack, grid, and place .
- The pack manager organizes widgets in horizontal and vertical boxes that are limited to left, right, top, bottom positions offset from each other.
- The grid manager locates widgets in a two dimensional grid using row and column relative coordinates.
- The place manager places widgets in a two dimensional grid using x and y absolute coordinates.
How to position a button in Tkinter with Grid
In this example, grid() is used to position buttons based on row and column coordinates on a grid in a frame:
This code will draw four buttons, and the placement of each button is specified by left, top, right, and bottom sections of a frame and are specified here. When you run the code it generates a dialog box with all four buttons at the specified locations.
import tkinter master=tkinter.Tk() master.title("grid() method") master.geometry("350x275") button1=tkinter.Button(master, text="button1") button1.grid(row=1,column=0) button2=tkinter.Button(master, text="button2") button2.grid(row=2,column=2) button3=tkinter.Button(master, text="button3") button3.grid(row=3,column=3) button4=tkinter.Button(master, text="button4") button4.grid(row=4,column=4) button5=tkinter.Button(master, text="button5") button5.grid(row=5,column=5) master.mainloop()
If you want to take advantage of the latest version of Tkinter, you’ll need to install a version of Python that supports Tcl/Tk 8.5 or greater. This will provide you with the Ttk (Tile extension integrated into Tk), which is required in order to run the current Tk widget set.
There are two other ways of installing a button in Tkinter – find them here.
Other Python Packages For Data Science, Web Development, Machine Learning, Code Quality And Security
ActivePython includes over 400 of the most popular Python packages. We’ve built the hard-to-build packages so you don’t have to waste time on configuration…get started right away! Learn more here.
How To Position Buttons In Tkinter With Place
When a Python GUI application is designed with Tkinter, widgets (including buttons) require programming so that the underlying application logic can respond to mouse clicks and other actions. Additionally, in order for them to work as intended, widgets need to be positioned intuitively for the user.
Tkinter has three built-in layout managers that use geometric methods to position buttons in an application frame: pack, grid, and place .
- The pack manager organizes widgets in horizontal and vertical boxes that are limited to left, right, top, bottom positions offset from each other.
- The grid manager locates widgets in a two dimensional grid using row and column relative coordinates.
- The place manager places widgets in a two dimensional grid using x and y absolute coordinates.
How to Position Buttons With Place
place() has two options you can use: x and y
- The x variable aligns buttons horizontally.
- The y variable aligns buttons vertically.
In this example, place() is used to position buttons based on x,y coordinates in a frame:
We’ll draw three buttons. The placement of each button is defined by x and y coordinates and is specified here for button one, two and three. When you run the code it generates a dialog box with all three buttons at the specified locations.
import tkinter master=tkinter.Tk() master.title("place() method") master.geometry("450x350") button1=tkinter.Button(master, text="button1") button1.place(x=25, y=100) button2=tkinter.Button(master, text="button2") button2.place(x=100, y=25) button3=tkinter.Button(master, text="button3") button3.place(x=175, y=100) master.mainloop()
If you want to take advantage of the latest version of Tkinter, you’ll need to install a version of Python that supports Tcl/Tk 8.5 or greater. This will provide you with the Ttk (Tile extension integrated into Tk), which is required in order to run the current Tk widget set.
There are two other ways of installing a button in Tkinter – find them here.
Other Python Packages For Data Science, Web Development, Machine Learning, Code Quality And Security
ActivePython includes over 400 of the most popular Python packages. We’ve built the hard-to-build packages so you don’t have to waste time on configuration…get started right away! Learn more here.
Python tkinter button position
Метод place() позволяет более точно настроить координаты и размеры виджета. Он принимает следующие параметры:
- height и width : устанавливают соответственно высоту и ширину элемента в пикселях
- relheight и relwidth : также задают соответственно высоту и ширину элемента, но в качестве значения используется число float в промежутке между 0.0 и 1.0, которое указывает на долю от высоты и ширины родительского контейнера
- x и y : устанавливают смещение элемента по горизонтали и вертикали в пикселях соответственно относительно верхнего левого угла контейнера
- relx и rely : также задают смещение элемента по горизонтали и вертикали, но в качестве значения используется число float в промежутке между 0.0 и 1.0, которое указывает на долю от высоты и ширины родительского контейнера
- bordermode : задает формат границы элемента. Может принимать значение INSIDE (по умолчанию) и OUTSIDE
- anchor : устанавливает опции растяжения элемента. Может принимать значения n, e, s, w, ne, nw, se, sw, c, которые являются сокращениями от North(север — вверх), South (юг — низ), East (восток — правая сторона), West (запад — левая сторона) и Center (по центру). Например, значение nw указывает на верхний левый угол
Установка расположения
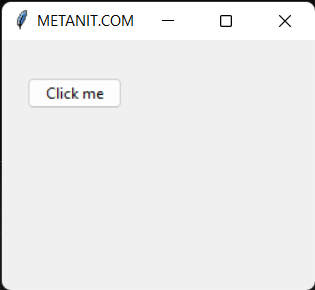
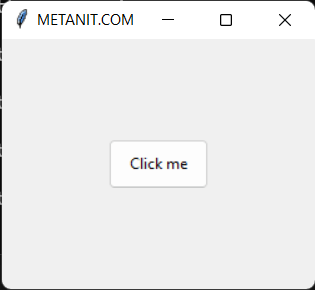
Параметры x и y позволяют задать точные параметры расположения относительно верхнего левого угла контейнера:
from tkinter import * from tkinter import ttk root = Tk() root.title("METANIT.COM") root.geometry("250x200") btn = ttk.Button(text="Click me") btn.place(x=20, y=30) root.mainloop() В данном случае кнопка относительно верхнего левого угла контейнера спещена на 20 единиц по оси X и на 30 единиц по оси Y:
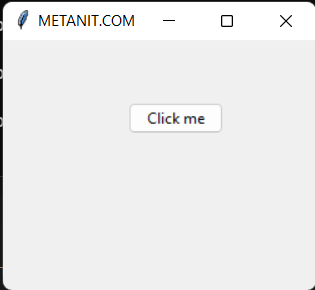
Параметры relx и rely также позволяют сместить виджет, но в качестве значения используется число float в промежутке между 0.0 и 1.0, которое указывает на долю от высоты и ширины родительского контейнера:
from tkinter import * from tkinter import ttk root = Tk() root.title("METANIT.COM") root.geometry("250x200") btn = ttk.Button(text="Click me") btn.place(relx=0.4, rely=0.25) root.mainloop() В данном случае кнопка смещена относительно верхнего левого угла контейнера на 40% ширины контейнера по оси Х и на 25% высоты контейнера по оси Y.
Anchor
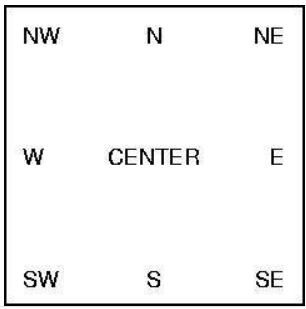
Параметр anchor помещает виджет в определенной части контейнера. Может принимать следующие значения:
- n : положение вверху по центру
- e : положение в правой части контейнера по центру
- s : положение внизу по центру
- w : положение в левой части контейнера по центру
- nw : положение в верхнем левом углу
- ne : положение в верхнем правом углу
- se : положение в нижнем правом углу
- sw : положение в нижнем левом углу
- center : положение центру
Схематически это выглядит следующим образом:
Стоит отметить, что значение в кавычках для параметра anchor передается в нижнем регистре, без кавычек — в верхнем регистре
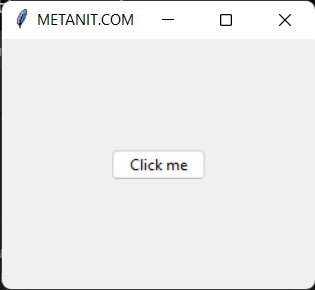
Например, разместим кнопку в центре окна:
from tkinter import * from tkinter import ttk root = Tk() root.title("METANIT.COM") root.geometry("250x200") btn = ttk.Button(text="Click me") btn.place(relx=.5, rely=.5, anchor="c") root.mainloop() При этом все равно устанавливаются относительные координаты, которые примерно соответствуют центру окна, однако сам виджет все позиционируется по центру
Размеры
Параметры height и width устанавливают соответственно высоту и ширину элемента в пикселях:
from tkinter import * from tkinter import ttk root = Tk() root.title("METANIT.COM") root.geometry("250x200") btn = ttk.Button(text="Click me") btn.place(relx=0.5, rely=0.5, anchor="c", width=80, height=40) root.mainloop() Здесь кнопка имеет ширину в 80 единиц и высоту в 40 единиц.
Параметры relheight и relwidth также задают соответственно высоту и ширину элемента, но в качестве значения используется число float в промежутке между 0.0 и 1.0, которое указывает на долю от высоты и ширины родительского контейнера:
from tkinter import * from tkinter import ttk root = Tk() root.title("METANIT.COM") root.geometry("250x200") btn = ttk.Button(text="Click me") btn.place(relx=0.5, rely=0.5, anchor="c", relwidth=0.33, relheight=0.25) root.mainloop() Здесь ширина кнопки составляет треть ширины контейнера, а высота кнопки — четверть высоты контейнера. И по мере изменения размеров контейнера размеры кнопки тоже будут изменяться.
How To Position Buttons In Tkinter With Pack
When a Python GUI application is designed with Tkinter, widgets (including buttons) require programming so that the underlying application logic can respond to mouse clicks and other actions. Additionally, in order for them to work as intended, widgets need to be positioned intuitively for the user.
Tkinter has three built-in layout managers that use geometric methods to position buttons in an application frame: pack, grid, and place.
- The pack manager organizes widgets in horizontal and vertical boxes that are limited to left, right, top, bottom positions offset from each other.
- The grid manager locates widgets in a two dimensional grid using row and column relative coordinates.
- The place manager places widgets in a two dimensional grid using x and y absolute coordinates.
How to Position Buttons With Pack
Pack() has three options you can use: side, fill, expand.
- The side option aligns buttons horizontally.
- The fill option aligns buttons vertically.
- The expand option takes up the full height of the frame.
In this example, pack() uses the side option to position buttons in the left, right, top and bottom sections of a frame:
This code will draw four buttons, and the placement of each button is specified by left, top, right, and bottom sections of a frame and are specified here. When you run the code it generates a dialog box with all four buttons at the specified locations.
import tkinter master=tkinter.Tk() master.title("pack() method") master.geometry("450x350") button1=tkinter.Button(master, text="LEFT") button1.pack(side=tkinter.LEFT) button2=tkinter.Button(master, text="RIGHT") button2.pack(side=tkinter.RIGHT) button3=tkinter.Button(master, text="TOP") button3.pack(side=tkinter.TOP) button4=tkinter.Button(master, text="BOTTOM") button4.pack(side=tkinter.BOTTOM) master.mainloop()
If you want to take advantage of the latest version of Tkinter, you’ll need to install a version of Python that supports Tcl/Tk 8.5 or greater. This will provide you with the Ttk (Tile extension integrated into Tk), which is required in order to run the current Tk widget set.
There are two other ways of installing a button in Tkinter – find them here.
Other Python Packages For Data Science, Web Development, Machine Learning, Code Quality And Security
ActivePython includes over 400 of the most popular Python packages. We’ve built the hard-to-build packages so you don’t have to waste time on configuration…get started right away! Learn more here.