Tkinter buttons (GUI Programming)
Buttons are standard widgets in a GUI. They come with the default Tkinter module and you can place them in your window.
A Python function or method can be associated with a button. This function or method is named the callback function. If you click the button, the callback function is called.
A note on buttons: a tkinter button can only show text in a single font. The button text can be multi line. That means that this widget won’t show icons next to the text, for that you’d need another widget.
Example
Introduction
exitButton = Button(self, text=«Exit», command=self.clickExitButton)
exitButton.place(x=0, y=0)
def clickExitButton(self):
exit()
Without a callback method, a button is shown but clicking it won’t do anything.
This window should show up:
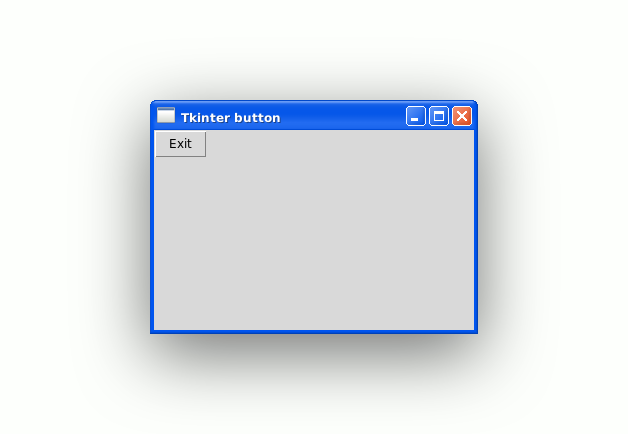
Button example
To run the example, save it as button.py and run it with the python interpreter.
This example opens a window, shows a button and you can click the button.
1
2
3
4
5
6
7
8
9
10
11
12
13
14
15
16
17
18
19
20
21
22
23
24
25
26
from tkinter import *
class Window(Frame):
def __init__(self, master=None):
Frame.__init__(self, master)
self.master = master
# widget can take all window
self.pack(fill=BOTH, expand=1)
# create button, link it to clickExitButton()
exitButton = Button(self, text=«Exit», command=self.clickExitButton)
# place button at (0,0)
exitButton.place(x=0, y=0)
def clickExitButton(self):
exit()
root = Tk()
app = Window(root)
root.wm_title(«Tkinter button»)
root.geometry(«320×200»)
root.mainloop()
Menus in Tkinter (GUI Programming)
# Button — кнопка
Для создания кнопки используется конструктор Button() . В этом конструкторе с помощью параметра text можно установить текст кнопки:
from tkinter import * root = Tk() button = Button(root, text="Click me!") button.pack() root.mainloop() Чтобы сделать элемент видимым, у него вызывается метод pack() . В итоге вверху окна будет красоваться кнопка:
Каждый виджет, в том числе кнопка, имеет ряд атрибутов, которые влияют на ее визуализацию и которые мы можем настроить через конструктор:
from tkinter import * root = Tk() button = Button(root, text="Click me!", fg="red", bg="yellow") button.pack() root.mainloop() Параметры bg — background и fg — foreground получают значение цвета. Результат выполнения:
# Параметры виджета
Всего же конструктор Button может принимать следующие параметры:
Параметр master представляет ссылку на родительский контейнер. В случае выше это могло бы быть само графическое окно, и мы могли написать:
from tkinter import * root = Tk() root.title("GUI на Python") root.geometry("300x250") button = Button(root, text="Hello") button.pack() root.mainloop() Однако если в коде создается одно окно, то кнопка и любой другой элемент уже по умолчанию размещаются в этом окне. Поэтому первый параметр можно опустить, как в примерах выше. Если бы у нас в коде создавалось бы несколько окон, тогда мы могли бы передать в Button(root) ссылку на нужное окно.
Второй параметр options представляет набор параметров, которые мы можем установить по их имени:
- activebackground : цвет элемента, когда он находится в нажатом состоянии;
- activefontground : цвет текста элемента, когда он в нажатом состоянии;
- bd : толщина границы (по умолчанию 2);
- bg/background : фоновый цвет;
- fg/fontground : цвет текста;
- font : шрифт текста, например, font= «Arial 14» — шрифт Arial высотой 14px , или font=(«Verdana», 13, «bold») — шрифт Verdana высотой 13px с выделением жирным;
- height : высота элемента;
- highlightcolor : цвет элемента, когда она в фокусе;
- image : изображение на элементе;
- justify : устанавливает выравнивание текста. Значение LEFT выравнивает текст по левому краю, CENTER — по центру, RIGHT — по правому краю;
- padx : отступ от границ элемента до ее текста справа и слева;
- pady : отступ от границ элемента до ее текста сверху и снизу;
- relief : определяет тип границы, может принимать значения SUNKEN, RAISED, GROOVE, RIDGE;
- state : устанавливает состояние элемента, может принимать значения DISABLED, ACTIVE, NORMAL (по умолчанию);
- text : устанавливает текст элемента;
- textvariable : устанавливает привязку к элементу StringVar ;
- underline : указывает на номер символа в тексте элемента, который подчеркивается. По умолчанию значение -1, то есть никакой символ не подчеркивается;
- width : ширина элемента;
- wraplength : при положительном значении строки текста будут переносится для вмещения в пространство элемента.
# Упражнения
Имена переменным нужно задавать корректно: состоят из двух слов (или более), отражающих суть содержания объекта, слова соединяются нижним подчеркиванием.
- Создайте окно с двумя кнопками: «OK» и «NOT OK».
- Создайте окно с тремя кнопками: «OK», «Are you sure?», «Maybe NOT?»
- Создайте окно с двумя кнопками: «OK» и «NOT OK», и примените для каждой кнопки параметр underline=1 . Какие изменения вы заметили?
- Решение необходимо найти в интернете. Создайте окно с двумя кнопками:
- кнопка с иконкой (рисунок),
- кнопка с рисунком и надписью.
Python — Tkinter Button
The Button widget is used to add buttons in a Python application. These buttons can display text or images that convey the purpose of the buttons. You can attach a function or a method to a button which is called automatically when you click the button.
Syntax
Here is the simple syntax to create this widget −
w = Button ( master, option=value, . )
Parameters
- master − This represents the parent window.
- options − Here is the list of most commonly used options for this widget. These options can be used as key-value pairs separated by commas.
Background color when the button is under the cursor.
Foreground color when the button is under the cursor.
Border width in pixels. Default is 2.
Function or method to be called when the button is clicked.
Normal foreground (text) color.
Text font to be used for the button’s label.
Height of the button in text lines (for textual buttons) or pixels (for images).
The color of the focus highlight when the widget has focus.
Image to be displayed on the button (instead of text).
How to show multiple text lines: LEFT to left-justify each line; CENTER to center them; or RIGHT to right-justify.
Additional padding left and right of the text.
Additional padding above and below the text.
Relief specifies the type of the border. Some of the values are SUNKEN, RAISED, GROOVE, and RIDGE.
Set this option to DISABLED to gray out the button and make it unresponsive. Has the value ACTIVE when the mouse is over it. Default is NORMAL.
Default is -1, meaning that no character of the text on the button will be underlined. If nonnegative, the corresponding text character will be underlined.
Width of the button in letters (if displaying text) or pixels (if displaying an image).
If this value is set to a positive number, the text lines will be wrapped to fit within this length.
Methods
Following are commonly used methods for this widget −
Causes the button to flash several times between active and normal colors. Leaves the button in the state it was in originally. Ignored if the button is disabled.
Calls the button’s callback, and returns what that function returns. Has no effect if the button is disabled or there is no callback.
Example
Try the following example yourself −
import Tkinter import tkMessageBox top = Tkinter.Tk() def helloCallBack(): tkMessageBox.showinfo( "Hello Python", "Hello World") B = Tkinter.Button(top, text ="Hello", command = helloCallBack) B.pack() top.mainloop()
When the above code is executed, it produces the following result −
tkinter button
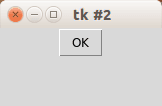
Tk button with onClick event
To create a Tkinter window with a button use the example below. The program enters mainloop() which wait for events (user actions). We define the button which has a callback to the function callback(). master is the root window, the window where your button will appear in.
from Tkinter import *
master = Tk()
def callback():
print «click!»
b = Button(master, text=«OK», command=callback)
b.pack()
mainloop()
Related course
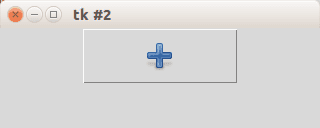
Tk image button
If you want an image button, use the PhotoImage class. We set the size of the window and the miminum size with the functions minsize() and geometry(). Example:
from Tkinter import *
master = Tk()
master.minsize(300,100)
master.geometry(«320×100»)
def callback():
print «click!»
photo=PhotoImage(file=«add.png»)
b = Button(master,image=photo, command=callback, height=50, width=150)
b.pack()
mainloop()
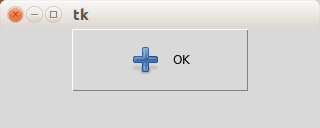
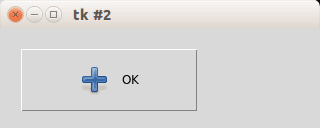
Tk Image button with text label
If you want both an image and text, simply add the parameter compound=LEFT.
from Tkinter import *
master = Tk()
master.minsize(300,100)
master.geometry(«320×100»)
def callback():
print «click!»
photo=PhotoImage(file=«add.png»)
b = Button(master,image=photo, text=«OK», command=callback, height=50, width=150, compound=LEFT)
b.pack()
mainloop()
tk button with text and image
Button location
If you want to place the button on your coordinates do not use the pack() function but instead use the function place(x,y), as shown in the example below:
from Tkinter import *
master = Tk()
master.minsize(300,100)
master.geometry(«320×100»)
def callback():
print «click!»
photo=PhotoImage(file=«add.png»)
b = Button(master,image=photo, text=«OK», command=callback, height=50, width=150, compound=LEFT)
b.place(x = 20, y = 20)
mainloop()
If you are new to programming Tkinter, I highly recommend this course.