- How to change Tkinter Button font style?
- Pseudo Code – Change Button Font
- Examples
- 1. Change font family of Button to Helvetica
- 2. Change font size of tkinter Button to 30
- 3. Change font weight of tkinter Button to bold
- 4. Change font family, size, and style of Button in a single statement.
- Summary
- tkinter.font — Tkinter font wrapper
- Tkinter Label – Bold Text
- Steps to set bold text for Label in Tkinter
- Step 1
- Step 2
- Examples
- 1. Label with bold text
- Summary
- Python Tkinter Tutorial: Understanding the Tkinter Font Class
- Introduction to Tkinter
- A small Hello World code with Tkinter
- Understanding the Basics of Printing Text in Tkinter
- Working with the Tkinter Font Class
- Conclusion
How to change Tkinter Button font style?
You can change the font properties like font-family, font size, font weight, etc., of Tkinter Button, by using tkinter.font package. In your Python program, import tkinter.font as font, create font.Font() object with required options and assign the Font object to font option of Button.
In this tutorial, we shall learn how to change the font-family, font size and font weight, with the help of well detailed example Python programs.
Pseudo Code – Change Button Font
Following is the pseudo code to change font style of Tkinter Button.
import tkinter.font as font #create Font object myFont = font.Font(family='Helvetica') button = Button(parent, font=myFont) #or button = Button(parent) button['font'] = myFontExamples
1. Change font family of Button to Helvetica
In this example, we will change the font family of tkinter button using family named argument provided to font.Font().
Python Program
from tkinter import * import tkinter.font as font gui = Tk(className='Python Examples - Button') gui.geometry("500x200") # define font myFont = font.Font(family='Helvetica') # create button button = Button(gui, text='My Button', bg='#0052cc', fg='#ffffff') # apply font to the button label button['font'] = myFont # add button to gui window button.pack() gui.mainloop() 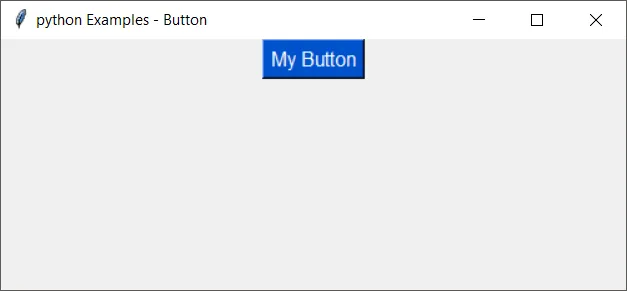
Without font, the button would look like in the following GUI window.
You can compare the output of our next examples with this button and find how a font property has affected the button.
2. Change font size of tkinter Button to 30
You can also change font size of the text in tkinter Button, by passing named argument size to font.Font().
In this example, we will change the font size of tkinter button.
Python Program
from tkinter import * import tkinter.font as font gui = Tk(className='Python Examples - Button') gui.geometry("500x200") # define font myFont = font.Font(size=30) # create button button = Button(gui, text='My Button', bg='#0052cc', fg='#ffffff') # apply font to the button label button['font'] = myFont # add button to gui window button.pack() gui.mainloop() 
Font size of the button is 30.
3. Change font weight of tkinter Button to bold
You can change font weight of the text in tkinter Button, by passing named argument weight to font.Font().
In this example, we will change the font weight of tkinter button.
Python Program
from tkinter import * import tkinter.font as font gui = Tk(className='Python Examples - Button') gui.geometry("500x200") # define font myFont = font.Font(weight="bold") # create button button = Button(gui, text='My Button', bg='#0052cc', fg='#ffffff') # apply font to the button label button['font'] = myFont # add button to gui window button.pack() gui.mainloop() 
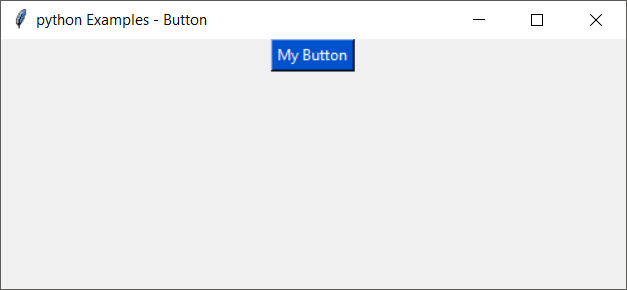
4. Change font family, size, and style of Button in a single statement.
We can apply all the font styling together with font.Font().
In this example, we will change font family, font size and font weight.
Python Program
from tkinter import * import tkinter.font as font gui = Tk(className='Python Examples - Button') gui.geometry("500x200") # define font myFont = font.Font(family='Helvetica', size=20, weight='bold') # create button button = Button(gui, text='My Button', bg='#0052cc', fg='#ffffff') # apply font to the button label button['font'] = myFont # add button to gui window button.pack() gui.mainloop() When you run this application, you will get the window

Let us change the font family to Courier and run the application.
myFont = font.Font(family='Courier', size=20, weight='bold')
Summary
In this tutorial of Python Examples, we changed the font family, font size and font weight of tkinter Button, with the help of well detailed examples.
tkinter.font — Tkinter font wrapper
The tkinter.font module provides the Font class for creating and using named fonts.
The different font weights and slants are:
tkinter.font. NORMAL ¶ tkinter.font. BOLD ¶ tkinter.font. ITALIC ¶ tkinter.font. ROMAN ¶ class tkinter.font. Font ( root = None , font = None , name = None , exists = False , ** options ) 
The Font class represents a named font. Font instances are given unique names and can be specified by their family, size, and style configuration. Named fonts are Tk’s method of creating and identifying fonts as a single object, rather than specifying a font by its attributes with each occurrence.
additional keyword options (ignored if font is specified):
Return the attributes of the font.
Retrieve an attribute of the font.
Modify attributes of the font.
Return new instance of the current font.
measure ( text , displayof = None ) 
Return amount of space the text would occupy on the specified display when formatted in the current font. If no display is specified then the main application window is assumed.
Return font-specific data. Options include:
ascent — distance between baseline and highest point that a
character of the font can occupy
descent — distance between baseline and lowest point that a
character of the font can occupy
linespace — minimum vertical separation necessary between any two
characters of the font that ensures no vertical overlap between lines.
fixed — 1 if font is fixed-width else 0
tkinter.font. families ( root = None , displayof = None ) 
Return the different font families.
tkinter.font. names ( root = None ) 
Return the names of defined fonts.
tkinter.font. nametofont ( name , root = None ) 
Return a Font representation of a tk named font.
Changed in version 3.10: The root parameter was added.
Tkinter Label – Bold Text
To set bold weighted font style for a Label widget in Tkinter, create a Font object with the weight parameter of Font() constructor set to “bold”, and pass this font object as argument to the font parameter of Label() constructor.

In this tutorial, you will learn how to set the bold font style for a Label widget, with examples.
Steps to set bold text for Label in Tkinter
Step 1
Import font from tkinter library, and create a Font class object with weight parameter set to bold.
from tkinter import font label_font = font.Font(weight="bold")Step 2
Create a label widget using tkinter.Label class constructor and pass the label_font (created in the above step) as argument to the font parameter.
tk.Label(window, text="Hello World!", font=label_font)Examples
1. Label with bold text
In this example, we shall create a Label with text Hello World! and font weight to bold, and display it in the main window.
import tkinter as tk from tkinter import font # Create the main window window = tk.Tk() window.title("PythonExamples.org") window.geometry("300x200") # Create font object label_font = font.Font(weight="bold") # Create a label widget with specific font label = tk.Label(window, text="Hello World!", font=label_font) # Pack the label widget to display it label.pack() # Run the application window.mainloop() 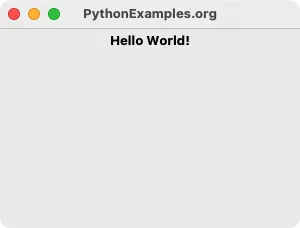
Summary
In this Python Tkinter tutorial, we learned how to create a Label widget with italic text, with examples.
Python Tkinter Tutorial: Understanding the Tkinter Font Class
In this article, we’ll learn more about the Tkinter font class. When it comes to design a Graphical User Interface that is fully functional and adaptive to every environment Tkinter is the best option. It is a built-in graphics library that comes with Python programming language. So, let us see about some features of this special library and make our GUI development go to the next level.
Introduction to Tkinter
Python has set many GUI development libraries out on the internet. Most of them are open source and easy to use. But when they are not much relevant for a Getting Started Guide to GUIs. In this sense, a beginner needs to invest a lot more time and resources to learn and implement them according to his knowledge. This is a list of some of those libraries:
But Tkinter lies in a very different frame. The reason why it comes built-in is that the basic Python Interpreter and IDLE– a lightweight python IDE all were designed using this package. Other than this, it is very easy to learn it from basics to advance than other libraries. Here is a list of the main components and classes of Tkinter.
- Root/Window: It is the main widget of this library. A resizable window that holds other sub widgets.
- Label: A label that can handle task of maintaining the labelling of each widget. It defines their properties.
- Button: A simple button that functions according to the user commands.
- Font: A special class which helps the creator to set the font of any sub-widget.
- Mainloop: This is the main loop that continuously runs the GUI infinite amount of times till the user do not exits.
A small Hello World code with Tkinter
In this section, we will write a code that creates a window of Hello World.
from tkinter import * root = Tk() root.title("Hello World") root.geometry("400x400") 
This is a window that we created using just a few lines of code. Let us understand each line.
- Import the module.
- Then creating an instance of the Tk() class using the root variable. We can give any name to the object of the Tk() class.
- Setting the title of the window using the title() function. This renders the text on the top left corner of the window.
- Then the geometry() function helps to set the width and height of our window.
Understanding the Basics of Printing Text in Tkinter
The reason to take from basics is we need to understand that fonts in Tkinter are not limited to a specific class but they reflect in some other main widgets also.
Now that we have come into flow let us learn more things about it. Most importantly the GUI we design should look attractive and informative. So, to make it this way we have the Label() widget from Tkinter. What it does is it makes some text render on the screen that gives some info about anything we want. The syntax for it is very simple:
label_1 = Label(active_window, foreground_color, background_color, font, height, width)
There are a lot more parameters for the Label widget but, these much are alos perfect for the study. So this is the code for the same.
from tkinter import * root = Tk() root.title("Hello World") root.geometry("400x400") my_label = Label(root, text = "Hello World", fg = "Green", bg = "red", font = ("Arial", 32)) # setting up the labels my_label.pack() root.mainloop() 
The main point to note down is that font acts as a parameter here. We can either give a tuple consisting of the Font type and size or directly the name. Various names are available for this parameter. A list of some is below.
- Arial
- Times
- Times New Roman
- Bold
- italic
- Bold italic
The pack() method is for displaying the label we created on the screen.
Working with the Tkinter Font Class
Fonts are some of the awesome writing styles that get created naturally. People across the world have different handwriting styles and those who know how to convert the same to a digital format, develop fonts that we use and love.
With the Tkinter font class, you can convert the text that is printed on a tkinter window to Bold, italic, Roman, and even change the font family.
Now that we have manipulated some of the font functionalities let us go through the main font class derived from the tkinter.font module. This module provides four main types:
To know more about this theory read the official documentation from this link.
We will directly see the application in the form of code.
from tkinter import * from tkinter.font import Font root = Tk() root.title("My Interface") root.geometry('400x400') my_font = Font( family = 'Times', size = 30, weight = 'bold', slant = 'roman', underline = 1, overstrike = 0 ) my_button = Button(root, text = 'Button', font = my_font) my_button.pack(pady = 20) root.mainloop() 
Explanation of the above code:
- First we import all the sub-modules the tkinter module. Then from the tkinter.font module import Font class. This is the main utility class.
- Then create an Instance namely root. Set the title to “My interface”
- Set the geometry to 500×500 (width x height).
- Then create the my_font as an instance of Font class. It has an extensice set of parameters: family:- for selecting the type of font, size:- size of the font, weight:- font thickness bold/normal, slant:- slanting style roman/italic, underline:- to draw an underline under the text, overstrike:- draw a strike through line.
- After that a button widget that only gets a click and nothing. There we set the parameters as default window as root, text label as “Button”, font = my_font. This calls the created my_font object of the Font class.
- The mainloop runs the whole code and keeps track of every GUI event. It exits when use presses the close button.
Conclusion
In this way, we end this topic of knowing about the tkinter’s font class. This is a vary easy topic to understand and implement. Hope this will make the GUI knowledge more improved.