- Создание PDF из HTML шаблона с помощью Python
- Создаем шаблон для формирования PDF
- Создаем PDF используя pdfkit
- Категории
- Свежие записи
- Introduction
- Details — Template definition
- How to create a template
- Example — Hardcoded
- Example — Elements defined in CSV file
- Designer — GUI tool to design templates
- How to Generate PDFs with Python, PDFKit and CraftMyPDF
- Create PDFs with Python Library – PDFKit
- Generate PDFs with CraftMyPDF
- Conclusion
Создание PDF из HTML шаблона с помощью Python
Довольно часто возникает необходимость сгенерировать PDF файл скриптом на Python, например у меня недавно возникла такая задача:
Необходимо добавить в систему управления предприятием функционал формирования дипломов для наград сотрудников в виде PDF файлов, чтобы можно было их распечатать или послать по почте.
Порядок работы должен быть таким:
- Менеджер, через веб-форму, вводит необходимые данные (имя сотрудника, должность и т.п.);
- Далее он выбирает шаблон диплома (шаблоны заранее подготавливаются в системе);
- Получает сформированный PDF файл.
Погуглив нашел для себя несколько способов решить задачу:
1. Использовать Python библиотеку для формирования PDF, например reportlab;
2. Сначала сформировать HTML страницу с помощью какого-нибудь шаблонизатора, а потом уже конвертировать HTML в PDF.
Первый вариант мне показался сложноватым из-за форматирования, нужно будет рисовать и позиционировать каждый элемент шаблона используя код python. По этой же причине в будущем будут сложности с поддержкой шаблонов.
Я выбрал второй вариант, поскольку HTML шаблон для моей задачи был простой и не должно было возникнуть сложности в его конвертации в PDF. В качестве шаблонизатора, я использовал Jinja
Для конвертации HTML в PDF я использовал Python-PDFKit (для его работы в вашу систему необходимо установить wkhtmltopdf).
Чтобы показать пример, я максимально упрощу задачу. Пусть нам необходимо, чтобы скрипт брал имя пользователя из переменной и подставлял его в HTML шаблон, а дальше мы бы получали PDF файл с текстом «Привет »!
Для начала установим все необходимое:
Так же необходимо скачать и установить в систему wkhtmltopdf.
Для этой заметки, я устанавливать не стал, а скачал portable версию для Windows и распаковал ее в D:\wkhtmltox (этот путь понадобится в дальнейшем).
Создаем шаблон для формирования PDF
Для нашей задачи HTML шаблон будет максимально примитивный, создадим файл pdf_template.html:
Здесь name — это переменная, которую мы будем передавать в шаблон.
Теперь нужно написать код python, который сгенерирует html шаблон. Как я уже писал мы используем шаблонизатор Jinja.
from jinja2 import Environment, FileSystemLoader name = 'Александр' env = Environment(loader=FileSystemLoader('.')) template = env.get_template("pdf_template.html") pdf_template = template.render()Сейчас в переменной pdf_template генерируется HTML шаблон:
Осталось сделать из него пдф.
Создаем PDF используя pdfkit
Осталось добавить к нашему скрипту пару строк и уже можно получить готовый пдф файл по нашему шаблону:
Сначала импортируем pdfkit:
И одной строчкой сформируем pdf:
Теперь, если выполнить скрипт, в папке появиться файл out.pdf созданный по нашему шаблону.
Поскольку я скачал portable версию wkhtmltopdf и пути к нему нет в переменной PATH, код нужно немного изменить, добавив путь к wkhtmltopdf.exe:
config = pdfkit.configuration(wkhtmltopdf=r’D:\wkhtmltox\bin\wkhtmltopdf.exe’)
pdfkit.from_string(pdf_template, ‘out.pdf’, configuration=config)
Итоговый код выглядит так:
from jinja2 import Environment, FileSystemLoader import pdfkit name = 'Александр' env = Environment(loader=FileSystemLoader('.')) template = env.get_template("pdf_template.html") pdf_template = template.render() pdfkit.from_string(pdf_template, 'out.pdf') # config = pdfkit.configuration(wkhtmltopdf=r'D:\wkhtmltox\bin\wkhtmltopdf.exe') # pdfkit.from_string(pdf_template, 'out.pdf', configuration=config) Категории
Свежие записи
Introduction
Templates are predefined documents (like invoices, tax forms, etc.), where each element (text, lines, barcodes, etc.) has a fixed position (x1, y1, x2, y2), style (font, size, etc.) and a default text.
This elements can act as placeholders, so the program can change the default text «filling» the document.
Also, the elements can be defined in a CSV file or in a database, so the user can easily adapt the form to his printing needs.
A template is used like a dict, setting its items’ values.
Details — Template definition
A template is composed of a header and a list of elements.
The header contains the page format, title of the document and other metadata.
Elements have the following properties (columns in a CSV, fields in a database):
- name: placeholder identification
- type: ‘T’: texts, ‘L’: lines, ‘I’: images, ‘B’: boxes, ‘BC’: barcodes
- x1, y1, x2, y2: top-left, bottom-right coordinates (in mm)
- font: e.g. «Arial»
- size: text size in points, e.g. 10
- bold, italic, underline: text style (non-empty to enable)
- foreground, background: text and fill colors, e.g. 0xFFFFFF
- align: text alignment, ‘L’: left, ‘R’: right, ‘C’: center
- text: default string, can be replaced at runtime
- priority: Z-order
- multiline: None for single line (default), True to for multicells (multiple lines), False trims to exactly fit the space defined
How to create a template
A template can be created in 3 ways:
- By defining everything manually in a hardcoded way
- By using a template definition in a CSV document and parsing the CSV with Template.parse_dict()
- By defining the template in a database (this applies to Web2Py integration)
Note the following, the definition of a template will contain the elements. The header will be given during instantiation (except for the database method).
Example — Hardcoded
from fpdf import Template #this will define the ELEMENTS that will compose the template. elements = [ < 'name': 'company_logo', 'type': 'I', 'x1': 20.0, 'y1': 17.0, 'x2': 78.0, 'y2': 30.0, 'font': None, 'size': 0.0, 'bold': 0, 'italic': 0, 'underline': 0, 'foreground': 0, 'background': 0, 'align': 'I', 'text': 'logo', 'priority': 2, >, < 'name': 'company_name', 'type': 'T', 'x1': 17.0, 'y1': 32.5, 'x2': 115.0, 'y2': 37.5, 'font': 'Arial', 'size': 12.0, 'bold': 1, 'italic': 0, 'underline': 0, 'foreground': 0, 'background': 0, 'align': 'I', 'text': '', 'priority': 2, >, < 'name': 'box', 'type': 'B', 'x1': 15.0, 'y1': 15.0, 'x2': 185.0, 'y2': 260.0, 'font': 'Arial', 'size': 0.0, 'bold': 0, 'italic': 0, 'underline': 0, 'foreground': 0, 'background': 0, 'align': 'I', 'text': None, 'priority': 0, >, < 'name': 'box_x', 'type': 'B', 'x1': 95.0, 'y1': 15.0, 'x2': 105.0, 'y2': 25.0, 'font': 'Arial', 'size': 0.0, 'bold': 1, 'italic': 0, 'underline': 0, 'foreground': 0, 'background': 0, 'align': 'I', 'text': None, 'priority': 2, >, < 'name': 'line1', 'type': 'L', 'x1': 100.0, 'y1': 25.0, 'x2': 100.0, 'y2': 57.0, 'font': 'Arial', 'size': 0, 'bold': 0, 'italic': 0, 'underline': 0, 'foreground': 0, 'background': 0, 'align': 'I', 'text': None, 'priority': 3, >, < 'name': 'barcode', 'type': 'BC', 'x1': 20.0, 'y1': 246.5, 'x2': 140.0, 'y2': 254.0, 'font': 'Interleaved 2of5 NT', 'size': 0.75, 'bold': 0, 'italic': 0, 'underline': 0, 'foreground': 0, 'background': 0, 'align': 'I', 'text': '200000000001000159053338016581200810081', 'priority': 3, >, ] #here we instantiate the template and define the HEADER f = Template(format="A4", elements=elements, title="Sample Invoice") f.add_page() #we FILL some of the fields of the template with the information we want #note we access the elements treating the template instance as a "dict" f["company_name"] = "Sample Company" f["company_logo"] = "pyfpdf/tutorial/logo.png" #and now we render the page f.render("./template.pdf") See template.py or Web2Py for a complete example.
Example — Elements defined in CSV file
You define your elements in a CSV file «mycsvfile.csv» that will look like:
line0;T;20.0;13.0;190.0;13.0;times;10.0;0;0;0;0;65535;C;;0 line1;T;20.0;67.0;190.0;67.0;times;10.0;0;0;0;0;65535;C;;0 name0;T;21;14;104;25;times;16.0;0;0;0;0;0;C;;2 title0;T;64;26;104;30;times;10.0;0;0;0;0;0;C;;2 Remember that each line represents an element and each field represents one of the properties of the element in the following order: (‘name’,’type’,’x1′,’y1′,’x2′,’y2′,’font’,’size’,’bold’,’italic’,’underline’,’foreground’,’background’,’align’,’text’,’priority’, ‘multiline’)
Then you can use the file like this:
def test_template(): f = Template(format="A4", title="Sample Invoice") f.parse_csv("mycsvfile.csv") f.add_page() f["company_name"] = "Sample Company" response.headers['Content-Type'] = 'application/pdf' return f.render("./template.pdf", dest='S') Designer — GUI tool to design templates
This library includes a program designer.py to visually modify the designs of a template (e.g., an invoice, report, etc.).
Input files are CSV spreadsheets describing the design (see above). Once opened, the designer displays the template with the elements as how they will be located.
The toolbar has buttons for:
- Open, save and print (preview) template
- Add, delete and duplicate
- Find items by name or by text
- Find and replace (modify selected elements, mainly move x/y)
Over an element, double left click opens a dialog to edit its text and right click opens a dialog with the properties window. You can select multiple items by holding down shift and left clicking them. To move the elements you can use the arrow keys or drag the elements.
To run it, just go to the directory and run:
(you need to have wx installed).
If you are having problems making it work, change the imports on designer.py file to the following (it should be fixed in the next version):
import os, sys import wx import wx.lib import wx.lib.ogl as ogl try: from wx.lib.wordwrap import wordwrap except ImportError: wordwrap = lambda text, width, dc: text try: from template import Template except ImportError: # we are frozen? from fpdf.template import Template As an example, the following screenshot shows the Visual Designer, with the sample invoice.csv file open and ‘logo’ element selected, editing its properties:
How to Generate PDFs with Python, PDFKit and CraftMyPDF
PDF stands for portable document format, it’s designed to be compatible across different operating systems. There are many use-cases of PDF documents, you can create invoices, contracts, shipping labels, and other PDF documents.
There are different approaches to generating PDFs in Python. Template-based PDF generation is the best way to create PDFs, it gives you the flexibility to create dynamic PDFs from pre-defined templates.
In this article, we are going to use a python library PDFKit to generate PDFs from HTML. In addition, we also make use of CraftMyPDF’s PDF generation API to create PDF documents from a drag-and-drop template.
Create PDFs with Python Library – PDFKit
HTML is the standard markup language for the webpages and it is used to define the structure and content of web documents. The easiest way to create PDFs is to render PDFs from HTML templates.
wkhtmltopdf is an open-source command-line tool that renders HTML into PDF with the Qt WebKit rendering engine. You can run the command in the console to generate PDFs.
To use the command-line in Python, JazzCore developed PDFKit – a wrapper for wkhtmltopdf utility.
First, we need to install wkhtmltopdf in Linux/Ubuntu
sudo apt-get update sudo apt-get install xvfb libfontconfig wkhtmltopdfThen, install the PDFKit library
Once wkhtmltopdf and PDFKit are installed, the next step is to create a Python file to generate a PDF from a URL.
The following is a simple example to pass the URL to wkhtmltopdf and generate a local file craftmy.pdf.
import pdfkit pdfkit.from_url('https://craftmypdf.com', 'craftmy.pdf')One of the coolest features of PDFKit is that can generate a PDF from directly HTML
import pdfkit html_sample = """This is a heading 1
1st line .
2nd line .
3rd line .
4th line .
""" pdfkit.from_string(html_sample, output_path = "craftmy.pdf") 
Generate PDFs with CraftMyPDF
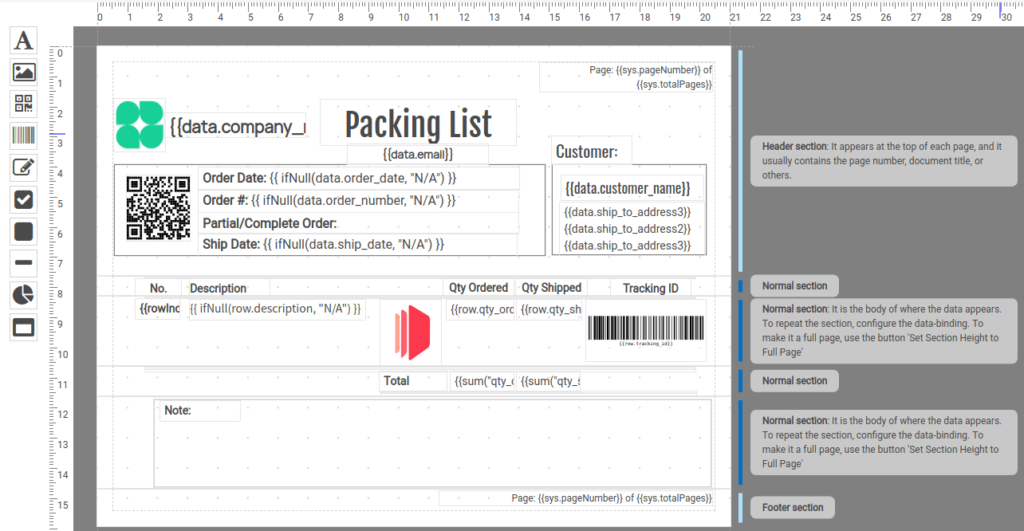
CraftMyPDF provides PDF generation API, and it comes with an easy-to-use drag & drop editor to let you design templates in any browser and generate pixel-perfect PDF documents from pre-defined templates and JSON data.
First, design a PDF template, the following is a packing list template designed with CraftMyPDF’s PDF template editor.
The following is the Python snippet to generate a PDF from a template:
import requests, json def main(): # Please replace this with your API Key api_key = "7832MjA6MTE6UjlkM3h4emxpTExzeFR0aQ=" data = < 'invoice_number': 'INV38379', 'date': '2021-09-30', 'currency': 'USD', 'total_amount': 82542.56 >json_payload = < "data": json.dumps(data) , "output_file": "output.pdf", "export_type": "json", "expiration": 10, "template_id": "05f77b2b18ad809a" ># Calling the REST API to generate a PDF response = requests.post( F"https://api.craftmypdf.com/v1/create", headers = ">, json = json_payload ) print(response.content) if __name__ == "__main__": main() Conclusion
Both methods offer you an easy way to turn templates and data into PDF documents.
In the first part of the tutorial, we walked you through the library PDFKit to generate PDFs from HTML in Python. In the second part, you have learned how to make use of REST API to generate PDFs with Python and CraftMyPDF.
To generate PDF documents from highly reusable templates, sign up for a free CraftMyPDF account now.