- 3. Navigating
- 3.1. Interacting with the page
- 3.2. Filling in forms
- 3.3. Drag and drop
- 3.4. Moving between windows and frames
- 3.5. Popup dialogs
- 3.6. Navigation: history and location
- 3.7. Cookies
- Работа с ссылками в Selenium
- Запуск браузера
- Найти ссылку по тексту
- Найти ссылку по ID
- Найти ссылку по частичному тексту
- Найти ссылку при помощи XPath
- Клик на N-ую ссылку с похожим текстом
- Клик на N-ую ссылку по CSS критериям
- Get Current URL using Selenium for Python
- Example
- Summary
3. Navigating
The first thing you’ll want to do with WebDriver is navigate to a link. The normal way to do this is by calling get method:
driver.get("http://www.google.com")
WebDriver will wait until the page has fully loaded (that is, the onload event has fired) before returning control to your test or script. Be aware that if your page uses a lot of AJAX on load then WebDriver may not know when it has completely loaded. If you need to ensure such pages are fully loaded then you can use waits .
3.1. Interacting with the page
Just being able to go to places isn’t terribly useful. What we’d really like to do is to interact with the pages, or, more specifically, the HTML elements within a page. First of all, we need to find one. WebDriver offers a number of ways to find elements. For example, given an element defined as:
input type="text" name="passwd" id="passwd-id" /> you could find it using any of:
element = driver.find_element(By.ID, "passwd-id") element = driver.find_element(By.NAME, "passwd") element = driver.find_element(By.XPATH, "//input[@id='passwd-id']") element = driver.find_element(By.CSS_SELECTOR, "input#passwd-id")
You can also look for a link by its text, but be careful! The text must be an exact match! You should also be careful when using XPATH in WebDriver . If there’s more than one element that matches the query, then only the first will be returned. If nothing can be found, a NoSuchElementException will be raised.
WebDriver has an “Object-based” API; we represent all types of elements using the same interface. This means that although you may see a lot of possible methods you could invoke when you hit your IDE’s auto-complete key combination, not all of them will make sense or be valid. Don’t worry! WebDriver will attempt to do the Right Thing, and if you call a method that makes no sense (“setSelected()” on a “meta” tag, for example) an exception will be raised.
So, you’ve got an element. What can you do with it? First of all, you may want to enter some text into a text field:
element.send_keys("some text")
You can simulate pressing the arrow keys by using the “Keys” class:
element.send_keys(" and some", Keys.ARROW_DOWN)
It is possible to call send_keys on any element, which makes it possible to test keyboard shortcuts such as those used on GMail. A side-effect of this is that typing something into a text field won’t automatically clear it. Instead, what you type will be appended to what’s already there. You can easily clear the contents of a text field or textarea with the clear method:
3.2. Filling in forms
We’ve already seen how to enter text into a textarea or text field, but what about the other elements? You can “toggle” the state of the drop down, and you can use “setSelected” to set something like an OPTION tag selected. Dealing with SELECT tags isn’t too bad:
element = driver.find_element(By.XPATH, "//select[@name='name']") all_options = element.find_elements(By.TAG_NAME, "option") for option in all_options: print("Value is: %s" % option.get_attribute("value")) option.click()
This will find the first “SELECT” element on the page, and cycle through each of its OPTIONs in turn, printing out their values, and selecting each in turn.
As you can see, this isn’t the most efficient way of dealing with SELECT elements. WebDriver’s support classes include one called a “Select”, which provides useful methods for interacting with these:
from selenium.webdriver.support.ui import Select select = Select(driver.find_element(By.NAME, 'name')) select.select_by_index(index) select.select_by_visible_text("text") select.select_by_value(value)
WebDriver also provides features for deselecting all the selected options:
select = Select(driver.find_element(By.ID, 'id')) select.deselect_all()
This will deselect all OPTIONs from that particular SELECT on the page.
Suppose in a test, we need the list of all default selected options, Select class provides a property method that returns a list:
select = Select(driver.find_element(By.XPATH, "//select[@name='name']")) all_selected_options = select.all_selected_options
To get all available options:
Once you’ve finished filling out the form, you probably want to submit it. One way to do this would be to find the “submit” button and click it:
# Assume the button has the ID "submit" :) driver.find_element(By.ID, "submit").click()
Alternatively, WebDriver has the convenience method “submit” on every element. If you call this on an element within a form, WebDriver will walk up the DOM until it finds the enclosing form and then calls submit on that. If the element isn’t in a form, then the NoSuchElementException will be raised:
3.3. Drag and drop
You can use drag and drop, either moving an element by a certain amount, or on to another element:
element = driver.find_element(By.NAME, "source") target = driver.find_element(By.NAME, "target") from selenium.webdriver import ActionChains action_chains = ActionChains(driver) action_chains.drag_and_drop(element, target).perform()
3.4. Moving between windows and frames
It’s rare for a modern web application not to have any frames or to be constrained to a single window. WebDriver supports moving between named windows using the “switch_to.window” method:
driver.switch_to.window("windowName")
All calls to driver will now be interpreted as being directed to the particular window. But how do you know the window’s name? Take a look at the javascript or link that opened it:
a href="somewhere.html" target="windowName">Click here to open a new windowa> Alternatively, you can pass a “window handle” to the “switch_to.window()” method. Knowing this, it’s possible to iterate over every open window like so:
for handle in driver.window_handles: driver.switch_to.window(handle)
You can also swing from frame to frame (or into iframes):
driver.switch_to.frame("frameName")
It’s possible to access subframes by separating the path with a dot, and you can specify the frame by its index too. That is:
driver.switch_to.frame("frameName.0.child")
would go to the frame named “child” of the first subframe of the frame called “frameName”. All frames are evaluated as if from *top*.
Once we are done with working on frames, we will have to come back to the parent frame which can be done using:
driver.switch_to.default_content()
3.5. Popup dialogs
Selenium WebDriver has built-in support for handling popup dialog boxes. After you’ve triggered action that would open a popup, you can access the alert with the following:
alert = driver.switch_to.alert
This will return the currently open alert object. With this object, you can now accept, dismiss, read its contents or even type into a prompt. This interface works equally well on alerts, confirms, prompts. Refer to the API documentation for more information.
3.6. Navigation: history and location
Earlier, we covered navigating to a page using the “get” command ( driver.get(«http://www.example.com») ). As you’ve seen, WebDriver has a number of smaller, task-focused interfaces, and navigation is a useful task. To navigate to a page, you can use get method:
driver.get("http://www.example.com")
To move backward and forward in your browser’s history:
Please be aware that this functionality depends entirely on the underlying driver. It’s just possible that something unexpected may happen when you call these methods if you’re used to the behavior of one browser over another.
3.7. Cookies
Before moving to the next section of the tutorial, you may be interested in understanding how to use cookies. First of all, you need to be on the domain that the cookie will be valid for:
# Go to the correct domain driver.get("http://www.example.com") # Now set the cookie. This one's valid for the entire domain cookie = 'name' : 'foo', 'value' : 'bar'> driver.add_cookie(cookie) # And now output all the available cookies for the current URL driver.get_cookies()
Работа с ссылками в Selenium

Ссылки являются фундаментальными элементами веб-страниц. По сути, это гиперссылки, которые делают возможным существование всемирной интернет сети. Ниже приведен пример ссылки, а также источник HTML.
Запуск браузера
Тестирование веб-сайтов начинается с браузера.
Используйте webdriver.Chrome или webdriver.Ie для тестирования в Chrome и IE соответственно. Для новичков рекомендуется закрыть окно браузера в конце тестового примера.
Найти ссылку по тексту
Поиск по тексту — это, пожалуй, самый прямой способ найти ссылку в Selenium, поскольку это то, что мы видим на странице.
Найти ссылку по ID
Кроме того, если вы тестируете веб-сайт с несколькими языками, использование идентификаторов является, пожалуй, единственно возможным вариантом. Если вы не хотите писать тестовые скрипты, как показано ниже:
Найти ссылку по частичному тексту
Найти ссылку при помощи XPath
Пример ниже — поиск ссылки с текстом «Recommend Selenium» под тегом абзаца
.
Можно сказать, что приведенный выше пример (найти по тексту ссылки) проще и интуитивно понятнее. Но давайте рассмотрим другой пример:
На этой странице есть две ссылки «Click here». Если в тестовом случае вам нужно щелкнуть вторую ссылку «Click here», простой find_element_by_link_text («Click here«) не будет работать (так как он нажимает первый). Вот способ выполнения XPath:
Клик на N-ую ссылку с похожим текстом
Это не редкость, что существует более одной ссылки с точно таким же текстом. По умолчанию Selenium выберет первый. Что, если вы выберете второй или N-ый? На приведенной ниже веб-странице есть три ссылки «Show Answer».

Чтобы выбрать вторую ссылку:
find_elements_xxx возвращает список (также называемый массивом) веб-элементов, соответствующих критериям в порядке появления. Selenium (Python) использует индексирование на основе нуля, то есть первое из них равно 0.
Клик на N-ую ссылку по CSS критериям
Вы также можете использовать CSS выражения для поиска веб-элемента.
Get Current URL using Selenium for Python
To get the current URL in the browser window using Selenium for Python, read the current_url property of web driver object.
Example
- Initialise Chrome Web Driver object as driver.
- Get the URL https://pythonexamples.org/ using web driver object.
- Find element by link text ‘OpenCV’ and click on the element.
- Make an implicit wait of 5 seconds.
- Get the current URL to my_current_url variable.
- Print the current URL to output.
Python Program
from selenium.webdriver.chrome.service import Service from selenium import webdriver from selenium.webdriver.common.by import By service = Service(executable_path="/usr/local/bin/chromedriver") with webdriver.Chrome(service=service) as driver: driver.get('https://pythonexamples.org/') driver.find_element(By.LINK_TEXT, 'OpenCV').click() driver.implicitly_wait(5) my_current_url = driver.current_url print(my_current_url)https://pythonexamples.org/python-opencv/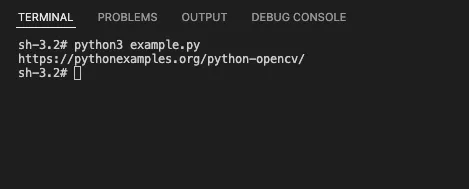
Summary
In this Python Selenium Tutorial, we learned how to navigate to a specific URL using driver.get() method.