- How to append data in excel using openpyxl in Python
- Step 1: Openpyxl Installation
- Step 2: Import the workbook module from Openpyxl
- Step 3: Generate a new workbook
- Step 4: Define data to be appended
- Step 5: Append data to Worksheet
- Step 6: Use save() function
- Inserting and deleting rows and columns, moving ranges of cells
- Deleting rows and columns
- Moving ranges of cells
- Merge / Unmerge cells
- Python openpyxl – How to Insert Rows, Columns in Excel
- Library
- Mock-up Data
- Insert Rows and Columns in Excel using Python openpyxl
- Merge Cells using openpyxl
- Inserting & Deleting rows/columns using openpyxl
- Inserting and Deleting rows and columns
- How To Install openpyxl Library
- How To Insert a Row into Excel File
- The sample python code to Inserting row into excel:
- How To Insert a Column into Excel File
- The sample python code to Inserting Column into excel:
- How To Delete a Row From Excel File
- Sample Python Code to Delete Row from Excel:
- How To Delete a Column From Excel File
- Sample Python Code to Delete Column from Excel:
- Conclusion
How to append data in excel using openpyxl in Python
Suppose you want to add or append data to an excel sheet using Python. In this case, we can make use of the openpyxl library that is available in Python which can easily append data to an EXCEL file. Thus in the tutorial, we will learn how to append data in excel using openpyxl in Python.
Follow the steps given below to append data in excel using openpyxl in Python:
Step 1: Openpyxl Installation
To operate with EXCEL sheets in Python we can make use of openpyxl which is an open-source library available in Python. it is easy to use with simplified instructions and can be used to read and write data in these EXCEL sheets. To install openpyxl on your local computer execute the below-mentioned command.
Step 2: Import the workbook module from Openpyxl
Next, we will import the openpyxl library of Python.
Step 3: Generate a new workbook
In this step, we will generate a completely new workbook that will initially contain a single worksheet. In order to activate this sheet and use it for read and write operations, we use the activate() function.
wb = openpyxl.Workbook() ws = wb.active
Initially, the worksheet is empty as shown below:

Step 4: Define data to be appended
In this step, we are going to declare the data that is to be appended in the form of tuples. Let us consider our worksheet in EXCEL contains these attributes: Product, Cost Price, and Selling Price. Our aim in this scenario is to add three more rows containing the corresponding values to this EXCEL sheet. So we will define the group of values in a single tuple called ‘data’.
data = ( ("Product","Cost Price","Selling Price"), ("earpod",90, 50), ("laptop", 3000, 8200), ("smartphone", 5100, 7200) ) Step 5: Append data to Worksheet
In this step, we will apply a for loop on the data tuple. It will thus iterate over every row inside the tuple. Each row’s contents are appended to the excel Worksheet using the append() function available in the openpyxl library.
The append() function is used to add a group of values at the end of the current worksheet. If it is a completely new worksheet then it will simply add the values to this new worksheet.
Step 6: Use save() function
Lastly, we will use the save() function of openpyxl to save the entire workbook with the appended changes. The desired path where the workbook is to be saved is taken as a parameter to this function.
The final output.xlsx file is:

Thus we reach the end of this tutorial on how to append data in excel using openpyxl in Python. To read more about openpyxl click on the following link: Copy data from one excel sheet to another using openpyxl in Python
Inserting and deleting rows and columns, moving ranges of cells
You can insert rows or columns using the relevant worksheet methods:
The default is one row or column. For example to insert a row at 7 (before the existing row 7):
Deleting rows and columns
Openpyxl does not manage dependencies, such as formulae, tables, charts, etc., when rows or columns are inserted or deleted. This is considered to be out of scope for a library that focuses on managing the file format. As a result, client code must implement the functionality required in any particular use case.
Moving ranges of cells
You can also move ranges of cells within a worksheet:
>>> ws.move_range("D4:F10", rows=-1, cols=2)
This will move the cells in the range D4:F10 up one row, and right two columns. The cells will overwrite any existing cells.
If cells contain formulae you can let openpyxl translate these for you, but as this is not always what you want it is disabled by default. Also only the formulae in the cells themselves will be translated. References to the cells from other cells or defined names will not be updated; you can use the Parsing Formulas translator to do this:
>>> ws.move_range("G4:H10", rows=1, cols=1, translate=True)
This will move the relative references in formulae in the range by one row and one column.
Merge / Unmerge cells
When you merge cells all cells but the top-left one are removed from the worksheet. To carry the border-information of the merged cell, the boundary cells of the merged cell are created as MergeCells which always have the value None. See Styling Merged Cells for information on formatting merged cells.
>>> from openpyxl.workbook import Workbook >>> >>> wb = Workbook() >>> ws = wb.active >>> >>> ws.merge_cells('A2:D2') >>> ws.unmerge_cells('A2:D2') >>> >>> # or equivalently >>> ws.merge_cells(start_row=2, start_column=1, end_row=4, end_column=4) >>> ws.unmerge_cells(start_row=2, start_column=1, end_row=4, end_column=4)
© Copyright 2010 — 2023, See AUTHORS Revision 4212e3e95a42 .
Versions latest stable 3.1.2 3.1.1 3.1.0 3.1 3.0 2.6 2.5.14 2.5 2.4 Downloads html On Read the Docs Project Home Builds Free document hosting provided by Read the Docs.
Python openpyxl – How to Insert Rows, Columns in Excel
This tutorial will show you how to use the Python openpyxl library to insert rows, columns and merge cells in an Excel workbook. Formatting an Excel file can be a tedious and time-consuming task, so it’s a good task to automate away!
Library
We are going to use openpyxl library to build a simple budgeting Excel spreadsheet. To install the library, type the following into a command prompt window:
Mock-up Data
The below code creates an Excel file named “formatting.xlsx” with some data inside. Copy and run the following code if you want to follow along:
from openpyxl import Workbook wb = Workbook() ws = wb.active ws.title = 'formatting' income = [('Income', ''), ('Salary', 1000), ('Investment', 500), ('Side hustle', 500), ('Total', 2000)] expense = [('Expense',''), ('Housing', 1200), ('Insurance', 200), ('Grocery', 500), ('Entertainment', 500), ('Total', 2400)] for row in income+expense: ws.append(row) wb.save('formatting.xslx')You should get an unformatted Excel file that looks like this:

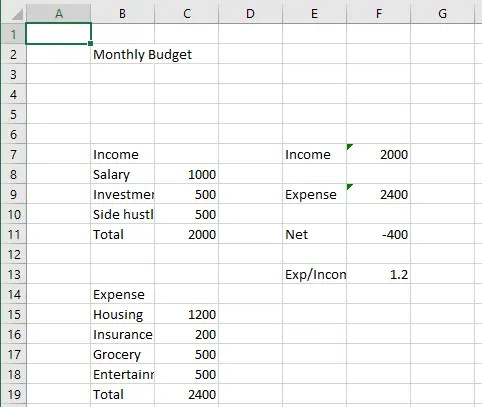
Insert Rows and Columns in Excel using Python openpyxl
Let’s start formatting by moving the cells (with data) around to make the workbook look a little nicer. Add the following code after the for loop block, but before saving the file:
ws.insert_rows(1,6) ws.insert_cols(1) ws.move_range("B12:C17", rows = 2, cols = 0) ##Add more stuff ws['B2'] = 'Monthly Budget' ws['E7'] = 'Income' ws['F7'] = '=sum(C8:C10)' ws['E9'] = 'Expense' ws['F9'] = '=sum(C15:C18)' ws['E11'] = 'Net' ws['F11'] = '=F7-F9' ws['E13'] = 'Exp/Income Ratio' ws['F13'] = '=F9/F7' - The 1st line – Insert 6 rows, from row 1-6
- The 2nd line – Insert 1 column at column A (1)
- And the 3rd line – Moved the Expense section (with the previous 2 steps, this section is now at B12:C17) down by 2 rows
- Rest of the code – added a bunch of other things in B2, and cells around E7:F13
Merge Cells using openpyxl
- Using the normal Excel range notation, e.g. ‘B2:F2’
- Use 4 arguments to select boundaries for the cells to be merged
ws.merge_cells('B2:F2') ws.merge_cells('E7:E8') ws.merge_cells('F7:F8') for r in range(9,14,2): for c in range(5,7): ws.merge_cells(start_row = r, start_column = c, end_row=r+1, end_column = c) Inserting & Deleting rows/columns using openpyxl

This python tutorial help to insert and delete rows and columns into an excel file using openpyxl. openpyxl is a Python Library developed by Eric Gazoni and Charlie Clark to read and write Excel xlsx/xlsm/xltm/xltx files without using the Excel software. It is an open source excel libs and the most widely used library for excel operation. The openpyxl is the default reader for Python Pandas.
Excel is a very powerful and popular software for spreadsheets. The python excel libs helps in reading and modifying excel spreadsheet files through python programs.
Inserting and Deleting rows and columns
The openpyxl providing a set of methods to the sheet class, that help to add and delete rows/columns from the excel sheet. I’m going to load the workbook, and then grab that active sheet and perform add/delete operations.
How To Install openpyxl Library
This module does not come built-in with Python 3. You can install this package into your python application by running of the following command into the terminal.
I am just extending the previous tutorial and adding functionality to insert and delete rows with columns.
How To Insert a Row into Excel File
You can insert rows using an excel file using the insert_rows() worksheet methods. The default is one row to insert into an excel file. The syntax is as follows:
Whereas: The first parameter represents row number and the second parameter represents a number of rows.
The sample python code to Inserting row into excel:
path = "C:\employee.xlsx" wb_obj = openpyxl.load_workbook(path.strip()) sheet_obj = wb_obj.active print("Maximum rows before inserting:", sheet_obj.max_row) #insert 2 rows starting on the first row sheet_obj.insert_rows(idx=3) #insert multiple rows at once #insert 3 rows starting on the six row sheet_obj.insert_rows(6,3) print("Maximum rows after inserting:", sheet_obj.max_row) # save the file to the path path = './employee.xlsx' sheet_obj.save(path) How To Insert a Column into Excel File
You can insert columns into the excel file using the insert_cols() worksheet methods. The default is one column to insert into excel file. The syntax is as follows:
insert_cols(idx, amount=1)
Whereas : The first parameter represents column number and the second parameter represents the number of columns to add
The sample python code to Inserting Column into excel:
path = "C:\employee.xlsx" wb_obj = openpyxl.load_workbook(path.strip()) sheet_obj = wb_obj.active print("Maximum column before inserting:", sheet_obj.max_column) #insert a column before first column A sheet_obj.insert_cols(idx=1) print("Maximum column after inserting:", sheet_obj.max_column) # save the file to the path path = './employee.xlsx' sheet_obj.save(path) How To Delete a Row From Excel File
You can delete a row from the excel file using the delete_rows() worksheet methods. The default is one row to delete from the excel file. The syntax is as follows:
Whereas: The first parameter represents row number and the second parameter represents the number of rows to delete
Sample Python Code to Delete Row from Excel:
path = "C:\employee.xlsx" wb_obj = openpyxl.load_workbook(path.strip()) //sheet = employee['sheet1'] sheet_obj = wb_obj.active print("Maximum rows before removing:", sheet_obj.max_row) # delete 2 rows starting on the third row sheet_obj.delete_rows(idx=3, amount=2) print("Maximum rows after removing:", sheet_obj.max_row) # save the file to the path path = './employee.xlsx' sheet_obj.save(path) How To Delete a Column From Excel File
You can delete a column from an excel file using the delete_cols() worksheet methods. The default is one column to delete from the excel file. The syntax is as follows:
Sample Python Code to Delete Column from Excel:
path = "C:\employee.xlsx" wb_obj = openpyxl.load_workbook(path.strip()) sheet_obj = wb_obj.active print("Maximum rows before removing:", sheet_obj.max_column) #Delete column A sheet_obj.delete_cols(idx=1) print("Maximum cols after removing:", sheet_obj.max_column) # save the file to the path path = './employee.xlsx' sheet_obj.save(path) Conclusion
We have learned to insert a row of data into the existing excel file and insert a column into the existing excel file. Also, deleted a row and column from the excel file using openpyxl. There are a lots of Popular Python excel Library.