- How to fix ssl connection error while using mysql connector with python?
- Method 1: Configuring SSL Certificate
- Method 2: Updating Packages
- Method 3: Checking Server Configuration
- Method 4: Disabling SSL Verification
- Quickstart: Use Python to connect and query data in Azure Database for MySQL
- Prerequisites
- Install Python and the MySQL connector
- Get connection information
- Running the Python code samples
- Step 1: Create a table and insert data
- Step 2: Read data
- Step 3: Update data
- Step 4: Delete data
- Clean up resources
How to fix ssl connection error while using mysql connector with python?
The SSL Connection Error is a common issue faced by users while connecting to a MySQL database using the MySQL Connector and Python. This error can occur due to several reasons such as incorrect SSL certificate configuration, server misconfiguration, or outdated packages. Solving this error is important to establish a secure and reliable connection to the database.
Method 1: Configuring SSL Certificate
To fix the SSL connection error while using MySQL Connector with Python, you can configure the SSL certificate. Here are the steps to do this:
- Install the MySQL Connector module using the following command:
pip install mysql-connector-pythonimport mysql.connector import ssl context = ssl.create_default_context() context.options |= ssl.OP_NO_TLSv1 context.load_cert_chain(certfile='cert.pem', keyfile='key.pem') cnx = mysql.connector.connect(user='user', password='password', host='localhost', database='database', ssl_context=context)In this example, the cert.pem and key.pem files are located in the same directory as the Python script.
Note that you may need to set additional SSL options depending on your MySQL server configuration. You can find more information about SSL options in the MySQL Connector documentation.
Method 2: Updating Packages
If you are facing the SSL Connection Error while using MySQL Connector with Python, you can try updating the packages to resolve the issue. Here are the steps to do so:
pip install --upgrade setuptoolspip install --upgrade wheelpip install --upgrade cryptographypip install --upgrade mysql-connector-pythonBy updating the packages, you should be able to resolve the SSL Connection Error while using MySQL Connector with Python.
Method 3: Checking Server Configuration
If you are encountering SSL Connection Error while using MySQL Connector with Python, one of the possible solutions is to check the server configuration. Here are the steps to do it:
- Make sure that the SSL certificate and key files are located in the correct directory and have the correct permissions. The default location for the files is /etc/mysql/ssl/ .
- Check if the SSL certificate and key files are readable by the user running the MySQL server. You can do this by running the following commands:
sudo chmod 644 /etc/mysql/ssl/server-cert.pem sudo chmod 644 /etc/mysql/ssl/server-key.pem- Make sure that the SSL certificate and key files are owned by the user running the MySQL server. You can do this by running the following commands:
sudo chown mysql:mysql /etc/mysql/ssl/server-cert.pem sudo chown mysql:mysql /etc/mysql/ssl/server-key.pem- Finally, make sure that the SSL options are set correctly in your Python code. Here is an example of how to connect to a MySQL server using SSL:
import mysql.connector from mysql.connector.constants import ClientFlag config = 'user': 'your_username', 'password': 'your_password', 'host': 'your_host', 'database': 'your_database', 'client_flags': [ClientFlag.SSL], 'ssl_ca': '/etc/mysql/ssl/ca-cert.pem', 'ssl_cert': '/etc/mysql/ssl/client-cert.pem', 'ssl_key': '/etc/mysql/ssl/client-key.pem' > cnx = mysql.connector.connect(**config)In this example, the ClientFlag.SSL option is used to enable SSL, and the SSL certificate and key files are specified using the ssl_ca , ssl_cert , and ssl_key options.
By following these steps, you should be able to fix the SSL Connection Error while using MySQL Connector with Python by checking the server configuration.
Method 4: Disabling SSL Verification
To fix SSL Connection Error while using MySQL Connector with Python, you can disable SSL verification. Here are the steps:
Step 1: Import mysql.connector and ssl modules:
import mysql.connector import sslStep 2: Create an SSL context with verify_mode set to ssl.CERT_NONE:
ssl_context = ssl.create_default_context() ssl_context.verify_mode = ssl.CERT_NONEStep 3: Create a connection with the SSL context:
cnx = mysql.connector.connect(user='user', password='password', host='host', database='database', ssl_context=ssl_context)import mysql.connector import ssl ssl_context = ssl.create_default_context() ssl_context.verify_mode = ssl.CERT_NONE cnx = mysql.connector.connect(user='user', password='password', host='host', database='database', ssl_context=ssl_context) cursor = cnx.cursor() query = ("SELECT * FROM table") cursor.execute(query) for row in cursor: print(row) cursor.close() cnx.close()This should solve the SSL Connection Error while using MySQL Connector with Python by disabling SSL verification.
Quickstart: Use Python to connect and query data in Azure Database for MySQL

APPLIES TO: Azure Database for MySQL — Single Server
Azure Database for MySQL — Single Server is on the retirement path. We strongly recommend for you to upgrade to Azure Database for MySQL — Flexible Server. For more information about migrating to Azure Database for MySQL — Flexible Server, see What’s happening to Azure Database for MySQL Single Server?
In this quickstart, you connect to an Azure Database for MySQL by using Python. You then use SQL statements to query, insert, update, and delete data in the database from Mac, Ubuntu Linux, and Windows platforms.
Prerequisites
For this quickstart you need:
Install Python and the MySQL connector
Install Python and the MySQL connector for Python on your computer by using the following steps:
- Download and install Python 3.7 or above for your OS. Make sure to add Python to your PATH , because the MySQL connector requires that.
- Open a command prompt or bash shell, and check your Python version by running python -V with the uppercase V switch.
- The pip package installer is included in the latest versions of Python. Update pip to the latest version by running pip install -U pip . If pip isn’t installed, you can download and install it with get-pip.py . For more information, see Installation.
- Use pip to install the MySQL connector for Python and its dependencies:
pip install mysql-connector-python Get connection information
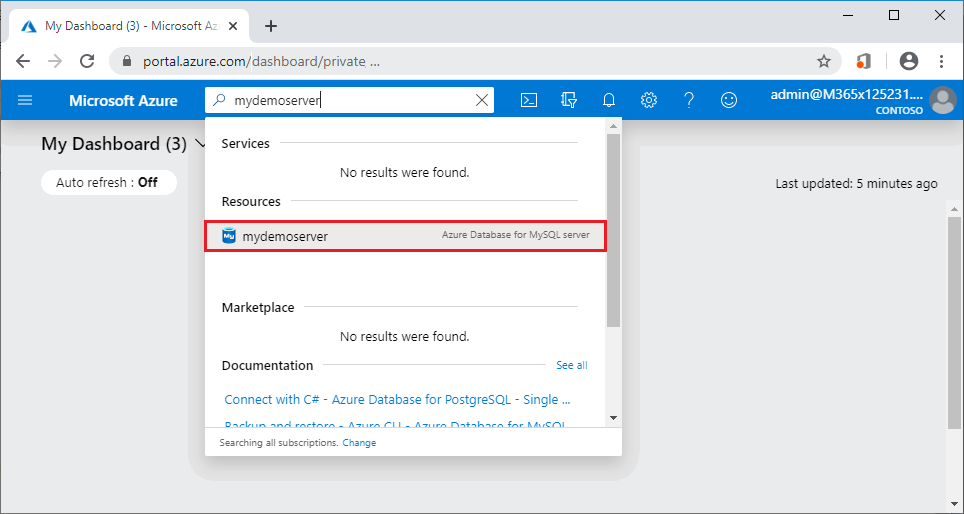
Get the connection information you need to connect to Azure Database for MySQL from the Azure portal. You need the server name, database name, and login credentials.
- Sign in to the Azure portal.
- In the portal search bar, search for and select the Azure Database for MySQL server you created, such as mydemoserver.

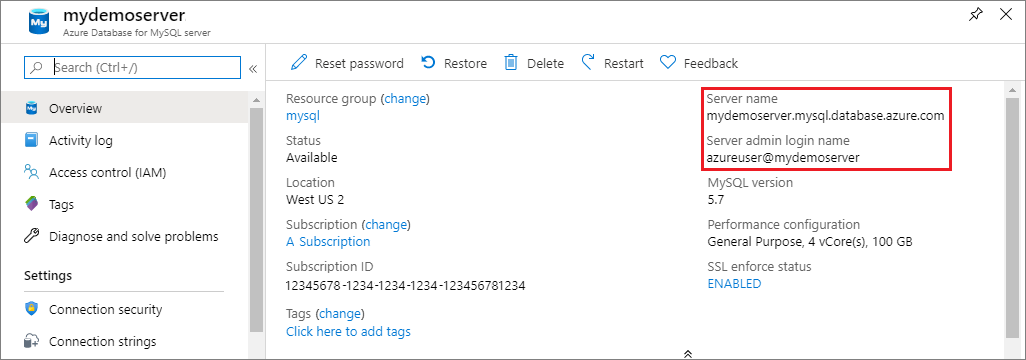
- From the server’s Overview page, make a note of the Server name and Server admin login name. If you forget your password, you can also reset the password from this page.
Running the Python code samples
For each code example in this article:
- Create a new file in a text editor.
- Add the code example to the file. In the code, replace the , , , and placeholders with the values for your MySQL server and database.
- SSL is enabled by default on Azure Database for MySQL servers. You may need to download the DigiCertGlobalRootG2 SSL certificate to connect from your local environment. Replace the ssl_ca value in the code with path to this file on your computer.
- Save the file in a project folder with a .py extension, such as C:\pythonmysql\createtable.py or /home/username/pythonmysql/createtable.py.
- To run the code, open a command prompt or bash shell and change directory into your project folder, for example cd pythonmysql . Type the python command followed by the file name, for example python createtable.py , and press Enter.
Note On Windows, if python.exe is not found, you may need to add the Python path into your PATH environment variable, or provide the full path to python.exe, for example C:\python27\python.exe createtable.py .
Step 1: Create a table and insert data
Use the following code to connect to the server and database, create a table, and load data by using an INSERT SQL statement.The code imports the mysql.connector library, and uses the method:
- connect() function to connect to Azure Database for MySQL using the arguments in the config collection.
- cursor.execute() method executes the SQL query against the MySQL database.
- cursor.close() when you are done using a cursor.
- conn.close() to close the connection the connection.
import mysql.connector from mysql.connector import errorcode # Obtain connection string information from the portal config = < 'host':'.mysql.database.azure.com', 'user':'@', 'password':'', 'database':'', 'client_flags': [mysql.connector.ClientFlag.SSL], 'ssl_ca': '/DigiCertGlobalRootG2.crt.pem' > # Construct connection string try: conn = mysql.connector.connect(**config) print("Connection established") except mysql.connector.Error as err: if err.errno == errorcode.ER_ACCESS_DENIED_ERROR: print("Something is wrong with the user name or password") elif err.errno == errorcode.ER_BAD_DB_ERROR: print("Database does not exist") else: print(err) else: cursor = conn.cursor() # Drop previous table of same name if one exists cursor.execute("DROP TABLE IF EXISTS inventory;") print("Finished dropping table (if existed).") # Create table cursor.execute("CREATE TABLE inventory (id serial PRIMARY KEY, name VARCHAR(50), quantity INTEGER);") print("Finished creating table.") # Insert some data into table cursor.execute("INSERT INTO inventory (name, quantity) VALUES (%s, %s);", ("banana", 150)) print("Inserted",cursor.rowcount,"row(s) of data.") cursor.execute("INSERT INTO inventory (name, quantity) VALUES (%s, %s);", ("orange", 154)) print("Inserted",cursor.rowcount,"row(s) of data.") cursor.execute("INSERT INTO inventory (name, quantity) VALUES (%s, %s);", ("apple", 100)) print("Inserted",cursor.rowcount,"row(s) of data.") # Cleanup conn.commit() cursor.close() conn.close() print("Done.") Step 2: Read data
Use the following code to connect and read the data by using a SELECT SQL statement. The code imports the mysql.connector library, and uses cursor.execute() method executes the SQL query against the MySQL database.
The code reads the data rows using the fetchall() method, keeps the result set in a collection row, and uses a for iterator to loop over the rows.
import mysql.connector from mysql.connector import errorcode # Obtain connection string information from the portal config = < 'host':'.mysql.database.azure.com', 'user':'@', 'password':'', 'database':'', 'client_flags': [mysql.connector.ClientFlag.SSL], 'ssl_ca': '/DigiCertGlobalRootG2.crt.pem' > # Construct connection string try: conn = mysql.connector.connect(**config) print("Connection established") except mysql.connector.Error as err: if err.errno == errorcode.ER_ACCESS_DENIED_ERROR: print("Something is wrong with the user name or password") elif err.errno == errorcode.ER_BAD_DB_ERROR: print("Database does not exist") else: print(err) else: cursor = conn.cursor() # Read data cursor.execute("SELECT * FROM inventory;") rows = cursor.fetchall() print("Read",cursor.rowcount,"row(s) of data.") # Print all rows for row in rows: print("Data row = (%s, %s, %s)" %(str(row[0]), str(row[1]), str(row[2]))) # Cleanup conn.commit() cursor.close() conn.close() print("Done.") Step 3: Update data
Use the following code to connect and update the data by using an UPDATE SQL statement. The code imports the mysql.connector library, and uses cursor.execute() method executes the SQL query against the MySQL database.
import mysql.connector from mysql.connector import errorcode # Obtain connection string information from the portal config = < 'host':'.mysql.database.azure.com', 'user':'@', 'password':'', 'database':'', 'client_flags': [mysql.connector.ClientFlag.SSL], 'ssl_ca': '/DigiCertGlobalRootG2.crt.pem' > # Construct connection string try: conn = mysql.connector.connect(**config) print("Connection established") except mysql.connector.Error as err: if err.errno == errorcode.ER_ACCESS_DENIED_ERROR: print("Something is wrong with the user name or password") elif err.errno == errorcode.ER_BAD_DB_ERROR: print("Database does not exist") else: print(err) else: cursor = conn.cursor() # Update a data row in the table cursor.execute("UPDATE inventory SET quantity = %s WHERE name = %s;", (300, "apple")) print("Updated",cursor.rowcount,"row(s) of data.") # Cleanup conn.commit() cursor.close() conn.close() print("Done.") Step 4: Delete data
Use the following code to connect and remove data by using a DELETE SQL statement. The code imports the mysql.connector library, and uses cursor.execute() method executes the SQL query against the MySQL database.
import mysql.connector from mysql.connector import errorcode # Obtain connection string information from the portal config = < 'host':'.mysql.database.azure.com', 'user':'@', 'password':'', 'database':'', 'client_flags': [mysql.connector.ClientFlag.SSL], 'ssl_ca': '/DigiCertGlobalRootG2.crt.pem' > # Construct connection string try: conn = mysql.connector.connect(**config) print("Connection established") except mysql.connector.Error as err: if err.errno == errorcode.ER_ACCESS_DENIED_ERROR: print("Something is wrong with the user name or password") elif err.errno == errorcode.ER_BAD_DB_ERROR: print("Database does not exist") else: print(err) else: cursor = conn.cursor() # Delete a data row in the table cursor.execute("DELETE FROM inventory WHERE name=%(param1)s;", ) print("Deleted",cursor.rowcount,"row(s) of data.") # Cleanup conn.commit() cursor.close() conn.close() print("Done.") Clean up resources
To clean up all resources used during this quickstart, delete the resource group using the following command:
az group delete \ --name $AZ_RESOURCE_GROUP \ --yes