- Gracefully Manage Python Zip Files in your Python Scripts
- Prerequisites
- Creating a Zip File with Python
- Applying Filters When Zipping Files
- Listing the Contents of a Zip File
- Adding Files to an Existing Zip File
- Extracting the Contents of Zip Files with the zipfile Module
- Extracting the Contents of Python Zip Files with the shutil module
- Applying Filters When Unzipping Files
- Conclusion
Gracefully Manage Python Zip Files in your Python Scripts
Ransomware recovery test drive: This technical workshop is designed to take you behind the scenes and shows you how to adopt strategies to automate recovery, ensuring you’re ready to become a recovery hero. REQUEST YOUR LAB
Zip files are great for compressing data and are used in many different circumstances. If you’re building a Python script and need to create or decompress Python ZIP files, you’re in luck.
In this tutorial, you’re going to learn how to zip and unzip (decompress) zip files, all with Python!
Prerequisites
If you’d like to follow along with this tutorial, be sure you have the following:
Creating a Zip File with Python
Let’s get started and first focus on zipping files with Python. This tutorial will begin with the simplest possible method and will build upon various techniques.
1. Open your favorite text editor.
2. If you’d like to follow along exactly with the tutorial, create a directory at ~/pythonzipdemo and download these BMP files into it. Once you do, you should four bitmap files; all_black.bmp, all_blue.bmp, all_green.bmp, and all_red.bmp. You’ll also have a demo.py Python script that contains all of the code in this tutorial.
The tutorial files are bitmap files, which greatly benefit from compression. Not all types of files will compress as well.
3. Create a new Python script called demo.py. This tutorial will be saving the demo script in the home directory or ~/demo.py.
4. In your Python script, start coding. First, import the zipfile module. The zipfile module is a built-in Python module that contains all of the functions you’ll need to zip and unzip files with Python.
import zipfile # imports the zipfile module so you can make use of it5. Next, instantiate a zipfile object using the ZipFile() method, open the zip file in write mode ( w ), add a file to it, and then close the instance ( close() ).
## Instantiate a new zipfile object creating the single_zip.zip archive. zf = zipfile.ZipFile('single_file.zip', mode='w') ## Add a file to the archive zf.write('all_black.bmp') ## Close the archive releasing it from memory zf.close()This tutorial relies on relative paths. The relative path looks for the files in the current directory, where Python is currently running. You can specify absolute paths instead when specifying file names.
Once you run the script, you should now see a file called single_file.zip in the folder. Congrats! You’ve zipped up your first file! But wait. Notice that it’s not any smaller. By default, the zip file is not compressed. To compress the files inside, you must perform one more step.
Since zipfile is a context manager, you can also use the with statement e.g.
with ZipFile(‘single_file.zip’, ‘w’) as zipfile: zipfile.write(‘all_black.bmp’)
6. Finally, add a compression parameter when instantiating the zipfile object. The zipfile module uses various compression attributes such as ZIP_STORED, ZIP_DEFLATED, ZIP_BZIP2, and ZIP_LZMA that dictate how Python compresses the files inside. By default, that attribute is set to ZIP_STORED , meaning no compression.
To compress the files inside the archive, you must specify the ZIP_DEFLATED attribute, as shown below.
import zipfile ## Instantiate a new zipfile object creating the single_zip.zip archive and compressing it zf = zipfile.ZipFile('single_file.zip', mode='w', compression=zipfile.ZIP_DEFLATED) ## Add a file to the archive zf.write('all_black.bmp') ## Close the archive releasing it from memory zf.close()When you run this script, you should now see that the single_file.zip is much smaller than the actual bitmap file.
Applying Filters When Zipping Files
A lot about zipping files has been mentioned already, but only by referencing the files manually. When you have to deal with a large number of files, specifying each file manually is far from ideal.
You can filter the files you want to operate on based on filters. A filter can be based on the file size or the file name, for example.
There are no built-in ways to filter files being added to a zip file. You’ll need to build your own solution. One way to build your own solution is to create a Python function. A Python function is a set of code you can execute as one. Building a function is a great way to “encapsulate” code into one single unit.
The function to build for this task will consist of roughly four separate phases:
- Opening the zip file in write mode.
- Read all files in the source folder you’d like to add files to the zip file from.
- Iterate over each file and check to see if it matches a particular string.
- If the file matches the string, add it to the zip file.
You can see this function below. This function is more complex than what you may be used to but it shows how flexible Python is, allowing you to create whatever you need.
A lambda in Python is used to create small anonymous functions. Strings are not callable, and to make name callable; lambda converts name into a function.
# imports the zipfile module so you can make use of it import zipfile # for manipulating directories import os # for deleting any prefix up to the last slash character of a pathname file from a given directory that matches the filter from os.path import basename # zip the files from given directory that matches the filter def filter_and_zip_files (destination_file, source_foulder, filter): with zipfile.ZipFile(destination_file, mode="w", compression=zipfile.ZIP_DEFLATED) as new_zip: # Iterate over all the files in the folder test = os.walk(source_foulder) for folder, subfolders, filenames in os.walk(source_foulder): for filename in filenames: if filter(filename): # create complete filepath of file in directory file_path = os.path.join(folder, filename) # Add file to zip new_zip.write(file_path, basename(file_path)) # zipping only colors that start with b to only_b_colors by using_filters filter_and_zip_files("only_b_colors.zip", ".", lambda name : name.startswith("all_b")) list_zip_file_contents("only_b_colors.zip")Listing the Contents of a Zip File
Once you have created a zip file, you can also use Python to read the files inside. To do that, use the namelist() method. The namelist() method is a handy way to query all files in the zip file returned as an array of file names.
As shown below, building off the previous example, invoke the namelist() method on the zipfile object.
import zipfile ## Open the zip file for reading zip_read = zipfile.ZipFile('single_file.zip', mode='r') ## Inspect the contents of single_file.zip zip_read.namelist() ## Close the archive releasing it from memory zip_read.close() You’ll see that the namelist() returns an array of each file in the zip file. At this time, you’ll only see one file (all_black.bmp) in the zip file.

If you’d like a more human-readable output of file names, use a Python for loop to read each file name and place a tab in the middle of each one, as shown below.
import zipfile ## Open the zip file for reading zip_read = zipfile.ZipFile('single_file.zip', mode='r') ## Inspect the contents of single_file.zip files = zip_read.namelist() for file_name in files: # prints the name of files within, with a tab for better readability print("\t", file_name) ## Close the archive releasing it from memory zip_read.close()Adding Files to an Existing Zip File
So you’ve already got a zip file and would like to add some files to it. No problem! You’ll simply need to change the mode that you open the zip file in.
To add a file to an existing zip file, open the zip file in append mode ( mode=’a’ ), then invoke the write() method passing the file to add to the zip file, as shown below.
import zipfile ## Open the zip file for appending zip_file = zipfile.ZipFile('single_file.zip', mode='a') ## Optionally see the files in the zip before the addition zip_read.namelist() ## Add the file to the zip zip_file.write('all_blue.bmp') ## Optionally see the files in the zip before after the addition zip_read.namelist() ## Close the archive releasing it from memory zip_read.close()Extracting the Contents of Zip Files with the zipfile Module
Let’s move on to extracting files from existing zip files. Using either the extract() and extractall() methods, you can make it happen.
The example below is opening the zip for reading ( mode=’r’ ) then extracting a single file ( all_blue.bmp ) from the zip to your home folder. It’s also demonstrating using the extractall() method to extract all files in the zip to your home folder.
import zipfile ## Open the zip file for reading zip_file = zipfile.ZipFile('single_file.zip', mode='r') ## Extract a single file from the zip file to your home directory zip_file.extract('all_blue.bmp', path='~') ## Extract all files from the zip file to your home directory zip_file.extractall('path='~') ## Close the archive releasing it from memory zip_read.close()Extracting the Contents of Python Zip Files with the shutil module
As an alternative to using the zipfile module, you can also use another built-in Python module called shutil . shutil is a module that’s not specifically focused on zip files but more general file management. It just so happens to have some handy zip file methods to use.
To extract the contents of zip files with the shutil module, provide the zip file and path to extract all files to. Unlike the extract() method on the zipfile module, the unpack_archive() method of shutil does not allow you to pick files from the archive to extract.
# imports the shutil module import shutil ## Extract all files in the single_zip.zip file to your home folder. shutil.unpack_archive('single_file.zip', '~') Applying Filters When Unzipping Files
As covered in the zip filtering section, let’s now apply the same methodology (creating a function) to unzip files matching a specific filter. You can see the function example below. This function reads a zip file, reads all files inside the zip file, iterates over each file, and if that file matches the defined filter, it passes it to the extract() method.
import zipfile # unzip only files withtin the zip file that match the filter def unzip_filtered_files (source_file, destination_folder, filter): with zipfile.ZipFile(source_file, "r") as source: list_of_file_names = source.namelist() # you'll get an iterable object for file_name in list_of_file_names: # checks if the file matches the filter if filter(file_name): # Extract the files to destination_folder source.extract(file_name,path=destination_folder) unzip_filtered_files("multiple_files.zip", "not_b_colors", lambda name : not name.startswith("all_b"))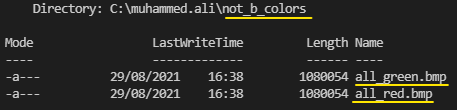
Conclusion
You should now have a good understanding of working with zip files in Python. Using both the zipfile and shutil module, along with even building some Python functions, you should now know how to manage whatever zip file task is thrown at you.
How will you integrate this newfound knowledge into your next Python project?
Hate ads? Want to support the writer? Get many of our tutorials packaged as an ATA Guidebook.