Python Tkinter drag and drop
In this Python tutorial, we will learn about how to drag and drop widgets on the screen using Python Tkinter. Apart from Python Tkinter drag and drop, we will cover these topics.
- Python Tkinter Drag Drop
- Python Tkinter Drag Drop File
- Python Tkinter Drag and Drop Listbox
- Python Tkinter Drag and Drop Folder
- Python Tkinter Drag and Drop ide
- Python Tkinter Treeview Drag and Drop
Python Tkinter Drag and Drop
- Drag and Drop refers to moving widget while holding left click pressed. One can drag the widget or object in the x-axis or y-axis.
- As per the official documentation to enable an object to be dragged, It is necessary to bind an event to a callback function. The function should call, Tkdnd.dnd_start(source, event) , where ‘source‘ is the object to be dragged, and ‘event‘ is the event that invoked the call.
- We tried this way, but it didn’t work for us. So we figured out a workaround for this.
- Drag & drop involve three activities:
- The mouse button is pressed
- The mouse is moved
- The mouse button is released
- tkdnd2.8 by Georgios Petasis
- TkinterDnD2 by klappnase
The first step is to download tkdnd2.8 and TkinterDnD2. TkinterDnD2 will be downloaded as soon as you will click on this link. for tkdnd2.8 click on this link and you will be redirected to the below page. Select the operating system and download the file. In our case, we are working on windows 10.

Extract both the files and find the path where python is installed. in most of the cases it is installed on this location C:\Users\username\AppData\Local \ Python . In our case, we have installed python straight away on the C drive like this C:\Python .

This is the picture of two file explorers, one has the path for downloaded files while the other has Python>tcl folder opened. We have drag the tkdndn2.8 folder to Python/tcl folder.

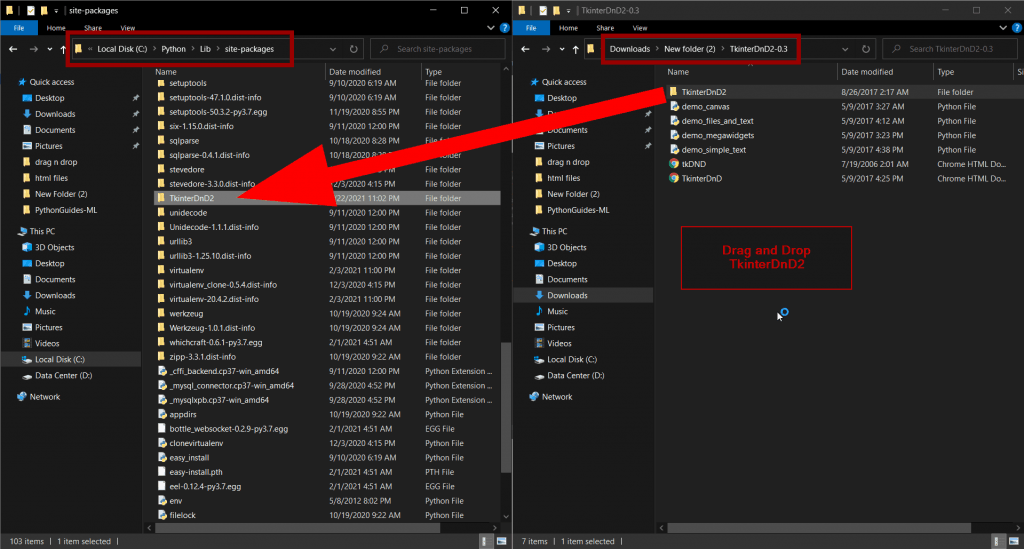
Navigate to Library then top site-package under python folder. drag and drop the TkinterDnD2 folder inside the site-package.
Note: you will find TkinterDnD2 inside the TkinterDnD2-0.3 folder

Now, this is just a test to check if the package is placed at the right location. In your ide if it auto suggests TkinterDnD2 package then that means it is working. You can skip this step incase you code on idle, notepad or any other platform that do not give auto suggestions.

Python Tkinter Drag Drop File
- In this section, we will learn how to drag and drop a file. The text file will be dragged on the screen and it will open up aromatically. That means the content of the file will be displayed as soon as the file is dragged on the screen.
- We are using only text files in this case, but you can read any file with popular extensions like pdf, CSV, word, excel, etc. but for that, you have to use pandas.
- The first step would be importing Tkinter and TkinterDnD2
- this time instead of ws =Tk() we will specify ws = TkinterDnD.Tk()
- textarea.drop_target_register(DND_FILES) this command prepares the text box to accept the dropped files.
- textarea.dnd_bind(‘>’, show_text) here, the drop is an event that will call the function every time the dragged file is released. show_text is a function that will be called.
- show_text() function holds instructions to delete the existing formation first and then check if the file has a txt extension. If yes then read the file and display the formation on the text box.
Here is the code, text text file can be dragged to the window & it will display the text.
from tkinter import * from TkinterDnD2 import * def show_text(event): textarea.delete("1.0","end") if event.data.endswith(".txt"): with open(event.data, "r") as file: for line in file: line=line.strip() textarea.insert("end",f"\n") ws = TkinterDnD.Tk() ws.title('PythonGuides') ws.geometry('400x300') ws.config(bg='#fcb103') frame = Frame(ws) frame.pack() textarea = Text(frame, height=18, width=40) textarea.pack(side=LEFT) textarea.drop_target_register(DND_FILES) textarea.dnd_bind('>', show_text) sbv = Scrollbar(frame, orient=VERTICAL) sbv.pack(side=RIGHT, fill=Y) textarea.configure(yscrollcommand=sbv.set) sbv.config(command=textarea.yview) ws.mainloop()In this output, the dummy is a text file that contains dummy text. Now when this file is dragged on the window the text is displayed.

Python Tkinter Drag and Drop Listbox
- In this section, we will learn how to drag and drop objects on the Listbox using Python Tkinter.
- Python Tkinter Listbox is a widget to display more than one item. It also allows you to select multiple items.
- Click on the below link to read more about Python Tkinter Listbox.
In this code, we have created a Listbox that will display the path of the file or folder drag and dropped on it. Repetition of activity multiple times will create a list of paths.
from tkinter import * from TkinterDnD2 import * def addto_listbox(event): lb.insert("end", event.data) ws = TkinterDnD.Tk() ws.title('PythonGuides') ws.geometry('400x300') ws.config(bg='#fcb103') frame = Frame(ws) frame.pack() lb = Listbox( frame, width=50, height=15, selectmode=SINGLE, ) lb.pack(fill=X, side=LEFT) lb.drop_target_register(DND_FILES) lb.dnd_bind('>', addto_listbox) sbv = Scrollbar( frame, orient=VERTICAL ) sbv.pack(side=RIGHT, fill=Y) lb.configure(yscrollcommand=sbv.set) sbv.config(command=lb.yview) ws.mainloop()In this output, six files of different extensions have been dragged on the Listbox and each file path has been recorded.

Python Tkinter Drag and Drop Folder
- In this section, we will learn how to drag & drop folder in Python Tkinter.
- this section is similar to Python Tkinter drag and drops Listbox. All we have to change is instead of Listbox we will place an Entry box.
from tkinter import * from TkinterDnD2 import * def drop(event): var.set(event.data) ws = TkinterDnD.Tk() ws.title('PythonGuides') ws.geometry('300x200') ws.config(bg='#fcba03') var = StringVar() Label(ws, text='Path of the Folder', bg='#fcba03').pack(anchor=NW, padx=10) e_box = Entry(ws, textvar=var, width=80) e_box.pack(fill=X, padx=10) e_box.drop_target_register(DND_FILES) e_box.dnd_bind('>', drop) lframe = LabelFrame(ws, text='Instructions', bg='#fcba03') Label( lframe, bg='#fcba03', text='Drag and drop the folder \nof your choice in the above text field.\n You will notice a path over there.' ).pack(fill=BOTH, expand=True) lframe.pack(fill=BOTH, expand=True, padx=10, pady=10) ws.mainloop()In this output, the first image displays the interface of the application. Users can drag the folder and drop it in a text field. It will display the path of the folder. Output for the same is displayed in the next picture.

In this picture, you can see that folder is dragged and dropped in the entry box. Now the path is displayed on the entry box.

Python Tkinter Drag and Drop ide
- In this section, we will discuss Tkinter ide that allows us to easily create the interface by dragging & dropping widgets.
- There are various options to do so like pygubu, visualtk, etc. We personally recommend visualtk. The reason behind it, it is online and works perfectly.
- You can easily drag and drop the widgets on the screen and then once you have completed the designing you can switch to the Code tab. You can see the autogenerated code for the application.
- We have attached the picture of visualtk. You can see how a simple interface can be used to create an effective application.

Here is the screenshot of the code section for the above program. This code is generated automatically.

Python Tkinter Treeview Drag and Drop
- In this section, we will learn to drag and drop the items in Treeview.
- Treeview is the tabular representation of data. It also allows creating parent-child objects.
- Click on the below click to read more about Python Tkinter Treeview.
In this code, we have displayed employees information in a Treeview.
.from tkinter import * from tkinter import ttk def downwars_shift(event): tv = event.widget select = [tv.index(s) for s in tv.selection()] select.append(tv.index(tv.identify_row(event.y))) select.sort() for i in range(select[0],select[-1]+1,1): tv.selection_add(tv.get_children()[i]) def move_down(event): tv = event.widget if tv.identify_row(event.y) not in tv.selection(): tv.selection_set(tv.identify_row(event.y)) def move_up(event): tv = event.widget if tv.identify_row(event.y) in tv.selection(): tv.selection_set(tv.identify_row(event.y)) def upward_shift(event): pass def Movement(event): tv = event.widget moveto = tv.index(tv.identify_row(event.y)) for s in tv.selection(): tv.move(s, '', moveto) ws = Tk() ws.title('PythonGuides') ws.geometry('400x300') ws.config(bg='#037272') tv = ttk.Treeview(ws) tv['columns']=('Eid', 'Name', 'Department') tv.column('#0', width=0, stretch=NO) tv.column('Eid', anchor=CENTER, width=80) tv.column('Name', anchor=CENTER, width=80) tv.column('Department', anchor=CENTER, width=80) tv.heading('#0', text='', anchor=CENTER) tv.heading('Eid', text='Id', anchor=CENTER) tv.heading('Name', text='Name', anchor=CENTER) tv.heading('Department', text='Department', anchor=CENTER) tv.insert(parent='', index=0, iid=0, text='', values=('E01','Vineet','Cisco')) tv.insert(parent='', index=1, iid=1, text='', values=('E02','Anil','Design')) tv.insert(parent='', index=2, iid=2, text='', values=('E03','Vaishali','IT/Security')) tv.insert(parent='', index=3, iid=3, text='', values=('E04','Vimal','Support')) tv.insert(parent='', index=4, iid=4, text='', values=('E05','Ankita','HR')) tv.pack(pady=20) tv.bind("",move_down) tv.bind("",move_up, add='+') tv.bind("",Movement, add='+') tv.bind("",downwars_shift, add='+') tv.bind("",upward_shift, add='+') style = ttk.Style() style.theme_use("default") style.map("Treeview") ws.mainloop()In this output, we have displayed the employee information.

In this, second picture you can notice that we have dragged E01 to third position.

You may like the following Python Tkinter tutorials:
In this tutorial, we have learned how to drag and drop objects using Python Tkinter. Also, we have covered these topics.
- Python Tkinter Drag and Drop
- Python Tkinter Drag Drop File
- Python Tkinter Drag and Drop Listbox
- Python Tkinter Drag and Drop Folder
- Python Tkinter Drag and Drop ide
- Python Tkinter Treeview Drag and Drop
I am Bijay Kumar, a Microsoft MVP in SharePoint. Apart from SharePoint, I started working on Python, Machine learning, and artificial intelligence for the last 5 years. During this time I got expertise in various Python libraries also like Tkinter, Pandas, NumPy, Turtle, Django, Matplotlib, Tensorflow, Scipy, Scikit-Learn, etc… for various clients in the United States, Canada, the United Kingdom, Australia, New Zealand, etc. Check out my profile.
tkinter.dnd — Drag and drop support
This is experimental and due to be deprecated when it is replaced with the Tk DND.
The tkinter.dnd module provides drag-and-drop support for objects within a single application, within the same window or between windows. To enable an object to be dragged, you must create an event binding for it that starts the drag-and-drop process. Typically, you bind a ButtonPress event to a callback function that you write (see Bindings and Events ). The function should call dnd_start() , where ‘source’ is the object to be dragged, and ‘event’ is the event that invoked the call (the argument to your callback function).
Selection of a target object occurs as follows:
- Target widget should have a callable dnd_accept attribute
- If dnd_accept is not present or returns None, search moves to parent widget
- If no target widget is found, then the target object is None
- Call to .dnd_leave(source, event)
- Call to .dnd_enter(source, event)
- Call to .dnd_commit(source, event) to notify of drop
- Call to .dnd_end(target, event) to signal end of drag-and-drop
The DndHandler class handles drag-and-drop events tracking Motion and ButtonRelease events on the root of the event widget.
Cancel the drag-and-drop process.
Execute end of drag-and-drop functions.
Inspect area below mouse for target objects while drag is performed.
Signal end of drag when the release pattern is triggered.
tkinter.dnd. dnd_start ( source , event ) 
Factory function for drag-and-drop process.