- How to Send email using Python?
- Send Email with SMTP Server using Python
- Sending Email Without SMTP Server
- Sending Email Without Password
- Sending Outlook Email Using Python
- Conclusion
- Quick Start
- Examples
- Retrieving Emails
- Sending Emails
- Message
- new_email()
- send_email()
- Contacts
- How to Automate Outlook Emails With Python
- Fulfilling a Few Prerequisites
- Installing the win32com.client
- Check win32com.client Version
- Installing win32com Library
- Sending Emails From Python Using Outlook
How to Send email using Python?
In this Python tutorial, we will explore different ways you can send emails using Python, including sending without an SMTP server, without a password, and using Outlook.
Send Email with SMTP Server using Python
SMTP, or Simple Mail Transfer Protocol, is the standard protocol for sending emails. Here’s how you can use Python to send an email through an SMTP server:
Import the smtplib library:
Set up the SMTP server:
server = smtplib.SMTP('smtp.gmail.com', 587) server.starttls() server = smtplib.SMTP('smtp.mail.yahoo.com', 587) server.starttls() Log in to your email account:
server.login('your_email@example.com', 'your_password') Send an email:
server.sendmail('your_email@example.com', 'recipient_email@example.com', 'Hello, this is a test email.') Close the server:
Sending Email Without SMTP Server
Sending an email without an SMTP server in Python involves creating a direct SMTP session with the recipient’s email server. Be cautious; this method can cause your email to be flagged as spam.
Import the libraries:
import smtplib, dns.resolver Find the MX record of the recipient’s domain:
domain = 'example.com' records = dns.resolver.resolve(domain, 'MX') mx_record = records[0].exchange Establish a direct SMTP session:
server = smtplib.SMTP(mx_record, 25) Send an email:
server.sendmail('your_email@example.com', 'recipient_email@example.com', 'Hello, this is a test email.') Close the server:
Sending Email Without Password
This method is not recommended as it is less secure. However, if you have an application-specific password or an email server that doesn’t require authentication, you can use this method:
Set up the SMTP server:
server = smtplib.SMTP('smtp.example.com', 587) server.starttls() Send an email:
server.sendmail('your_email@example.com', 'recipient_email@example.com', 'Hello, this is a test email.') Close the server:
Sending Outlook Email Using Python
You can also send emails via Outlook by using its SMTP server in Python.
Set up the Outlook SMTP server:
server = smtplib.SMTP('smtp.office365.com', 587) server.starttls() Log in to your Outlook account:
server.login('your_outlook_email@example.com', 'your_password') Send an email:
server.sendmail('your_outlook_email@example.com', 'recipient_email@example.com', 'Hello, this is a test email.') Close the server:
Conclusion
Sending emails through Python is a handy tool for automating communication. Whether you are using an SMTP server, sending without an SMTP server or password, or utilizing Outlook, Python has you covered.
I am Bijay Kumar, a Microsoft MVP in SharePoint. Apart from SharePoint, I started working on Python, Machine learning, and artificial intelligence for the last 5 years. During this time I got expertise in various Python libraries also like Tkinter, Pandas, NumPy, Turtle, Django, Matplotlib, Tensorflow, Scipy, Scikit-Learn, etc… for various clients in the United States, Canada, the United Kingdom, Australia, New Zealand, etc. Check out my profile.
Quick Start
pyOutlook interacts with Outlook messages and folders through the class OutlookAccount(). The OutlookAccount acts as a gatekeeper to the other methods available, and stores the access token associated with an account.
from pyOutlook import OutlookAccount account_one = OutlookAccount('token 1') account_two = OutlookAccount('token 2')
From here you can access any of the methods as documented in the pyOutlook section. Here are two examples of accessing an inbox and sending a new email.
Examples
Retrieving Emails
Through the OutlookAccount class you can call one of many methods — get_messages() , inbox() , etc. These methods return a list of Message objects, allowing you to access the attributes therein.
inbox = account.inbox() inbox[0].body >>> 'A very fine body'
Sending Emails
As above, you can send emails through the OutlookAccount class. There are two methods for sending emails — one allows chaining of methods and the other takes all arguments upfront and immediately sends.
Message
You can create an instance of a Message and then send from there.
from pyOutlook import * # or from pyOutlook.core.message import Message account = OutlookAccount('token') message = Message(account, 'A body', 'A subject', [Contact('to@email.com')]) message.attach(bytes('some bytes', 'utf-8'), 'bytes.txt') message.send()
new_email()
body = 'I\'m sending an email through Python.
Best,
Me' email = account.new_email(body=body, subject='Hey there', to=Contact('myemail@domain.com')) email.sender = Contact('some_other_account@email.com') email.send()
Note that HTML formatting is accepted in the message body.
send_email()
This method takes all of its arguments at once and then sends.
account_one.send_email( to=[Contact('myemail@domain.com')], # or to=['myemail@domain.com')] subject='Hey there', body="I'm sending an email through Python.
Best,
Me", )
Contacts
All recipients, and the sender attribute, in Messages are represented by Contacts . Right now, this allows you to retrieve the name of a recipient, if provided by Outlook.
message = account.inbox()[0] message.sender.name >>> 'Dude'
When providing recipients to Message you can provide them either as a list of strings, or a list of Contacts . I prefer the latter, as there are further options in the Outlook API for interacting with Contacts — functionality for those may be added in the future.
© Copyright 2016, Jens Astrup. Revision 93a74d5d .
Versions latest stable v4.2.1 v4.2.0 v4.1.1 v4.1.0 v4.0.0 Downloads pdf htmlzip epub On Read the Docs Project Home Builds Free document hosting provided by Read the Docs.
How to Automate Outlook Emails With Python
Integrate Outlook with your Python applications and programmatically create, compose, and send emails.

Readers like you help support MUO. When you make a purchase using links on our site, we may earn an affiliate commission. Read More.
When one talks about Python, it’s difficult to overlook how far the functionalities spread and what you can achieve with just a few pieces of code. Today, sending and receiving emails is the most relevant thing, and Python’s email automation in Microsoft Outlook makes things handier.
Why spend endless moments compiling emails on an email client when you can let Python do it for you in a single instance? If you are intrigued, you must read on to see how you can send automated emails from Python using Microsoft Outlook.
Fulfilling a Few Prerequisites
Considering the two major platforms referenced in this guide, these are the prerequisites for enabling this simple yet helpful task. To get started, download and install the following:
- Microsoft Outlook: You must have the MS Outlook application installed and running on your system. You can use any email domain with Outlook, as it doesn’t have any restrictions regarding email configurations.
- win32com.client: This third-party library is essential to connect to your Microsoft applications. Since Microsoft Outlook is one such application, you need this library within Python to connect to the Outlook exchange server.
Microsoft Outlook is one of the oldest and most widely used email clients, which ranks in the list of most popular email providers after Gmail and Yahoo. In this guide, a Gmail address is configured within Outlook.
Installing the win32com.client
win32com.client is an integral aspect of this code, and you need a fully functional library to establish a connection between Microsoft Outlook and Python.
Check win32com.client Version
Before installing, you can check if win32com is already installed on your machine. Some IDE versions offer this package by default. You can cross-check if it is available with the following command.
python -m pip show pywin32 If you get an error ‘pip’ is not recognized as an internal or external command while running the above command, you can install pip on Windows, Mac, and Linux, to ensure your library installations are seamless.
After running the above command, if you receive a version number, you don’t need to install it again.
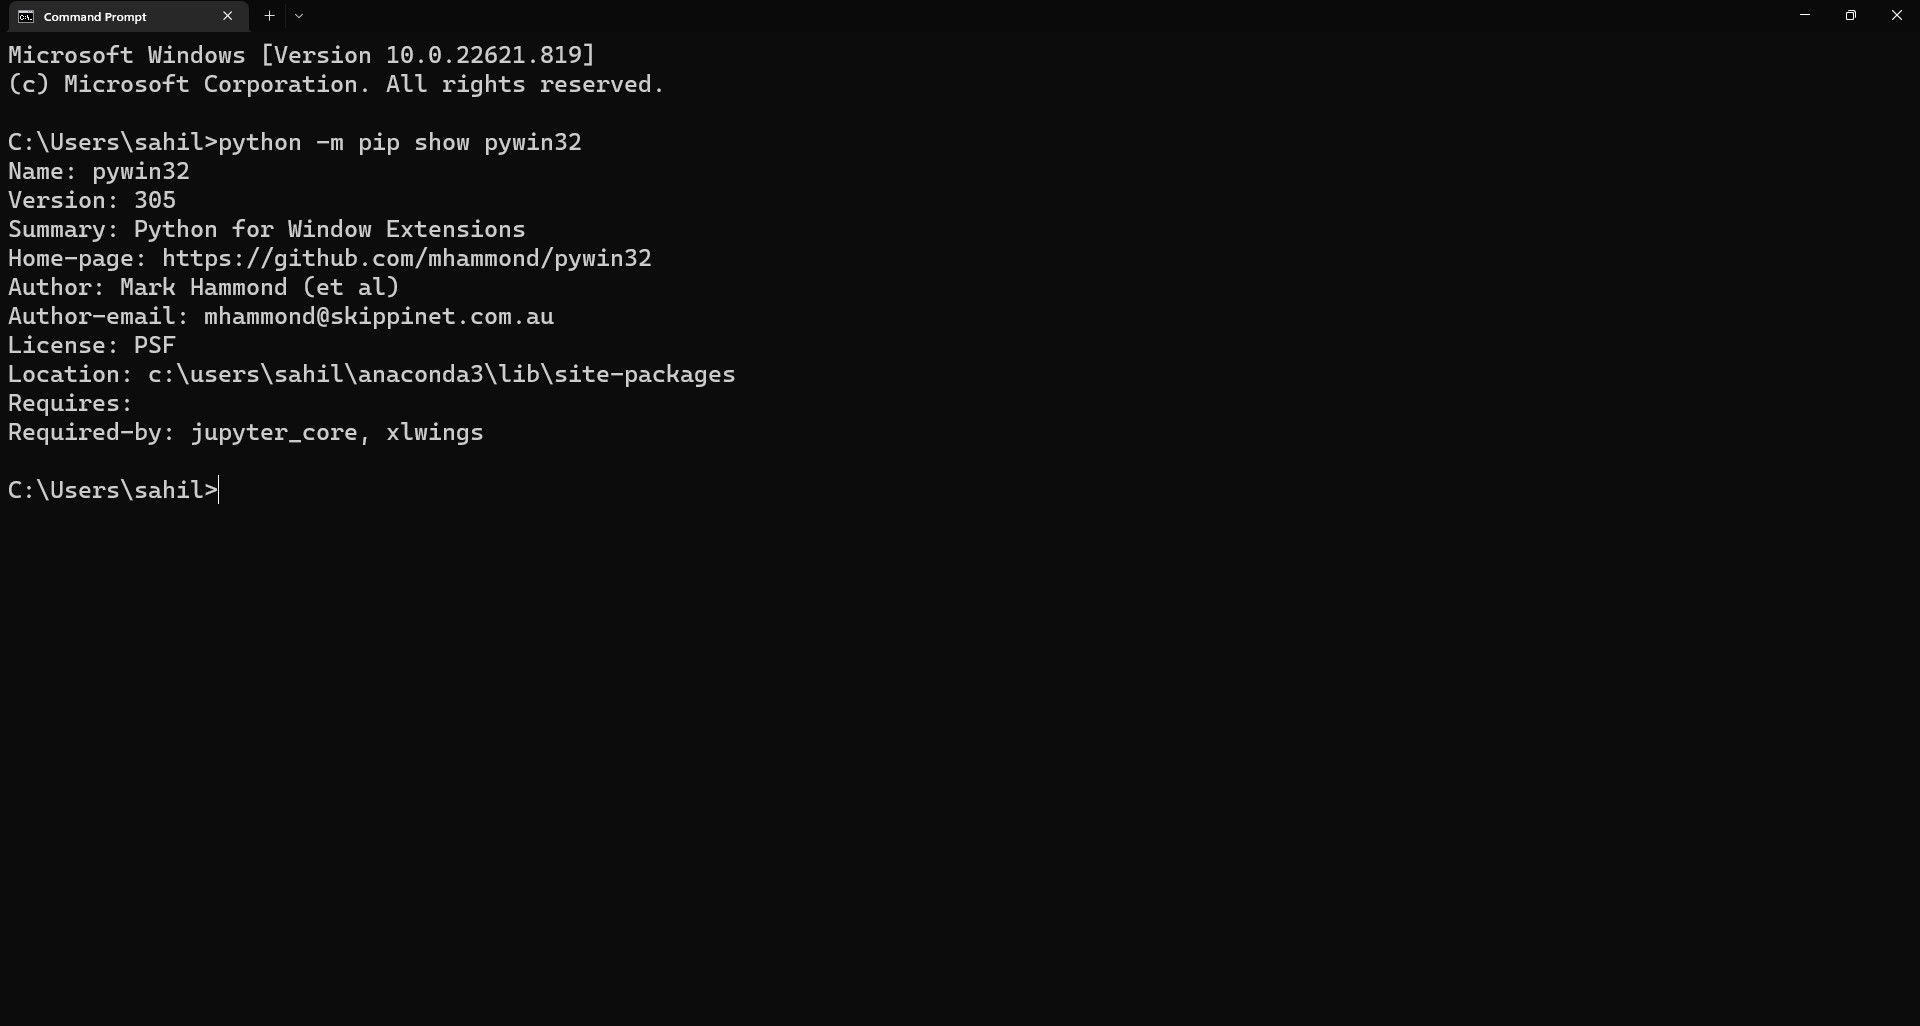
Subsequently, if you get the following error message, you need to install the win32com library on your system:
'pywin32' is not recognized as an internal or external command, operable program, or batch file. Installing win32com Library
Open the prompt and type in the pip command to install the library from the terminal window.
python -m pip install pywin32 
Follow the onscreen instructions to complete the process. You can use the —show command post-installation to verify whether win32com is successfully installed on your system.
python -m pip show pywin32 Sending Emails From Python Using Outlook
Since the prerequisites are taken care of, it’s time to start writing the code. To start with, you need to import the win32com.client library by using the import statement.
You can now write code to connect Python and Microsoft’s email application, Outlook.
ol = win32com.client.Dispatch('Outlook.Application') - ol: New variable to store the connection reference.
- win32com.client: Windows library to establish a connection between Python and Outlook.
- Dispatch: Function to create the connection.
- Outlook.Application: This can be replaced with any Microsoft application name, as required.

Next, it is necessary to define the dimensions of the new email message so that Python understands where the content needs to be updated.
# size of the new email
olmailitem = 0x0 - olmailitem: New variable to store the dimensions.
- 0x0: Dimensions of the new email message in Python’s memory.
Python’s functions pop-open a new email item, as soon as you define the email body dimensions.
newmail = ol.CreateItem(olmailitem) - newmail: New variable to store the new email reference.
- ol: Reference of the previously created connection between Python and Outlook.
- CreateItem(olmailitem): Command to create a new email draft.
Since every email is incomplete without a subject line, you can define it within the code so that Python adds it automatically before sending the email to the recipient. This will be visible to the recipient, so be careful how you define the case and the content.
newmail.Subject = 'Testing Mail' - newmail: Variable to store the new mail item reference.
- Subject: This can vary, depending on what you wish to have as the subject for your email.
You can add the intended recipients within the To and CC keywords as follows:
newmail.To = 'xyz@gmail.com'
newmail.CC = 'xyz@gmail.com' - To: Main recipient’s email address.
- CC: Copied email recipients.
With Python, you can send emails to multiple recipients. Add a semi-colon (;) separator between email IDs within the To/CC column.
Finally, once you define the subject and the recipients, you can add the email body to the new mail item before sending it to the recipients within the To and CC columns.
newmail.Body= 'Hello, this is a test email to showcase how to send emails from Python and Outlook.' To add attachments to your email, you can use the following commands:
attach = 'C:\\Users\\admin\\Desktop\\Python\\Sample.xlsx' newmail.Attachments.Add(attach) As the email is ready to be sent, there are two options you can use. If you want a preview of your email before sending it to the recipients, you can use the Display() command as follows:
You can use the Send() command if you want to send the email without reviewing it beforehand.
Remember, you won’t see a preview of the email if you use the Send command directly. Use this command wisely if you are changing your email body content regularly. You can use the Python code in one go to import the library, establish the connection, and send the emails quickly.
import win32com.client
ol=win32com.client.Dispatch("outlook.application")
olmailitem=0x0 #size of the new email
newmail=ol.CreateItem(olmailitem)
newmail.Subject= 'Testing Mail'
newmail.To='xyz@gmail.com'
newmail.CC='xyz@gmail.com'
newmail.Body= 'Hello, this is a test email to showcase how to send emails from Python and Outlook.'
# attach='C:\\Users\\admin\\Desktop\\Python\\Sample.xlsx'
# newmail.Attachments.Add(attach)
# To display the mail before sending it
# newmail.Display()
newmail.Send()