- Install MySQL Connector Python on Windows, MacOs, Linux, Unix and Ubuntu
- Table of contents
- Prerequisites before installing MySQL Connector Python
- Python MySQL Connector Versions
- Pip Command to install MySQL Connector python
- Verifying MySQL Connector Python installation
- Download and Install MySQL Connector Python on Windows
- Install MySQL Connector Python on Windows using a Source Code Distribution:-
- Verifying MySQL Connector/Python installation on windows
- Download and Install MySQL Connector Python on Linux
- Verifying MySQL Connector Python installation on Linux
- Download and Install MySQL Connector Python on MacOs
- Install MySQL Connector Python on Ubuntu
- Next Steps:
- About Vishal
- Related Tutorial Topics:
- Python Exercises and Quizzes
- Ubuntu — Installing MySQL and Python
- Installing Python
- Installing MySQL
Install MySQL Connector Python on Windows, MacOs, Linux, Unix and Ubuntu
In this lesson, You will learn how to Install MySQL Connector Python on Windows, macOS, Linux, Unix, and Ubuntu using pip and vis source code. To connect to a MySQL server from Python, you need a database driver (module). MySQL Connector Python is the official Oracle-supported driver to connect MySQL through Python.
Further Reading:
Table of contents
Prerequisites before installing MySQL Connector Python
- You need root or administrator privileges to perform the installation process.
- Python must be installed on your machine.
Note: – MySQL Connector Python requires Python to be in the system’s PATH. Installation fails if it doesn’t find Python.
- Python is generally located in a directory included in the default PATH setting on Unix and Unix-like systems.
- On Windows, If Python doesn’t exist in the system’s PATH, please manually add the directory containing python.exe yourself.
This article applies to: –
Platform(s): 64-bit Windows, Windows 10, Windows 7, Windows 8, Windows Vista, Windows XP, Linux, Ubuntu Linux, Debian Linux, SUSE Linux, Red Hat Linux, Fedora, MacOs.
Python version(s): Python 2 and 3
MySQL Version(s): Greater than 4.1
Ways to install MySQL Connector Python
There are multiple ways to install Oracle’s MySQL Connector Python on your machine. The following are a few ways.
- Install MySQL Connector Python using the pip command
- Install MySQL connector python via source code (via ZIP or TAR file)
- Use Built Distribution A package created in the native packaging format intended for a given platform. For example, RPM packages for Linux or MSI installer for windows.
Python MySQL Connector Versions
Please refer to the following table of MySQL connector Python versions. You need to install a module that is compatible with your Python version.
| MySQL Connector Python | MySQL Versions | Python Versions |
|---|---|---|
| 8.0 | 8.0, 5.7, 5.6, 5.5 | 3.6, 3.5, 3.4, 2.7 |
| 2.2 | 5.7, 5.6, 5.5 | 3.5, 3.4, 2.7 |
| 2.1 | 5.7, 5.6, 5.5 | 3.5, 3.4, 2.7, 2.6 |
| 2.0 | 5.7, 5.6, 5.5 | 3.5, 3.4, 2.7, 2.6 |
| 1.2 | 5.7, 5.6, 5.5 (5.1, 5.0, 4.1) | 3.4, 3.3, 3.2, 3.1, 2.7, 2.6 |
Great! Now you can choose the version as per your need.
Pip Command to install MySQL Connector python
It is always accessible and straightforward to install any module using pip in Python. MySQL Connector Python is available on pypi.org, so you can install it using the pip command.
pip install mysql-connector-pythonIf you are facing any problem while installing, please mention the module’s version and then try to install it again. Refer to the above table to install the correct version.
pip install mysql-connector-python==8.0.11If you are facing pip install fails error with connection error: [SSL: CERTIFICATE_VERIFY_FAILED] certificate verify failed (_ssl.c:598) . You can solve this error.
You can ignore SSL errors by setting pypi.org and files.pythonhosted.org as trusted hosts. Please try following the pip command to install MySQL Connector Python.
python -m pip install --trusted-host pypi.org --trusted-host files.pythonhosted.org --trusted-host pypi.python.org mysql-connector-pythonVerifying MySQL Connector Python installation
You should get the following messages after running pip command: –
- Collecting mysql-connector-python
- Downloading packages.
- Requirement already satisfied: setup tools in D:python\python37-32\lib\site-packages.
- Installing collected packages: mysql-connector-python
- Successfully installed mysql-connector-python-8.0.13
Verify MySQL Connector Python installation by Connecting to MySQL Using MySQL Connector Python.
If you are unable to install using pip you can install using the following approaches.
Download and Install MySQL Connector Python on Windows
There are two ways to install MySQL Connector Python on windows.
- Install using Source Code Distribution ( Platform Independent and Architecture Independent ZIP Archive)
- Install using Built Distribution i.e., MSI installer
Install MySQL Connector Python on Windows using a Source Code Distribution:-
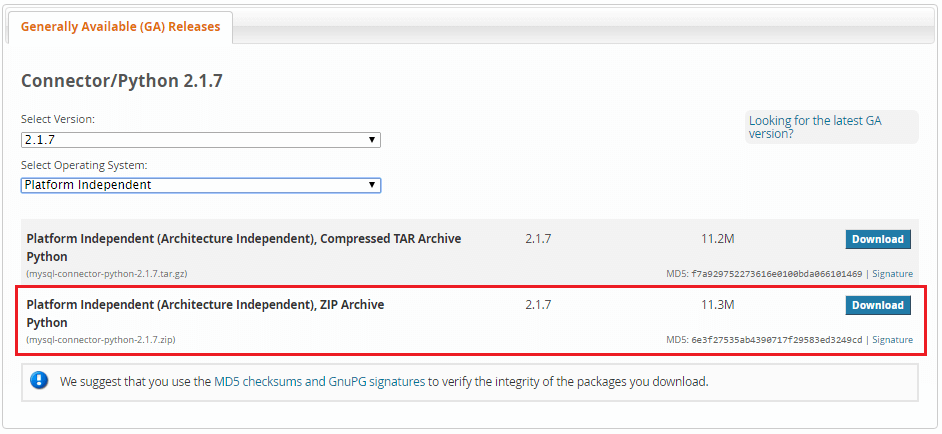
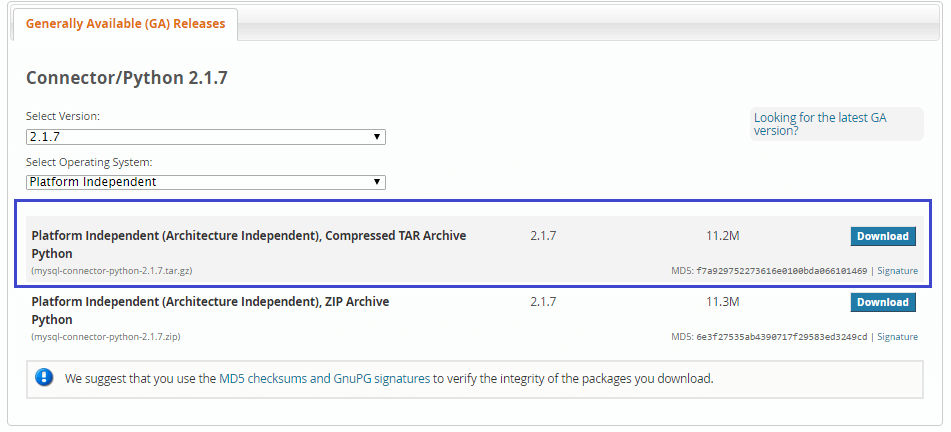
Follow below instruction to download Platform Independent ZIP. Go to download MySQL Connector Python for windows from here
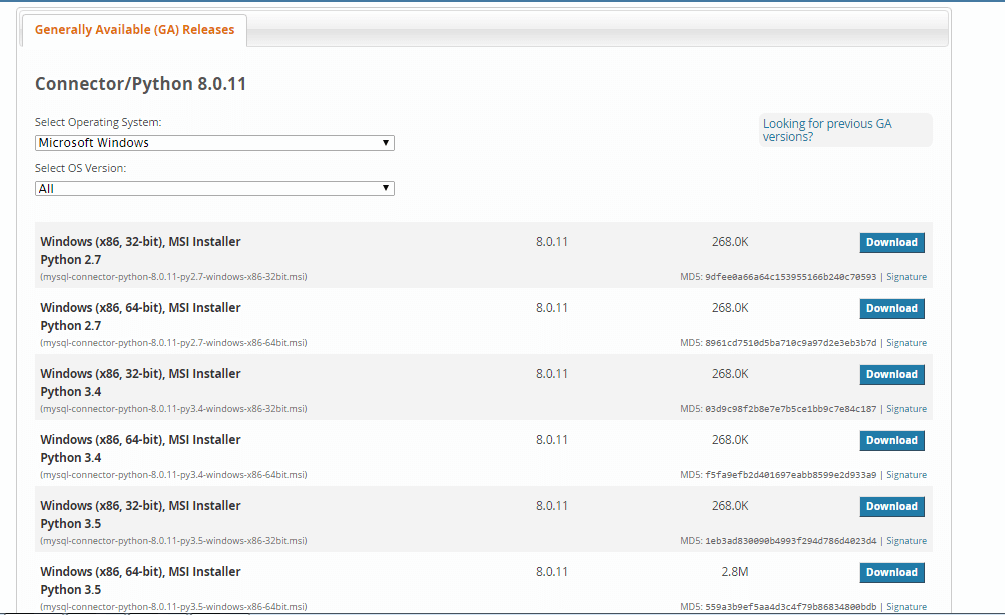
- Abobe URL automatically opens the latest version of MySQL Connector Python.
- If you want to use the older version which is compatible with your python version, then select “Looking for previous GA versions” option which you can find at the right side.
- If you want to check which version of MySQL Connector Python is compatible with your python version, refer to the above table.
I am downloading 2.1.7 because I am using Python 3.5. Select Platform independent from the drop-down list
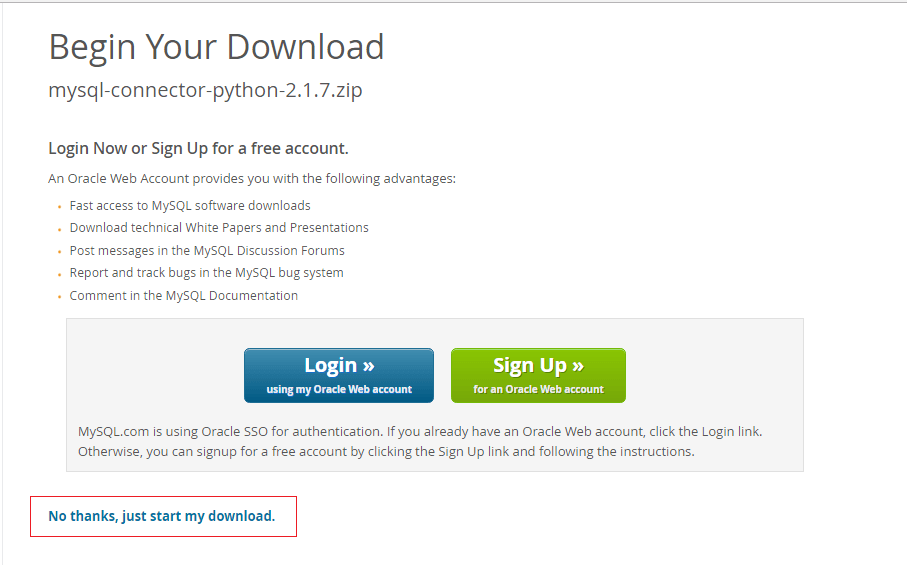
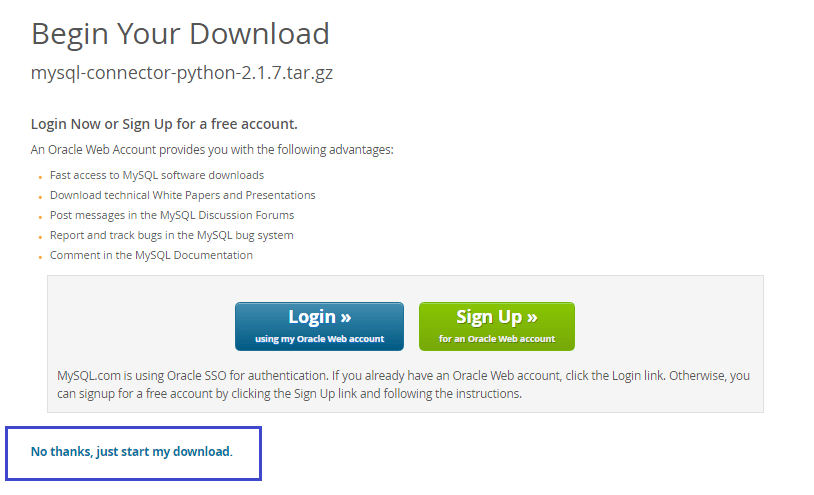
Click on the “download” button to download the ZIP file on your machine. After clicking download you get the below screen, click on No Thanks, start the download option.
Note: If you want to download the latest version, i.e. 8.0.1 then select “Looking for the latest GA versions” option which you can find at the right side.
After the download is complete, please follow the below steps to install: –
- Unpack or extract the Zip archive in the intended installation directory (for example, C:\mysql-connector\) using 7Zip or another tool that can read .zip files.
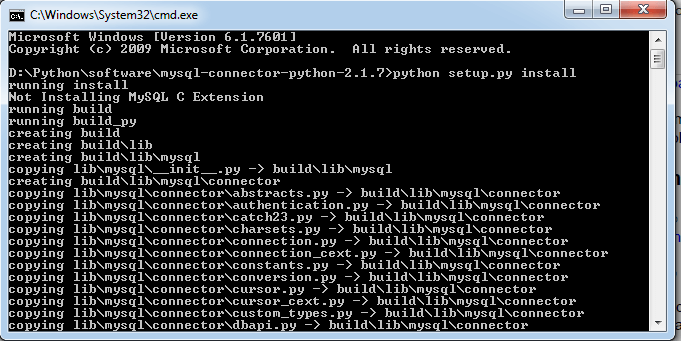
- Start a console window and change the location to the folder where you unpacked the Zip archive:
You should get the following screen after this command.
Verifying MySQL Connector/Python installation on windows
To verify MySQL connection Python is installed and to make sure that it is working correctly and you can connect to the MySQL database server without any issues. To verify the installation use the following steps:
- On Windows, the default MySQL Connector Python installation location is C:\Python.Version\Lib\sitepackages\ . Here Python.version is the Python version you used to install the connector.
- Type importing MySQL connector using import mysql.connector . If it is executed successfully mean installation completed successfully.
- Also, you can check that MySQL Connector Python installation is working and able to connect to MySQL Server by Connecting to MySQL Using MySQL Connector Python.
Download and Install MySQL Connector Python on Linux
There are two ways to install MySQL Connector Python on For Unix and Unix-like systems such as Linux, Solaris, macOS, and FreeBSD.
- Install using Source Code Distribution ( Platform Independent (Architecture Independent), TAR File)
- You can install using Built Distribution for Example RPM file.
Install MySQL Connector Python on Linux using Source Code Distribution. Follow the below instructions to download MySQL connector python Platform Independent TAR (tar.gz) file.

- It opens the latest version of MySQL connector python. Choose the Previous GA version from the right side if you want to install a version other than 8.0.1. you can refer to the above table to check which version is compatible with your python version.
- Select Platform independent TAR from the “Select Operating System” drop-down list. I am downloading 2.1.7 because I am using Python 3.5
Choose the TAR archive file and click on the download button. You should get the following screen, click on the start of my download.
After the download is complete, please follow the below steps to install: –
- Untar the downloaded tar.gz file. Use below command to untar.
shell>tar xzf mysql-connector-python-VERSION.tar.gz
shell> cd mysql-connector-python-VERSION
Verifying MySQL Connector Python installation on Linux
To verify the installation, use the following steps:
- On Unix-like systems, the default Connector/Python installation location is /prefix/python.VERSION/site-packages/ where prefix is the location where Python installed, and VERSION is the Python version.
- Type import mysql.connector and execute the program. If it is executed successfully mean installation completed successfully.
- Also, you can check that MySQL Connector Python installation is working and able to connect to MySQL Server by Connecting to MySQL Using MySQL Connector Python.
Download and Install MySQL Connector Python on MacOs
You can Installing MySQL Connector Python on macOS Using a Disk Image.
- Go to download MySQL Connector python for macOS from here
- Refer the above table to check which version is compatible with your python version
- Download the mysql-connector-python-8.0.11-macos10.13.dmg file. it is an architecture Independent DMG file.
- .Install the downloaded MySQL Connector Python by opening it and double-clicking the resulting .pkg file.
Verifying MySQL Connector Python installation on macOS
Check that MySQL Connector Python installation is working and able to connect to MySQL Server by Connecting to MySQL Using MySQL Connector Python.
Install MySQL Connector Python on Ubuntu
Use the following command to install MySQL connector Python on Ubuntu.
sudo apt-get install mysql-connector-python
After this run the following command.
pip install mysql-connector-python
You can replace pip with pip3 if the command fails in Python3. If the above approach doesn’t work, you can still install it on Ubuntu using the source code.
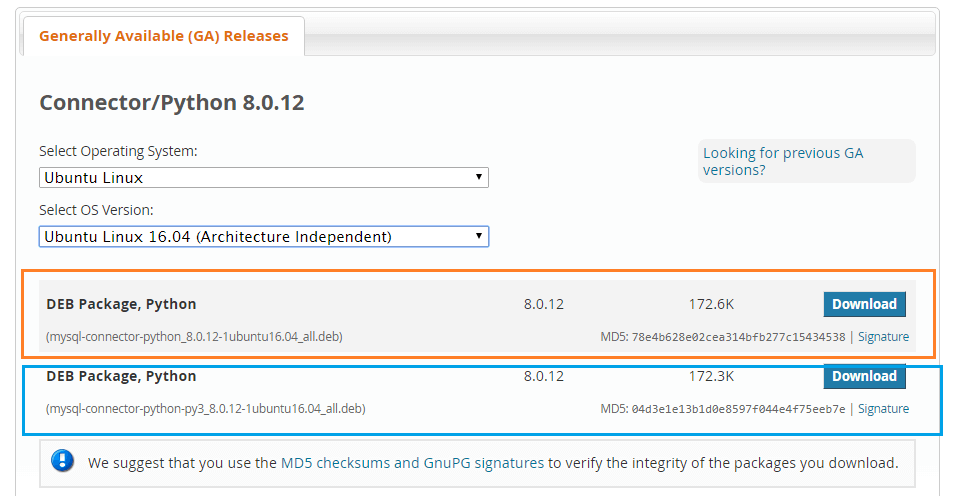
- Go to download MySQL Connector python for Ubuntu from here.
- Select the Operating system Ubuntu Linux from the drop-down.
- Select the OS version as an architecture-independent. I am selecting Ubuntu-Linux 16.04 (architecture-independent).
- You should get two entries fro DEB Package python for MySQL Connector Python (For python 2 and Python 3).
sudo dpkg -i /path_to_downloaded_deb_file
Next Steps:
To practice what you learned in this article, Please solve a Python Database Exercise project to Practice and master the Python Database operations.
Did you find this page helpful? Let others know about it. Sharing helps me continue to create free Python resources.
About Vishal
I’m Vishal Hule, Founder of PYnative.com. I am a Python developer, and I love to write articles to help students, developers, and learners. Follow me on Twitter
Related Tutorial Topics:
Python Exercises and Quizzes
Free coding exercises and quizzes cover Python basics, data structure, data analytics, and more.
- 15+ Topic-specific Exercises and Quizzes
- Each Exercise contains 10 questions
- Each Quiz contains 12-15 MCQ
Ubuntu — Installing MySQL and Python
MySQL and Python are famous database and development software respectively. These are normally installed on Linux-based systems. Let’s see how we can get them installed on Ubuntu server environments.
Installing Python
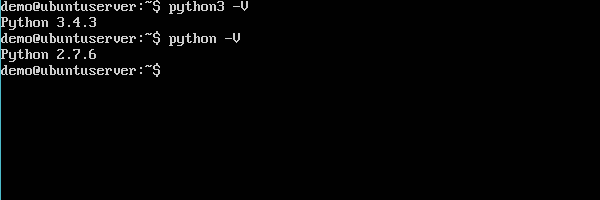
The first thing to do is to find out what is the version of Python installed on the system. We can find this issuing the following command.
Where the –v option specifies to show what is the version of Python installed. The following screenshot shows a sample of the output of the above command.
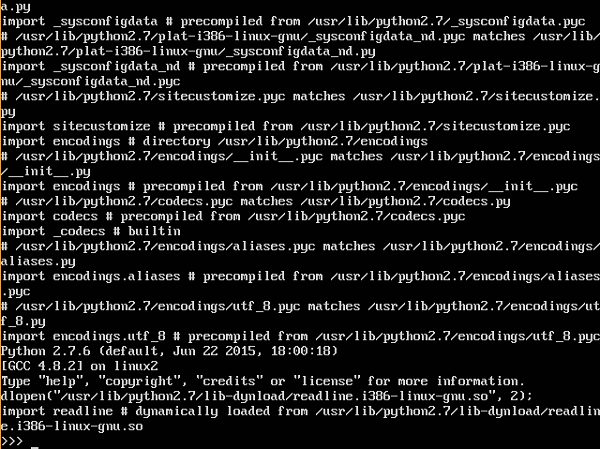
From the above output, we can see that the version of Python installed is version 2.7.
There is another way to see if Python is installed via the following commands.
The later command is used to see the version 3 of Python installed.
If we want to have the latest version of Python installed, then we need to issue the following statement.
sudo apt-get install python3
The above command will download the necessary packages for Python and have it installed.
Installing MySQL
To install MySQL, the following steps need to be followed.
Step 1 − Issue the apt-get command to ensure all operating system packages are up to date.
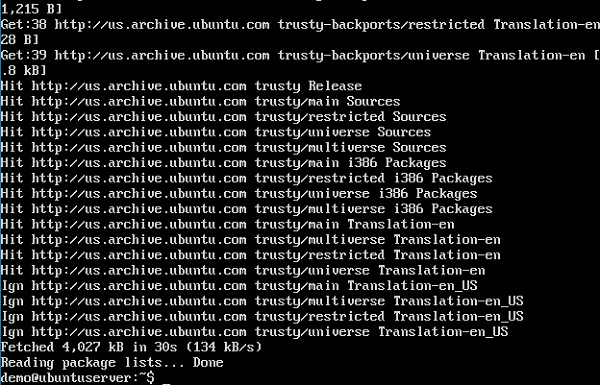
Step 2 − Once all the packages have been updated, it is time to get the packages for MySQL.
sudo apt-get install mysql-server
The above command will start the download of all the relevant packages for MySQL.
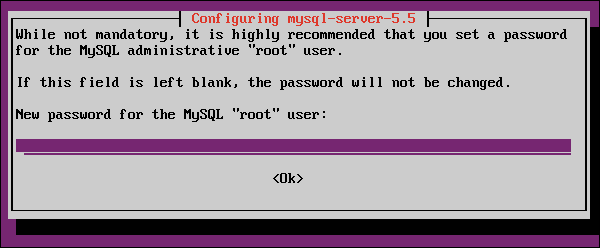
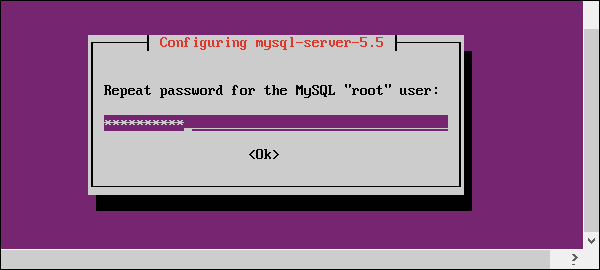
Once the download completes and the installation starts, the installer will first ask to configure a root password.
Step 3 − Enter the required password and click the OK button. It will also prompt to re-enter the password.
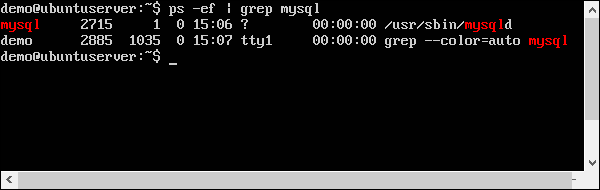
Step 4 − To see the MySQL process running, run the following command.
The following screenshot shows mysqld which is the daemon process for mysql running in the background.
Step 5 − To configure mysql, run the following command.
/usr/bin/mysql_secure_installation
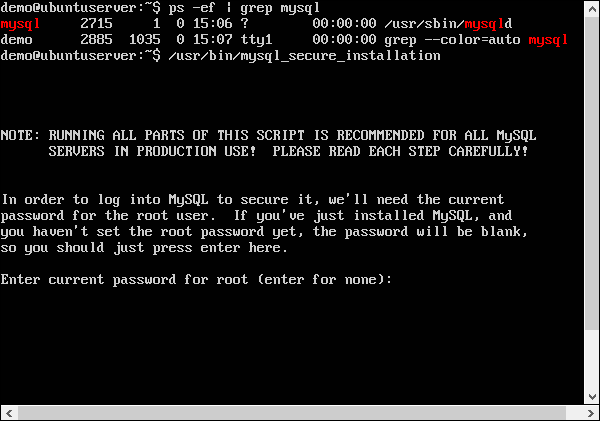
It prompts to enter the root password which was entered during the installation process.
Step 6 − Enter the password and hit Enter.
Now, it prompts on whether we want to change the root password.
Step 7 − Enter ‘N’ for No and proceed.
Again, it prompts on whether we want to remove the Anonymous access.
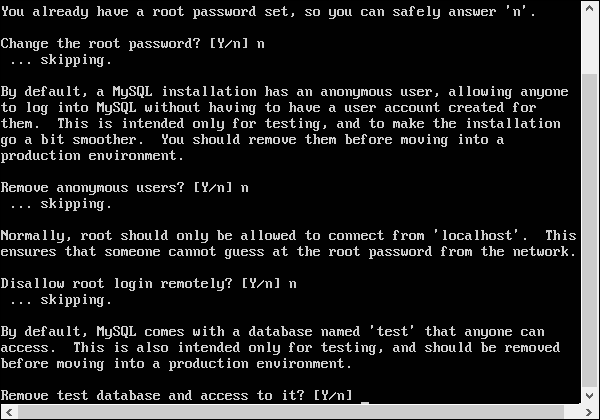
Step 8 − When connecting from other machines on this database, it is advised to keep the default options as ‘N’ for both anonymous users and disallow root login remotely.
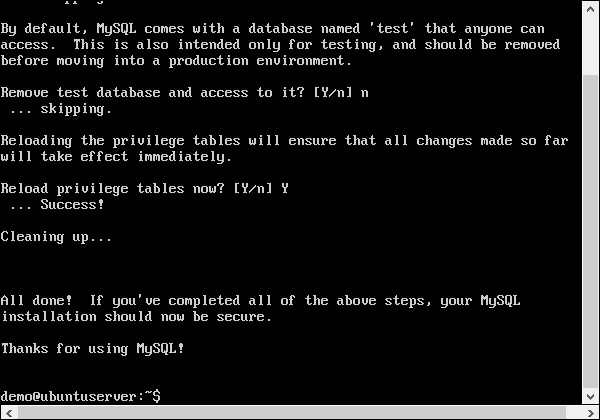
Step 9 − It is advised to provide the option as No for the options of Remove test database as well. We can enter ‘Y’ to reload the privileges table.
Finally, the configuration of MySQL will be complete.