- Populate projects
- Create new files
- Create directories
- Create Python Packages
- Mark a directory as a namespace package
- Auto import
- Automatically add import statements
- Disable import tooltips
- Disable all tooltips
- Disable auto import
- Optimize imports
- Optimize all imports
- Optimize imports in a single file
- Optimize imports when committing changes to Git
- Automatically optimize imports on save
- Optimize imports when reformatting a file
- Creating imports on the fly
- Import packages on-the-fly
- Toggling relative and absolute imports
- Adding import statements on code completion
- Configure auto-import on completion
- Ignoring missing import statements
Populate projects
Populate your project by creating new elements of various types ( directories , packages and files). PyCharm suggests the following alternative ways of accessing the corresponding functionality:
- File | New from the main menu.
- The New context menu command.
- The keyboard shortcut Alt+Insert .
As a result, the New menu is shown in which you select the type of an element to be created.
For generating PyCharm-specific elements, refer to Django support section.
Create new files
- Do one of the following:
- In the Project tool window Alt+1 , select the directory or package in which you want to create a new file, and then choose File | New from the main menu.
- Right-click the corresponding directory or package and select New from the context menu.
- Press Alt+Insert .
- Select the desired file type. Generally, all the options except File , Package and Directory correspond to using a file template.
 An existing file template may be missing from the list if this is a custom template whose filename extension (template extension) does not match the registered patterns of any of the recognized file types. In such a case, you may want to register the corresponding pattern for an existing recognized file type or add a new file type and register the corresponding pattern for this new type. For more information, see File type associations.
- In the dialog that opens, type the name of the file in the corresponding field. Note that you should not type the filename extension.
 You can specify the whole directory structure prepending the new filename. If the nested directories do not yet exist, they will be created.
  If required, specify the kind of the new template-based file, its extension, and other parameters. For example, if you select to create an HTML file, you’ll be able to create HTML, HTML4, or XHTML file. In other words, use one of the corresponding related file templates. Specify other information as required. For example, you may be asked to define the values of custom variables if the corresponding file template contains such variables and their values are not currently set.
 - Click OK . The new file that corresponds to the selected file template will be created under the target location. If the names of non-existent sub-directories were specified before the new filename, the whole structure will be created under the target directory :
 Sometimes, you may want to change the auto-generated filename extension. To do that, use the Rename refactoring ( Refactor | Rename ).


Create directories
- Open the Project tool window (for example View | Tool Windows | Project ).
- Select the destination directory.
- Do one of the following:
- Select File | New | Directory .
- Select New | Directory from the context menu.
- Press Alt+Insert and select Directory .

- In the dialog that opens, specify the directory name. If you want to create a number of nested directories, specify the directory names separated with slashes.
 Press Enter to complete the task.


PyCharm makes it possible to create Python packages recursively, thus creating the whole package structure.
The Python package nodes are marked with the icon.
Create Python Packages
- In the Project tool window, select the destination directory.
- From the context menu of the selection, choose New | Python Package , or press Alt+Insert to invoke the context menu:

- In the New Package dialog that opens, specify the package name. You can also specify nested packages; in this case, the names should be delimited with dots:
 Click OK . PyCharm creates the new package or package structure:


Now that you created a package, you can do the following:
- Import the package into the project files. Use code completion to discover it.
- Commit and push the package into a VCS repository.
- Install the package in a virtual environment locally or from VCS so that you can use it in your other projects with that environment.
If you want to ensure that imports from the same directory are resolved, mark that directory as a namespace package.
Mark a directory as a namespace package

- Consider two packages, lib1 and lib2 that reside in the same directory. Try to include a lib1 import statement into lib2.py . PyCharm reports a relative import outside of the package.
- To resolve the import and avoid the warning, mark the mydir directory as a namespace package. You have the following options:
- Place the caret at the import statement, press Alt+Enter (or click the yellow bulb), and apply the corresponding quick-fix.
- Right-click the directory in the Project tool window and select Mark Directory as | Namespace Package .
Auto import
When you reference a class that has not been imported, PyCharm helps you locate this file and add it to the list of imports. You can import a single class or an entire package, depending on your settings.
The import statement is added to the imports section, but the caret does not move from the current position, and your current editing session does not suspend. This feature is known as the Import Assistant . Using Import Assistant is the preferred way to handle imports in PyCharm because import optimizations are not supported via command line.
The same possibility applies to XML files. When you type a tag with an unbound namespace, the import assistant suggests creating a namespace and offers a list of appropriate choices.
Automatically add import statements
You can configure the IDE to automatically add import statements if there are no options to choose from.
- Press Control+Alt+S to open the IDE settings and select Editor | General | Auto Import .
- In the Python section, configure automatic imports:
- Select Show import popup to automatically display an import popup when tying the name of a class that lacks an import statement.
- Select one of the Preferred import style options to define the way an import statement to be generated.
Disable import tooltips
When tooltips are disabled, unresolved references are underlined and marked with the red bulb icon . To view the list of suggestions, click this icon (or press Alt+Enter ) and select Import class .
Disable all tooltips
- Hover the mouse over the inspection widget in the top-right corner of the editor, click , and disable the Show Auto-Import Tooltip option.
Disable auto import
If you want to completely disable auto-import, make sure that:
Optimize imports
The Optimize Imports feature helps you remove unused imports and organize import statements in the current file or in all files in a directory at once according to the rules specified in Settings | Editor | Code Style | | Imports .
You can exclude specific files and folders from import optimization. For more information, refer to Exclude files from reformatting.
Optimize all imports
- Select a file or a directory in the Project tool window ( View | Tool Windows | Project ).
- Do any of the following:
- From the main menu, select Code | Optimize Imports (or press Control+Alt+O ).
- From the context menu, select Optimize Imports .
- (If you’ve selected a directory) Choose whether you want to optimize imports in all files in the directory, or only in locally modified files (if your project is under version control), and click Run .
Optimize imports in a single file

- Place the caret at the import statement and press Alt+Enter or use the icon.
- Select Optimize imports .
To optimize imports in a file, you can also press Control+Alt+Shift+L , select Optimize imports , and click Run .
Optimize imports when committing changes to Git
If your project is under version control, you can instruct PyCharm to optimize imports in modified files before committing them to VCS.
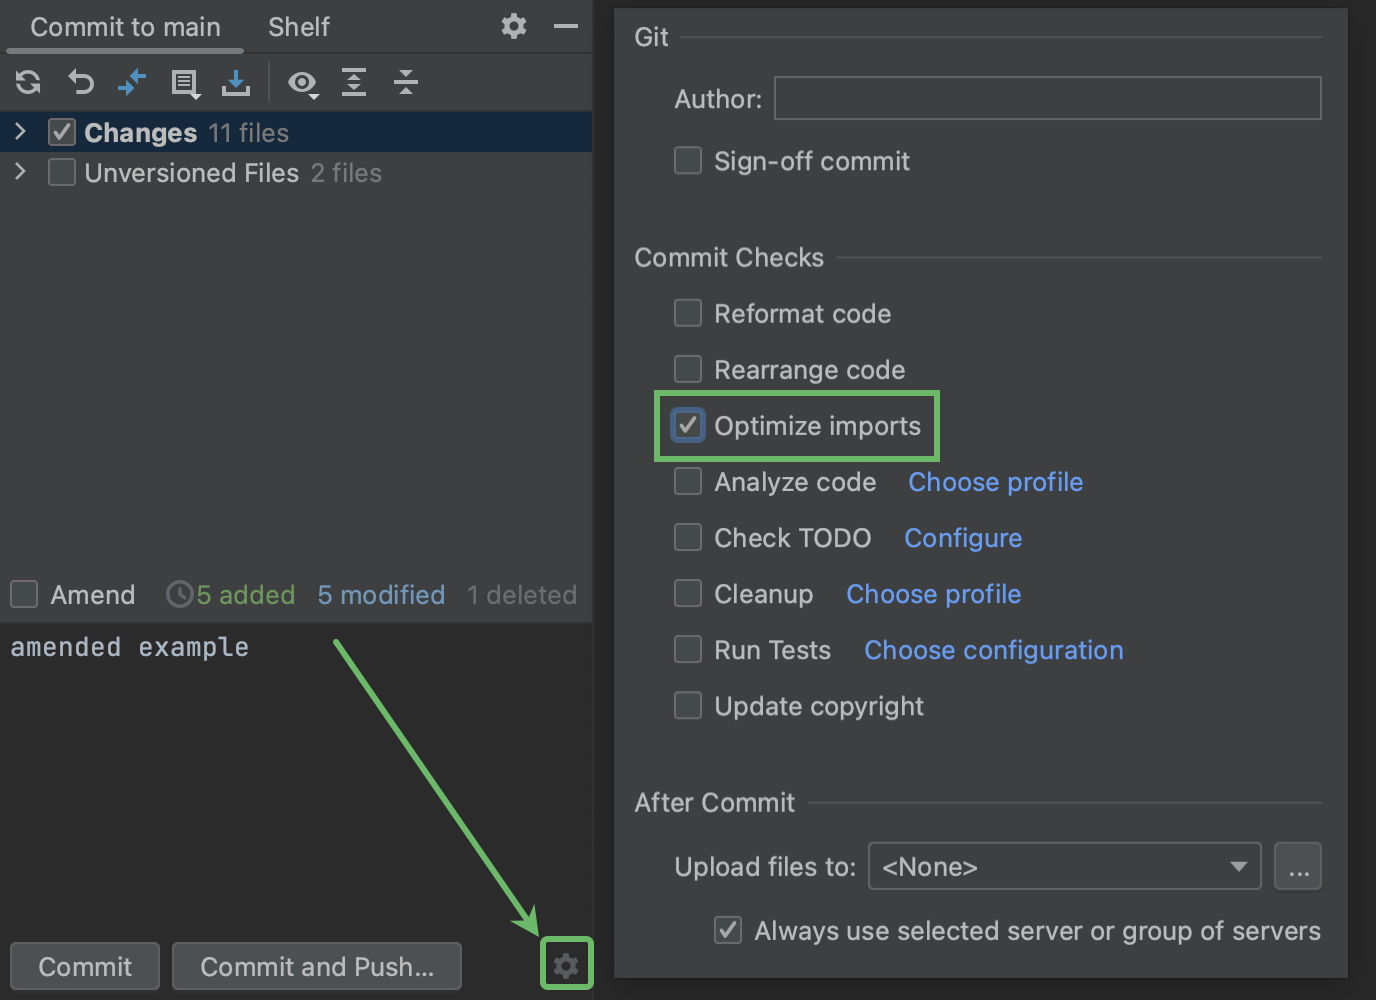
- Press Control+K or select Git | Commit from the main menu.
- Click and in the commit message area, select the Optimize imports checkbox.
Automatically optimize imports on save
You can configure the IDE to optimize imports in modified files automatically when your changes are saved.
- Press Control+Alt+S to open the IDE settings and select Tools | Actions on Save .
- Enable the Optimize imports option. Additionally, from the All file types list, select the types of files in which you want to optimize imports.
- Apply the changes and close the dialog.
Optimize imports when reformatting a file
You can tell PyCharm to optimize imports in a file every time it is reformatted.

- Open the file in the editor, press Control+Alt+Shift+L , and make sure the Optimize imports checkbox is selected in the Reformat File dialog that opens.
After that every time you press Control+Alt+L in this project, PyCharm will optimize its imports automatically.
Creating imports on the fly
Import packages on-the-fly
- Start typing a name in the editor. If the name references a class that has not been imported, the following prompt appears:
 The unresolved references will be underlined, and you will have to invoke intention action Add import explicitly.
 - Press Alt+Enter . If there are multiple choices, select the desired import from the list.


You can define your preferred import style for Python code by using the following options available on the Auto Import page of the project settings ( Settings | Editor | General | Auto Import ):
PyCharm provides a quick-fix that automatically installs the package you’re trying to import: if, after the keyword import , you type a name of a package that is not currently available on your machine, a quick-fix suggests to either ignore the unresolved reference, or download and install the missing package:

Toggling relative and absolute imports
PyCharm helps you organize relative and absolute imports within a source root. With the specific intention, you can convert absolute imports into relative and relative imports into absolute.
If your code contains any relative import statement, PyCharm will add relative imports when fixing the missing imports.
Note that relative imports work only within the current source root: you cannot relatively import a package from another source root.
The intentions prompting you to convert imports are enabled by default. To disable them, open project Settings ( Control+Alt+S ), select Editor | Intentions , and deselect the Convert absolute import to relative and Convert relative import to absolute .

When you complete a ES6 symbol or a CommonJS module, PyCharm either decides on the style of the import statement itself or displays a popup where you can choose the style you need. Learn more from Auto-import in JavaScript.
Adding import statements on code completion
PyCharm automatically adds an import statement when you refer any module member or package in the Python code and invoke code completion. Auto-import on code completion is also applied to some popular package name aliases, such as np for numpy or pd for pandas .
PyCharm also adds import statements when you complete exported JavaScript or TypeScript symbols.
Configure auto-import on completion
You can disable auto-import on completion and use quick-fixes instead:
- In the Settings dialog ( Control+Alt+S ), go to Editor | General | Auto Import .
- On the Auto Import page that opens, use the checkboxes in the TypeScript/JavaScript area to enable or disable import generation on code completion.
Ignoring missing import statements
If you use a module in your code that doesn’t have any corresponding stub, PyCharm might show a missing statement error. To suppress this error message, use the # type: ignore comment: